
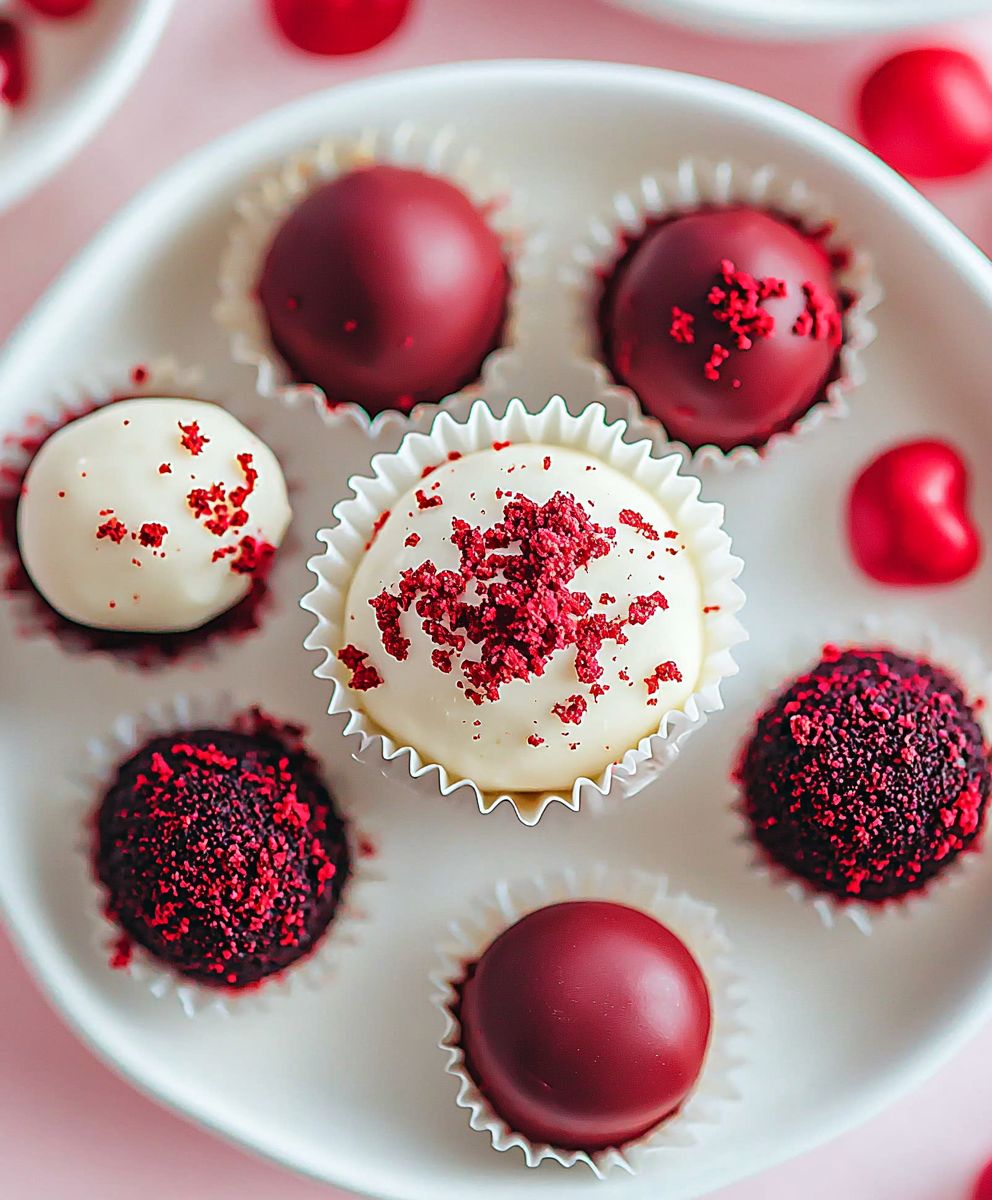
Red Velvet Truffles: Prepare to be captivated by these decadent, bite-sized treats that are as visually stunning as they are delicious! Imagine sinking your teeth into a smooth, creamy center, bursting with the unmistakable tang of red velvet cake, all enveloped in a rich, velvety chocolate coating. These aren’t just truffles; they’re miniature masterpieces that will elevate any occasion.
The allure of red velvet extends far beyond its captivating color. While its exact origins are debated, many believe red velvet cake emerged during the Depression era, where cooks used beet juice or cocoa to enhance the color and moisture of their cakes. Over time, the vibrant hue became synonymous with elegance and indulgence, making it a beloved classic.
What makes red velvet truffles so irresistible? It’s the perfect marriage of flavors and textures. The slight tang of buttermilk and cocoa in the red velvet filling perfectly complements the sweetness of the chocolate coating. Their convenient, no-bake nature also makes them a fantastic option for quick and impressive desserts. Whether you’re looking for a show-stopping treat for a holiday gathering, a delightful homemade gift, or simply a little something to satisfy your sweet tooth, these truffles are guaranteed to impress. I know you’ll love making and sharing these as much as I do!
Ingredients:
- 1 (15.25 ounce) package red velvet cake mix
- 1 (16 ounce) container cream cheese frosting
- 1 (12 ounce) package semi-sweet chocolate chips
- 1 tablespoon shortening
- Red food coloring (optional, for enhanced color)
- Sprinkles or other decorations (optional)
Baking the Cake:
Okay, let’s get started! First, we need to bake the red velvet cake according to the package directions. Don’t worry, we’re not going for perfection here, just a fully baked cake. Think of it as the foundation for our delicious truffles!
- Preheat your oven according to the cake mix instructions (usually around 350°F or 175°C).
- Prepare the cake batter as directed on the package. This usually involves adding eggs, oil, and water. Make sure to mix everything well until it’s smooth and lump-free.
- Pour the batter into a greased and floured 9×13 inch baking pan. This size works best for even baking and gives us plenty of cake to work with.
- Bake for the time specified on the cake mix package (usually around 25-30 minutes). To check for doneness, insert a toothpick into the center of the cake. If it comes out clean, it’s ready!
- Let the cake cool completely in the pan before moving on to the next step. This is crucial! A warm cake will crumble too much and make the truffles difficult to form.
Crumbling and Mixing:
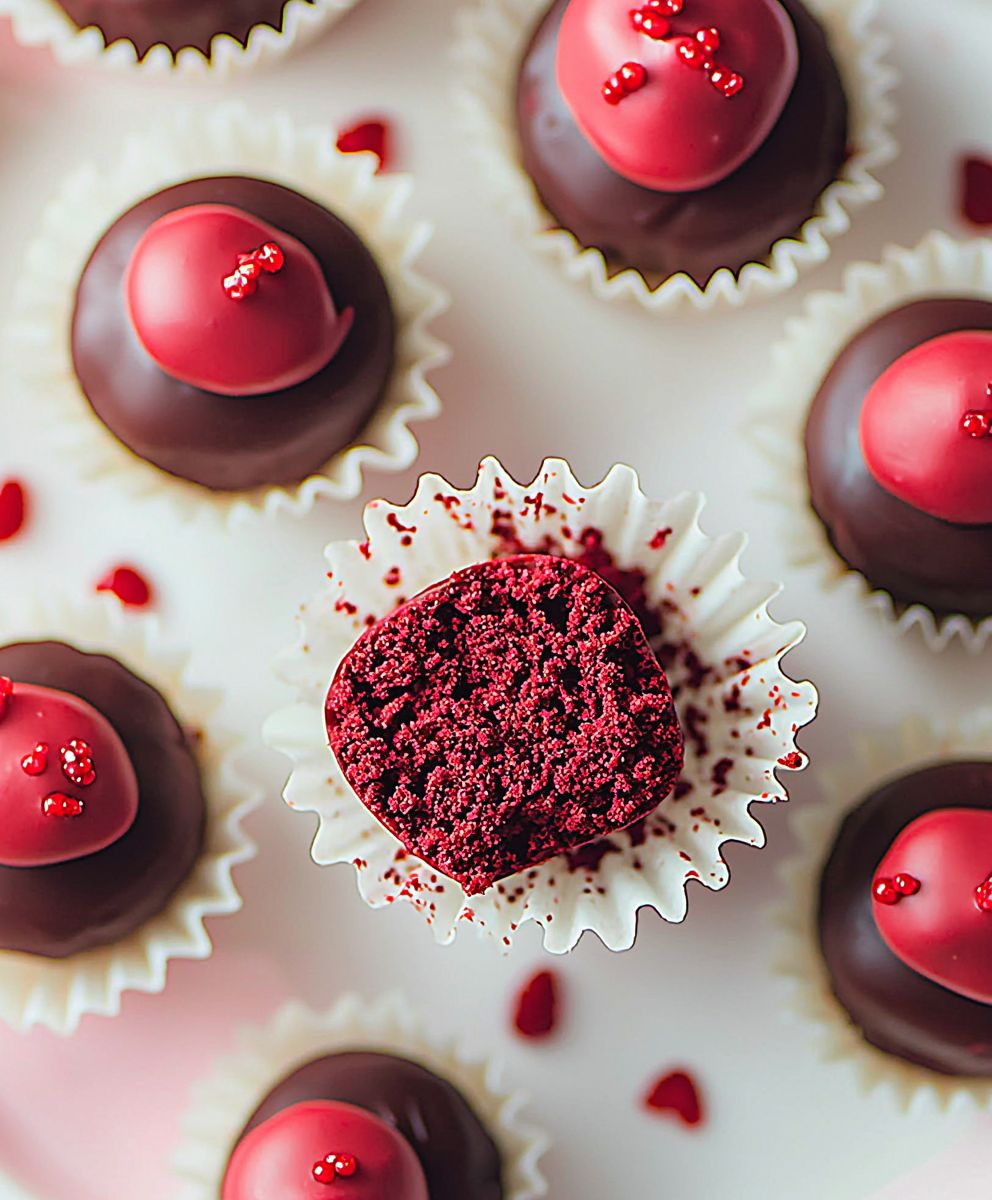
Now for the fun part getting our hands dirty! We’re going to crumble the cooled cake into a large bowl and mix it with the cream cheese frosting. This is where the magic happens, transforming a simple cake into a rich and decadent truffle base.
- Once the cake is completely cool, use your hands to crumble it into a large bowl. You want to break it down into fine crumbs, almost like breadcrumbs. Get rid of any hard or crusty edges.
- Add the entire container of cream cheese frosting to the crumbled cake. Yes, the whole thing! This is what binds the cake together and gives the truffles their creamy texture.
- Using your hands (or a sturdy spoon), mix the cake crumbs and frosting together until they are completely combined. The mixture should be moist and hold its shape when pressed together. If it seems too dry, you can add a tablespoon or two of extra frosting. If it seems too wet, add a little bit of powdered sugar.
- If you want a more intense red color, now is the time to add a few drops of red food coloring. Mix it in thoroughly until you achieve your desired shade. Be careful not to add too much, as it can affect the taste.
Forming the Truffles:
Time to shape our truffle mixture into bite-sized balls of deliciousness! This step requires a little patience, but the results are well worth the effort. We’re aiming for uniform size and a smooth, round shape.
- Line a baking sheet with parchment paper or wax paper. This will prevent the truffles from sticking and make cleanup a breeze.
- Using a spoon or a small cookie scoop, scoop out portions of the cake mixture. I usually aim for about 1 tablespoon per truffle, but you can adjust the size to your preference.
- Roll each portion of cake mixture between your palms to form a smooth, round ball. Don’t worry if they’re not perfect; a little imperfection adds character!
- Place the formed truffles on the prepared baking sheet.
- Once all the truffles are formed, place the baking sheet in the refrigerator for at least 30 minutes to allow them to firm up. This will make them easier to dip in chocolate. You can even freeze them for 15 minutes for a quicker chill.
Melting the Chocolate:
Now for the grand finale the chocolate coating! This is what transforms our cake balls into true truffles. We’ll melt the chocolate chips with a little shortening to create a smooth and glossy coating.
- In a microwave-safe bowl, combine the semi-sweet chocolate chips and shortening. The shortening helps to thin the chocolate and gives it a smoother, shinier finish.
- Microwave in 30-second intervals, stirring after each interval, until the chocolate is completely melted and smooth. Be careful not to overheat the chocolate, as it can burn. If you prefer, you can melt the chocolate in a double boiler over simmering water.
- Once the chocolate is melted, remove it from the microwave (or double boiler) and let it cool slightly. This will help the chocolate adhere to the truffles better.
Dipping and Decorating:
The final step! We’re going to dip our chilled truffles in the melted chocolate and decorate them with sprinkles or other toppings. This is where you can get creative and personalize your truffles.
- Remove the chilled truffles from the refrigerator.
- Using a fork or dipping tools, dip each truffle into the melted chocolate, making sure it’s completely coated.
- Lift the truffle out of the chocolate and gently tap the fork against the side of the bowl to remove any excess chocolate.
- Place the dipped truffle back on the parchment-lined baking sheet.
- Immediately sprinkle the truffle with sprinkles, chopped nuts, or any other decorations you desire. The chocolate will set quickly, so you need to decorate them right away.
- Repeat steps 2-5 for all the remaining truffles.
- Once all the truffles are dipped and decorated, place the baking sheet back in the refrigerator for at least 15-20 minutes to allow the chocolate to set completely.
Storage:
These Red Velvet Truffles are best stored in an airtight container in the refrigerator. They will keep for up to a week (if they last that long!). You can also freeze them for longer storage. Just thaw them in the refrigerator before serving.
Tips and Variations:
- Use different types of chocolate: Experiment with milk chocolate, dark chocolate, or white chocolate for the coating.
- Add extracts: A few drops of vanilla extract, almond extract, or peppermint extract can add a unique flavor to the truffle mixture.
- Roll in different toppings: Instead of sprinkles, try rolling the truffles in cocoa powder, powdered sugar, crushed cookies, or chopped nuts.
- Add a filling: Before forming the truffles, you can add a small piece of caramel, a chocolate-covered pretzel, or a maraschino cherry to the center of each truffle.
- Make them boozy: Add a tablespoon or two of your favorite liqueur (such as rum, bourbon, or Irish cream) to the cake and frosting mixture.
Enjoy!
Conclusion:
So, there you have it! These Red Velvet Truffles are truly a must-try for anyone who loves a little indulgence. The combination of the tangy cream cheese, the rich cocoa flavor, and that vibrant red hue makes them utterly irresistible. They’re surprisingly simple to make, yet they look and taste like something you’d find in a high-end chocolatier. Honestly, what’s not to love? I know you might be thinking, “Red velvet? Isn’t that a bit overdone?” But trust me, these truffles are a whole different ball game. They’re not just another red velvet dessert; they’re a perfectly balanced bite of creamy, decadent goodness. The slight tang from the cream cheese cuts through the sweetness beautifully, preventing them from being cloying. And that hint of cocoa? It elevates the entire experience. But the best part? You can totally customize them to your liking! Feeling adventurous? Try adding a pinch of cayenne pepper to the mixture for a subtle kick. Or, if you’re a coffee lover like me, a teaspoon of instant espresso powder will add a depth of flavor that’s simply divine. For serving suggestions, the possibilities are endless. These Red Velvet Truffles are perfect as an after-dinner treat, a delightful addition to a dessert platter, or even a thoughtful homemade gift. Imagine presenting a beautifully wrapped box of these to your friends or family they’ll be absolutely thrilled! You can also get creative with the coatings. While I love the classic powdered sugar, you could also try dipping them in melted white chocolate, dark chocolate, or even rolling them in crushed nuts or sprinkles. If you’re planning a party, these truffles are a guaranteed crowd-pleaser. They’re easy to make ahead of time, and they look absolutely stunning on a dessert table. Plus, they’re the perfect size for a quick and satisfying bite. I’ve even used them as cupcake toppers just place one on top of each cupcake for an extra touch of elegance. And don’t forget about the holidays! These Red Velvet Truffles are especially festive during Christmas and Valentine’s Day. The vibrant red color makes them a perfect addition to any holiday spread. You can even use different colored sprinkles or edible glitter to make them even more festive. I truly believe that everyone should experience the joy of making and eating these truffles. They’re a little bit of happiness in every bite. So, I encourage you to give this recipe a try. I promise you won’t be disappointed. Once you’ve made them, I’d absolutely love to hear about your experience! Did you try any variations? What did you think of the flavor? Did you share them with friends and family? Please, share your thoughts and photos in the comments below. I’m always eager to see your creations and hear your feedback. Happy truffle-making! Let me know if you have any questions, and I’ll do my best to help. Enjoy your journey into the world of homemade Red Velvet Truffles! Print
Red Velvet Truffles: The Ultimate Guide to Making Delicious Treats
- Total Time: 45 minutes
- Yield: 24–30 truffles 1x
Description
Decadent and easy Red Velvet Truffles made from cake mix, cream cheese frosting, and a smooth chocolate coating. Perfect for parties or a sweet treat!
Ingredients
- 1 (15.25 ounce) package red velvet cake mix
- 1 (16 ounce) container cream cheese frosting
- 1 (12 ounce) package semi-sweet chocolate chips
- 1 tablespoon shortening
- Red food coloring (optional, for enhanced color)
- Sprinkles or other decorations (optional)
Instructions
- Bake the Cake: Preheat oven according to cake mix instructions (usually 350°F/175°C). Prepare cake batter as directed on the package. Pour into a greased and floured 9×13 inch baking pan. Bake for the time specified on the cake mix package (usually around 25-30 minutes). Check for doneness with a toothpick. Let cool completely in the pan.
- Crumble and Mix: Once the cake is completely cool, use your hands to crumble it into a large bowl. Add the entire container of cream cheese frosting to the crumbled cake. Mix the cake crumbs and frosting together until they are completely combined. The mixture should be moist and hold its shape when pressed together. If it seems too dry, you can add a tablespoon or two of extra frosting. If it seems too wet, add a little bit of powdered sugar. Add red food coloring (optional) for a more intense red color.
- Form the Truffles: Line a baking sheet with parchment paper or wax paper. Using a spoon or a small cookie scoop, scoop out portions of the cake mixture (about 1 tablespoon per truffle). Roll each portion between your palms to form a smooth, round ball. Place the formed truffles on the prepared baking sheet. Refrigerate for at least 30 minutes to firm up (or freeze for 15 minutes).
- Melt the Chocolate: In a microwave-safe bowl, combine the semi-sweet chocolate chips and shortening. Microwave in 30-second intervals, stirring after each interval, until completely melted and smooth. Be careful not to overheat the chocolate, as it can burn. If you prefer, you can melt the chocolate in a double boiler over simmering water. Let cool slightly.
- Dipping and Decorating: Remove the chilled truffles from the refrigerator. Using a fork or dipping tools, dip each truffle into the melted chocolate, making sure it’s completely coated. Lift the truffle out of the chocolate and gently tap the fork against the side of the bowl to remove any excess chocolate. Place the dipped truffle back on the parchment-lined baking sheet. Immediately sprinkle with sprinkles, chopped nuts, or other decorations. Repeat for all truffles.
- Set and Store: Place the baking sheet back in the refrigerator for at least 15-20 minutes to allow the chocolate to set completely. Store in an airtight container in the refrigerator for up to a week, or freeze for longer storage. Thaw in the refrigerator before serving.
Notes
- Cake Consistency: If the cake and frosting mixture is too dry, add a little more frosting. If it’s too wet, add a little powdered sugar.
- Chocolate Melting: Be careful not to overheat the chocolate when melting. Microwave in short intervals and stir frequently.
- Decorating: Decorate the truffles immediately after dipping, as the chocolate sets quickly.
- Variations:
- Use different types of chocolate (milk, dark, white).
- Add extracts (vanilla, almond, peppermint) to the truffle mixture.
- Roll in cocoa powder, powdered sugar, crushed cookies, or chopped nuts.
- Add a filling (caramel, chocolate-covered pretzel, maraschino cherry) to the center of each truffle.
- Add a tablespoon or two of your favorite liqueur (such as rum, bourbon, or Irish cream) to the cake and frosting mixture.
- Prep Time: 20 minutes
- Cook Time: 25 minutes

Leave a Comment