
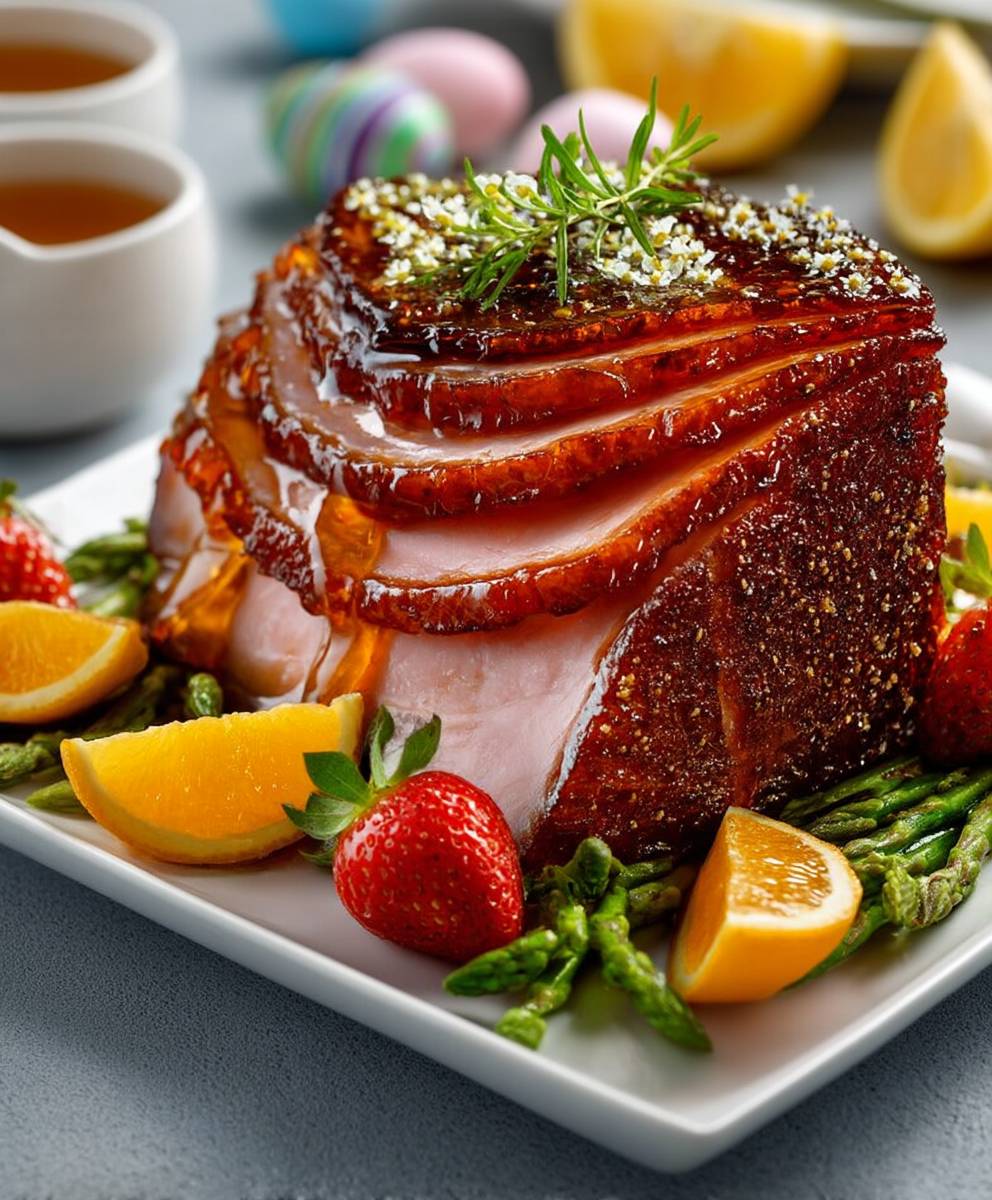
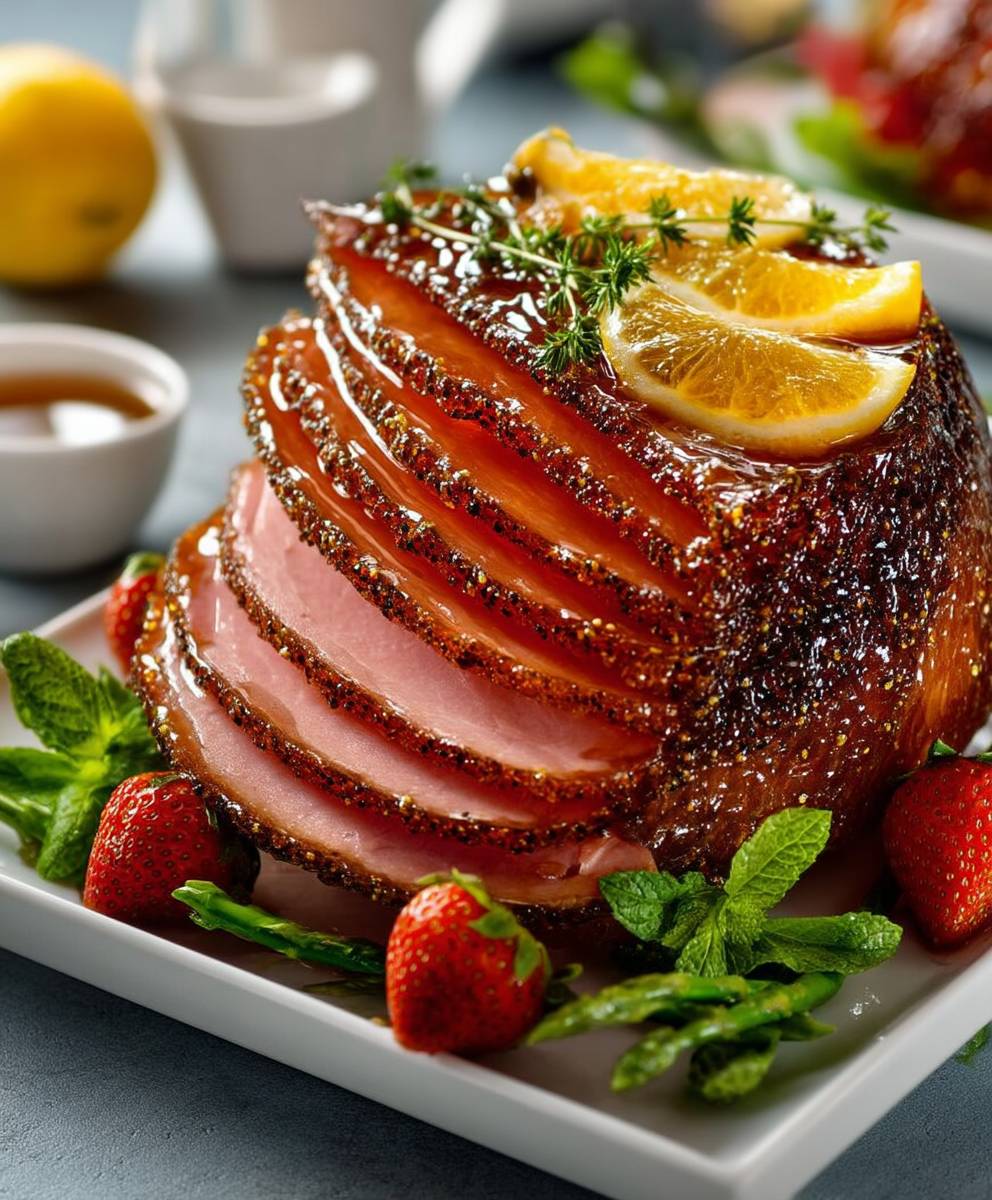
Red Pepper Jelly Ham: Prepare to elevate your holiday ham from ordinary to extraordinary! Imagine a glistening, ruby-red glaze, sweet with a hint of spice, transforming a classic centerpiece into a show-stopping culinary masterpiece. This isn’t just ham; it’s an experience.
The tradition of glazing ham dates back centuries, with honey and fruit preserves being common choices. But the introduction of red pepper jelly adds a modern twist, a delightful contrast that awakens the palate. While its exact origins are debated, red pepper jelly itself is a Southern staple, often enjoyed with cream cheese and crackers. Marrying it with ham creates a harmonious blend of Southern charm and holiday tradition.
Why is red pepper jelly ham such a crowd-pleaser? It’s the perfect balance of sweet and savory. The sweetness of the jelly caramelizes beautifully in the oven, creating a sticky, flavorful crust. The subtle heat from the peppers cuts through the richness of the ham, preventing it from being overly cloying. Plus, it’s incredibly easy to make! With just a few simple ingredients and minimal effort, you can create a dish that will have everyone singing your praises. The tender, juicy ham, infused with the vibrant flavor of red pepper jelly, is guaranteed to be the star of your next gathering. Get ready to impress!
Ingredients:
- 1 (10-12 pound) bone-in, fully cooked ham
- 1 (12-ounce) jar red pepper jelly
- 1/4 cup Dijon mustard
- 2 tablespoons apple cider vinegar
- 1 tablespoon Worcestershire sauce
- 1 teaspoon smoked paprika
- 1/2 teaspoon garlic powder
- 1/4 teaspoon ground cloves
- Fresh rosemary sprigs, for garnish (optional)
Preparing the Red Pepper Jelly Glaze:
Okay, let’s get started with the star of the show the red pepper jelly glaze! This is what’s going to give our ham that beautiful, sweet, and slightly spicy kick. Trust me, it’s worth the extra few minutes to make this glaze from scratch (well, almost scratch!).
- Combine the glaze ingredients: In a medium saucepan, whisk together the red pepper jelly, Dijon mustard, apple cider vinegar, Worcestershire sauce, smoked paprika, garlic powder, and ground cloves. Make sure everything is nicely combined.
- Simmer the glaze: Place the saucepan over medium heat and bring the mixture to a gentle simmer. You don’t want it boiling vigorously, just a nice, slow simmer.
- Reduce the glaze: Continue to simmer the glaze for about 10-15 minutes, stirring occasionally, until it thickens slightly. It should coat the back of a spoon nicely. This step is important because it concentrates the flavors and creates a beautiful, glossy glaze.
- Remove from heat: Once the glaze has thickened, remove it from the heat and set it aside. We’ll use it later to baste the ham.
Preparing the Ham:
Now, let’s get our ham ready for its transformation! Since we’re using a fully cooked ham, our goal is to warm it through and infuse it with that delicious red pepper jelly flavor. Don’t worry, it’s easier than it sounds!
- Preheat the oven: Preheat your oven to 325°F (160°C). This lower temperature will ensure that the ham warms through evenly without drying out.
- Prepare the ham for baking: Remove the ham from its packaging and place it on a large roasting pan. If your ham has a rind, you can score it in a diamond pattern. This will help the glaze penetrate the ham and create a beautiful presentation. To score the ham, use a sharp knife to make shallow cuts about 1 inch apart, then repeat in the opposite direction to create a diamond pattern. Be careful not to cut too deep, just through the rind.
- Add water to the roasting pan (optional): Pour about 1 cup of water into the bottom of the roasting pan. This will help to create steam and keep the ham moist during baking.
- Cover the ham: Cover the ham tightly with aluminum foil. This will prevent it from drying out while it’s baking.
Baking and Glazing the Ham:
This is where the magic happens! We’ll bake the ham until it’s heated through, then we’ll slather it with that amazing red pepper jelly glaze and let it caramelize to perfection.
- Bake the ham: Place the covered roasting pan in the preheated oven and bake for about 10-12 minutes per pound, or until the internal temperature reaches 140°F (60°C). Use a meat thermometer to check the temperature. Insert the thermometer into the thickest part of the ham, being careful not to touch the bone.
- Remove the foil: About 30 minutes before the ham is done, remove the foil. This will allow the ham to brown and the glaze to caramelize.
- Baste with the glaze: Brush about half of the red pepper jelly glaze evenly over the ham. Make sure to get into all the nooks and crannies.
- Continue baking: Return the ham to the oven and continue baking for another 15 minutes.
- Baste again: Remove the ham from the oven and brush it with the remaining glaze.
- Final bake: Return the ham to the oven and bake for a final 15 minutes, or until the glaze is bubbly and caramelized and the ham is a beautiful golden brown. Keep a close eye on it during this final bake to prevent the glaze from burning.
- Rest the ham: Once the ham is done, remove it from the oven and let it rest for at least 15-20 minutes before carving. This will allow the juices to redistribute, resulting in a more tender and flavorful ham.
Carving and Serving:
Almost there! Now it’s time to carve that beautiful ham and enjoy the fruits of our labor. Here’s how to carve it like a pro:
- Position the ham: Place the ham on a large cutting board with the shank (the narrow end) facing you.
- Make the first cut: Using a sharp carving knife, make a long, horizontal cut along the top of the ham, following the bone.
- Release the slices: Starting from the top cut, slice down towards the bone, creating thin, even slices.
- Remove the slices: Use the tip of your knife to release the slices from the bone.
- Repeat on the other side: Turn the ham around and repeat the process on the other side.
- Serve and enjoy: Arrange the ham slices on a platter and garnish with fresh rosemary sprigs, if desired. Serve immediately and enjoy!
Tips and Variations:
- Spice it up: For an extra kick, add a pinch of cayenne pepper to the red pepper jelly glaze.
- Sweeten it up: If you prefer a sweeter glaze, add a tablespoon of honey or maple syrup to the glaze.
- Use different jelly: Feel free to experiment with different flavors of jelly, such as apricot or peach.
- Add fruit: Stud the ham with cloves and add pineapple rings or cherries to the roasting pan for a festive touch.
- Make it ahead: The red pepper jelly glaze can be made ahead of time and stored in the refrigerator for up to a week.
- Leftovers: Leftover ham can be stored in the refrigerator for up to 5 days. It’s delicious in sandwiches, salads, or omelets.
Serving Suggestions:
This Red Pepper Jelly Ham is a showstopper on its own, but it’s even better when served with some delicious side dishes. Here are a few of my favorites:
- Scalloped Potatoes
- Green Bean Casserole
- Roasted Asparagus
- Sweet Potato Casserole
- Dinner Rolls
- Cranberry Sauce
I hope you enjoy this recipe as much as I do! It’s perfect for holidays, special occasions, or any time you want to impress your guests with a truly memorable meal. Happy cooking!
Conclusion:
So, there you have it! This Red Pepper Jelly Ham isn’t just another holiday centerpiece; it’s a flavor explosion waiting to happen. The sweet heat of the red pepper jelly perfectly complements the savory ham, creating a truly unforgettable dish that will have your guests begging for the recipe. Trust me, the combination is simply divine, and the ease of preparation makes it a winner in my book, especially when you’re juggling a million other things during the holidays.
Why is this a must-try? Well, beyond the incredible taste, it’s the versatility. This ham is equally at home at a formal holiday dinner as it is sliced thin for sandwiches the next day. It’s a crowd-pleaser that requires minimal effort, leaving you more time to actually enjoy the festivities. Plus, the vibrant color of the glaze makes it a stunning addition to any table.
Serving Suggestions and Variations:
Now, let’s talk about how to make this Red Pepper Jelly Ham truly your own. For serving, I love to pair it with classic sides like scalloped potatoes, green bean casserole, and cranberry sauce. But don’t be afraid to get creative! A side of roasted Brussels sprouts with balsamic glaze would also be a fantastic complement. And for a lighter option, try serving it with a fresh salad with a citrus vinaigrette.
Looking for variations? You’ve got options! If you prefer a spicier kick, add a pinch of cayenne pepper to the red pepper jelly glaze. Or, for a sweeter flavor, try using a combination of red pepper jelly and apricot preserves. You can also experiment with different types of ham. A bone-in ham will provide more flavor, while a boneless ham is easier to slice. And if you’re feeling adventurous, try using a smoked ham for an extra layer of smoky goodness.
Another fun variation is to add a touch of Dijon mustard to the glaze for a tangy twist. You could also stud the ham with cloves before baking for a more traditional holiday flavor. And if you’re short on time, you can even use pre-cooked ham slices and simply glaze them before serving. The possibilities are endless!
Don’t forget about the leftovers! This ham is fantastic in sandwiches, salads, and even omelets. You can also use it to make a delicious ham and bean soup. And if you’re feeling really creative, try using it in a quiche or frittata.
I truly believe this recipe will become a new family favorite. It’s simple, delicious, and guaranteed to impress. So, what are you waiting for? Gather your ingredients, preheat your oven, and get ready to experience the magic of Red Pepper Jelly Ham. I’m confident you’ll love it as much as I do!
I’m so excited for you to try this recipe! Once you’ve made it, please come back and share your experience in the comments below. I’d love to hear what you think and any variations you tried. Happy cooking!
Red Pepper Jelly Ham: A Delicious and Easy Recipe
A show-stopping ham recipe featuring a sweet and spicy red pepper jelly glaze. Perfect for holidays or any special occasion!
Ingredients
- 1 (10-12 pound) bone-in, fully cooked ham
- 1 (12-ounce) jar red pepper jelly
- 1/4 cup Dijon mustard
- 2 tablespoons apple cider vinegar
- 1 tablespoon Worcestershire sauce
- 1 teaspoon smoked paprika
- 1/2 teaspoon garlic powder
- 1/4 teaspoon ground cloves
- Fresh rosemary sprigs, for garnish (optional)
Instructions
- Prepare the Red Pepper Jelly Glaze: In a medium saucepan, whisk together the red pepper jelly, Dijon mustard, apple cider vinegar, Worcestershire sauce, smoked paprika, garlic powder, and ground cloves.
- Place the saucepan over medium heat and bring the mixture to a gentle simmer.
- Simmer for 10-15 minutes, stirring occasionally, until the glaze thickens slightly and coats the back of a spoon. Remove from heat and set aside.
- Prepare the Ham: Preheat oven to 325°F (160°C).
- Remove the ham from its packaging and place it on a large roasting pan. Score the rind in a diamond pattern, if desired.
- Pour about 1 cup of water into the bottom of the roasting pan (optional).
- Cover the ham tightly with aluminum foil.
- Bake and Glaze the Ham: Bake the covered ham for 10-12 minutes per pound, or until the internal temperature reaches 140°F (60°C). Use a meat thermometer to check.
- Remove the foil about 30 minutes before the ham is done.
- Brush about half of the red pepper jelly glaze evenly over the ham.
- Return the ham to the oven and continue baking for another 15 minutes.
- Remove the ham from the oven and brush it with the remaining glaze.
- Return the ham to the oven and bake for a final 15 minutes, or until the glaze is bubbly and caramelized and the ham is a beautiful golden brown.
- Rest the Ham: Remove the ham from the oven and let it rest for at least 15-20 minutes before carving.
- Carve and Serve: Place the ham on a large cutting board. Make a long, horizontal cut along the top of the ham, following the bone. Slice down towards the bone, creating thin, even slices. Remove the slices from the bone. Repeat on the other side. Arrange the ham slices on a platter and garnish with fresh rosemary sprigs, if desired. Serve immediately.
Notes
- Spice it up: Add a pinch of cayenne pepper to the red pepper jelly glaze.
- Sweeten it up: Add a tablespoon of honey or maple syrup to the glaze.
- Use different jelly: Experiment with different flavors of jelly, such as apricot or peach.
- Add fruit: Stud the ham with cloves and add pineapple rings or cherries to the roasting pan for a festive touch.
- Make it ahead: The red pepper jelly glaze can be made ahead of time and stored in the refrigerator for up to a week.
- Leftovers: Leftover ham can be stored in the refrigerator for up to 5 days. It’s delicious in sandwiches, salads, or omelets.
Leave a Comment