
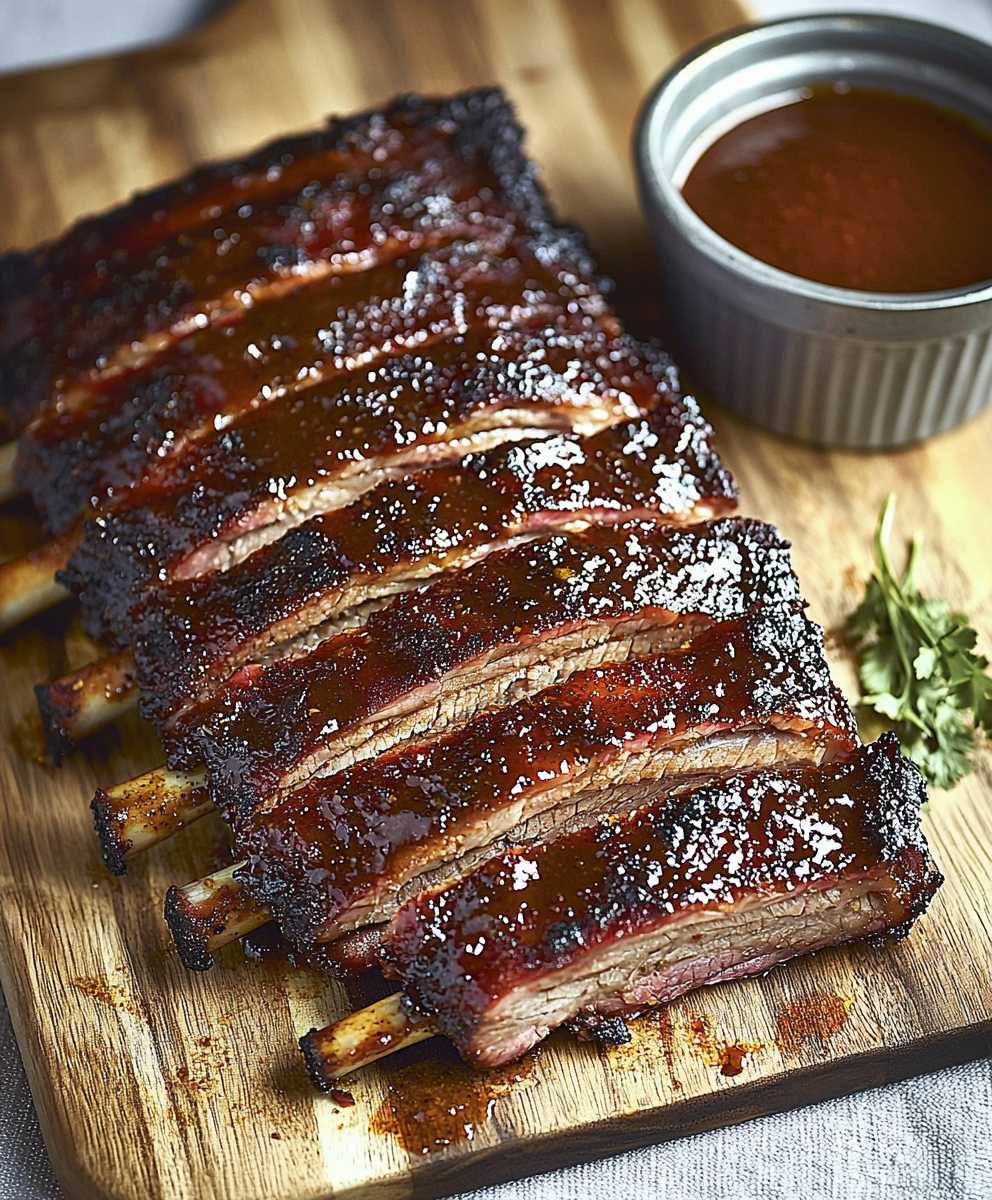
Oven Rib Rub: The secret weapon to fall-off-the-bone, restaurant-quality ribs, right in your own kitchen! Forget slaving over a smoker for hours; with this simple yet incredibly flavorful rub, you can achieve tender, juicy ribs using just your oven.
Ribs, a staple of American barbecue, have a rich history rooted in resourcefulness. Traditionally, they were the less desirable cuts of meat, often slow-cooked by those who couldn’t afford the prime cuts. This slow cooking process, combined with flavorful rubs and sauces, transformed these humble cuts into a culinary masterpiece. While outdoor smoking remains a beloved tradition, not everyone has the time or equipment. That’s where this oven rib rub comes in!
People adore ribs for their irresistible combination of smoky, savory, and slightly sweet flavors. The tender, melt-in-your-mouth texture is equally captivating. This particular rub captures all those essential elements, delivering a deeply satisfying experience without the fuss. It’s the perfect blend of convenience and incredible taste, making it a weeknight-friendly option for satisfying your rib cravings. Get ready to impress your family and friends with ribs that are bursting with flavor and cooked to perfection!
Ingredients:
- 4 lbs pork ribs (spare ribs or baby back ribs)
- 2 tablespoons smoked paprika
- 2 tablespoons brown sugar (light or dark, packed)
- 1 tablespoon garlic powder
- 1 tablespoon onion powder
- 1 tablespoon kosher salt
- 1 tablespoon black pepper, freshly ground
- 1 teaspoon chili powder
- 1 teaspoon dried oregano
- 1/2 teaspoon cayenne pepper (optional, for heat)
- 1/4 teaspoon ground cumin
- 1/4 cup yellow mustard
- 1/4 cup apple cider vinegar
Preparing the Ribs and Rub
- Prepare the Ribs: First things first, let’s get those ribs ready for some serious flavor! Take your ribs out of the packaging and give them a good rinse under cold water. Pat them dry with paper towels. This helps the rub adhere better.
- Remove the Membrane: This is a crucial step for tender ribs. Flip the ribs over so the bone side is facing up. You’ll see a thin, silvery membrane covering the bones. This membrane can become tough and chewy when cooked, so we want to remove it. To do this, slide a butter knife under the membrane at one end of the rack. Once you’ve got a good grip, use a paper towel to grab the membrane and pull it off. It might come off in one piece, or you might have to work at it a bit. Don’t worry if you don’t get it all just get as much as you can.
- Mix the Dry Rub: In a medium bowl, combine the smoked paprika, brown sugar, garlic powder, onion powder, kosher salt, black pepper, chili powder, dried oregano, cayenne pepper (if using), and ground cumin. Whisk everything together until it’s well combined. This is your flavor powerhouse!
- Apply the Mustard Binder: This might sound strange, but trust me, it works! The mustard acts as a binder, helping the dry rub stick to the ribs. Plus, you won’t taste the mustard in the final product. Spread a thin, even layer of yellow mustard over both sides of the ribs.
- Apply the Dry Rub: Now for the fun part! Generously sprinkle the dry rub all over the ribs, making sure to coat every nook and cranny. Use your hands to gently press the rub into the meat. Don’t be shy you want a good, thick layer of flavor. Flip the ribs over and repeat on the other side.
- Marinate (Optional but Recommended): For the best flavor, wrap the ribs tightly in plastic wrap and refrigerate them for at least 2 hours, or preferably overnight. This allows the flavors of the rub to penetrate the meat, resulting in a more flavorful and tender final product. If you’re short on time, you can skip this step, but I highly recommend it if you can.
Cooking the Ribs in the Oven
- Preheat the Oven: Preheat your oven to 275°F (135°C). This low and slow cooking method is key to tender, fall-off-the-bone ribs.
- Prepare the Baking Sheet: Line a large baking sheet with heavy-duty aluminum foil. This will make cleanup a breeze. Place a wire rack on top of the foil-lined baking sheet. This allows the heat to circulate around the ribs, ensuring even cooking.
- Arrange the Ribs: Place the ribs on the wire rack, bone-side down. If you’re cooking multiple racks of ribs, make sure they’re not overcrowded. You want to leave some space between them for air circulation.
- First Bake (Dry Bake): Bake the ribs in the preheated oven for 3 hours. This initial dry bake helps to render some of the fat and develop a nice crust on the ribs.
- Prepare the Foil Wrap: After 3 hours, remove the ribs from the oven. Tear off a large sheet of heavy-duty aluminum foil, large enough to completely wrap the ribs.
- Add Apple Cider Vinegar: Place the ribs on the foil. Pour 1/4 cup of apple cider vinegar over the ribs. This will add moisture and help to tenderize the meat even further.
- Wrap the Ribs Tightly: Wrap the ribs tightly in the foil, creating a sealed packet. Make sure there are no holes or tears in the foil, as this will allow the steam to escape.
- Second Bake (Steaming): Return the wrapped ribs to the oven and bake for another 2 hours. This steaming process will make the ribs incredibly tender and juicy.
- Check for Doneness: After 2 hours, remove the ribs from the oven. Carefully open the foil packet (be careful of the steam!). To check for doneness, insert a fork into the meat between the bones. If the fork slides in easily and the meat is very tender, the ribs are done. If not, wrap them back up and bake for another 30 minutes to an hour, checking every 30 minutes until they’re done.
- Optional: Broil for Caramelization: If you want a slightly caramelized crust on your ribs, you can broil them for a few minutes. Remove the ribs from the foil packet and place them back on the wire rack. Turn on your broiler and broil the ribs for 2-3 minutes per side, watching them closely to prevent burning.
Resting and Serving
- Rest the Ribs: Once the ribs are cooked to your liking, remove them from the oven and let them rest for at least 10 minutes before slicing. This allows the juices to redistribute throughout the meat, resulting in a more flavorful and tender final product.
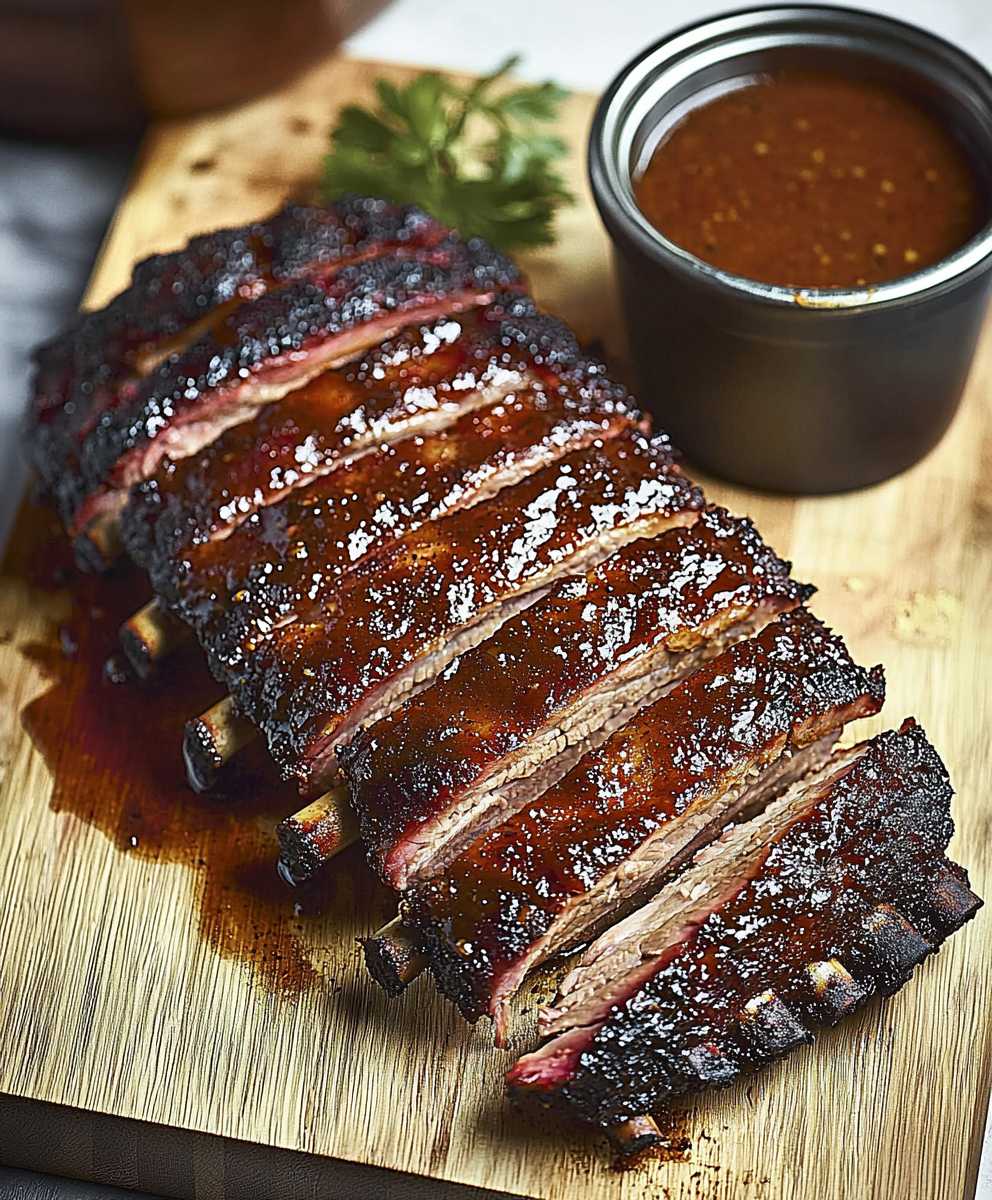
- Slice and Serve: Slice the ribs between the bones and serve immediately. These ribs are delicious on their own, or you can serve them with your favorite barbecue sauce.
Conclusion:
This Oven Rib Rub recipe isn’t just another spice blend; it’s a gateway to unbelievably tender, flavorful ribs right from your own kitchen. I’ve spent years perfecting this combination, and trust me, the results speak for themselves. The balance of sweet, smoky, and savory notes creates a symphony of flavors that will have everyone reaching for seconds (and maybe even thirds!). Forget about complicated marinades or hours spent tending a smoker this rub delivers that authentic, slow-cooked taste with minimal effort. Why is this a must-try? Because it’s simple, effective, and consistently produces restaurant-quality ribs. You don’t need to be a seasoned chef to master this recipe. The ingredients are readily available in most pantries, and the instructions are straightforward. Plus, the versatility of this rub extends beyond just ribs. I’ve used it on chicken, pork shoulder, and even grilled vegetables with fantastic results. It’s a true all-purpose flavor enhancer that will quickly become a staple in your cooking arsenal. But the best part? The sheer joy of biting into a perfectly cooked rib, the meat practically falling off the bone, infused with that irresistible smoky sweetness. It’s a culinary experience that’s both satisfying and incredibly rewarding. And the aroma that fills your kitchen while the ribs are baking? Pure heaven! Now, let’s talk about serving suggestions and variations. While these ribs are delicious on their own, a few simple accompaniments can elevate the meal to the next level. I personally love serving them with a side of creamy coleslaw, tangy potato salad, and some grilled corn on the cob. For a spicier kick, try adding a pinch of cayenne pepper to the rub or serving the ribs with your favorite hot sauce. If you’re feeling adventurous, you can also experiment with different types of wood chips in your oven to infuse the ribs with even more smoky flavor. Applewood and hickory are both excellent choices. Simply place a small foil packet of soaked wood chips on the bottom rack of your oven while the ribs are baking. Another variation I enjoy is adding a touch of brown sugar to the rub for an extra layer of sweetness. This is especially delicious if you’re using a spicier barbecue sauce. You can also adjust the amount of paprika to control the smokiness of the ribs. Ultimately, the beauty of this Oven Rib Rub is that it’s completely customizable to your own taste preferences. Don’t be afraid to experiment and find the perfect combination of flavors that you love. So, what are you waiting for? Gather your ingredients, preheat your oven, and get ready to experience the best ribs you’ve ever made. I’m confident that this recipe will become a family favorite. I’m so excited for you to try this recipe and experience the magic of perfectly seasoned, oven-baked ribs. Once you’ve given it a go, I’d love to hear about your experience! Share your photos and comments below. Let me know what variations you tried, what sides you served, and most importantly, how much you enjoyed it. Your feedback is invaluable, and it helps me continue to improve and share delicious recipes with all of you. Happy cooking! Print
Oven Rib Rub: The Ultimate Guide to Perfect Ribs
- Total Time: 320 minutes
- Yield: 4–6 servings 1x
Description
Tender, fall-off-the-bone oven-baked ribs with a flavorful dry rub and a touch of apple cider vinegar for ultimate juiciness.
Ingredients
- 4 lbs pork ribs (spare ribs or baby back ribs)
- 2 tablespoons smoked paprika
- 2 tablespoons brown sugar (light or dark, packed)
- 1 tablespoon garlic powder
- 1 tablespoon onion powder
- 1 tablespoon kosher salt
- 1 tablespoon black pepper, freshly ground
- 1 teaspoon chili powder
- 1 teaspoon dried oregano
- 1/2 teaspoon cayenne pepper (optional, for heat)
- 1/4 teaspoon ground cumin
- 1/4 cup yellow mustard
- 1/4 cup apple cider vinegar
Instructions
- Prepare the Ribs: Rinse ribs under cold water and pat dry.
- Remove the Membrane: Flip ribs bone-side up. Slide a butter knife under the membrane at one end and use a paper towel to grip and pull it off.
- Mix the Dry Rub: In a medium bowl, combine smoked paprika, brown sugar, garlic powder, onion powder, kosher salt, black pepper, chili powder, dried oregano, cayenne pepper (if using), and ground cumin. Whisk well.
- Apply the Mustard Binder: Spread a thin, even layer of yellow mustard over both sides of the ribs.
- Apply the Dry Rub: Generously sprinkle the dry rub all over the ribs, pressing it into the meat. Repeat on the other side.
- Marinate (Optional): Wrap ribs tightly in plastic wrap and refrigerate for at least 2 hours, or preferably overnight.
- Preheat the Oven: Preheat oven to 275°F (135°C).
- Prepare the Baking Sheet: Line a large baking sheet with heavy-duty aluminum foil. Place a wire rack on top.
- Arrange the Ribs: Place ribs on the wire rack, bone-side down.
- First Bake (Dry Bake): Bake for 3 hours.
- Prepare the Foil Wrap: Tear off a large sheet of heavy-duty aluminum foil.
- Add Apple Cider Vinegar: Place ribs on the foil. Pour 1/4 cup of apple cider vinegar over the ribs.
- Wrap the Ribs Tightly: Wrap ribs tightly in the foil, creating a sealed packet.
- Second Bake (Steaming): Bake for another 2 hours.
- Check for Doneness: Carefully open the foil packet. Insert a fork into the meat between the bones. If it slides in easily, the ribs are done. If not, wrap back up and bake for another 30 minutes to an hour, checking every 30 minutes.
- Optional: Broil for Caramelization: Remove ribs from foil and place back on the wire rack. Broil for 2-3 minutes per side, watching closely.
- Rest the Ribs: Let ribs rest for at least 10 minutes before slicing.
- Slice and Serve: Slice ribs between the bones and serve.
Notes
- Removing the membrane is crucial for tender ribs.
- Marinating the ribs overnight will result in the best flavor.
- Low and slow cooking is key to fall-off-the-bone tenderness.
- Be careful when opening the foil packet, as steam will escape.
- Broiling is optional but adds a nice caramelized crust.
- Prep Time: 20 minutes
- Cook Time: 330 minutes
Leave a Comment