
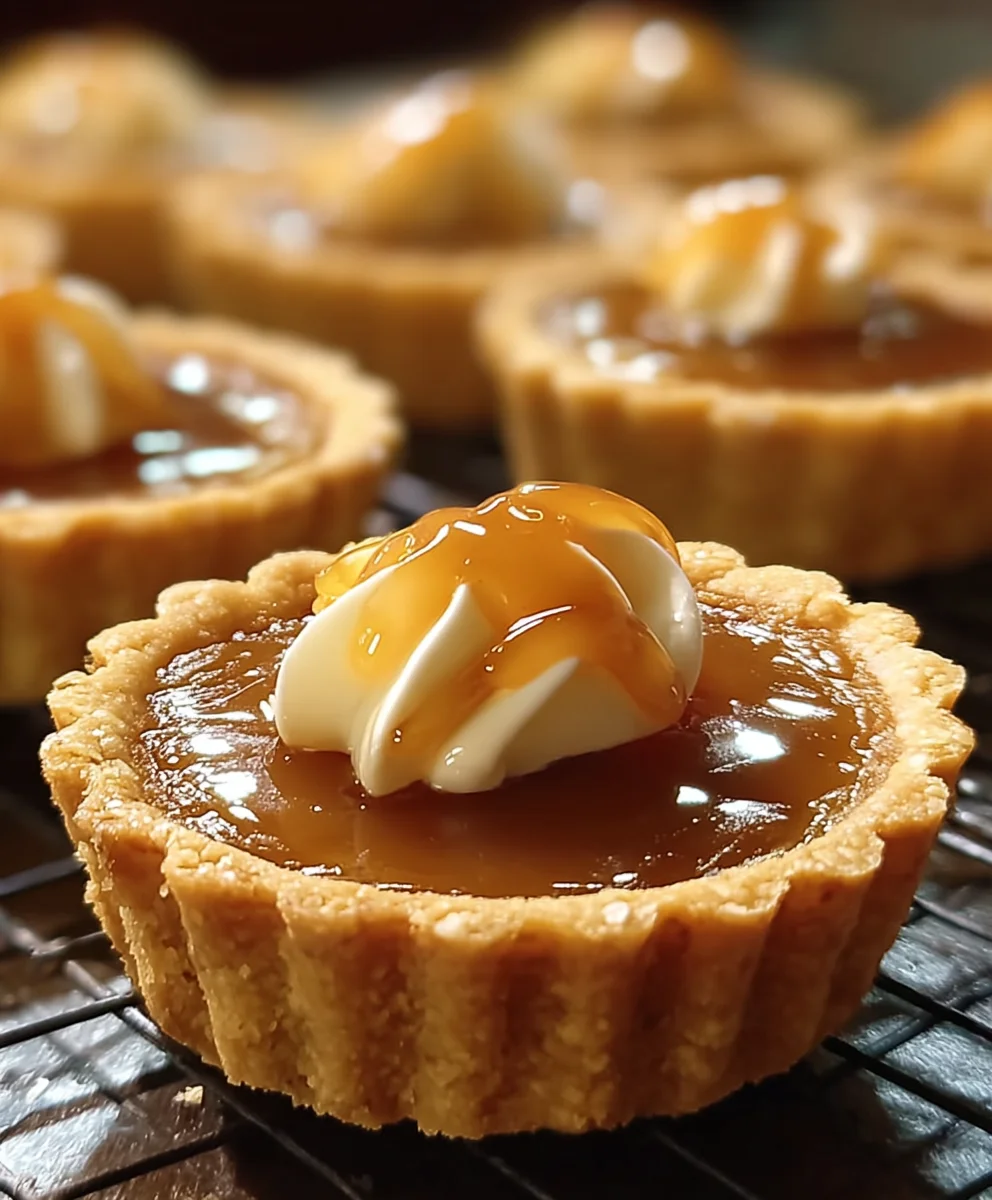
Mini Butterscotch Tarts are a delightful treat that promises to whisk you away to a world of sweet, buttery bliss with just one bite. Imagine a golden, flaky crust cradling a luscious, smooth butterscotch filling, all perfectly sized for a single, satisfying indulgence. There’s something truly enchanting about these small wonders, and I am thrilled to share with you a recipe that captures their irresistible charm.
While tarts have graced dessert tables for centuries, the beloved butterscotch flavor, with its rich caramel notes, has captivated palates since its rise in popularity in 19th-century England, originally as a hard candy. These smaller, more convenient versions bring a touch of vintage charm and sophisticated simplicity to any modern gathering. It’s not hard to see why these charming desserts are adored. The intricate balance of sweet and slightly salty butterscotch, combined with the tender crispness of the pastry, creates an unforgettable sensory experience. Their convenient, individual serving size makes them an absolute dream for entertaining, potlucks, or simply enjoying a moment of personal decadence without the commitment of a larger dessert.
Why Everyone Loves Mini Butterscotch Tarts
Each Mini Butterscotch Tart offers a perfect portion of pure comfort, making them an ideal choice for a sophisticated tea party or a simple afternoon pick-me-up. The ease of preparation, combined with their undeniably delicious taste and elegant presentation, ensures they are a crowd-pleaser every single time. Get ready to impress your guests and satisfy your sweet cravings with these exquisite, bite-sized delights.
Ingredients:
For the Flaky Mini Tart Crusts:
- 1 ½ cups (180g) all-purpose flour, plus more for dusting
- ½ teaspoon fine sea salt
- 1 tablespoon (12g) granulated sugar
- ½ cup (113g) unsalted butter, very cold and cut into ½-inch cubes
- ¼ cup (60ml) ice water, plus an additional 1-2 tablespoons if needed
For the Rich Butterscotch Filling:
- ½ cup (113g) unsalted butter
- 1 cup (200g) packed light brown sugar
- ½ teaspoon fine sea salt
- ½ cup (120ml) heavy cream
- 2 large egg yolks
- 1 tablespoon (8g) cornstarch
- 1 teaspoon pure vanilla extract
For the Optional Garnishes:
- ½ cup (120ml) heavy cream, very cold
- 1 tablespoon (15g) powdered sugar
- ½ teaspoon pure vanilla extract
- ¼ cup finely chopped toasted pecans or walnuts
Preparing the Mini Tart Crusts
Creating the perfect base for our Mini Butterscotch Tarts is the first crucial step. A flaky, buttery crust provides a wonderful contrast to the creamy filling. Patience and cold ingredients are your best friends here!
- Combine Dry Ingredients: In a large mixing bowl, I start by whisking together the all-purpose flour, fine sea salt, and granulated sugar. This ensures that these dry components are evenly distributed, laying a consistent foundation for our dough. Make sure there are no clumps, as this can affect the final texture.
- Cut in the Cold Butter: Now, for the magic of flakiness! I add the very cold, cubed unsalted butter directly into the flour mixture. Using a pastry blender, two knives, or even your fingertips (working quickly to keep the butter cold), I cut the butter into the flour until the mixture resembles coarse meal with some pea-sized pieces of butter remaining. It’s essential not to overwork the butter here; those little pockets of butter are what create steam and ultimately lead to that irresistible flaky texture in our Mini Butterscotch Tarts. I sometimes even pop the bowl into the freezer for 5 minutes if my kitchen is particularly warm, just to maintain that crucial chill.
- Add Ice Water Gradually: Next, I slowly drizzle in ¼ cup of ice water, a tablespoon at a time, mixing gently with a fork or your hands until the dough just begins to come together. The key is to add only enough water for the dough to form a cohesive ball. I always err on the side of caution; too much water can make the crust tough. If it’s still too crumbly, I add an additional tablespoon, perhaps two, of ice water, mixing just until it holds. I make sure to avoid overmixing, as this develops gluten, which we don’t want in a tender tart crust.
- Chill the Dough: Once the dough forms, I gather it into a disk, wrap it tightly in plastic wrap, and refrigerate it for at least 30 minutes, or even up to an hour. This chilling period is non-negotiable! It allows the gluten to relax, making the dough easier to roll, and solidifies the butter, which is crucial for a flaky crust. This also gives the flour time to fully hydrate, resulting in a more tender crumb for our Mini Butterscotch Tarts.
- Roll and Cut the Dough: After chilling, I lightly flour a clean work surface. I unwrap the dough and roll it out evenly to about ⅛-inch thickness. Now, to create our mini tart shells, I use a round cookie cutter that is slightly larger than the openings of my mini muffin or tart pan – usually a 2 ½ to 3-inch cutter works perfectly. I cut out as many circles as possible, then gather the scraps, gently re-roll them, and cut out more circles until all the dough is used.
- Form the Tart Shells: I carefully press each dough circle into the cavities of a lightly greased (or non-stick) mini muffin or tart pan. I make sure the dough fits snugly against the bottom and sides, without any air pockets. For a neater edge, I gently trim any excess dough that hangs over the top of the pan, or I can even flute the edges if I’m feeling particularly fancy. The goal is an even thickness throughout the shell to ensure even baking.
- Blind Bake the Crusts: To prevent the crusts from puffing up and to ensure a crisp base, we need to blind bake them. I prick the bottoms of each tart shell several times with a fork. Then, I line each shell with a small piece of parchment paper and fill it with pie weights, dried beans, or rice. I bake them in a preheated oven at 375°F (190°C) for 10-12 minutes, or until the edges are just starting to turn golden. After this initial bake, I carefully remove the parchment and weights and continue baking for another 5-7 minutes, or until the entire shell is light golden brown and looks dry. This ensures a fully cooked, sturdy base for our Mini Butterscotch Tarts filling.
- Cool Completely: Once baked, I remove the mini tart shells from the oven and let them cool in the pan for a few minutes before gently transferring them to a wire rack to cool completely. It’s vital that the crusts are entirely cool before adding the warm filling to prevent a soggy bottom. This step ensures the structural integrity of your finished Mini Butterscotch Tarts.
Crafting the Velvety Butterscotch Filling
The heart of our Mini Butterscotch Tarts is this incredibly rich, smooth, and utterly decadent filling. It’s a process that requires a little attention, but the reward is truly worth every stir.
- Prepare the Wet Ingredients: In a medium-sized heavy-bottomed saucepan, over medium heat, I melt the unsalted butter. Once melted, I add the packed light brown sugar and the fine sea salt. I stir these ingredients constantly with a heat-proof spatula or wooden spoon until the sugar has fully dissolved and the mixture is smooth and bubbly, about 2-3 minutes. This initial simmering helps to develop a deep, caramelized flavor that is characteristic of excellent butterscotch. I make sure to scrape down the sides of the pan to prevent any sugar crystals from forming.
- Whisk in the Heavy Cream: Once the butter and sugar are beautifully combined and bubbling gently, I slowly pour in the heavy cream, continuing to stir. The mixture will likely seize up a bit at first, but don’t worry! Just keep stirring over the medium heat until it becomes smooth again and returns to a gentle simmer. I let it simmer for another 2 minutes, stirring occasionally. This helps to further thicken the base and deepen the flavor.
- Prepare the Egg Yolk Mixture: While the butterscotch base is simmering, in a separate small bowl, I whisk together the two large egg yolks and the cornstarch until completely smooth and no lumps remain. The cornstarch is our secret weapon for achieving that perfect, luxurious thickness without using too many eggs, which can sometimes make the filling taste too “eggy.”
- Temper the Egg Yolks: This is a crucial step to prevent the eggs from scrambling. I slowly pour about half a cup of the hot butterscotch mixture into the egg yolk mixture, whisking constantly and vigorously as I pour. This gradually raises the temperature of the egg yolks without cooking them. Don’t rush this part; a slow, steady stream and continuous whisking are key. Once tempered, I pour the warmed egg yolk mixture back into the saucepan with the remaining butterscotch base, again whisking continuously to ensure everything is thoroughly combined.
- Cook the Filling to Perfection: I return the saucepan to medium-low heat and continue to cook the filling, stirring constantly with my spatula or whisk. This cooking process can take anywhere from 5 to 8 minutes. I watch carefully as the mixture thickens significantly, eventually becoming custard-like and coating the back of my spoon. A good indicator is when you can draw a line with your finger on the back of the spoon and it holds its shape. Be very careful not to let it boil vigorously, as this can cause the eggs to curdle. Lower the heat if it starts to bubble too much.
- Stir in Vanilla: Once the filling has reached the desired thickness, I remove the saucepan from the heat and stir in the pure vanilla extract. The warmth of the filling will beautifully release the vanilla’s aroma and flavor, adding another layer of complexity to our Mini Butterscotch Tarts.
- Cool Slightly: I let the butterscotch filling cool in the saucepan for about 10-15 minutes, stirring occasionally, before pouring it into the tart shells. This cooling period helps it to thicken just a bit more and prevents it from being so hot that it might make the crust soggy.
Assembling and Finishing Your Mini Butterscotch Tarts
With our perfectly baked crusts and luscious butterscotch filling ready, it’s time to bring these delightful Mini Butterscotch Tarts to life. The final touches make all the difference!
- Fill the Cooled Tart Shells: Once the butterscotch filling has cooled slightly (it should still be pourable but noticeably thicker), I carefully spoon or pour it into the completely cooled mini tart shells. I fill each shell almost to the brim, leaving just a tiny bit of space at the top for any optional garnishes. If you prefer a very smooth top, you can gently tap the pan on your counter a few times to release any air bubbles and level the surface.
- Chill Until Set: This step is critical for allowing the butterscotch filling to fully set and firm up. I carefully transfer the filled Mini Butterscotch Tarts to the refrigerator and chill them for at least 2-3 hours, or preferably overnight. This extended chilling time ensures that the filling achieves its ideal firm-yet-creamy texture, making the tarts easy to handle and a pleasure to eat. Rushing this step will result in a runny filling.
- Prepare Optional Whipped Cream: If you’re opting for a whipped cream topping (and I highly recommend it for an extra touch of indulgence!), I make this just before serving. In a very cold mixing bowl (I often chill my bowl and whisk attachment in the freezer for 10-15 minutes beforehand), I pour in the very cold heavy cream, powdered sugar, and vanilla extract. I whip on medium-high speed until soft peaks form, then increase to high speed until stiff peaks are achieved. Be careful not to over-whip, or you’ll end up with butter!
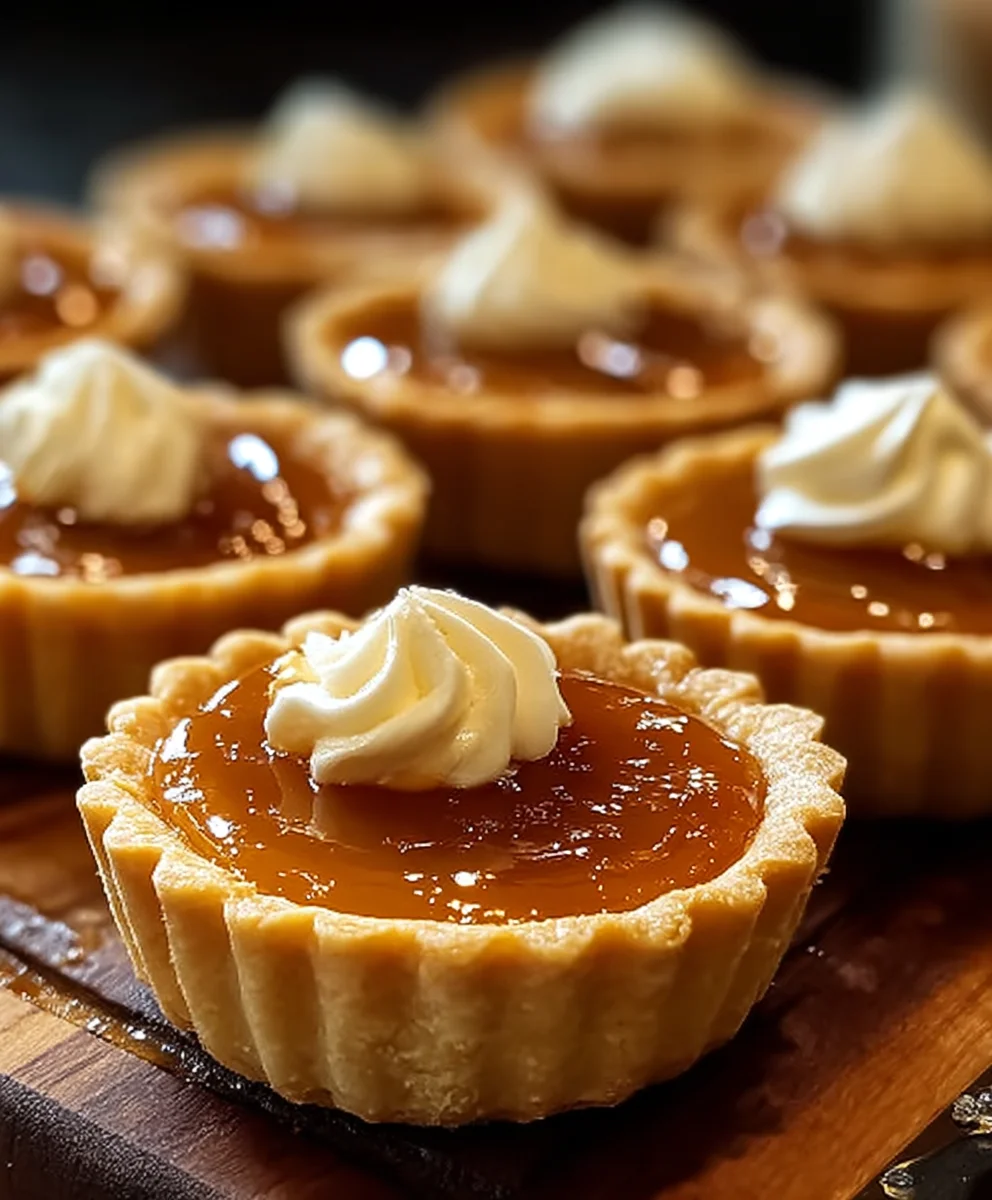
- Garnish and Serve: Once the Mini Butterscotch Tarts are thoroughly chilled and set, I carefully remove them from the mini muffin or tart pan. They should pop out easily if the pan was greased correctly or if it’s non-stick. I then top each tart with a dollop of the freshly whipped cream (I sometimes use a piping bag with a star tip for a prettier presentation) and sprinkle generously with the finely chopped toasted pecans or walnuts. The crunch of the nuts provides a wonderful textural contrast to the smooth filling and light cream.
- Serving Temperature: These Mini Butterscotch Tarts are best served chilled. The cold temperature enhances the firmness of the filling and makes them incredibly refreshing.
- Storage: Any leftover Mini Butterscotch Tarts should be stored in an airtight container in the refrigerator. They will keep well for up to 3-4 days. If they are topped with whipped cream, it’s best to add the whipped cream just before serving, as it can weep over time. If they are already topped, consume them within 1-2 days for the best quality. For optimal flavor and texture, I often find it best to let them sit out for just 10-15 minutes before serving if they’ve been deeply chilled, allowing the filling to slightly soften and its flavors to truly shine. Enjoy these delightful, bite-sized treasures!
Conclusion:
So there you have it – the delightful journey to creating your very own perfect Mini Butterscotch Tarts. I truly believe these aren’t just any dessert; they are a bite-sized piece of pure joy, a testament to how simple ingredients can come together to create something truly extraordinary. The rich, creamy butterscotch filling, with its signature golden hue and deep, caramelized notes, is absolutely irresistible. It’s a flavor that evokes warmth and comfort, a nostalgic embrace in every single morsel. Paired with that crisp, delicate tart shell, the textural contrast is simply divine. You get that satisfying snap followed by the silky-smooth, melt-in-your-mouth filling. These tarts are an absolute showstopper without requiring hours of complicated work in the kitchen. They look incredibly elegant and professional, yet the process is surprisingly straightforward, making them perfect for both seasoned bakers and those just starting their culinary adventures.
But the magic of these tarts doesn’t end with their creation; it extends to how you choose to enjoy them! While they are undoubtedly exquisite on their own, a warm Mini Butterscotch Tart served alongside a scoop of vanilla bean ice cream or a dollop of freshly whipped cream elevates the experience to another level of indulgence. Imagine the cool creaminess melding with the warm, sticky butterscotch – pure bliss! They also make a fantastic accompaniment to your afternoon tea or coffee, transforming a simple break into a sophisticated treat. For a brunch gathering, they add a touch of sweet elegance that your guests will adore. Planning a dessert buffet? These minis are perfect for variety and easy portion control. They are incredibly versatile for any occasion, from casual family desserts to elegant dinner parties.
Now, if you’re feeling a little adventurous, don’t hesitate to experiment with variations. A tiny sprinkle of flaky sea salt on top of the finished butterscotch filling before it sets creates a delightful salted butterscotch effect, enhancing the depth of flavor. You could also try a light dusting of cocoa powder or a delicate chocolate drizzle for a complementary flavor profile. For an adult-friendly version, a drop of bourbon or rum in the butterscotch mixture during the cooling phase adds a subtle warmth and complexity that is truly special. Consider using different crusts too – perhaps a ginger snap crust for a spicy kick, or even a classic shortbread for a more buttery base. The possibilities are truly endless, allowing you to tailor these incredible Mini Butterscotch Tarts to your personal taste and any occasion.
I genuinely hope that reading through this recipe has inspired you to roll up your sleeves and give these magnificent treats a try. Trust me when I say that the aroma filling your kitchen as these bake, and the sheer delight on the faces of those who taste them, makes every step worthwhile. Baking should be a joyful, creative process, and I believe these tarts embody that spirit perfectly. They are designed to bring smiles, spark conversations, and create wonderful memories.
So, what are you waiting for? Gather your ingredients, put on your favorite apron, and embark on this delicious baking adventure. I am so incredibly excited for you to experience the satisfaction of creating something so utterly delicious from scratch. Once you’ve baked your batch of Mini Butterscotch Tarts, I would absolutely love to hear all about your experience! Did you stick to the original recipe, or did you put your own unique spin on them? What were your favorite serving suggestions? Please, don’t be shy – share your baking triumphs, your photos, and your feedback. Your stories inspire me and help build a wonderful community of fellow food lovers. Let’s celebrate the joy of homemade goodness together! Happy baking, and I can’t wait to hear how wonderfully yours turn out!
Mini Butterscotch Tarts
Mini Butterscotch Tarts are a delightful treat that promises to whisk you away to a world of sweet, buttery bliss with just one bite. Imagine a golden, flaky crust cradling a luscious, smooth butterscotch filling, all perfectly sized for a single, satisfying indulgence. There’s something truly enchanting about these small wonders, and I am thrilled to share with you a recipe that captures their irresistible charm.
Ingredients
-
1 ½ cups (180g) all-purpose flour
-
½ teaspoon fine sea salt (for crust)
-
1 tablespoon (12g) granulated sugar
-
½ cup (113g) unsalted butter, very cold and cut into ½-inch cubes (for crust)
-
¼ cup (60ml) ice water, plus 1-2 tablespoons if needed
-
½ cup (113g) unsalted butter (for filling)
-
1 cup (200g) packed light brown sugar
-
½ teaspoon fine sea salt (for filling)
-
½ cup (120ml) heavy cream (for filling)
-
2 large egg yolks
-
1 tablespoon (8g) cornstarch
-
1 teaspoon pure vanilla extract (for filling)
-
½ cup (120ml) heavy cream, very cold (for garnish)
-
1 tablespoon (15g) powdered sugar
-
½ teaspoon pure vanilla extract (for garnish)
-
¼ cup finely chopped toasted pecans or walnuts
Instructions
-
Step 1
Whisk flour, salt, and sugar. Cut in cold, cubed butter until coarse meal with pea-sized pieces remain. Gradually add ice water, mixing until dough just comes together. Form into a disk, wrap, and chill for 30-60 minutes. -
Step 2
On a lightly floured surface, roll dough to ⅛-inch thick. Cut 2.5-3 inch circles and press into greased mini muffin/tart pan cavities. Prick bottoms. Blind bake in a preheated 375°F (190°C) oven with pie weights for 10-12 minutes. Remove weights; bake 5-7 minutes more until light golden. Cool completely. -
Step 3
Melt ½ cup unsalted butter in a heavy-bottomed saucepan over medium heat. Stir in brown sugar and ½ teaspoon salt until dissolved and bubbly (2-3 minutes). Slowly whisk in ½ cup heavy cream; simmer for 2 minutes, stirring. -
Step 4
In a separate bowl, whisk egg yolks and cornstarch until smooth. Slowly whisk ½ cup of the hot butterscotch mixture into the egg yolks to temper them. Pour the tempered mixture back into the saucepan, whisking continuously. -
Step 5
Return saucepan to medium-low heat and cook, stirring constantly, for 5-8 minutes until significantly thickened and custard-like (coats a spoon). Do not boil vigorously. Remove from heat, stir in 1 teaspoon vanilla extract. Cool slightly (10-15 minutes), stirring occasionally. -
Step 6
Pour the slightly cooled butterscotch filling into the completely cooled tart shells, filling almost to the brim. Chill tarts in the refrigerator for at least 2-3 hours or overnight until fully set. -
Step 7
If desired, just before serving, whip ½ cup cold heavy cream, 1 tablespoon powdered sugar, and ½ teaspoon vanilla extract until stiff peaks form. -
Step 8
Remove chilled tarts from pans. Top each tart with whipped cream (if using) and sprinkle with toasted pecans or walnuts. Serve chilled. Store leftovers in an airtight container in the refrigerator for up to 3-4 days (1-2 days if topped with whipped cream). Freezing is not recommended as filling and cream may not maintain proper texture.
Important Information
Nutrition Facts (Per Serving)
It is important to consider this information as approximate and not to use it as definitive health advice.
Allergy Information
Please check ingredients for potential allergens and consult a health professional if in doubt.

Leave a Comment