
Korean Bbq Beef Rice Stack is not merely a dish; it’s an architectural marvel of flavor and texture, a culinary journey that, I promise, will captivate your senses from the very first glance. I find myself always drawn to the succulent, thinly sliced beef, marinated in a delectable blend of soy sauce, sesame oil, garlic, and ginger. This preparation is beautifully reminiscent of the beloved bulgogi, a cornerstone of Korean cuisine enjoyed for centuries. While traditional Korean BBQ often thrives as a communal experience around a sizzling grill, I believe our modern take brilliantly transforms those iconic tastes into an elegant, easy-to-enjoy tower, perfect for any occasion.
A Modern Take on a Beloved Classic
I understand why people worldwide have fallen in love with the vibrant and complex profiles of Korean BBQ. This stacked rendition ensures you get all that incredible taste in every perfect bite. I know you’ll cherish its perfect balance of savory and sweet notes, the melt-in-your-mouth tenderness of the beef, and the satisfying contrast provided by fluffy rice and crisp, fresh vegetables. Whether you’re a long-time fan of Korean flavors or new to its magic, I assure you that preparing your own Korean Bbq Beef Rice Stack is an incredibly rewarding experience that delivers both stunning presentation and unforgettable taste.
Ingredients:
- For the Korean BBQ Beef (Bulgogi):
- 1.5 lbs (about 680g) thinly sliced beef sirloin, ribeye, or short plate, preferably frozen for easier slicing. I often ask my butcher to do this for me, specifying bulgogi cut for the best “Korean Bbq Beef Rice Stack” experience.
- 1/2 cup low-sodium soy sauce. I find this gives me more control over the saltiness, allowing the other flavors to shine through in the marinade.
- 1/4 cup mirin (sweet rice wine). This adds a lovely subtle sweetness and helps tenderize the beef, contributing to that melt-in-your-mouth texture.
- 2 tablespoons sesame oil. The rich, nutty aroma of good quality sesame oil is absolutely essential here; it’s a cornerstone of Korean flavors.
- 2 tablespoons brown sugar, packed. For that perfect balance of sweetness and savory depth, and to aid in the beautiful caramelization during cooking.
- 1 tablespoon grated fresh ginger (about a 1-inch piece). Don’t skip the fresh ginger; its pungent, zesty notes make a huge difference to the overall brightness of the bulgogi.
- 4 cloves garlic, minced. Garlic is undoubtedly the heart of Korean cuisine; its robust flavor builds the foundation for our amazing beef.
- 1/2 medium yellow onion, thinly sliced. This adds a sweet, aromatic base to the marinade and becomes wonderfully tender when cooked with the beef.
- 1/2 Asian pear or small apple, grated (optional, but highly recommended for superior tenderness and natural sweetness). This is truly my secret weapon for achieving incredibly tender bulgogi.
- 1/4 teaspoon black pepper. A simple but effective addition to round out the savory profile.
- 2 green onions (scallions), chopped, reserved for garnish and a touch in the marinade for fresh onion notes.
- For the Seasoned Sushi Rice:
- 2 cups short-grain sushi rice. This particular type of rice has the perfect stickiness and texture to hold its shape beautifully when forming our “Korean Bbq Beef Rice Stack.”
- 2.5 cups water, specifically for cooking the rice to its ideal consistency.
- 1/4 cup rice vinegar. This provides the classic tangy counterpoint that defines seasoned sushi rice.
- 2 tablespoons granulated sugar. Balances the vinegar and adds a subtle sweetness.
- 1 teaspoon salt. Enhances all the other flavors in the rice seasoning.
- For the Quick Kimchi Slaw:
- 2 cups thinly sliced Napa cabbage. You can also use green cabbage, but Napa is a bit softer and absorbs the dressing wonderfully for this slaw.
- 1 large carrot, julienned or shredded. Adds fantastic crunch, vibrant color, and natural sweetness to the slaw.
- 2 tablespoons kimchi juice (from a jar of kimchi). This is where the magic happens for the authentic fermented flavor; it’s crucial for our slaw’s unique taste.
- 1 tablespoon rice vinegar. Adds an extra layer of bright acidity to the dressing.
- 1 teaspoon sesame oil. Contributes a nutty depth to the slaw’s dressing.
- 1 teaspoon granulated sugar. Helps to balance the tanginess of the kimchi juice and vinegar.
- Pinch of salt. To heighten the overall flavors of the slaw.
- For Garnish and Assembly:
- Toasted sesame seeds. For a final flourish and added nutty texture.
- Extra chopped green onions (scallions). A fresh, crisp garnish that brightens the dish.
- A drizzle of sriracha mayo or gochujang sauce (optional, but a fantastic addition if you love a little extra creamy heat on your “Korean Bbq Beef Rice Stack”!).
- Fried eggs (one per stack, optional, but highly recommended for a truly indulgent and complete meal experience). The runny yolk is divine.
- Vegetable oil or preferred cooking oil, for cooking the beef and eggs.
Preparing the Korean BBQ Beef Marinade and Marinating
- First things first, let’s get that amazing Korean BBQ beef, our “Bulgogi,” marinating. This is the absolute heart of our “Korean Bbq Beef Rice Stack” and truly deserves your full attention and a little time. In a generously sized mixing bowl, I combine all the wet ingredients and aromatics that will make our beef sing: the low-sodium soy sauce, mirin, fragrant sesame oil, rich brown sugar, freshly grated ginger, finely minced garlic, a good pinch of black pepper, and about half of the chopped green onions. If you’re using the grated Asian pear or apple – and I strongly suggest you do for that extra layer of tenderness and subtle sweetness – add that in now too. I take a moment to whisk everything together thoroughly until the brown sugar dissolves completely and all the ingredients are beautifully emulsified. This creates a wonderfully aromatic and perfectly balanced marinade that will penetrate and transform our beef. Remember, a well-mixed marinade is key for consistently flavorful bulgogi throughout your stack.
- Next, I add the thinly sliced yellow onion to the marinade mixture. The onion slices will slowly release their natural sweetness into the liquid, contributing another layer of flavor. During cooking, these marinated onions will become incredibly tender and slightly caramelized, adding a delightful textural and flavor component to each bite of beef.
- Now, for the star: the beef! If your beef isn’t already thinly sliced (which I often request from my butcher as “bulgogi cut”), I have a little trick for you. Partially freezing the beef for about 30-45 minutes makes it much easier to slice against the grain into very thin, bite-sized pieces, roughly 1/8 to 1/4 inch thick. This thinness is absolutely crucial, not just for the beef to quickly absorb all the wonderful marinade flavors, but also for it to cook evenly and rapidly in the pan, ensuring tender results every time.
- Once the beef is perfectly sliced, I add it to the bowl with the prepared marinade and onions. Using my clean hands, I gently but thoroughly massage the marinade into the beef, making sure that every single piece is fully coated. This hands-on step is incredibly important for both tenderizing the beef fibers and infusing them deeply with all those incredible, complex Korean flavors we’ve built into the marinade. Don’t rush this part; it’s an investment in flavor!
- After the beef is fully coated, cover the bowl tightly with plastic wrap and refrigerate for at least 2 hours. However, for the absolute best flavor and unparalleled tenderness, I really, really encourage you to extend the marinating time. Aim for 4 hours, or even better, leave it overnight (up to 24 hours). The longer the beef has to steep in this glorious marinade, the more profoundly flavorful and exquisitely tender your bulgogi will be, setting the stage for an truly unforgettable “Korean Bbq Beef Rice Stack.” Patience here is truly a virtue!
Preparing the Seasoned Sushi Rice
- While our beef is busy soaking up all that delicious marinade, let’s prepare the foundation of our impressive “Korean Bbq Beef Rice Stack”: the perfectly seasoned sushi rice. Start by thoroughly rinsing your short-grain sushi rice. I place the measured rice in a fine-mesh sieve or a large bowl and rinse it meticulously under cold running water, swirling it with my hand until the water that drains away runs completely clear. This usually takes about 5-7 rinses and is an absolutely crucial step for removing excess starch. Skipping this can result in overly sticky, gummy rice, whereas proper rinsing yields perfectly fluffy, distinct rice grains that still possess enough natural stickiness to hold their shape beautifully for stacking.
- Once rinsed, drain the rice exceptionally well. Transfer the well-drained rice to a medium-sized pot that has a tight-fitting lid. Add precisely 2.5 cups of cold water. Bring the water to a full, rolling boil over medium-high heat. As soon as it reaches a boil, immediately reduce the heat to the absolute lowest setting, cover the pot tightly with its lid, and let the rice simmer undisturbed for precisely 15 minutes. It is imperative that you do not lift the lid during this cooking time! The steam trapped inside is essential for cooking the rice evenly and thoroughly.
- After the 15 minutes of simmering, remove the pot from the heat but keep the lid on tightly. Let the rice continue to steam off the heat for another 10 minutes. This crucial resting period allows the rice grains to fully absorb any remaining moisture and become wonderfully plump and fluffy, ready for seasoning.
- While the rice is steaming, let’s prepare the essential sushi vinegar mixture. In a small, microwave-safe bowl, combine the rice vinegar, granulated sugar, and salt. Microwave this mixture for about 30 seconds to 1 minute, or gently heat it on the stovetop over low heat, stirring continuously until the sugar and salt are completely dissolved into the vinegar. You want a clear liquid. Let it cool slightly, as pouring it scalding hot onto the rice isn’t ideal.
- Once the rice has finished its final steaming stage, carefully transfer it to a large, shallow non-metallic bowl or, if you’re feeling authentic, a traditional wooden hangiri. Pour the prepared sushi vinegar mixture evenly over the hot rice.
- Using a rice paddle or a flat wooden spoon, gently fold the vinegar mixture into the rice. I employ a specific technique: I use a cutting motion, slicing through the rice grains, and then gently folding them over. The goal here is to separate the individual grains and coat them evenly with the seasoning while simultaneously allowing the excess steam to escape. It’s important to be gentle and avoid mashing the rice, which can make it clumpy. Continue this gentle folding until the rice cools to approximately body temperature. For a truly professional finish and to speed up the cooling process while giving the rice a lovely sheen, you can fan the rice with a piece of cardboard or a hand fan as you mix. The perfectly seasoned and cooled rice is now ready to be shaped for the stunning layers of your “Korean Bbq Beef Rice Stack.”
Crafting the Quick Kimchi Slaw
- This quick kimchi slaw is a phenomenal addition to our “Korean Bbq Beef Rice Stack,” offering a fantastic crunchy texture and a zesty, subtly spicy, and wonderfully fermented kick that cuts through the richness of the beef. Plus, it’s incredibly simple and quick to prepare, adding a vibrant element to your meal. In a medium mixing bowl, combine the thinly sliced Napa cabbage and the beautifully julienned or shredded carrot. I find that using a mandoline slicer for the cabbage makes quick work of it, resulting in consistently thin, delicate strips that absorb the dressing perfectly.
- In a separate, small bowl, we’ll whisk together the dressing that brings this slaw to life. Combine the tangy kimchi juice – this is truly where the magic happens for that authentic fermented flavor – with the bright rice vinegar, aromatic sesame oil, granulated sugar, and a tiny pinch of salt. Whisk everything together until the sugar is fully dissolved and the dressing is well combined. Take a moment to taste it and adjust the seasoning if needed; you might find you want a little more sugar for balance if your kimchi juice is particularly sour, or a tiny bit more salt to bring out the flavors. The kimchi juice is definitely the star here, providing that distinct umami and subtle spice without needing actual kimchi pieces.
- Once your dressing is ready, pour it evenly over the prepared cabbage and carrots in the larger mixing bowl. Toss everything together thoroughly, making sure that every strand of cabbage and carrot is beautifully coated with the flavorful dressing. You’ll notice the colors brightening and the aroma becoming quite enticing.
- Cover the bowl with plastic wrap and refrigerate the slaw for at least 15-20 minutes before serving. This brief chilling period allows all the wonderful flavors to meld together beautifully and gives the cabbage just enough time to soften slightly, though it will still retain a delightful, crisp crunch. This vibrant, tangy, and refreshing slaw will provide a perfect contrast to the rich bulgogi and seasoned rice, making each bite of your “Korean Bbq Beef Rice Stack” truly dynamic.
Cooking the Korean BBQ Beef
- Now it’s time to bring our star ingredient for the “Korean Bbq Beef Rice Stack” to life – the beautifully marinated bulgogi! Heat a large, heavy-bottomed skillet or a cast-iron griddle over impressively high heat. Add just a tablespoon of vegetable oil (or your preferred cooking oil) to the hot pan. You want the pan to be very hot, almost smoking, to ensure you achieve a fantastic sear and that coveted caramelization on the beef, rather than merely steaming it.
- Once the oil is shimmering and just starting to smoke, carefully add a single layer of marinated beef to the pan. This is a critical step: do not overcrowd the pan! Cooking the beef in small batches is absolutely crucial for proper caramelization and a tender outcome. Overcrowding will drastically lower the pan’s temperature, causing the beef to release its juices and essentially steam instead of sear. This will result in less flavor development and a tougher texture, which we definitely want to avoid for our exquisite “Korean Bbq Beef Rice Stack.”
- Cook the beef for a very short duration, typically only 2-3 minutes per side, stirring frequently to ensure even cooking and browning. Since the slices are so thin, they cook incredibly quickly. I often look for those slightly crispy, wonderfully browned edges that are absolutely packed with concentrated flavor. The thinly sliced onions from the marinade will also soften and caramelize beautifully alongside the beef, adding another layer of sweet, savory goodness to each piece.
- Once a batch of beef is perfectly cooked, remove it promptly from the pan and transfer it to a clean bowl. Repeat this process with the remaining marinated beef, adding a tiny bit more oil to the pan if necessary for each subsequent batch to maintain that high heat and prevent sticking. This methodical approach ensures that every single piece of bulgogi is perfectly cooked, achieving that ideal balance of tenderness, flavor, and delightful caramelization, ready to be the savory centerpiece of your magnificent “Korean Bbq Beef Rice Stack.”
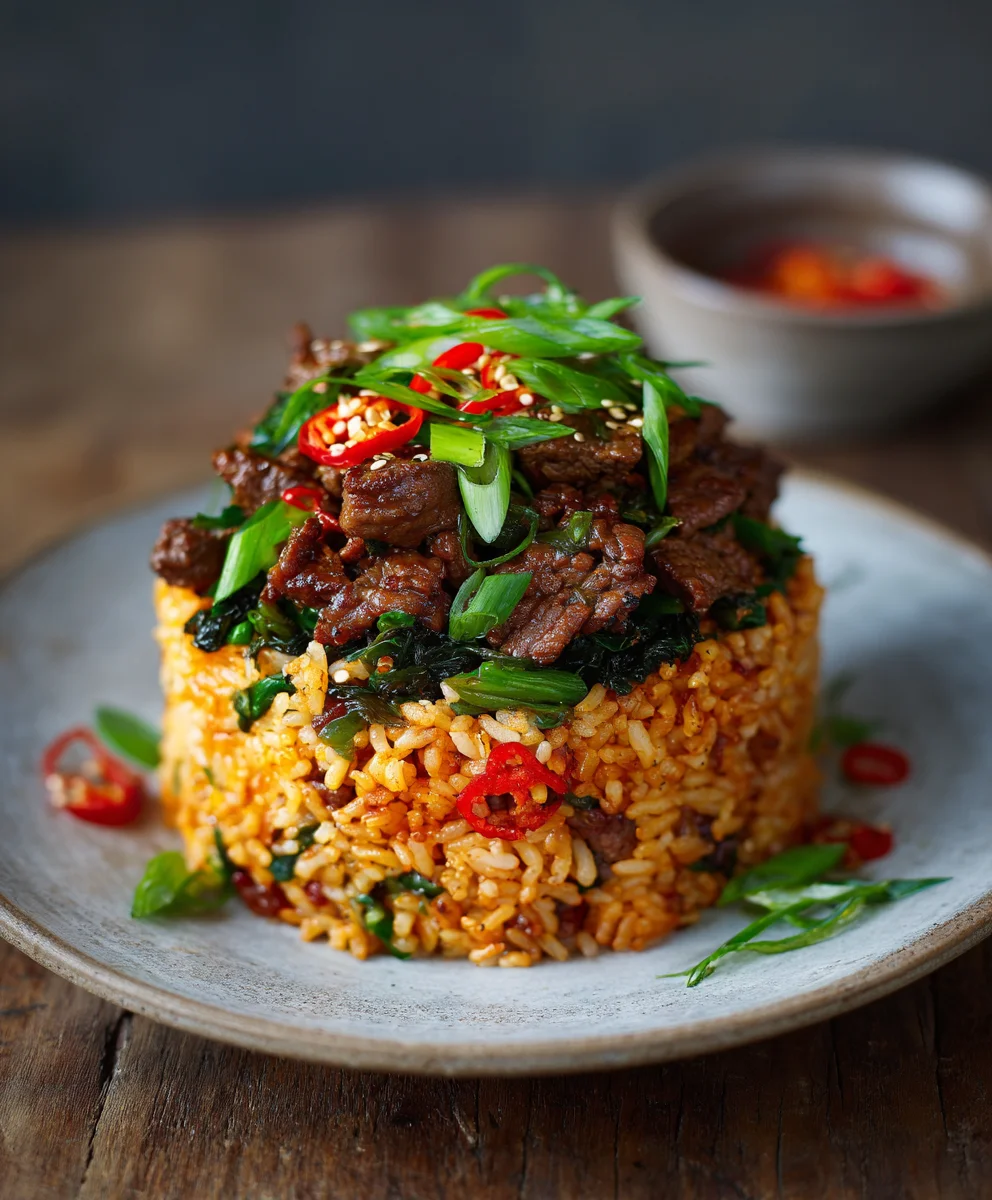
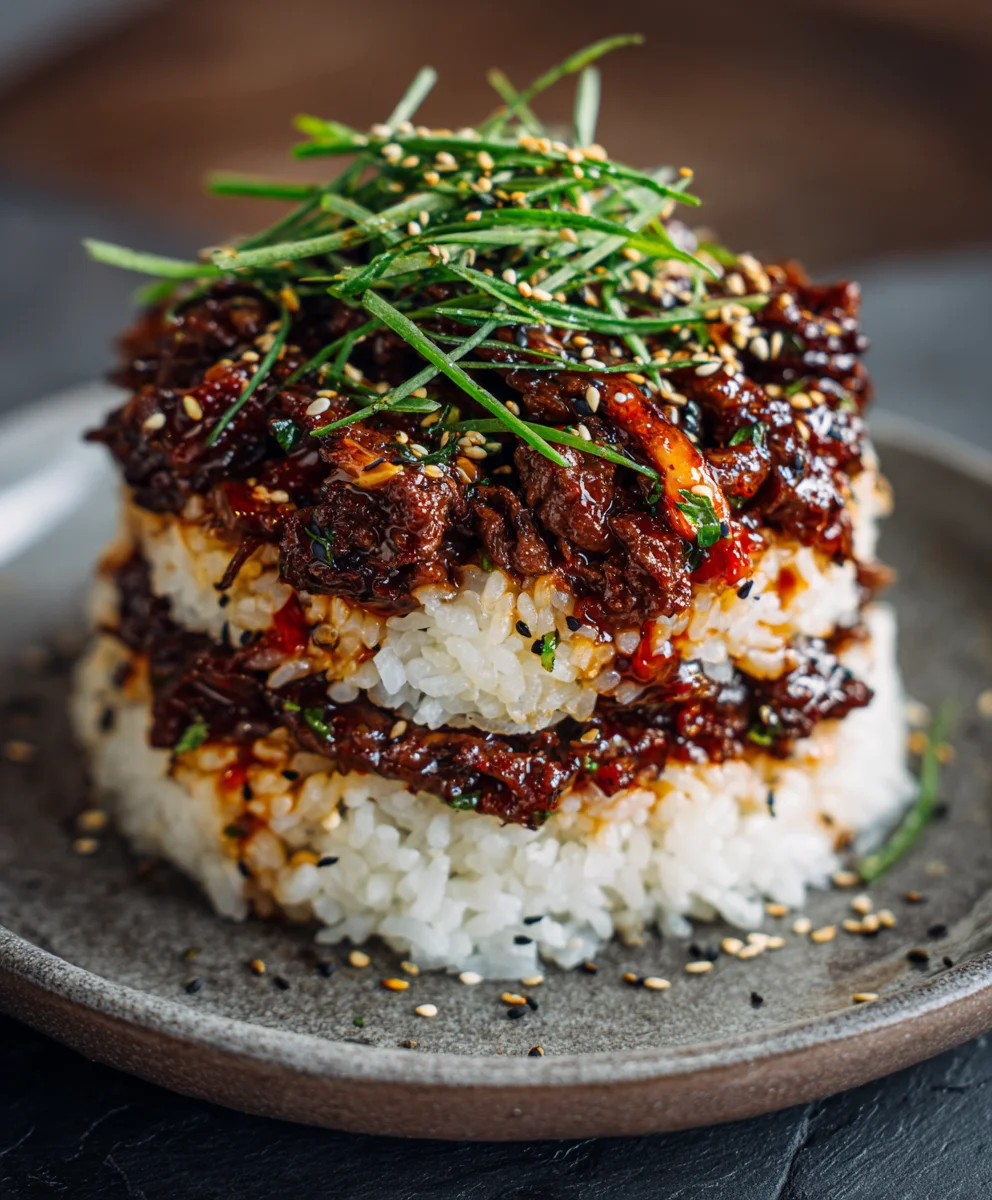
Assembling Your Korean Bbq Beef Rice Stack
- This is the exciting grand finale where all our hard work comes together in a stunning and incredibly delicious “Korean Bbq Beef Rice Stack”! To achieve that beautifully structured, restaurant-quality presentation, I highly recommend using a circular food ring mold. An ideal size is about 3-4 inches in diameter and 2-3 inches tall. If you don’t happen to have one, don’t despair! You can get creative with a clean, empty tuna can with both ends removed, or even try freehanding it. While freehanding will be less perfectly structured, it will still be just as delicious!
- First Layer: The Essential Rice Base. Begin by placing your chosen food ring mold squarely in the center of your individual serving plate. Take about 1/2 to 3/4 cup of your perfectly seasoned sushi rice and carefully spoon it into the very bottom of the mold. Using the back of a spoon or a rice paddle, gently but firmly press the rice down to create a compact, even, and sturdy layer. This forms the unshakeable foundation for your magnificent stack.
- Second Layer: The Vibrant Quick Kimchi Slaw. Next, delicately spoon about 1/4 to 1/3 cup of your quick kimchi slaw over the pressed rice layer. Spread it out evenly within the confines of the mold. The vibrant colors of the cabbage and carrot, along with the tantalizing tang and subtle spice of the slaw, will add both crucial visual appeal and a refreshing, crunchy counterpoint to the richness of the beef and rice.
- Third Layer: The Star – Korean BBQ Beef. Now, for the main event, the layer everyone is waiting for! Generously spoon a good portion of the freshly cooked Korean BBQ beef (bulgogi) over the slaw layer. I usually aim for about 1/2 to 3/4 cup of beef per stack. Make sure to distribute it evenly, ensuring you get some of those wonderfully delicious, slightly caramelized onions along with the beef. Again, press down gently with the back of your spoon or paddle to compact this layer, making sure the stack holds together.
- Optional Fourth Layer: The Indulgent Fried Egg. If you’re opting for the glorious addition of a fried egg, now’s the perfect time to prepare it. In a small non-stick skillet, heat a tiny bit of vegetable oil over medium heat. Crack an egg into the pan and cook it sunny-side up, or with a slightly runny yolk, for about 2-3 minutes, until the whites are just set but the yolk is still beautifully liquid and vibrant. Season the egg with a tiny pinch of salt and pepper. Gently, using a spatula, slide the perfectly fried egg directly on top of the beef layer within the mold. The promise of that eventually cascading, rich runny yolk is truly an incredibly luxurious experience for your “Korean Bbq Beef Rice Stack.”
- Final Touches and Unmolding. This is the moment of truth! Very carefully and with a steady hand, lift the food ring mold straight up and away from the stack. Take your time with this step to ensure the entire “Korean Bbq Beef Rice Stack” holds its magnificent shape. If it’s a little wobbly or a piece of beef decides to stray, you can gently reshape it with the side of a spoon or your clean fingertips. Don’t worry, even a slightly imperfect stack will still be bursting with flavor!
- Garnish and Serve. To crown your magnificent creation, generously sprinkle your “Korean Bbq Beef Rice Stack” with toasted sesame seeds for added crunch and visual appeal, and the remaining fresh chopped green onions for a final burst of freshness. If you like a little extra creamy kick, now is the time to artfully drizzle some sriracha mayo or a diluted gochujang sauce around the plate, or directly over the stack.
- Repeat this entire layering process for each individual serving you are preparing. Each carefully constructed stack is a complete, satisfying, and visually impressive meal, bursting with layers of authentic Korean flavors and delightful textures. Serve immediately and bask in the impressive presentation and incredible taste of your homemade “Korean Bbq Beef Rice Stack”! This is truly a dish that combines comforting, rich flavors with a gourmet, stunning presentation, perfect for any occasion.
Welcome to the grand finale of our culinary journey! I truly hope you’ve enjoyed discovering the nuances and simple joys of crafting this dish as much as I’ve enjoyed sharing it with you. As we wrap things up, I want to take a moment to underscore why this particular recipe isn’t just another meal, but a vibrant experience waiting to unfold in your kitchen.
Conclusion:
This isn’t merely a recipe; it’s an invitation to savor the rich tapestry of Korean flavors, presented in a uniquely satisfying and utterly delicious format. My goal was to create something that feels both exotic and approachable, a dish that will impress your dinner guests yet remain wonderfully simple to prepare on a busy weeknight. I wholeheartedly believe this recipe achieves just that, delivering an unparalleled combination of tender, marinated beef, perfectly cooked rice, and an array of fresh, vibrant toppings that come together in a symphony of taste and texture. The magic lies in the balance: the savory depth of the bulgogi, the subtle sweetness, the hint of garlic and sesame, all grounded by the comforting warmth of fluffy rice. Each bite is a journey, a harmonious blend of umami-rich meat, crisp vegetables, and the delightful chewiness of grains. It’s an interactive dish that encourages everyone at the table to build their perfect mouthful, fostering a communal and fun dining experience.
Why This Dish Is a Must-Try Culinary Adventure
You might be wondering what makes this dish so special, so essential for your culinary repertoire. Well, for starters, the preparation is surprisingly straightforward, especially considering the gourmet results. We’ve broken down each step into manageable, clear instructions, ensuring that even novice cooks can achieve a masterpiece. But beyond the ease, it’s the explosion of flavor that truly sets it apart. The marinade for the beef penetrates deeply, transforming humble slices into succulent, juicy morsels bursting with authentic Korean essence. When seared, these pieces develop a beautiful caramelization that adds another layer of irresistible taste and texture. Then there’s the aesthetic appeal; stacking ingredients not only makes for a fun and engaging eating experience but also creates a visually stunning presentation that is sure to draw oohs and aahs from anyone you serve it to. It’s the kind of meal that feels special without demanding hours of complex work, making it perfect for celebrating small victories or just elevating an ordinary Tuesday night.
Elevate Your Meal: Serving Suggestions and Creative Variations
Now, let’s talk about how you can truly make this recipe your own, enhancing it with your personal touch. While the base recipe is incredibly fulfilling on its own, I always encourage experimentation. For serving, consider laying out a variety of banchan, or Korean side dishes, alongside your stacks. Think crisp kimchi, sweet and sour pickled radish, or delicate seasoned spinach (sigeumchi namul). A side of fresh lettuce leaves, perilla leaves, or even thin rice paper wrappers allows guests to create their own mini wraps, adding a refreshing crunch to each bite. Don’t forget an extra drizzle of ssamjang or gochujang for those who love an extra kick!
If you’re feeling adventurous, here are some delightful variations:
- Protein Power-Ups: While beef is classic, feel free to substitute with thinly sliced pork belly, chicken thigh, or even firm tofu for a vegetarian option. Just adjust the marinating time accordingly.
- Veggie Visions: Beyond the suggested toppings, sautéed mushrooms, bell peppers, or even a quick blanch of asparagus can add wonderful color and nutrients. A sprinkle of toasted sesame seeds or a fried egg with a runny yolk on top can also elevate the experience.
- Rice Remix: Experiment with different types of rice – brown rice for a nuttier flavor and added fiber, or even a mix of white and wild rice for textural contrast.
- Sauce Sensations: Introduce a homemade sriracha mayo or a sesame-ginger vinaigrette to drizzle over the stack for an unexpected twist.
- Make it a Bowl: For a less formal, but equally delicious experience, simply layer all the components in a large bowl and enjoy it as a deconstructed bibimbap.
These variations not only keep things exciting but also allow you to tailor the dish to various dietary preferences and what you have on hand. The beauty of this recipe lies in its adaptability!
Your Turn: Try This Korean Bbq Beef Rice Stack and Share Your Journey!
I’ve shared my passion and my recipe, and now it’s your turn to bring this culinary delight to life! I sincerely hope you feel inspired and confident to whip up this magnificent dish in your own kitchen. There’s something truly magical about cooking for yourself, your family, or your friends, and seeing their faces light up with every delicious bite. This Korean Bbq Beef Rice Stack is more than just a meal; it’s an experience, a conversation starter, and a fantastic way to explore new flavors or revisit beloved ones.
So, gather your ingredients, put on some good music, and embark on this flavorful adventure. I’m genuinely excited for you to discover how simple it is to create something so incredibly satisfying and impressive. Once you’ve had a chance to try it, please come back and share your experience! Did you stick to the original recipe, or did you put your own unique spin on it? What were your favorite parts of the process, and, most importantly, how did it taste? Your feedback and shared stories are what make this culinary community so vibrant and inspiring. Don’t hesitate to leave a comment below or tag me on social media with your creations. I can’t wait to see your beautiful Korean Bbq Beef Rice Stack masterpieces and hear all about your delicious journey! Happy cooking, friends!
Korean BBQ Beef Rice Stack
An architectural marvel of flavor and texture, this Korean BBQ Beef Rice Stack transforms traditional bulgogi tastes into an elegant, easy-to-enjoy tower. Succulent, thinly sliced beef, marinated in soy sauce, sesame oil, garlic, and ginger, is layered with seasoned sushi rice and a vibrant kimchi slaw for a stunning and flavorful meal.
Ingredients
-
1.5 lbs (680g) thinly sliced beef (sirloin, ribeye, or short plate)
-
1/2 cup low-sodium soy sauce
-
1/4 cup non-alcoholic sweet rice seasoning (e.g., non-alcoholic mirin)
-
2 tablespoons sesame oil
-
2 tablespoons brown sugar, packed
-
1 tablespoon grated fresh ginger
-
4 cloves garlic, minced
-
1/2 medium yellow onion, thinly sliced
-
1/2 Asian pear or small apple, grated (optional)
-
1/4 teaspoon black pepper
-
2 green onions, chopped (for marinade & garnish)
-
2 cups short-grain sushi rice
-
2.5 cups water (for rice)
-
1/4 cup rice vinegar (for rice seasoning)
-
2 tablespoons granulated sugar (for rice seasoning)
-
1 teaspoon salt (for rice seasoning)
-
2 cups thinly sliced Napa cabbage
-
1 large carrot, julienned or shredded
-
2 tablespoons kimchi juice
-
1 tablespoon rice vinegar (for slaw)
-
1 teaspoon sesame oil (for slaw)
-
1 teaspoon granulated sugar (for slaw)
-
Pinch of salt (for slaw)
-
Toasted sesame seeds (for garnish)
-
Extra chopped green onions (for garnish)
-
Sriracha mayo or gochujang sauce (optional)
-
Fried eggs (1 per stack, optional)
-
Vegetable oil (for cooking)
Instructions
-
Step 1
Combine soy sauce, non-alcoholic sweet rice seasoning, sesame oil, brown sugar, ginger, garlic, black pepper, and half of the green onions in a bowl. Whisk until sugar dissolves. Add grated Asian pear/apple (if using). -
Step 2
Add thinly sliced yellow onion and beef to the marinade. Massage thoroughly. Cover and refrigerate for at least 2-4 hours, or preferably overnight (up to 24 hours), for best flavor and tenderness. -
Step 3
Rinse 2 cups short-grain sushi rice under cold water until clear (5-7 rinses); drain well. Combine rinsed rice and 2.5 cups water in a pot with a tight-fitting lid. Bring to a boil, then reduce heat to low, cover, and simmer for 15 minutes. Do not lift the lid. Remove from heat, keep lid on, and let steam for another 10 minutes. -
Step 4
While rice steams, combine 1/4 cup rice vinegar, 2 tbsp granulated sugar, and 1 tsp salt in a small bowl. Heat until dissolved; let cool slightly. Transfer cooked rice to a large non-metallic bowl. Pour sushi vinegar mixture over hot rice. Gently fold with a paddle/spoon to separate grains and cool to body temperature. -
Step 5
In a bowl, combine 2 cups thinly sliced Napa cabbage and 1 large julienned carrot. In a separate small bowl, whisk together 2 tbsp kimchi juice, 1 tbsp rice vinegar, 1 tsp sesame oil, 1 tsp granulated sugar, and a pinch of salt. Pour dressing over cabbage and carrots. Toss thoroughly. Cover and refrigerate for at least 15-20 minutes. -
Step 6
Heat a large, heavy-bottomed skillet over high heat with 1 tbsp vegetable oil until almost smoking. Add marinated beef in a single layer (do not overcrowd). Cook for 2-3 minutes per side, stirring frequently, until browned and caramelized. Remove cooked beef to a clean bowl. Repeat with remaining beef, adding more oil if needed. -
Step 7
Place a 3-4 inch circular food ring mold on an individual serving plate. Layer as follows: 1/2-3/4 cup seasoned sushi rice, pressed firmly; 1/4-1/3 cup kimchi slaw; 1/2-3/4 cup cooked Korean BBQ beef, pressed gently. If desired, fry an egg sunny-side up with a runny yolk and gently slide onto the beef layer within the mold. -
Step 8
Carefully lift the food ring mold straight up to unmold the stack. Garnish with toasted sesame seeds and remaining chopped green onions. Drizzle with sriracha mayo or gochujang sauce (optional). Repeat for each serving and serve immediately.
Important Information
Nutrition Facts (Per Serving)
It is important to consider this information as approximate and not to use it as definitive health advice.
Allergy Information
Please check ingredients for potential allergens and consult a health professional if in doubt.


Leave a Comment