
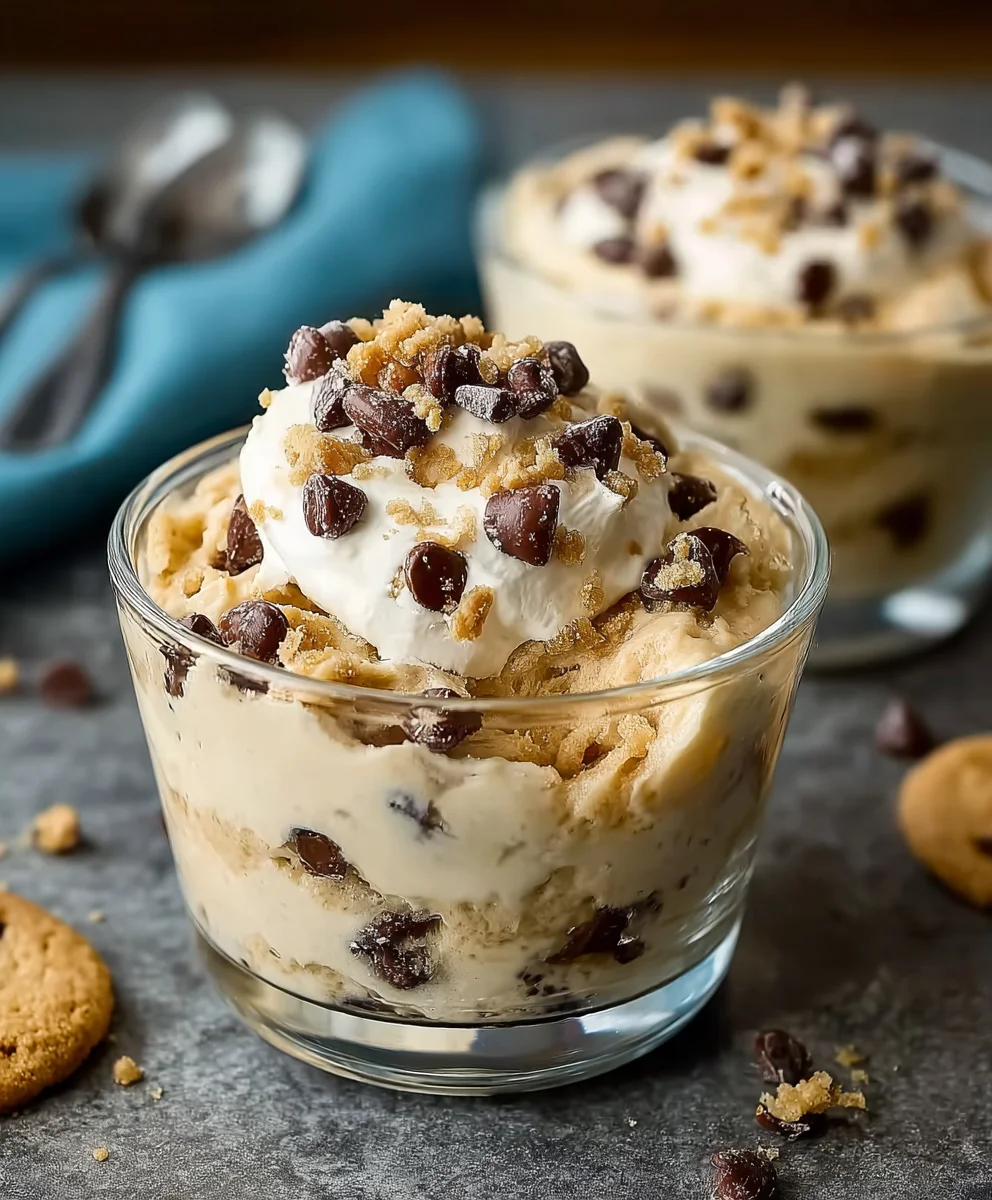
Cookie Dough Pudding is the dessert dreams are made of, a delightful fusion that brings together the irresistible allure of chocolate chip cookie dough and the creamy, dreamy comfort of smooth pudding. Who can resist that spoonful of pure bliss, bursting with the sweet chewiness of perfectly baked cookie dough chunks suspended in a luscious, velvety pudding base? It’s a treat that instantly transports us back to childhood kitchen adventures and the simple joy of sneaking a bite of raw dough, but with all the satisfying goodness of a perfectly composed dessert. What truly sets this Cookie Dough Pudding apart is its incredible versatility – it’s a blank canvas for your favorite cookie dough additions, from mini chocolate chips to chunks of your preferred candy bar. Get ready to indulge in a dessert experience that’s both nostalgic and utterly decadent.

Ingredients:
- 1/2 cup packed brown sugar
- 2 tablespoons cornstarch
- 1/4 teaspoon salt
- 2 cups whole milk
- 1 teaspoon vanilla extract
- 2 tablespoons unsalted butter
- 1-2 cups mini chocolate chips
- Small chocolate chip cookies for topping (optional)
Making the Cookie Dough Pudding Base
The foundation of our delicious Cookie Dough Pudding is a smooth, rich custard that perfectly mimics the texture of actual cookie dough. This process is straightforward but requires a bit of attention to detail to achieve the best results.
Step 1: Whisking Together the Dry Ingredients
In a medium-sized, heavy-bottomed saucepan, combine the packed brown sugar, cornstarch, and salt. It’s crucial to use a heavy-bottomed pan to prevent scorching and ensure even heating of the mixture. Take your whisk and thoroughly combine these dry ingredients. This initial whisking helps to break up any clumps in the brown sugar and distribute the cornstarch evenly. A well-mixed dry base is key to preventing lumps in your pudding later on. Spend a good minute or two making sure everything is uniform before proceeding to the next step.
Step 2: Gradually Incorporating the Milk
Now, it’s time to introduce the whole milk. Slowly pour about half a cup of the milk into the saucepan with the dry ingredients. Whisk continuously until you have a smooth, thick paste. This initial addition of milk and whisking is a vital step in tempering the cornstarch and sugar, making it easier to incorporate the remaining liquid without forming lumps. Once you have this smooth paste, gradually whisk in the remaining 1.5 cups of whole milk until everything is completely combined and you have a liquid mixture. Make sure there are no dry pockets of cornstarch or sugar clinging to the bottom or sides of the pan.
Step 3: Cooking the Pudding Until Thickened
Place the saucepan over medium heat. Stir constantly with a whisk or a heatproof spatula, ensuring you scrape the bottom and sides of the pan. This continuous stirring is essential to prevent the pudding from sticking or burning. You will notice the mixture starting to thicken as it heats up. Continue to cook and stir for about 8-10 minutes, or until the pudding has thickened to a consistency that coats the back of a spoon. It should be noticeably thicker than when you started, but not yet a solid mass. A good test is to draw a line with your finger through the pudding on the back of the spoon; the line should hold its shape for a few seconds. Be patient during this stage; overcooking can make it gummy, while undercooking will result in a runny pudding.
Step 4: Adding the Flavor and Richness
Once the pudding has reached the desired thickness, remove the saucepan from the heat. Stir in the vanilla extract and the unsalted butter. The butter will melt into the hot pudding, adding a wonderful richness and glossy sheen. Stir until the butter is completely incorporated and you have a smooth, velvety texture. This is where our pudding starts to take on its luxurious mouthfeel. The vanilla extract provides that classic comforting flavor that we all associate with baked goods.
Step 5: Incorporating the “Dough” Elements
Now comes the fun part – adding the chocolate chips! Gently fold in 1 to 2 cups of mini chocolate chips. The residual heat from the pudding will slightly soften them, creating delightful pockets of melted chocolate throughout, just like you’d find in real cookie dough. I like to use a generous amount, aiming for that perfect balance of pudding and chocolate. If you prefer a more subtle chocolate presence, you can start with 1 cup and add more to your liking. Stir them in until they are evenly distributed. This step transforms our cooked pudding into a true Cookie Dough Pudding experience.
Step 6: Chilling and Serving
Pour the Cookie Dough Pudding into individual serving dishes, or a larger bowl if you prefer. For the best texture and flavor, cover the surface of the pudding directly with plastic wrap. This prevents a skin from forming on top. Refrigerate for at least 2-3 hours, or until thoroughly chilled and set. This chilling time allows the flavors to meld and the pudding to firm up beautifully. Before serving, you can adorn your Cookie Dough Pudding with crumbled small chocolate chip cookies for an extra layer of texture and cookie flavor. This optional topping elevates the dessert from delicious to truly spectacular, making it feel like you’re enjoying a scoop of edible cookie dough.
Conclusion:
And there you have it – a delightful and surprisingly simple recipe for Cookie Dough Pudding that’s sure to be a crowd-pleaser! This dessert perfectly captures the irresistible flavor of cookie dough in a smooth, creamy, and utterly satisfying pudding form. It’s a fantastic treat for any occasion, from casual weeknight indulgence to special gatherings. I love serving this chilled, garnished with extra chocolate chips or a dollop of whipped cream. For a fun twist, try adding a swirl of caramel or a sprinkle of sea salt on top. Don’t be afraid to experiment with different kinds of chocolate chips – milk, dark, or even white chocolate all work beautifully. I truly hope you enjoy making and devouring this Cookie Dough Pudding as much as I do!
Frequently Asked Questions:
Can I make this Cookie Dough Pudding ahead of time?
Absolutely! Cookie Dough Pudding is an excellent make-ahead dessert. It needs at least 2-3 hours to chill and set properly, but it can be made up to 2 days in advance. The flavors will actually meld together even more, making it even more delicious. Just ensure it’s covered tightly to prevent any drying out or absorbing other fridge odors.
What can I use if I don’t have cookie dough bites?
If you can’t find pre-made cookie dough bites or prefer not to use them, you can easily make your own! You’ll want to use an edible cookie dough recipe that omits the egg. Simply mix together softened butter, brown sugar, granulated sugar, flour (heat-treated to make it safe), milk, vanilla extract, and your desired chocolate chips. Roll into small balls and freeze them for about 30 minutes before adding them to the pudding.
Irresistible Cookie Dough Pudding Recipe
A rich and creamy pudding with the delightful flavors and textures of cookie dough, studded with mini chocolate chips.
Ingredients
-
1/2 cup packed brown sugar
-
2 tablespoons cornstarch
-
1/4 teaspoon salt
-
2 cups whole milk
-
1 teaspoon vanilla extract
-
2 tablespoons unsalted butter
-
1-2 cups mini chocolate chips
-
Small chocolate chip cookies for topping (optional)
Instructions
-
Step 1
In a medium-sized, heavy-bottomed saucepan, combine the packed brown sugar, cornstarch, and salt. Whisk thoroughly to combine and break up any clumps. -
Step 2
Gradually whisk in about half a cup of whole milk to form a smooth, thick paste. Then, slowly whisk in the remaining 1.5 cups of milk until completely combined. -
Step 3
Cook over medium heat, stirring constantly with a whisk or spatula, for 8-10 minutes, or until the pudding has thickened to coat the back of a spoon. -
Step 4
Remove from heat and stir in the vanilla extract and unsalted butter until smooth and glossy. -
Step 5
Gently fold in 1 to 2 cups of mini chocolate chips until evenly distributed. -
Step 6
Pour into serving dishes, cover the surface with plastic wrap, and refrigerate for at least 2-3 hours until chilled and set. Top with crumbled cookies before serving, if desired.
Important Information
Nutrition Facts (Per Serving)
It is important to consider this information as approximate and not to use it as definitive health advice.
Allergy Information
Please check ingredients for potential allergens and consult a health professional if in doubt.
Leave a Comment