
Hibachi Fried Rice: Just the name conjures up images of sizzling grills, skilled chefs, and that unforgettable, savory aroma that fills the air. Have you ever wondered how to recreate that restaurant magic at home? Well, wonder no more! This recipe unlocks the secrets to crafting authentic Hibachi Fried Rice in your very own kitchen, delivering a taste of Japan without the need for a reservation.
Hibachi, meaning “fire bowl,” refers to a traditional Japanese heating device, but in the Western world, it’s become synonymous with a style of cooking where chefs prepare food on a large, flat griddle right before your eyes. While the theatrics are certainly part of the experience, the heart of Hibachi lies in the fresh ingredients and simple, yet flavorful, techniques. Fried rice, a staple in many Asian cuisines, takes on a special character when prepared Hibachi-style, absorbing the smoky essence of the grill and the umami-rich flavors of soy sauce and sesame oil.
People adore Hibachi Fried Rice for its delightful combination of textures and tastes. The fluffy rice, tender vegetables, and perfectly cooked protein (chicken, shrimp, or steak the choice is yours!) create a symphony of flavors that dance on your palate. It’s also incredibly convenient! This one-pan wonder is a complete meal, making it perfect for busy weeknights or a fun weekend cooking project. Get ready to impress your family and friends with this easy-to-follow recipe that will transport you to your favorite Hibachi restaurant, bite after delicious bite.
Ingredients:
- Cooked Rice: 6 cups, preferably day-old, long-grain rice (such as Jasmine or Basmati)
- Protein: 1 pound, your choice of protein (chicken, shrimp, steak, tofu), cut into bite-sized pieces
- Vegetables:
- 1 large onion, diced
- 2 carrots, diced
- 2 celery stalks, diced
- 1 red bell pepper, diced
- 1 green bell pepper, diced
- 1 cup frozen peas
- 1 cup frozen corn
- 4 cloves garlic, minced
- 1/2 cup green onions, chopped, for garnish
- Eggs: 2 large eggs, lightly beaten
- Soy Sauce: 1/4 cup, low sodium
- Sesame Oil: 2 tablespoons
- Vegetable Oil: 2 tablespoons
- Butter: 2 tablespoons, unsalted
- Mirin (Sweet Rice Wine): 2 tablespoons (optional, but highly recommended)
- Ginger: 1 tablespoon, freshly grated
- Garlic Powder: 1 teaspoon
- Onion Powder: 1 teaspoon
- Black Pepper: 1/2 teaspoon
- Salt: To taste
- Optional Garnishes: Sesame seeds, sriracha mayo, yum yum sauce
Preparing the Protein and Vegetables:
Before we even think about touching the rice, let’s get our protein and veggies prepped. This will make the whole cooking process much smoother and faster. Trust me, you don’t want to be scrambling to chop vegetables while your rice is burning!
- Prepare the Protein: If you’re using chicken, shrimp, steak, or tofu, make sure it’s cut into bite-sized pieces. This ensures even cooking and makes it easier to eat with the rice. For chicken or steak, I like to marinate it for at least 30 minutes (or even overnight!) in a mixture of soy sauce, a little sesame oil, and some grated ginger. This really amps up the flavor. If using shrimp, pat it dry with paper towels before cooking to get a nice sear. Tofu should be pressed to remove excess water.
- Dice the Vegetables: Dice the onion, carrots, celery, red bell pepper, and green bell pepper into small, uniform pieces. Consistency is key here, not just for aesthetics, but also for even cooking. Mince the garlic and grate the ginger. Set aside the frozen peas and corn; we’ll add those later.
Cooking the Protein and Eggs:
Now, let’s get some heat going! We’ll start by cooking the protein and then move on to the eggs. This is where the magic starts to happen.
- Cook the Protein: Heat 1 tablespoon of vegetable oil in a large skillet or wok over medium-high heat. Add the protein and cook until it’s cooked through. For chicken, this usually takes about 5-7 minutes. For shrimp, it’s only 2-3 minutes per side. Steak will depend on your desired level of doneness. Tofu should be browned on all sides. Once the protein is cooked, remove it from the skillet and set it aside. Don’t overcrowd the pan; cook in batches if necessary to ensure proper browning.
- Scramble the Eggs: Add the beaten eggs to the same skillet (no need to clean it!). Cook, stirring constantly, until the eggs are set but still slightly moist. Remove the eggs from the skillet and set them aside. I like to break the eggs into smaller pieces while they’re cooking, so they’re easier to incorporate into the rice later.
Cooking the Vegetables and Rice:
This is the heart of the hibachi fried rice! We’ll be sautéing the vegetables and then adding the rice to create that delicious, flavorful base.
- Sauté the Vegetables: Add the remaining 1 tablespoon of vegetable oil and the sesame oil to the skillet. Add the diced onion, carrots, and celery. Cook, stirring occasionally, until the vegetables are softened, about 5-7 minutes. Then, add the diced bell peppers and minced garlic. Cook for another 2-3 minutes, until the bell peppers are slightly tender and the garlic is fragrant. Be careful not to burn the garlic!
- Add the Rice: Add the cooked rice to the skillet. Break up any clumps of rice with a spatula. Stir-fry the rice with the vegetables for 2-3 minutes, until the rice is heated through. This is where day-old rice really shines; it’s drier and less likely to become mushy.
- Season the Rice: Pour the soy sauce and mirin (if using) over the rice. Stir-fry until the rice is evenly coated with the sauce. Add the garlic powder, onion powder, and black pepper. Season with salt to taste. Remember that soy sauce is already salty, so start with a small amount of salt and add more as needed.
- Incorporate the Protein and Eggs: Add the cooked protein and scrambled eggs back to the skillet. Stir-fry until everything is well combined and heated through.
- Add the Frozen Vegetables: Add the frozen peas and corn to the skillet. Stir-fry for another 1-2 minutes, until the peas and corn are heated through.
Finishing Touches and Serving:
Almost there! Now it’s time to add those final touches that will take your hibachi fried rice to the next level.
- Add Butter: This is my secret weapon! Add the butter to the skillet and stir-fry until it’s melted and evenly distributed throughout the rice. The butter adds a richness and depth of flavor that you just can’t get any other way.
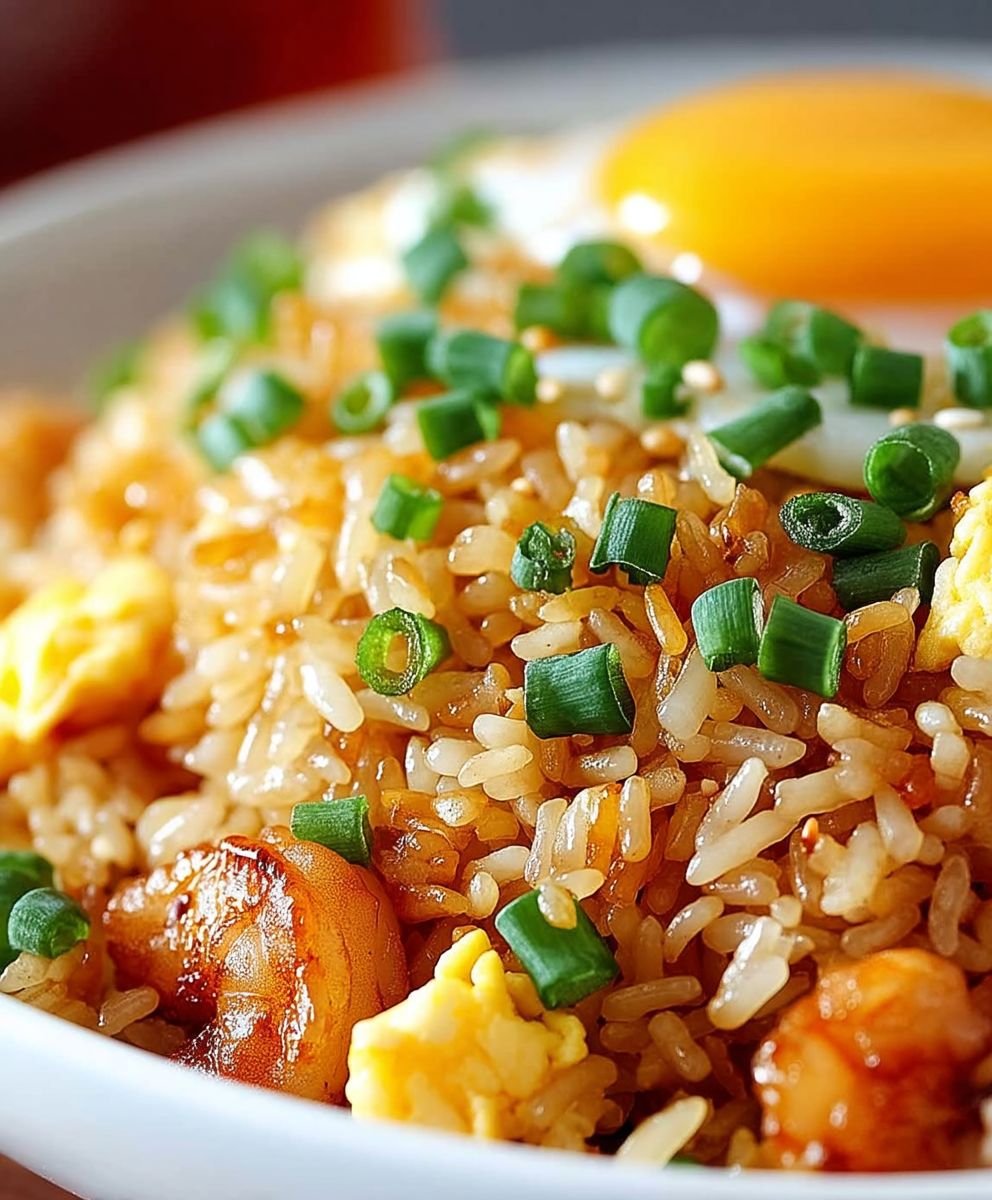
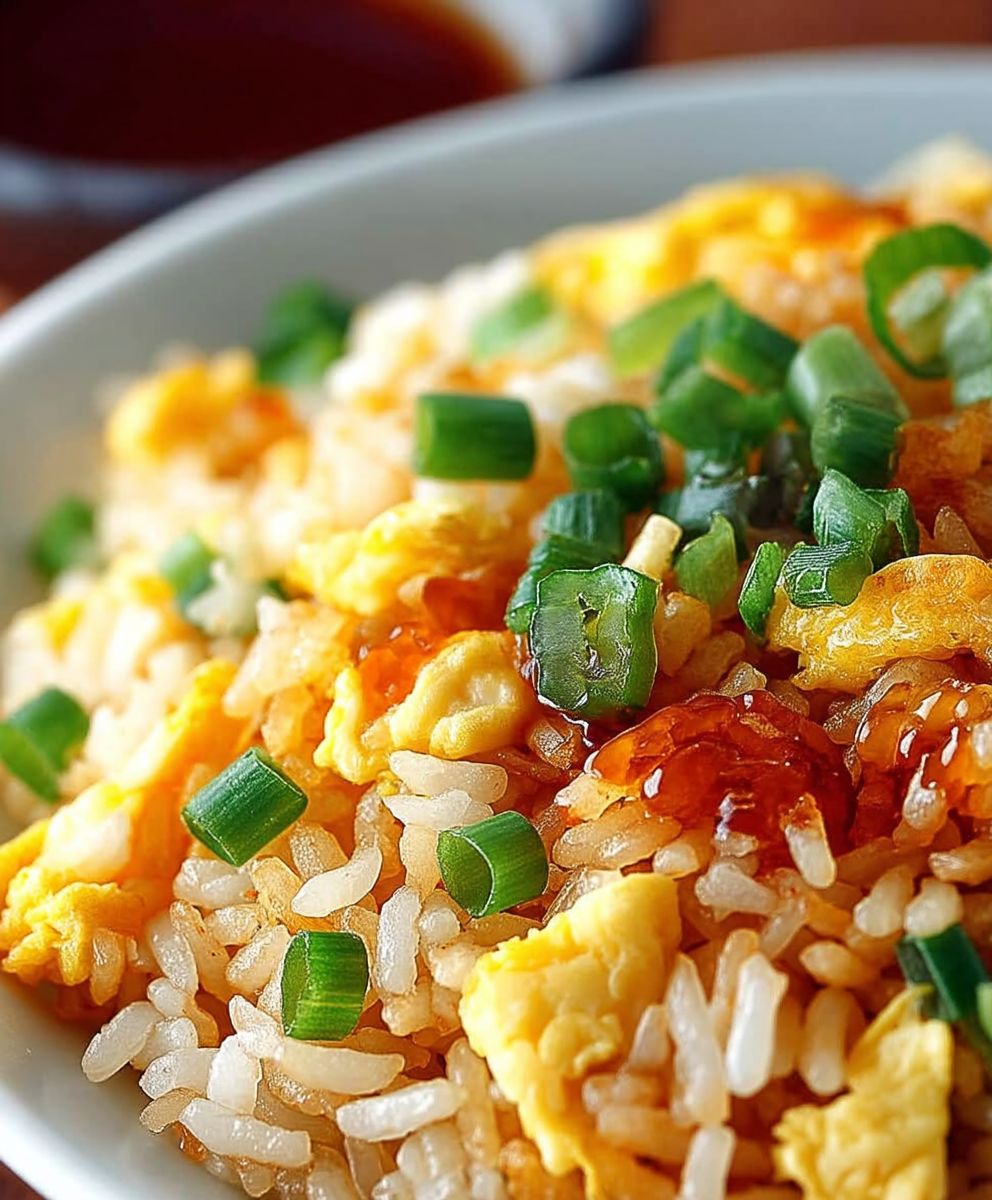
- Garnish and Serve: Garnish with chopped green onions and sesame seeds. Serve immediately. You can also drizzle with sriracha mayo or yum yum sauce for an extra kick.
Tips for Perfect Hibachi Fried Rice:
- Use Day-Old Rice: This is crucial! Freshly cooked rice is too moist and will result in mushy fried rice. Day-old rice has had time to dry out, making it perfect for stir-frying.
- Don’t Overcrowd the Pan: If you’re making a large batch of fried rice, it’s best to cook it in batches. Overcrowding the pan will lower the temperature and prevent the rice from browning properly.
- Use High Heat: Hibachi fried rice is best cooked over high heat. This will help to create that signature smoky flavor.
- Don’t Be Afraid to Experiment: Feel free to customize this recipe to your liking. Add different vegetables, proteins, or sauces. The possibilities are endless!
- Taste as You Go: Make sure to taste the rice as you’re cooking it and adjust the seasonings as needed.
Variations:
- Vegetarian Hibachi Fried Rice: Omit the protein and add more vegetables, such as mushrooms, broccoli, or zucchini. You can also add tofu for a protein boost.
- Seafood Hibachi Fried Rice: Use shrimp, scallops, or crab meat instead of chicken or steak.
- Spicy Hibachi Fried Rice: Add a pinch of red pepper flakes or a drizzle of sriracha to the rice.
- Pineapple Hibachi Fried Rice: Add diced pineapple to the rice for a sweet and tangy flavor.
Conclusion:
And there you have it! This Hibachi Fried Rice recipe isn’t just another weeknight dinner; it’s a flavor explosion that will transport you straight to your favorite Japanese steakhouse, all from the comfort of your own kitchen. I truly believe this is a must-try for anyone who loves delicious, satisfying, and relatively quick meals. The combination of perfectly cooked rice, tender vegetables, and that signature savory-sweet sauce is simply irresistible.
But why is this recipe so special? It’s the perfect balance of textures and tastes. The slightly crispy rice, the tender-crisp veggies, and the umami-rich sauce create a symphony of flavors in every bite. Plus, it’s incredibly versatile! You can easily adapt it to your own preferences and dietary needs.
Looking for serving suggestions? This Hibachi Fried Rice is fantastic on its own as a complete meal. However, it also pairs beautifully with grilled chicken, steak, or shrimp for a more substantial feast. For a vegetarian option, consider adding tofu or tempeh for extra protein. A side of edamame or a simple green salad would also complement the dish perfectly.
Now, let’s talk variations! Feel free to experiment with different vegetables. Bell peppers, zucchini, and mushrooms are all excellent additions. If you like a little heat, add a pinch of red pepper flakes or a dash of sriracha to the sauce. For a richer flavor, try using sesame oil instead of vegetable oil. And if you’re feeling adventurous, you can even add a fried egg on top for a truly decadent experience.
Don’t be afraid to get creative and make this recipe your own! The beauty of cooking is that there are no hard and fast rules. So, go ahead and experiment with different ingredients and techniques until you find what works best for you.
I know that sometimes cooking can seem daunting, but trust me, this recipe is incredibly easy to follow. Even if you’re a beginner in the kitchen, you’ll be able to whip up a batch of delicious Hibachi Fried Rice in no time. The key is to have all your ingredients prepped and ready to go before you start cooking. This will ensure that everything cooks evenly and that you don’t overcook anything.
I’m so confident that you’ll love this recipe that I urge you to try it out as soon as possible. Gather your ingredients, put on some music, and get ready to create a culinary masterpiece.
Once you’ve made it, I would absolutely love to hear about your experience! Did you make any modifications? What did you serve it with? What did your family and friends think? Share your photos and stories in the comments below. Your feedback is invaluable and helps me to continue creating recipes that you’ll love.
So, what are you waiting for? Go ahead and give this Hibachi Fried Rice recipe a try. I promise you won’t be disappointed. Happy cooking! I can’t wait to hear all about your culinary adventures. Let me know if you have any questions, and I’ll do my best to answer them. Enjoy!
Hibachi Fried Rice: The Ultimate Guide to Making it at Home
Delicious, customizable Hibachi Fried Rice made at home with day-old rice, your favorite protein, and fresh vegetables for a flavorful meal.
Ingredients
- 6 cups cooked rice, preferably day-old, long-grain (Jasmine or Basmati)
- 1 pound protein (chicken, shrimp, steak, tofu), cut into bite-sized pieces
- 1 large onion, diced
- 2 carrots, diced
- 2 celery stalks, diced
- 1 red bell pepper, diced
- 1 green bell pepper, diced
- 1 cup frozen peas
- 1 cup frozen corn
- 4 cloves garlic, minced
- 1/2 cup green onions, chopped, for garnish
- 2 large eggs, lightly beaten
- 1/4 cup low sodium soy sauce
- 2 tablespoons sesame oil
- 2 tablespoons vegetable oil
- 2 tablespoons unsalted butter
- 2 tablespoons mirin (sweet rice wine, optional)
- 1 tablespoon freshly grated ginger
- 1 teaspoon garlic powder
- 1 teaspoon onion powder
- 1/2 teaspoon black pepper
- Salt to taste
Instructions
- Prepare the Protein: If using chicken, steak, or tofu, marinate for at least 30 minutes in a mixture of soy sauce, sesame oil, and grated ginger. Pat shrimp dry. Press tofu to remove excess water.
- Dice the Vegetables: Dice the onion, carrots, celery, red bell pepper, and green bell pepper into small, uniform pieces. Mince the garlic and grate the ginger. Set aside the frozen peas and corn.
- Cook the Protein: Heat 1 tablespoon of vegetable oil in a large skillet or wok over medium-high heat. Add the protein and cook until cooked through (5-7 minutes for chicken, 2-3 minutes per side for shrimp, adjust for steak doneness, brown tofu on all sides). Remove from skillet and set aside. Cook in batches if necessary.
- Scramble the Eggs: Add the beaten eggs to the same skillet. Cook, stirring constantly, until set but slightly moist. Remove from skillet and set aside, breaking into smaller pieces.
- Sauté the Vegetables: Add the remaining 1 tablespoon of vegetable oil and the sesame oil to the skillet. Add the diced onion, carrots, and celery. Cook, stirring occasionally, until softened, about 5-7 minutes. Add the diced bell peppers and minced garlic. Cook for another 2-3 minutes, until the bell peppers are slightly tender and the garlic is fragrant.
- Add the Rice: Add the cooked rice to the skillet. Break up any clumps of rice with a spatula. Stir-fry the rice with the vegetables for 2-3 minutes, until the rice is heated through.
- Season the Rice: Pour the soy sauce and mirin (if using) over the rice. Stir-fry until the rice is evenly coated with the sauce. Add the garlic powder, onion powder, and black pepper. Season with salt to taste.
- Incorporate the Protein and Eggs: Add the cooked protein and scrambled eggs back to the skillet. Stir-fry until everything is well combined and heated through.
- Add the Frozen Vegetables: Add the frozen peas and corn to the skillet. Stir-fry for another 1-2 minutes, until the peas and corn are heated through.
- Add Butter: Add the butter to the skillet and stir-fry until it’s melted and evenly distributed throughout the rice.
- Garnish and Serve: Garnish with chopped green onions and sesame seeds. Serve immediately. Drizzle with sriracha mayo or yum yum sauce, if desired.
Notes
- Use day-old rice for best results.
- Don’t overcrowd the pan; cook in batches if necessary.
- Use high heat for a smoky flavor.
- Customize the recipe with your favorite vegetables, proteins, or sauces.
- Taste as you go and adjust seasonings as needed.

Leave a Comment