
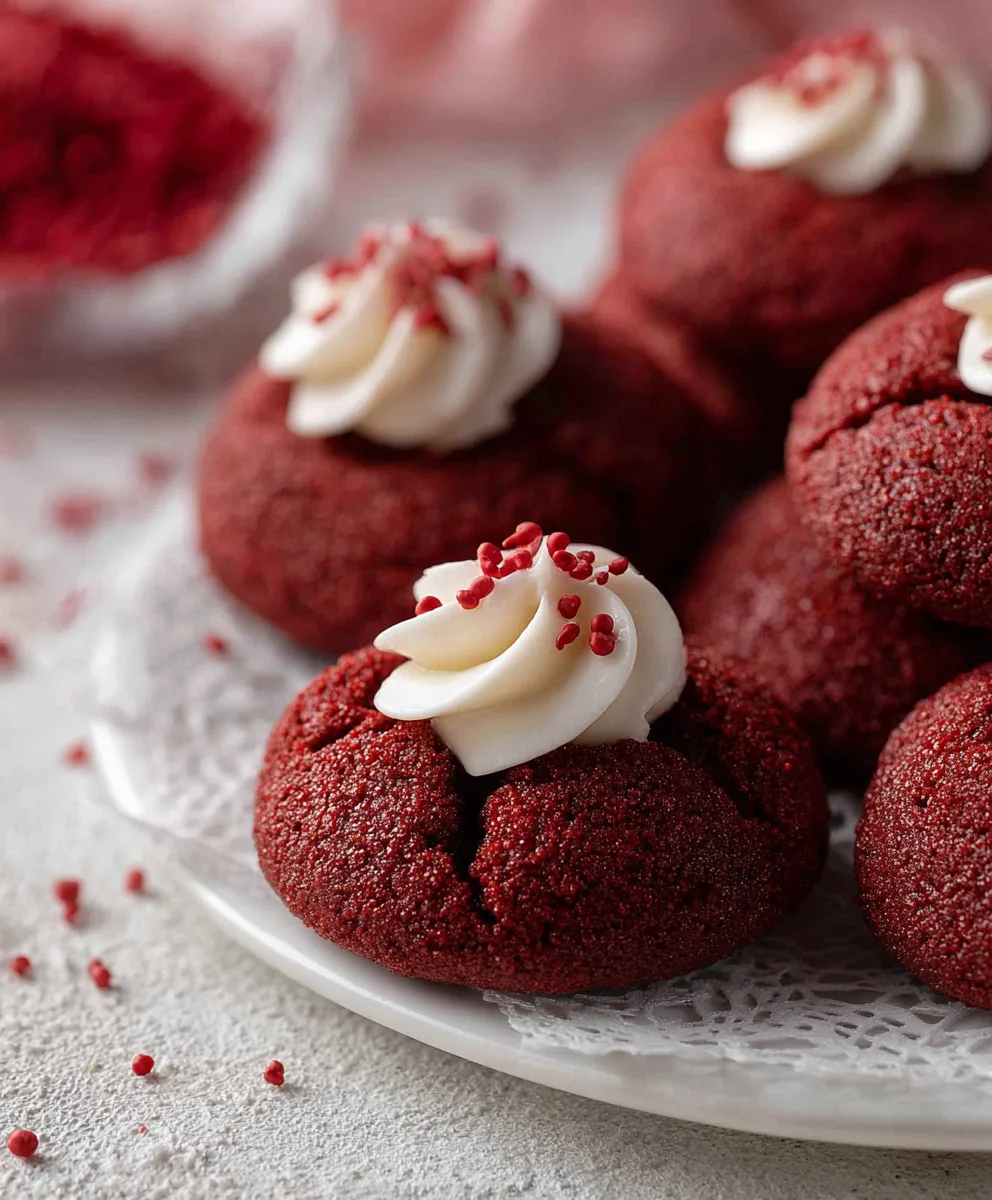
Hershey’s red velvet blossoms are more than just a cookie; they’re a little bite of festive magic, a ruby-red jewel in any dessert spread. If you’ve ever found yourself drawn to the vibrant color and the promise of a rich, chocolatey hug, you’re not alone. These cookies have a way of capturing hearts, whether it’s their striking appearance or their perfectly balanced sweet and slightly tangy flavor. What truly sets Hershey’s red velvet blossoms apart is the ingenious combination of a tender, moist red velvet cookie dough with the irresistible burst of a Hershey’s Kiss nestled right in the center. It’s that delightful surprise, the warm, melted chocolate peeking through the crimson cookie, that makes them so utterly craveable. We’re diving into a recipe that will help you recreate this iconic treat, ensuring every blossom is as beautiful and delicious as the last.
Ingredients:
- 7 tablespoons butter (salted or unsalted, softened)
- 1/2 cup packed brown sugar
- 2 tablespoons granulated sugar
- 1 teaspoon vanilla extract
- 1 large egg yolk
- 1/4 teaspoon red food coloring gel
- 1 cup all-purpose flour
- 1 tablespoon unsweetened cocoa powder
- 1/2 teaspoon baking powder
- 1/4 teaspoon salt
- 1/4 cup red sanding sugar
- 18 Hershey’s chocolate kisses
Preparing the Red Velvet Dough
Step 1: Creaming the Butter and Sugars
Start by preheating your oven to 350 degrees Fahrenheit (175 degrees Celsius). Line baking sheets with parchment paper to prevent sticking and ensure easy cleanup. In a large mixing bowl, combine the softened butter with the packed brown sugar and granulated sugar. Using an electric mixer on medium speed, cream these ingredients together until they are light and fluffy, and the mixture is well combined. This process usually takes about 2 to 3 minutes. Creaming effectively incorporates air into the dough, which contributes to the final texture of your Hershey’s red velvet blossoms. If you don’t have an electric mixer, you can achieve this with a sturdy whisk and some elbow grease, though it will take a bit longer.
Step 2: Incorporating Wet Ingredients and Color
Next, add the vanilla extract and the large egg yolk to the creamed butter and sugar mixture. Beat on medium speed again until everything is thoroughly blended. Now comes the vibrant part! Add the red food coloring gel. Gel coloring is preferred over liquid as it imparts a more intense color without adding excess moisture, which can alter the dough’s consistency. Start with the ¼ teaspoon, mix well, and then add a tiny bit more if you desire a deeper red hue, being careful not to overdo it. The dough should take on a beautiful, uniform red color. Ensure the food coloring is fully incorporated for an even appearance in your finished cookies.
Step 3: Combining Dry Ingredients
In a separate medium bowl, whisk together the all-purpose flour, unsweetened cocoa powder, baking powder, and salt. Whisking the dry ingredients together ensures that the leavening agent (baking powder) and salt are evenly distributed throughout the flour. This is crucial for consistent baking and flavor. The cocoa powder, even though it’s a small amount, contributes to the characteristic flavor profile of red velvet and balances the sweetness.
Forming and Baking the Blossoms
Step 4: Combining Wet and Dry Mixtures and Forming Dough Balls
Gradually add the dry ingredients to the wet ingredients in the large mixing bowl. Mix on low speed, or gently by hand with a spatula, just until the flour is incorporated and no dry streaks remain. Be careful not to overmix the dough at this stage; overmixing can develop the gluten in the flour, leading to tough cookies. Once the dough comes together, it will be quite thick and pliable. Scoop out rounded tablespoons of dough and roll them into smooth balls, about 1 inch in diameter. Place these dough balls onto your prepared baking sheets, leaving about 2 inches of space between each one to allow for spreading.
Step 5: The Hershey’s Kiss Embossment and Baking
Before baking, gently press one Hershey’s chocolate kiss into the center of each dough ball, pushing it down slightly so it’s nestled in. The chocolate will melt and spread during baking, creating the characteristic “blossom” effect. Now, bake in your preheated oven for 9 to 12 minutes, or until the edges of the cookies are set but the centers still look slightly soft. The baking time can vary depending on your oven, so keep a close eye on them. You want the cookies to be cooked through but still tender.
Step 6: Rolling in Sanding Sugar and Cooling
While the cookies are still warm, but not piping hot, carefully remove them from the baking sheet and immediately roll them in the red sanding sugar. The warmth of the cookies will help the sanding sugar adhere beautifully. If you wait too long, the sugar won’t stick as well. Be generous with the sanding sugar to achieve a festive sparkle. Place the coated cookies back onto the parchment-lined baking sheets or a wire rack to cool completely. The residual heat will continue to melt the chocolate kiss, allowing it to spread and create that iconic blossom shape as the cookies cool. Allow them to cool fully before attempting to move them too much, as they will be quite delicate when warm.

Conclusion:
You’ve done it! You’ve successfully baked a batch of delightful Hershey’s red velvet blossoms. These festive cookies are a beautiful blend of rich chocolate flavor and a hint of tangy sweetness, all topped with that iconic kiss. They’re perfect for any occasion, from holiday gatherings to a simple afternoon treat. I hope you enjoyed the process and are savoring every delicious bite! Don’t be afraid to get creative with them. They are wonderful served alongside a cold glass of milk, a steaming mug of coffee, or even as a sweet end to a meal with a scoop of vanilla ice cream. Remember, baking is all about experimentation, so feel free to explore different variations. Perhaps add a sprinkle of white chocolate chips to the dough for an extra layer of sweetness, or try using a different kind of kiss on top! Whatever you decide, I encourage you to share these Hershey’s red velvet blossoms with loved ones – they’re guaranteed to bring smiles.
Frequently Asked Questions:
Can I make Hershey’s red velvet blossoms ahead of time?
Absolutely! These cookies store exceptionally well. Once completely cooled, you can store them in an airtight container at room temperature for up to 3-4 days. For longer storage, they can be frozen for up to 2 months. Simply thaw them at room temperature before serving.
My red velvet blossoms aren’t a vibrant red. What did I do wrong?
The vibrancy of the red can sometimes depend on the specific food coloring you use. Ensure you’re using a gel-based red food coloring for the most intense color. Sometimes, the reaction of the cocoa powder with the leavening agents can slightly mute the red. Don’t worry too much, though, as even a softer red hue still results in a delicious cookie!
Hershey’s Red Velvet Blossoms Delightful Cookies
A delightful twist on classic blossoms, these red velvet cookies feature a vibrant color and are topped with a melted Hershey’s Kiss for a beautiful, festive treat.
Ingredients
-
7 tablespoons butter (salted or unsalted, softened)
-
1/2 cup packed brown sugar
-
2 tablespoons granulated sugar
-
1 teaspoon vanilla extract
-
1 large egg yolk
-
1/4 teaspoon red food coloring gel
-
1 cup all-purpose flour
-
1 tablespoon unsweetened cocoa powder
-
1/2 teaspoon baking powder
-
1/4 teaspoon salt
-
1/4 cup red sanding sugar
-
18 Hershey’s chocolate kisses
Instructions
-
Step 1
Preheat oven to 350°F (175°C). Line baking sheets with parchment paper. In a large bowl, cream together softened butter, brown sugar, and granulated sugar until light and fluffy (2-3 minutes). -
Step 2
Beat in vanilla extract and egg yolk until well blended. Add red food coloring gel and mix until a uniform red color is achieved. -
Step 3
In a separate bowl, whisk together flour, cocoa powder, baking powder, and salt. -
Step 4
Gradually add dry ingredients to wet ingredients, mixing on low speed or by hand until just combined. Do not overmix. Scoop rounded tablespoons of dough and roll into 1-inch balls. Place on prepared baking sheets, leaving 2 inches between cookies. -
Step 5
Gently press one Hershey’s chocolate kiss into the center of each dough ball. Bake for 9-12 minutes, or until edges are set and centers are slightly soft. -
Step 6
While cookies are still warm, roll them in red sanding sugar. Let cool completely on baking sheets or a wire rack. The residual heat will melt the kisses, creating the blossom effect.
Important Information
Nutrition Facts (Per Serving)
It is important to consider this information as approximate and not to use it as definitive health advice.
Allergy Information
Please check ingredients for potential allergens and consult a health professional if in doubt.


Leave a Comment