
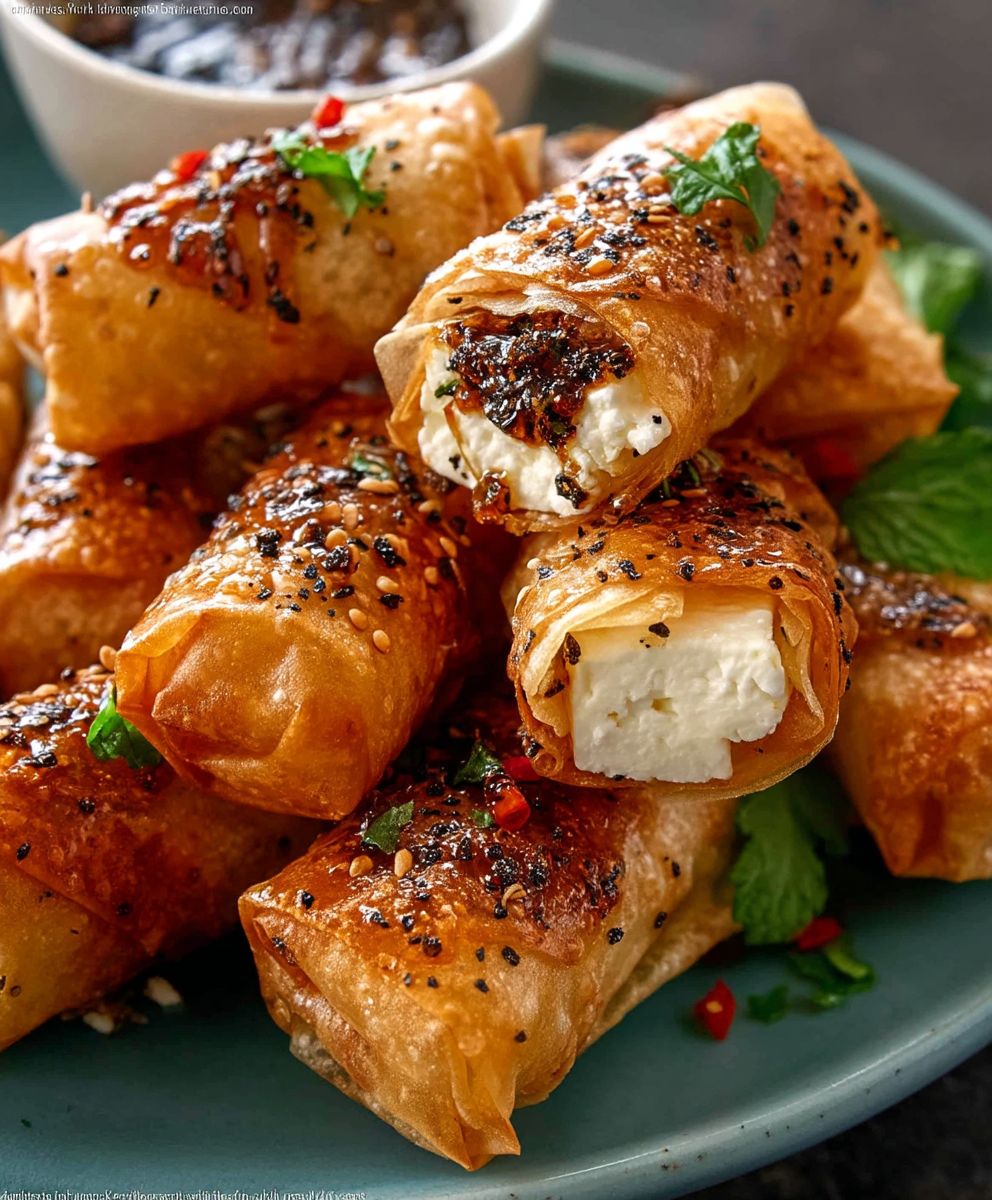
Fried Feta Rolls: Prepare to be utterly captivated by these golden, crispy delights! Imagine biting into a warm, flaky pastry, only to be greeted by an explosion of creamy, tangy feta cheese. It’s an experience that transcends simple snacking and elevates it to a culinary adventure.
While the exact origins of fried feta rolls are debated, similar cheese-filled pastries have been enjoyed throughout the Mediterranean and Balkan regions for centuries. Think of the Greek Tiropita, or the savory pastries found in Turkish cuisine. These dishes share a common thread: the irresistible combination of salty cheese and perfectly crisp dough. They represent a tradition of simple, satisfying comfort food, often enjoyed during festive gatherings or as a quick and delicious meal.
What makes these rolls so universally loved? It’s the symphony of textures and flavors. The satisfying crunch of the fried exterior gives way to the soft, melted feta within. The saltiness of the cheese is perfectly balanced by the subtle sweetness of the pastry. Plus, they’re incredibly easy to make! Whether you’re a seasoned chef or a kitchen novice, you can whip up a batch of these addictive treats in no time. Get ready to experience the magic of fried feta rolls your taste buds will thank you!
Ingredients:
- For the Feta Filling:
- 200g (7 ounces) Feta cheese, preferably Greek, drained well
- 100g (3.5 ounces) Cream cheese, softened
- 2 tablespoons Fresh dill, finely chopped
- 1 tablespoon Fresh mint, finely chopped
- 1 clove Garlic, minced
- 1/4 teaspoon Black pepper, freshly ground
- 1 tablespoon Olive oil (optional, for extra creaminess)
- For the Rolls:
- 10 sheets Filo pastry (phyllo dough), thawed according to package instructions
- 100g (3.5 ounces) Unsalted butter, melted
- 2 tablespoons Sesame seeds, for sprinkling
- 2 tablespoons Nigella seeds (optional), for sprinkling
- For Frying:
- Vegetable oil, for deep frying (approximately 2-3 cups, depending on your pot)
- Optional Garnishes:
- Honey, for drizzling
- Fresh parsley, chopped
- Lemon wedges, for serving
Preparing the Feta Filling
Okay, let’s get started with the heart of our fried feta rolls the delicious filling! This is where we’ll combine the salty feta with creamy goodness and fresh herbs. Trust me, this mixture is so good, you might want to eat it straight from the bowl (but resist the urge!).
- Crumble the Feta: In a medium-sized bowl, crumble the feta cheese. You want it to be in small pieces, but don’t worry about making it perfectly smooth. A little texture is nice.
- Soften the Cream Cheese: Make sure your cream cheese is softened to room temperature. This will make it much easier to mix with the feta. If you forgot to take it out of the fridge ahead of time, you can microwave it for a few seconds (literally, just a few!) until it’s soft.
- Combine the Cheeses: Add the softened cream cheese to the bowl with the crumbled feta.
- Add the Herbs and Garlic: Now, toss in the finely chopped fresh dill and mint. The freshness of these herbs really brightens up the flavor of the filling. Don’t skip them! Add the minced garlic as well. Make sure the garlic is finely minced so you don’t get any overpowering bites.
- Season with Pepper: Season the mixture with black pepper. I like to use freshly ground pepper for the best flavor. You probably won’t need any salt, as the feta is already quite salty. Taste the mixture and adjust if needed.
- Mix Well: Using a fork or a spoon, mix all the ingredients together until they are well combined. If you want a smoother filling, you can use an electric mixer on low speed. I personally prefer a little bit of texture, so I usually just use a fork.
- Add Olive Oil (Optional): If you want an even creamier filling, you can add a tablespoon of olive oil. This is totally optional, but it does add a nice richness.
- Taste and Adjust: Give the filling a taste and adjust the seasonings as needed. Maybe you want a little more dill, or a touch more pepper. This is your chance to make it perfect!
- Refrigerate (Optional): While not strictly necessary, refrigerating the filling for about 30 minutes can help it firm up slightly, making it easier to work with when you’re rolling the feta rolls.
Preparing the Filo Pastry
Working with filo pastry can be a little intimidating at first, but don’t worry, it’s not as difficult as it looks! The key is to keep it from drying out. Here’s how to handle it like a pro:
- Thaw the Filo Pastry: Make sure your filo pastry is completely thawed according to the package instructions. This usually involves leaving it in the refrigerator overnight. Don’t try to rush the thawing process, as this can make the pastry brittle and difficult to work with.
- Prepare Your Work Surface: Clear a large, flat work surface. This is important because you’ll need plenty of space to lay out the filo sheets.
- Melt the Butter: Melt the unsalted butter in a small saucepan or in the microwave. You’ll be using this to brush the filo sheets, which will help them become golden brown and crispy when fried.
- Keep the Filo Covered: This is the most important tip! Filo pastry dries out very quickly, so you need to keep it covered with a damp (not wet!) kitchen towel while you’re working with it. Only take out one sheet at a time.
Assembling the Feta Rolls
Now for the fun part rolling up those delicious feta rolls! This is where all your hard work comes together.
- Lay Out the First Sheet: Take one sheet of filo pastry from the package and carefully lay it out on your prepared work surface. Make sure to cover the remaining filo sheets with the damp towel.
- Brush with Butter: Using a pastry brush, lightly brush the entire surface of the filo sheet with melted butter. Don’t overdo it, just a thin layer is enough.
- Add the Second Sheet: Place a second sheet of filo pastry on top of the first buttered sheet.
- Brush with Butter Again: Brush the second sheet with melted butter as well.
- Add the Feta Filling: Spoon about 2 tablespoons of the feta filling along one of the short edges of the filo pastry, leaving about an inch of space at the edges.
- Fold in the Sides: Fold in the sides of the filo pastry over the filling to prevent it from leaking out during frying.
- Roll Up Tightly: Starting from the edge with the filling, tightly roll up the filo pastry like a cigar.
- Repeat: Repeat steps 1-7 with the remaining filo pastry and feta filling. You should end up with about 5 feta rolls.
- Cut the Rolls: Using a sharp knife, cut each roll into 2-inch pieces.
- Prepare for Frying: Place the cut feta rolls on a plate or baking sheet lined with parchment paper.
Frying the Feta Rolls
Time to get those rolls golden brown and crispy! Frying is quick, so keep a close eye on them.
- Heat the Oil: Pour enough vegetable oil into a deep pot or fryer to reach a depth of about 2-3 inches. Heat the oil over medium-high heat until it reaches a temperature of 350°F (175°C). You can use a deep-fry thermometer to check the temperature. If you don’t have a thermometer, you can test the oil by dropping a small piece of filo pastry into it. If it sizzles and turns golden brown in about 30 seconds, the oil is ready.
- Fry in Batches: Carefully add the feta rolls to the hot oil in batches, being careful not to overcrowd the pot. Overcrowding will lower the oil temperature and result in soggy rolls.
- Fry Until Golden Brown: Fry the feta rolls for about 2-3 minutes per side, or until they are golden brown and crispy.
- Remove and Drain: Using a slotted spoon or tongs, carefully remove the fried feta rolls from the oil and place them on a plate lined with paper towels to drain off any excess oil.
Serving the Fried Feta Rolls
These fried feta rolls are best served immediately while they’re still hot and crispy. Here are some serving suggestions:
- Sprinkle with Seeds: While the feta rolls are still hot, sprinkle them with sesame seeds and nigella seeds (if using). The seeds will adhere better to the warm rolls.
- Drizzle with Honey: A drizzle of honey adds a touch of sweetness that complements the salty feta perfectly.
- Garnish with Parsley: Sprinkle with fresh chopped parsley for a pop of color and freshness.
- Serve with Lemon Wedges: Serve with lemon wedges for squeezing over the rolls. The lemon juice adds a bright, acidic flavor that cuts through the richness of the cheese.
- Enjoy! Serve immediately and enjoy the crispy, cheesy goodness! These are perfect as an appetizer, snack, or even a light meal.

Conclusion:
And there you have it! These Fried Feta Rolls are more than just a snack; they’re a flavor explosion waiting to happen. I truly believe this recipe is a must-try for anyone looking to elevate their appetizer game or simply indulge in a little cheesy goodness. The combination of the salty feta, the crispy, golden-brown exterior, and that hint of honey sweetness is simply irresistible. It’s a surprisingly easy recipe to master, and the results are guaranteed to impress your friends and family.
But why is this recipe a must-try, you ask? Well, beyond the incredible taste, it’s incredibly versatile. Think about it: you can serve these as a delightful appetizer at your next dinner party, a satisfying snack on a cozy night in, or even as a unique addition to a brunch spread. They’re also surprisingly quick to prepare, making them perfect for those moments when you need a delicious dish in a hurry. Forget boring cheese and crackers; these Fried Feta Rolls are the new star of the show!
Now, let’s talk serving suggestions and variations. I personally love serving these warm with a drizzle of honey and a sprinkle of sesame seeds. The honey complements the saltiness of the feta perfectly, while the sesame seeds add a delightful crunch. But don’t be afraid to get creative! You could try serving them with a side of fig jam for a more sophisticated flavor profile, or a spicy chili sauce for those who like a little kick.
For variations, consider adding a sprinkle of dried oregano or thyme to the feta mixture for an extra layer of herbaceous flavor. You could also experiment with different types of cheese. While feta is the star of the show here, you could try adding a little ricotta or goat cheese for a creamier texture. Another fun variation is to wrap the feta in phyllo dough instead of spring roll wrappers for an even more delicate and flaky crust. The possibilities are endless!
I’ve poured my heart into perfecting this recipe, and I’m confident that you’ll love it as much as I do. It’s a simple yet elegant dish that’s sure to become a new favorite in your household. The key to truly amazing Fried Feta Rolls is to use high-quality feta cheese and to not overcrowd the pan when frying. This will ensure that the rolls cook evenly and become perfectly golden brown.
So, what are you waiting for? Gather your ingredients, roll up your sleeves, and get ready to experience the magic of these incredible Fried Feta Rolls. I promise you won’t be disappointed.
And most importantly, I want to hear about your experience! Did you try the recipe? Did you make any variations? What did your friends and family think? Share your photos and stories in the comments below. I can’t wait to see your creations and hear about your culinary adventures. Happy cooking! I am sure you will find that this recipe for Fried Feta Rolls will become a staple in your recipe book.
Fried Feta Rolls: The Ultimate Crispy & Cheesy Recipe
Crispy, golden-brown fried feta rolls filled with a creamy, herby feta and cream cheese mixture. A delicious appetizer or snack!
Ingredients
- 200g (7 ounces) Feta cheese, preferably Greek, drained well
- 100g (3.5 ounces) Cream cheese, softened
- 2 tablespoons Fresh dill, finely chopped
- 1 tablespoon Fresh mint, finely chopped
- 1 clove Garlic, minced
- 1/4 teaspoon Black pepper, freshly ground
- 1 tablespoon Olive oil (optional, for extra creaminess)
- 10 sheets Filo pastry (phyllo dough), thawed according to package instructions
- 100g (3.5 ounces) Unsalted butter, melted
- 2 tablespoons Sesame seeds, for sprinkling
- 2 tablespoons Nigella seeds (optional), for sprinkling
- Vegetable oil, for deep frying (approximately 2-3 cups, depending on your pot)
- Honey, for drizzling
- Fresh parsley, chopped
- Lemon wedges, for serving
Instructions
- Prepare the Feta Filling: In a medium bowl, crumble the feta cheese. Add the softened cream cheese, dill, mint, garlic, and pepper. Mix well until combined. Add olive oil for extra creaminess, if desired. Taste and adjust seasonings. Refrigerate for 30 minutes for easier handling (optional).
- Prepare the Filo Pastry: Ensure filo pastry is completely thawed. Clear a large work surface. Melt the butter. Keep the filo pastry covered with a damp kitchen towel while working.
- Assemble the Feta Rolls: Lay one sheet of filo pastry on the work surface. Brush with melted butter. Top with a second sheet of filo pastry and brush with melted butter.
- Spoon about 2 tablespoons of the feta filling along one of the short edges of the filo pastry, leaving about an inch of space at the edges.
- Fold in the sides of the filo pastry over the filling to prevent it from leaking out during frying.
- Starting from the edge with the filling, tightly roll up the filo pastry like a cigar.
- Repeat steps 3-6 with the remaining filo pastry and feta filling. You should end up with about 5 feta rolls.
- Using a sharp knife, cut each roll into 2-inch pieces.
- Place the cut feta rolls on a plate or baking sheet lined with parchment paper.
- Fry the Feta Rolls: Heat vegetable oil in a deep pot or fryer to 350°F (175°C).
- Carefully add the feta rolls to the hot oil in batches, being careful not to overcrowd the pot.
- Fry for 2-3 minutes per side, or until golden brown and crispy.
- Remove with a slotted spoon and drain on paper towels.
- Serve: Sprinkle with sesame seeds and nigella seeds (if using). Drizzle with honey, garnish with parsley, and serve with lemon wedges. Serve immediately.
Notes
- Keep filo pastry covered with a damp towel to prevent it from drying out.
- Don’t overcrowd the pot when frying to maintain oil temperature.
- Serve immediately for the best crispy texture.
- The feta filling can be made ahead of time and refrigerated.


Leave a Comment