
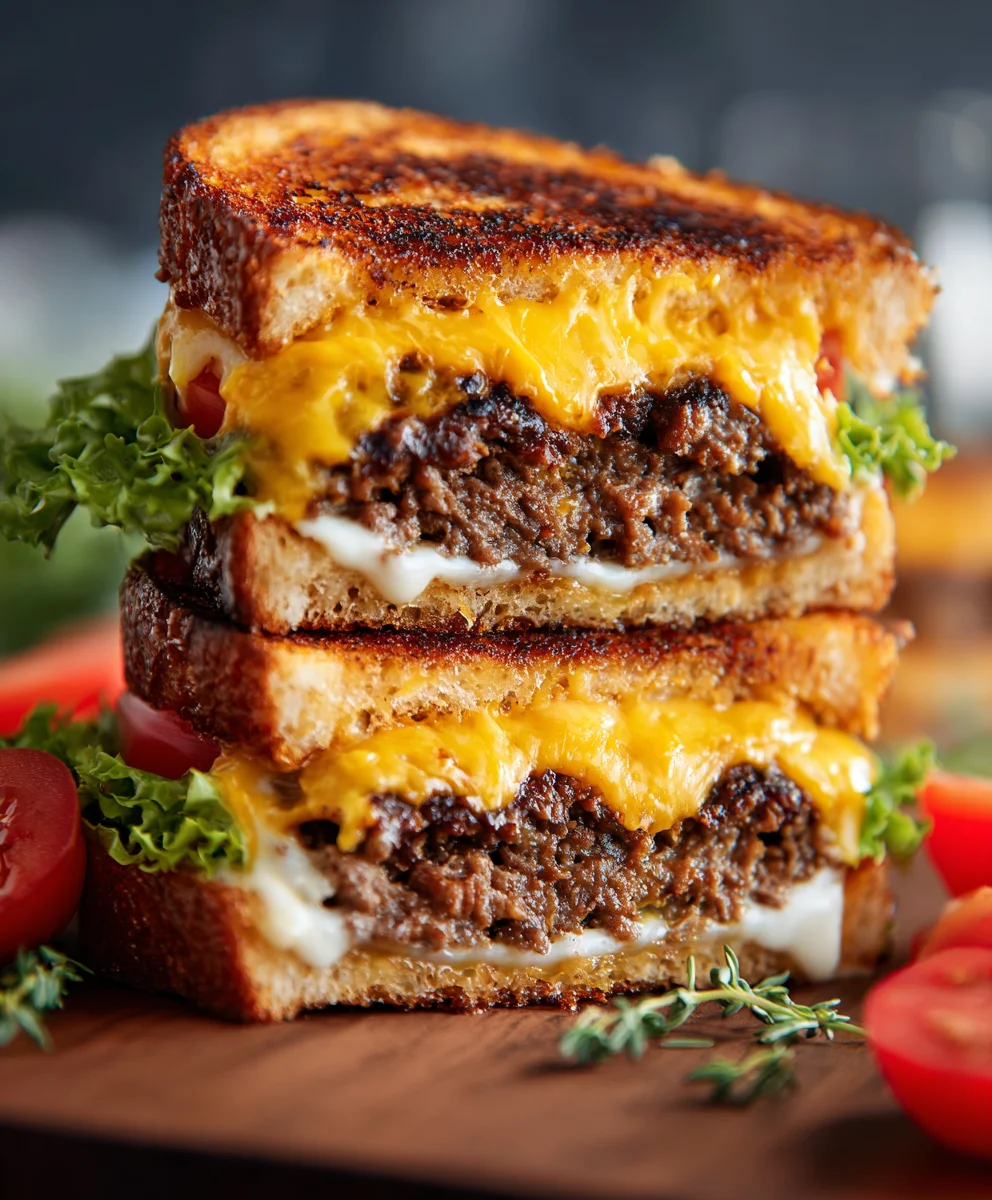
Smash Burger Grilled Cheese – just hearing those words evokes a symphony of comfort food desires, doesn’t it? As an avid home cook and a fervent admirer of culinary innovation, I’ve always believed that the most satisfying dishes are often born from daring combinations of familiar favorites. What if I told you there’s a dish that perfectly encapsulates the crispy, buttery delight of a classic grilled cheese sandwich and the irresistible, savory juiciness of a perfectly seared smash burger, all in one glorious package?
An Unforgettable Fusion of Flavor and Texture
This isn’t just a sandwich; it’s a testament to the boundless creativity that can elevate everyday ingredients into something truly extraordinary. While the exact genesis of the “Smash Burger Grilled Cheese” might be a modern culinary marvel, it stands firmly on the shoulders of two American titans. The grilled cheese, a timeless staple, has warmed hearts for generations, offering simple yet profound satisfaction. The smash burger, with its intensely flavorful, caramelized crust, has captured the imagination of burger enthusiasts worldwide, turning simple ground beef into an art form.
When these two beloved concepts unite, the result is an unparalleled textural and flavor experience – a crispy exterior giving way to melty cheese and a tender, seasoned patty that simply bursts with umami. People adore this innovative creation because it delivers maximum flavor with incredible convenience, transforming a casual meal into an unforgettable indulgence. I’m absolutely thrilled to share how you can master this incredible “Smash Burger Grilled Cheese” and bring this ultimate comfort food fusion to your own kitchen.
Ingredients:
Creating the ultimate Smash Burger Grilled Cheese requires a few key components, each playing a vital role in achieving that perfect symphony of crispy, cheesy, and savory flavors. Here’s everything you’ll need to assemble this magnificent creation:
- For the Smash Burger Patties:
- 1 pound (450g) 80/20 ground beef, preferably chilled (chilling helps with forming and smashing)
- 1 teaspoon kosher salt, or to taste
- ½ teaspoon black pepper, freshly ground, or to taste
- ¼ teaspoon garlic powder (optional, but highly recommended for depth)
- Pinch of cayenne pepper (optional, for a subtle kick)
- 1 tablespoon neutral oil (like canola, vegetable, or grapeseed oil) for the griddle/pan
- For the Grilled Cheese:
- 8 slices of your favorite sturdy sandwich bread (brioche, sourdough, or thick-cut white bread works wonderfully)
- 4-6 tablespoons unsalted butter, softened, divided (you’ll need more if you’re generous)
- 8 slices American cheese (the classic melter, don’t skimp!)
- 4 slices sharp cheddar cheese, or your preferred melty cheese like Monterey Jack or provolone (for added flavor complexity)
- Optional Add-ins & Condiments:
- Caramelized onions (a fantastic sweet and savory addition)
- Pickles (dill slices add a lovely tang)
- Your favorite burger sauce (such as a Thousand Island style dressing, or simple ketchup and mustard)
- Lettuce and tomato (for freshness, though some purists might argue against it in a grilled cheese)
For the Smash Burger Patties:
The heart of our Smash Burger Grilled Cheese lies in perfectly cooked, ultra-flavorful smash burger patties. This technique ensures a beautifully caramelized crust and juicy interior, which is essential for standing up to the rich grilled cheese.
- Prepare the Ground Beef: First, ensure your ground beef is well-chilled. This makes it much easier to handle and prevents it from sticking to your hands. Divide the 1 pound of 80/20 ground beef into 4 equal portions, each weighing approximately 4 ounces (about 115g). Gently form each portion into a loose, spherical ball. Do not overwork the meat! Overworking can lead to tough, dense burgers. We want tender, juicy patties, so handle them as little as possible. Just enough to shape them into a loose ball is perfect.
- Seasoning the Beef: In a small bowl, combine the kosher salt, black pepper, and optional garlic powder and cayenne pepper. Sprinkle this seasoning mixture generously over all sides of your loosely formed beef balls. You can do this just before cooking, or let them sit seasoned for about 10-15 minutes at room temperature while your griddle heats up. The salt will start to penetrate the meat, enhancing its flavor.
- Heat the Griddle or Pan: Place a heavy-bottomed cast iron skillet or a flat-top griddle over high heat. It’s crucial to get this surface screaming hot for an authentic smash burger crust. Let it preheat for at least 5-7 minutes until it’s smoking slightly. Add about 1 tablespoon of neutral oil to the hot surface and swirl to coat, or use a paper towel to spread a thin, even layer. You want just enough oil to prevent sticking and aid in crust development, but not so much that the burgers fry.
- The Smash: Carefully place two of the seasoned beef balls onto the very hot oiled surface, ensuring they have ample space between them. Immediately, using a sturdy metal spatula (preferably one with a flat edge) and a second, heavier object (like another smaller skillet, a brick wrapped in foil, or even your free hand pressing down firmly on the spatula), firmly press each beef ball down to a thickness of about ¼ to ⅛ inch. You want to create a wide, thin patty with craggy, irregular edges. Apply significant pressure for a full 10-15 seconds to ensure maximum contact with the hot surface. This is where the magic of the “smash” happens, creating that incredible Maillard reaction and a deeply flavorful crust.
- Cook the First Side: Allow the smashed patties to cook undisturbed for about 2-3 minutes. During this time, you’ll see the edges become crispy and dark brown, and the juices will start to bubble up through the top. This is a sign of that beautiful crust forming.
- Flip and Finish: Once a rich brown crust has formed, use your sturdy spatula to scrape underneath the patty, carefully detaching it from the griddle, making sure to preserve that crust. Flip the patties over. Immediately place one slice of American cheese on top of each patty. Continue to cook for another 1-2 minutes on the second side, or until the cheese is beautifully melted and slightly draped over the edges, and the burger is cooked through to your desired doneness. For smash burgers, this is typically medium to well-done due to their thinness.
- Rest the Patties: Transfer the cooked patties with their melted cheese to a plate. Cover them loosely with foil to keep them warm while you repeat the process with the remaining two beef balls and prepare the grilled cheese. This brief rest also allows the juices to redistribute, ensuring maximum flavor and tenderness.
Building the Ultimate Grilled Cheese:
Now that our incredible smash burger patties are ready, it’s time to construct the cheesy, golden vessel that will elevate our burger into a full-fledged Smash Burger Grilled Cheese masterpiece. The secret here is butter, good bread, and a mix of cheeses for optimal melt and flavor.
- Prepare the Bread: Take your 8 slices of sturdy sandwich bread. Ensure your butter is softened to room temperature; this makes it much easier to spread evenly without tearing the bread. Generously butter one side of each slice of bread, right to the edges. Don’t be shy with the butter; it’s key to achieving that deep golden-brown, crispy exterior. You can use about 1-1.5 tablespoons of butter per sandwich (on the outside pieces).
- Layer the Cheese (Pre-Cook One Side): For each sandwich, lay two slices of bread, butter-side down, onto a clean surface. On one of these slices (the “bottom” slice of your grilled cheese), place two slices of American cheese, covering the entire surface. On the second slice of bread (which will be the “top” slice), place one slice of sharp cheddar or your preferred melty cheese. This two-cheese approach adds complexity and ensures a super-melty interior.
- Pre-Toast the Grilled Cheese Halves: Return your griddle or large non-stick pan to medium-low heat. It’s crucial to use a lower heat for grilled cheese than for smash burgers to allow the bread to toast evenly and the cheese to melt fully without burning the bread. Place the two bread slices for one sandwich, butter-side up, onto the griddle. One slice will have American cheese, the other will have cheddar. Cook for 2-3 minutes, or until the bottom is lightly golden and the cheese is just starting to soften. This pre-toasting step helps ensure a uniform melt and a solid foundation for the burger.
Assembling and Cooking the Smash Burger Grilled Cheese:
This is where everything comes together! The combination of the crispy smash burger and the gooey grilled cheese will create a truly unforgettable eating experience. Pay close attention to temperature and timing for the perfect finish.
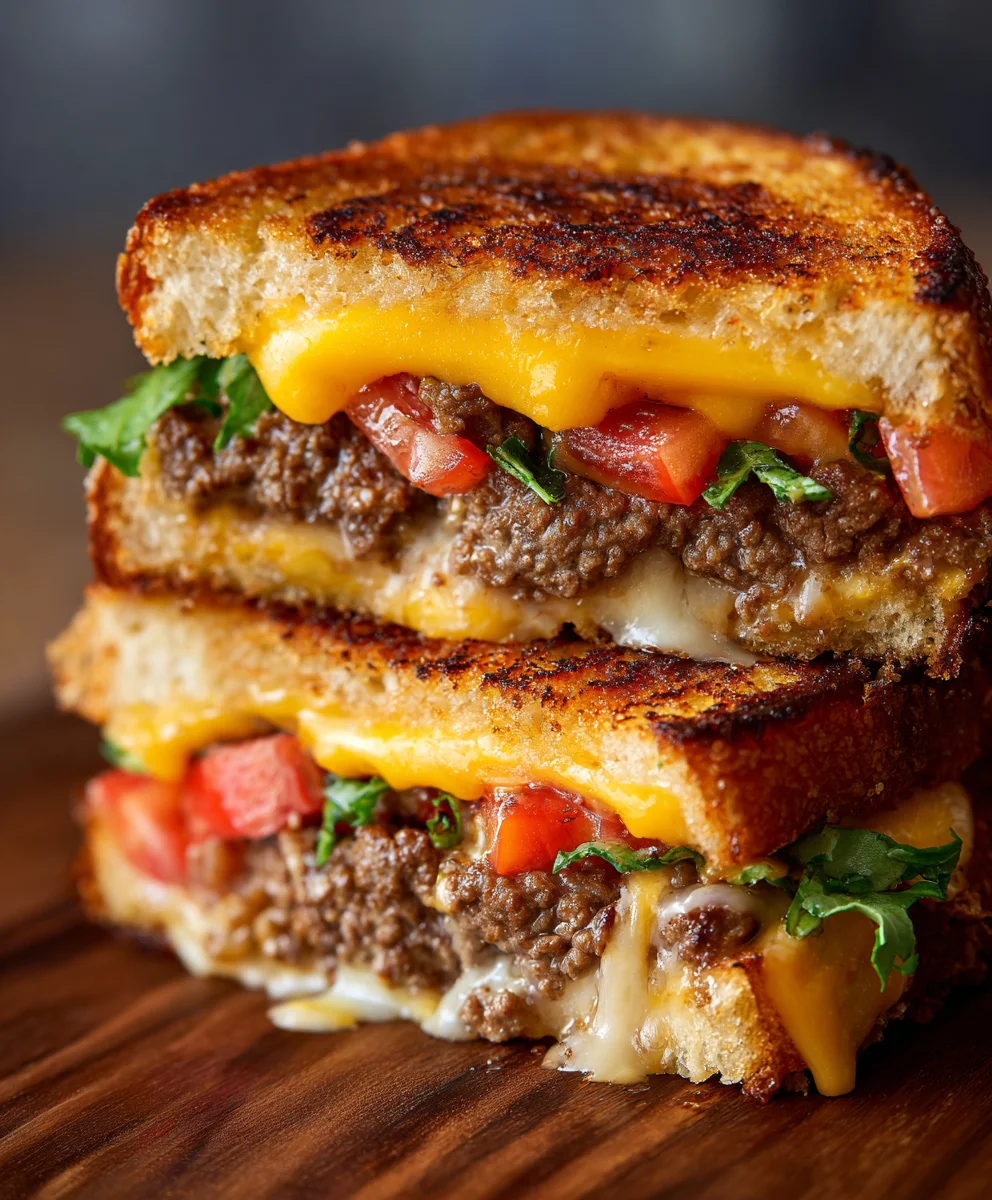
- Assemble the Smash Burger Grilled Cheese: Once the cheese on your pre-toasted bread halves is slightly softened and the bottom of the bread is lightly golden, it’s time to bring it all together. Carefully place one of your warm, cheese-topped smash burger patties directly onto the bread slice that has the melted American cheese (the one you toasted butter-side down). You might want to add any optional toppings like caramelized onions or pickles at this point, directly on top of the burger patty. Then, take the other slice of bread (the one with the cheddar, butter-side up) and gently place it on top of the burger patty, butter-side facing out. You’ve now created one half of your ultimate Smash Burger Grilled Cheese. Repeat this process for the second sandwich.
- The Final Cook: Gently press down on each sandwich with your spatula to ensure good contact between all the layers and with the griddle. Continue to cook on medium-low heat for another 3-5 minutes, or until the bottom slice of bread is a deep golden brown and the cheese inside is fully melted and oozy. If you’re concerned about the cheese not melting quickly enough, you can cover the pan with a lid for a minute or two to trap steam, but keep a close eye on the bread to prevent burning.
- Flip and Finish the Other Side: Using your spatula, carefully flip each Smash Burger Grilled Cheese sandwich over. Cook for another 3-5 minutes on the second side, pressing gently, until that side is also beautifully golden brown and crispy, and all the cheese is gloriously melted and bubbling. The goal is a uniform, rich golden color on both sides of the bread and a perfectly gooey interior. If the bread seems to be browning too quickly, lower the heat slightly. Patience is key here to achieve perfection!
- Serve Immediately: Once both sides are golden and the cheese is completely melted, carefully transfer the finished Smash Burger Grilled Cheese sandwiches to a cutting board. For the best presentation and eating experience, slice each sandwich in half diagonally. This reveals the layers of deliciousness within and makes it easier to handle. Serve immediately while hot and gooey. These are best enjoyed fresh off the griddle!
Tips and Tricks for Perfection:
To truly master the Smash Burger Grilled Cheese, a few extra tips can make all the difference. These insights will help you achieve consistent, mouth-watering results every time.
-
Choosing the Right Beef:
Opt for 80/20 ground chuck. The 20% fat content is crucial for both flavor and moisture. Leaner ground beef will result in dry patties, which won’t stand up as well to the richness of the grilled cheese. Keeping the beef very cold before forming and smashing also helps prevent it from sticking to your hands and tools.
-
The Perfect Smash Tool:
While a heavy spatula and a secondary weight work, investing in a dedicated burger press can make the smashing process much easier and more consistent. Look for one with a flat, sturdy bottom that won’t flex under pressure. A wide, flat spatula is also essential for scraping up that precious crust.
-
Cheese Choices Matter:
American cheese is non-negotiable for the ultimate grilled cheese melt. Its emulsifying salts ensure a perfectly gooey, stretchable texture. However, don’t hesitate to add a slice of a flavorful cheese like sharp cheddar, Monterey Jack, or even a good provolone for added depth and character. The blend of cheeses provides both the classic melt and a more complex flavor profile for your Smash Burger Grilled Cheese.
-
Don’t Skimp on the Butter:
Seriously, use enough butter. It’s what gives the bread that incredibly rich, golden, and crispy exterior. Softened butter spreads more evenly. If you prefer, you can also use mayonnaise on the outside of the bread instead of butter for an equally golden and often crispier crust, though it imparts a slightly different flavor.
-
Temperature Control is Key:
For smash burgers, you need screaming hot heat to get that irresistible crust. For the grilled cheese, a medium-low heat is essential. This allows the bread to toast slowly and evenly, ensuring the cheese melts completely without burning the bread. Rushing the grilled cheese step will lead to a scorched exterior and a cold, unmelted interior. Adjust your heat as needed throughout the cooking process.
-
Optional Flavor Boosters:
Consider adding a thin layer of your favorite burger sauce (like a classic “special sauce” or even just a good quality ketchup and mustard blend) directly onto the burger patty before adding the top slice of bread. Caramelized onions add a sweet and savory element that pairs beautifully with the beef and cheese. Pickles provide a welcome tangy contrast. These small additions can truly elevate your Smash Burger Grilled Cheese experience.
-
Don’t Overcrowd the Pan:
Whether you’re making the smash burgers or the grilled cheese, cook in batches if necessary. Overcrowding the pan lowers the temperature and prevents proper browning and crust development. Give everything space to breathe!
-
Serving Suggestions:
While this dish is substantial on its own, it pairs wonderfully with a side of crispy French fries, a simple green salad to cut through the richness, or even a cup of tomato soup for the ultimate comfort food experience.
Conclusion:
And there you have it, folks! We’ve journeyed together through the simple yet utterly transformative steps to create what I truly believe is one of the most magnificent culinary mash-ups you’ll ever encounter. The Smash Burger Grilled Cheese isn’t just a meal; it’s an experience, a symphony of textures and flavors that will redefine your notion of comfort food. This recipe is an absolute must-try because it takes two undisputed titans of the American diner – the juicy, intensely flavorful smash burger and the golden, gooey grilled cheese – and fuses them into something truly greater than the sum of its parts. You get the crispy, buttery exterior of the bread, the immediate melt of rich cheese, and then, the star of the show: a perfectly seared, incredibly juicy burger patty, bursting with savory goodness. It’s that moment when you bite through all those layers, feeling the crunch, the ooze, and the satisfying chew, that you realize you’ve stumbled upon a culinary revelation.
I simply cannot emphasize enough the sheer satisfaction this dish brings. It’s perfect for a weekend lunch, a quick weeknight dinner when you need something genuinely exciting, or even as a show-stopping centerpiece for your next casual get-together. Imagine the faces of your friends and family when they realize the delicious secret lurking within that perfectly golden-brown grilled cheese! It’s an instant crowd-pleaser and a guaranteed conversation starter. The beauty of this particular Smash Burger Grilled Cheese is its ability to deliver gourmet-level flavor with relatively minimal effort, proving that incredible food doesn’t always have to be complicated. It’s approachable enough for beginners but sophisticated enough to impress even the most seasoned home cooks.
Now, let’s talk about taking this masterpiece even further. While the classic rendition is perfection in itself, there are countless ways to customize your experience. For serving suggestions, I love pairing this with a side of crispy homemade french fries or some tangy coleslaw to cut through the richness. A simple dill pickle spear on the side adds a refreshing crunch that I highly recommend. Don’t forget your favorite dipping sauces – a smoky barbecue sauce, a spicy sriracha mayo, or even a classic ketchup and mustard combo will elevate each bite. For variations, consider experimenting with different cheeses: a sharp cheddar for a more robust flavor, pepper jack for a spicy kick, or even a creamy provolone. You could also introduce caramelized onions for a touch of sweetness, crispy bacon for an extra layer of savory texture, or even some sautéed mushrooms. Don’t be afraid to try different breads too; a sturdy sourdough or a rich brioche can completely change the character of your sandwich. For those feeling adventurous, a thin smear of my secret sauce (a blend of mayo, ketchup, relish, and a dash of hot sauce!) inside the sandwich before grilling takes it to another galaxy of flavor.
So, what are you waiting for? I wholeheartedly encourage you to roll up your sleeves, gather your ingredients, and give this incredible recipe a try this week. You deserve this kind of deliciousness in your life! Once you’ve experienced the magic of the Smash Burger Grilled Cheese, I would absolutely love to hear about it. Did you stick to the classic? Did you venture into creative variations? What were your favorite toppings or sides? Please, share your culinary adventures in the comments below, or even better, snap a photo and tag me on social media! Let’s build a community of burger-grilled-cheese enthusiasts. Happy cooking, and prepare to be amazed!
Frequently Asked Questions (FAQs):
How do you get a crispy grilled cheese without burning it?
The secret to a perfectly crispy, golden-brown grilled cheese lies in two main factors: medium-low heat and plenty of butter or mayonnaise on the outside of the bread. Cooking slowly allows the butter to crisp up the bread without charring it, giving the cheese ample time to melt thoroughly. Mayonnaise can also create an incredibly crispy, golden crust thanks to its oil content.
What’s the best cheese for a Smash Burger Grilled Cheese?
For a truly authentic and gooey experience, American cheese is often preferred for its incredible melting properties. However, feel free to experiment! Sharp cheddar adds a more robust flavor, Colby Jack offers a mild creaminess, and a blend of mozzarella and provolone can create an amazing cheese pull. Don’t be afraid to mix a couple of your favorites for complex flavor!
Can I use pre-made burger patties for this recipe?
While fresh ground beef formed into patties yields the best flavor and smash, you can certainly use pre-made burger patties. Just ensure they are not too thick, as thin patties are essential for the “smash” effect and to ensure everything cooks through evenly within the grilled cheese structure. You might need to adjust cooking times slightly.
What are the best side dishes to serve with a Smash Burger Grilled Cheese?
This hearty sandwich pairs wonderfully with classic comfort food sides. My top recommendations include crispy french fries, onion rings, a fresh tangy coleslaw, or a simple side salad to balance the richness. Pickles or pickled jalapeños also offer a great acidic counterpoint.
How do I prevent my Smash Burger Grilled Cheese from getting soggy?
To avoid sogginess, ensure your burger patty is fully cooked and drained of any excess grease before assembling. Also, avoid overstuffing the sandwich. If you’re adding moist ingredients like tomatoes, you might want to place them between two slices of cheese to create a barrier, or add them after the sandwich is cooked. Serving immediately after cooking is key to maintaining that delightful crispness.
Can I prepare components of the Smash Burger Grilled Cheese ahead of time?
You can definitely prep some elements in advance! You can form your ground beef into loose balls and refrigerate them. You can also slice your cheese and prepare any toppings like caramelized onions or special sauces. However, for the best results, assemble and cook the Smash Burger Grilled Cheese fresh, as the magic truly happens when all the hot, melty components come together right off the griddle.
Smash Burger Grilled Cheese
Experience the ultimate comfort food fusion: a crispy, buttery grilled cheese sandwich embracing a savory, juicy smash burger patty with melted cheese. This innovative dish combines two American classics for an unforgettable textural and flavor experience.
Ingredients
-
1 lb (450g) 80/20 ground beef, chilled
-
1 tsp kosher salt
-
½ tsp black pepper, fresh ground
-
1 tsp smashburger sauce
-
Thinly sliced onions (for patties)
-
1 tbsp neutral oil (canola, vegetable, or grapeseed)
-
8 slices sturdy sandwich bread
-
4-6 tbsp unsalted butter, softened
-
8 slices American cheese
-
4 slices sharp cheddar cheese (or Monterey Jack, provolone)
Instructions
-
Step 1
Prepare Beef: Divide 1 lb chilled 80/20 ground beef into 4 loose balls. Do not overwork. -
Step 2
Cook Patties (Smash): Heat 1 tbsp neutral oil in a heavy griddle or cast-iron skillet over high heat until smoking. Place 2 beef balls on griddle. Season each with ¼ tsp salt, ⅛ tsp pepper, and ¼ tsp smashburger sauce. Immediately top with a small amount of thinly sliced onions. Using parchment paper and a sturdy spatula, smash each beef ball firmly to ¼-⅛ inch thin. Cook undisturbed for 2-3 minutes until deeply caramelized. -
Step 3
Flip & Cheese Patties: Scrape and flip patties. Immediately top each with 1 slice American cheese. Cook 1-2 minutes until cheese is melted and burger is cooked through. Transfer to a plate, cover loosely, and repeat with remaining beef balls. -
Step 4
Butter Bread: Generously butter one side of each of the 8 bread slices. -
Step 5
Assemble & Pre-Toast Halves: For one sandwich, place 2 bread slices (butter-side down) on a surface. On one slice, place 2 American cheese slices. On the other, place 1 cheddar slice. Repeat for the second sandwich. Heat griddle to medium-low. Place these bread halves (butter-side up) on the griddle. Cook 2-3 minutes until lightly golden and cheese softens. -
Step 6
Combine & Final Cook: Place one warm, cheese-topped patty onto the American cheese half. Top with the cheddar half (butter-side out). Gently press. Cook 3-5 minutes until bottom is deep golden brown and cheese is fully melted. -
Step 7
Flip & Finish: Carefully flip the sandwich. Cook another 3-5 minutes until the second side is golden and crispy, and all cheese is gloriously melted. -
Step 8
Serve: Transfer to a cutting board, slice diagonally, and serve immediately.
Important Information
Nutrition Facts (Per Serving)
It is important to consider this information as approximate and not to use it as definitive health advice.
Allergy Information
Please check ingredients for potential allergens and consult a health professional if in doubt.

Leave a Comment