

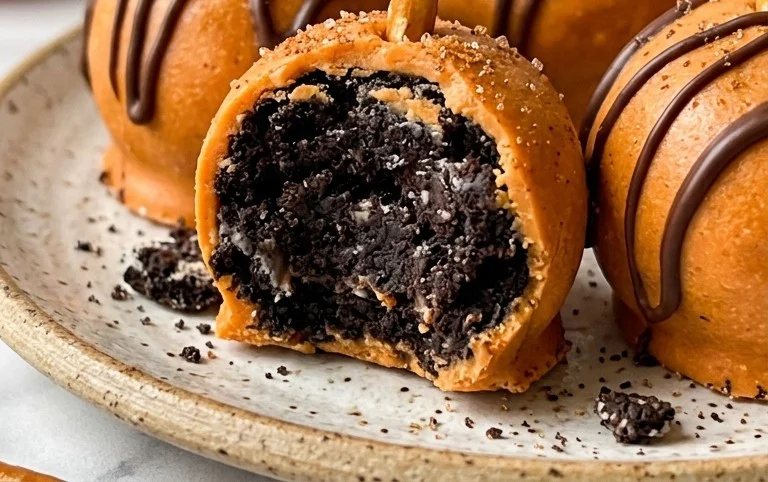
Pumpkin Oreo Balls capture the essence of fall in a single, sweet bite. I love making these when the leaves start changing because they bring that comforting pumpkin spice flavor without needing the oven. They have this amazing texture—creamy and crumbly on the inside from the crushed Oreos and cream cheese, but with a smooth, crisp coating that gives them a satisfying snap. What makes them so special is how they combine two favorite things: classic no-bake cookie balls and the cozy taste of pumpkin spice. Plus, they look so festive, especially with that hint of orange. They are surprisingly simple to put together, which is why I often make a big batch for gatherings or just for myself when that craving hits. The best part is they don’t require any baking, so they’re incredibly approachable, even if you’re new to making treats like this. You just need a few ingredients and a little time for chilling to get that perfect no-bake pumpkin cookie ball.

Pumpkin Oreo Balls
These Pumpkin Oreo Balls are a simple yet incredibly satisfying treat, perfect for a fall gathering, a holiday platter, or just when a craving strikes. They capture the essence of both a classic no-bake cookie ball and the beloved flavors of pumpkin spice season, all wrapped up in a sweet candy coating. The texture is a delightful contrast between the creamy, crumbly interior and the smooth, crisp shell. Making them is a straightforward process that doesn’t require any baking, making them accessible for cooks of all skill levels. The key is using good quality ingredients and taking your time during the chilling and coating stages, which ensures the best final product. They store well, making them ideal for preparing ahead of time for parties or events.
Ingredients:
- 36 Oreo cookies
- 8 oz cream cheese (softened)
- 12 oz orange candy melts
Making the Pumpkin Oreo Ball Mixture
The foundation of these delicious treats starts with just two main ingredients: Oreo cookies and cream cheese. For this recipe, we’re using 36 standard Oreo cookies. You can use regular Oreos or even the Golden Oreos if you prefer a lighter flavor base, though the classic chocolate cookie provides a wonderful depth that complements the pumpkin spice notes. The cream cheese is essential for binding the crushed cookies together and providing that signature creamy texture. It’s important that the cream cheese is fully softened. If it’s still cold, it will be difficult to incorporate evenly, leading to lumps in your mixture. I usually leave my cream cheese on the counter for at least an hour, or you can quickly soften it by cutting it into cubes and microwaving it on low power for about 20-30 seconds at a time, stirring in between, until it’s pliable but not melted.
In a food processor, pulse the 36 Oreo cookies until they are finely crushed into crumbs. You want them to resemble coarse sand. Don’t over-process them into a paste, as some texture is desirable. Transfer these crumbs to a large mixing bowl. Add the 8 oz of softened cream cheese to the bowl with the Oreo crumbs. Using a sturdy spoon or a spatula, mix the cream cheese and cookie crumbs together thoroughly. You need to ensure every bit of the cookie crumb is incorporated with the cream cheese. It will start as a crumbly mixture, but as you keep mixing, it will come together into a thick, dough-like consistency. This might take a few minutes of vigorous stirring. It should be moist enough to hold its shape when squeezed but not sticky. If it feels too dry and crumbly, your cream cheese might not have been soft enough. If it feels too wet and sticky, you may have added too much cream cheese, though this is less common with the specified quantities.
Forming and Chilling the Balls
Once your Oreo and cream cheese mixture is well combined, it’s time to form them into balls. I find using a small cookie scoop or a tablespoon to portion out the mixture helps ensure uniformly sized balls, which makes for a more aesthetically pleasing final product and also helps them cook or set evenly later on. Roll each portion into a firm ball, about 1 inch in diameter. The mixture should be pliable enough to roll smoothly. As you work, you might notice your hands getting a bit messy, which is perfectly normal. You can lightly dampen your hands with water if the mixture starts to stick too much. Place all the formed balls onto a baking sheet lined with parchment paper. Parchment paper prevents sticking and makes for easy cleanup. This step is crucial for ensuring the balls hold their shape when you start working with the candy melts.
After you’ve rolled all the balls, it’s essential to chill them. This step hardens the mixture, making them much easier to dip in the melted candy. Place the baking sheet with the Oreo balls into the refrigerator for at least 30 minutes, or into the freezer for about 15 minutes if you’re short on time. You’ll know they’re ready when they feel firm to the touch and no longer give easily when gently squeezed. This chilling process prevents the balls from falling apart or becoming too soft when they come into contact with the warm melted candy.
Melting and Coating with Orange Candy Melts
Now for the fun part: coating! We’ll be using 12 oz of orange candy melts for this. Candy melts are fantastic because they are designed to melt smoothly and harden quickly without the need for tempering, unlike real chocolate. This makes them very user-friendly for decorating and coating. To melt the candy melts, you have a couple of options. The most common method is in the microwave. Place the orange candy melts in a microwave-safe bowl. Microwave on 50% power for 30-second intervals, stirring well after each interval, until the melts are smooth and completely melted. Be careful not to overheat them, as this can cause them to seize up or become thick and difficult to work with. Stirring frequently is key to even melting. Another option is to melt them using a double boiler, which provides a gentler heat and is often preferred by some to avoid scorching.
Once your candy melts are smooth and fluid, it’s time to dip the chilled Oreo balls. You can do this one at a time. Holding a chilled Oreo ball with a fork or a dipping tool, carefully dip it into the melted orange candy. Rotate the ball to ensure it’s completely coated. Gently tap the fork on the side of the bowl to allow any excess candy coating to drip back into the bowl. This is important to prevent thick, uneven coatings that can crack. Carefully place the coated ball back onto the parchment-lined baking sheet. If you notice any drips or uneven spots, you can gently smooth them with the back of your fork or a toothpick while the coating is still wet. You want a nice, even layer that will harden to a crisp shell.
Finishing Touches and Setting
After you have dipped all your pumpkin Oreo balls, allow them to sit at room temperature for a few minutes to allow the candy coating to begin setting. You can speed up this process by placing the baking sheet back into the refrigerator for about 10-15 minutes, or until the candy melts are completely firm. Once hardened, they are ready to be enjoyed. If you’d like to add a little extra flair, you can melt some white or darker chocolate and drizzle it over the orange coating once it has set. For a more autumnal look, you could use a piping bag with a small round tip to draw little pumpkin stems or vines on top. These Pumpkin Oreo Balls are best stored in an airtight container at room temperature. They will keep well for about a week. If you live in a very warm climate, you might consider storing them in the refrigerator to prevent the candy coating from softening. Enjoy these delightful, festive treats!
Conclusion:
These Pumpkin Oreo Balls are a real winner for any fall occasion, or frankly, any time you want a simple, satisfying sweet treat. They are so straightforward to make and the combination of chocolatey Oreos with that hint of pumpkin spice is just wonderful. They look festive on a platter and are always a hit with guests, whether it’s for a Halloween party, Thanksgiving dessert, or just a cozy afternoon snack. You can serve them as is, or get creative with decorations; a drizzle of white chocolate or some festive sprinkles can make them even more special. They also keep well, so making them ahead of time is totally doable.
Variations:
Feel free to experiment! For a different base, you could try Golden Oreos. If you don’t have pumpkin spice, a mix of cinnamon, nutmeg, and a tiny pinch of cloves works well. You can also change up the coating—dark chocolate or white chocolate melts are great alternatives to the orange ones. Some people even like to add a tablespoon or two of pumpkin puree to the mixture, but make sure to reduce the cream cheese slightly to keep the consistency right, and you’ll likely need more chilling time.
Frequently Asked Questions:
Can I use regular cream cheese?
Yes, regular block cream cheese works best. Make sure it’s fully softened to room temperature so it blends smoothly with the cookie crumbs. Don’t use whipped cream cheese, as it has too much moisture and won’t hold the balls together properly.
How long do they need to chill?
You need to chill the mixture for at least 30 minutes after making it, and then chill the rolled balls for another 30 minutes before coating. This helps them firm up so they don’t fall apart when you dip them in the melted candy.
How should I store Pumpkin Oreo Balls?
Store them in an airtight container in the refrigerator. They will stay fresh for about 1 to 2 weeks. Letting them come to room temperature for a few minutes before serving makes the coating less brittle.
Pumpkin Oreo Balls
Decadent no-bake treats combining the classic flavors of pumpkin and Oreo cookies, dipped in smooth orange candy melts.
Ingredients
-
36 Oreo cookies
-
8 oz cream cheese, softened
-
12 oz orange candy melts
Instructions
-
Step 1
Crush the Oreo cookies into fine crumbs using a food processor or by placing them in a resealable bag and crushing them with a rolling pin. -
Step 2
In a medium bowl, combine the Oreo cookie crumbs and softened cream cheese. Mix until well combined and a dough forms. -
Step 3
Roll the mixture into small balls, about 1 inch in diameter. Place the balls on a parchment-lined baking sheet. -
Step 4
Melt the orange candy melts according to package directions. This can be done in a microwave-safe bowl in 30-second intervals, stirring in between, or in a double boiler. -
Step 5
Dip each Oreo ball into the melted candy melts, ensuring it’s fully coated. You can use a fork or a toothpick for dipping. Return the coated balls to the parchment-lined baking sheet. -
Step 6
Allow the candy coating to set completely. You can speed this up by placing the baking sheet in the refrigerator for about 15-30 minutes.
Important Information
Nutrition Facts (Per Serving)
It is important to consider this information as approximate and not to use it as definitive health advice.
Allergy Information
Please check ingredients for potential allergens and consult a health professional if in doubt.


Leave a Comment