
Easter Toffee. There’s something truly magical about the aroma of melted butter and sugar transforming into a golden, irresistible crunch that heralds the arrival of spring. As the days lengthen and the promise of renewal fills the air, our thoughts often turn to cherished family gatherings, vibrant celebrations, and, of course, delightful treats. I’m absolutely thrilled to share with you a recipe that has become a cherished part of my own holiday tradition: the ultimate Easter Toffee.
While the broader history of toffee, a simple yet elegant sugar confection, stretches back centuries, its specific embrace as a beloved Easter staple speaks to its versatility and appeal during the festive season. This particular dish isn’t just a dessert; it’s a symbol of the sweetness and joy that defines the holiday, often tucked into Easter baskets, shared as thoughtful gifts, or proudly displayed on dessert tables. Its simple elegance belies its incredible flavor, making it a truly beloved fixture for countless families.
Why is this Easter Toffee so universally adored?
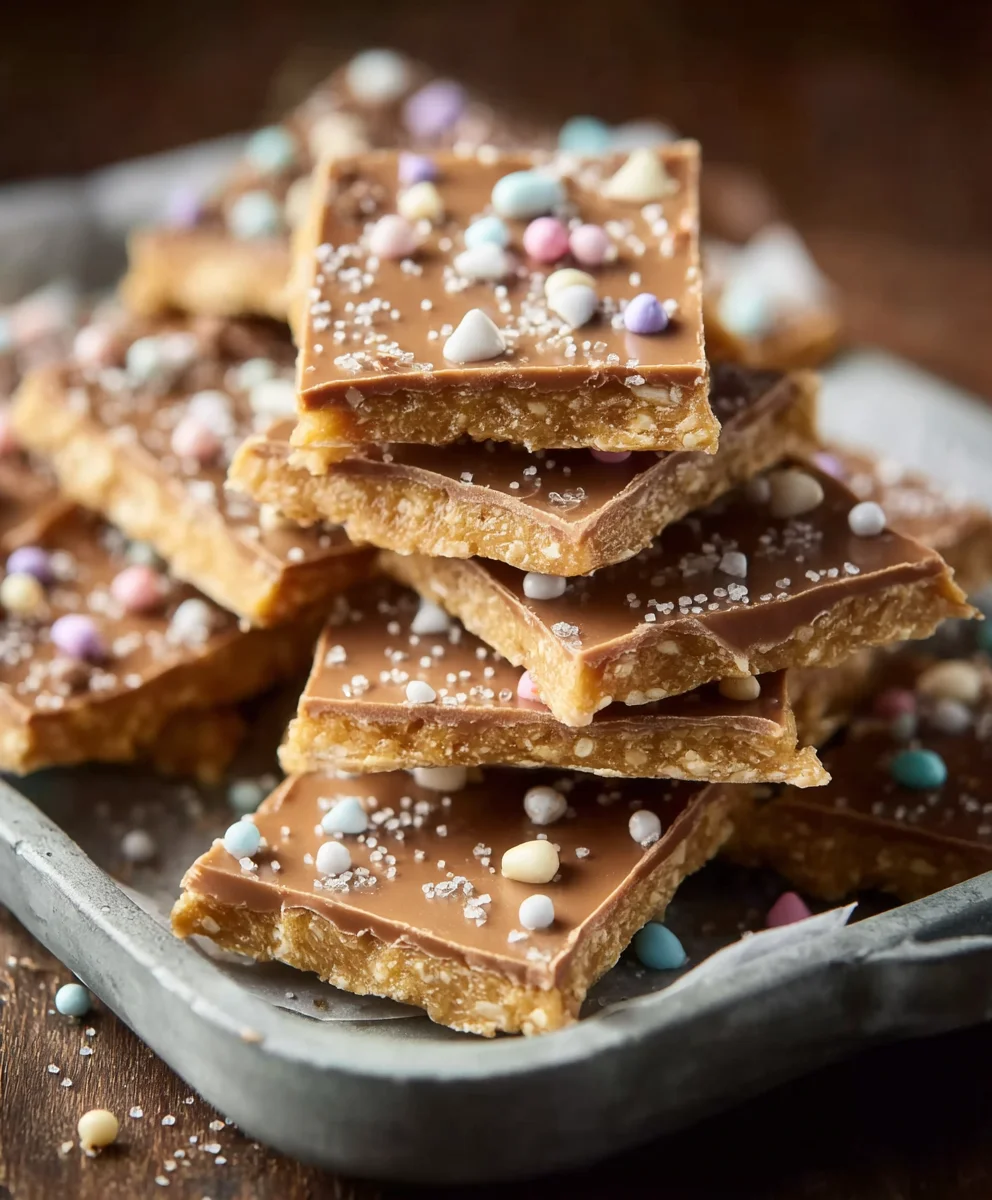
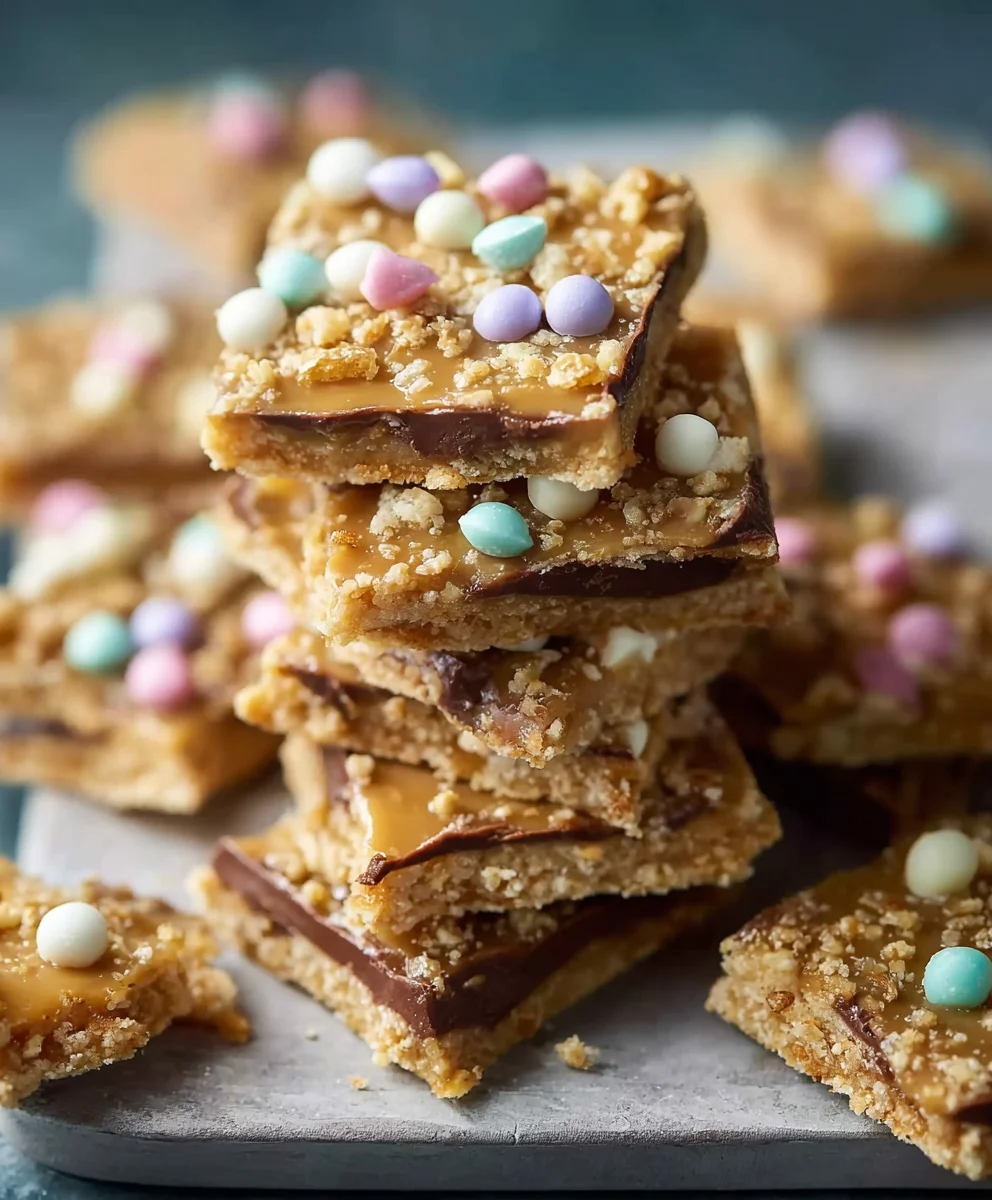
It’s the captivating contrast of textures and flavors that makes it utterly irresistible. Picture a perfectly thin, remarkably crisp layer of buttery caramel, generously adorned with a blanket of rich, melting chocolate, all finished with a satisfying sprinkle of your favorite toasted nuts. Each bite delivers that delightful snap, followed by a smooth, lingering sweetness that truly melts in your mouth. Beyond its exquisite taste, its relative ease of preparation makes it an ideal choice for busy holiday schedules, allowing you to create something truly spectacular without hours spent in the kitchen. Get ready to impress everyone with this delectable Easter Toffee!
Ingredients:
- For the Butter Toffee Base:
- 2 cups (4 sticks or 450g) unsalted butter, high quality for best flavor
- 2 cups (400g) granulated sugar
- ½ cup (120ml) water
- 1 teaspoon pure vanilla extract
- ½ teaspoon salt, preferably fine sea salt
- Optional: 2 tablespoons light corn syrup (helps prevent crystallization, though not strictly necessary if you’re careful)
- For the Chocolate Topping:
- 2 cups (about 340g) semi-sweet chocolate chips, or a combination of milk and dark chocolate chips for nuanced flavor
- Optional: ½ cup (85g) white chocolate chips for drizzling
- For the Easter Toffee Decorations:
- ½ cup (about 80g) pastel-colored sprinkles (nonpareils, jimmies, or a mix)
- ½ cup (about 80g) crushed mini chocolate eggs (Cadbury Mini Eggs are perfect for this Easter Toffee!)
- ¼ cup chopped nuts (like pecans or almonds) if desired, for extra crunch
- Optional: Additional pastel candies or small sugar decorations to enhance the Easter theme
Equipment You’ll Need:
- A heavy-bottomed 3 to 4-quart saucepan (this is crucial for even heat distribution and preventing burning)
- A reliable candy thermometer (digital is preferred for accuracy, but an analog one works too)
- A sturdy wooden spoon or heat-proof silicone spatula for stirring
- A 13×9-inch baking sheet with sides
- Aluminum foil or parchment paper for lining the baking sheet
- Non-stick cooking spray or a light coating of butter for the foil/parchment
- A small microwave-safe bowl if you opt for the white chocolate drizzle
- A sharp knife or a clean, heavy blunt object (like the back of a large spoon or a small meat mallet) for breaking the toffee
Getting Started: Your Workspace and Prep
Before we even think about turning on the stove, it’s paramount to get everything ready. Toffee-making moves quickly once the heat is on, and you won’t have time to scramble for ingredients or equipment. This preparation phase is key to a stress-free and successful Easter Toffee.
- First, line your 13×9-inch baking sheet with aluminum foil or parchment paper. Make sure the foil or paper extends up the sides of the pan slightly, creating a small lip. This makes removal much easier.
- Lightly grease the foil or parchment paper with non-stick cooking spray or a thin layer of butter. Even though foil/parchment is generally non-stick, this extra step provides insurance, ensuring your delicate toffee releases perfectly once cooled.
- Measure out all your ingredients. Seriously, have your butter, sugar, water, salt, vanilla, and any optional corn syrup pre-measured and waiting by the stove. This is called “mise en place” and it’s a chef’s best friend, especially for recipes like this Easter Toffee that require precision and speed.
- Have your candy thermometer clean, calibrated (if necessary), and ready to clip onto the side of your saucepan. Ensure the tip of the thermometer won’t touch the bottom of the pan, but will be submerged in the candy mixture once it starts to boil.
- Prepare your chocolate chips for the topping and your chosen Easter Toffee decorations. Place them in separate small bowls so they are ready to sprinkle immediately after you pour the hot toffee. For the crushed mini eggs, you can place them in a zip-top bag and gently crush them with a rolling pin or the back of a spoon until they are in small, but still noticeable, pieces.
Crafting the Perfect Toffee Base
This is where the magic happens, and achieving that golden, crunchy, buttery base for our Easter Toffee requires a bit of attention and patience. Don’t be intimidated by the candy thermometer; it’s your best friend here!
- In your heavy-bottomed 3 to 4-quart saucepan, combine the measured butter, granulated sugar, water, salt, and the optional corn syrup if you’re using it. Using a heavy-bottomed pan is absolutely essential to prevent scorching, which can ruin the flavor and texture of your toffee.
- Place the saucepan over medium heat. Stir constantly with your wooden spoon or silicone spatula until the butter is completely melted and the sugar has dissolved. You’ll know the sugar is dissolved when the mixture looks smooth and has no grainy texture when you rub a tiny bit between your fingers (careful, it’ll be warm!). This initial stirring is important for ensuring a smooth, crystalline-free toffee.
- Once the sugar is dissolved, clip your candy thermometer to the side of the pan, ensuring the tip is submerged but not touching the bottom. Stop stirring and bring the mixture to a boil. From this point forward, avoid stirring as much as possible. Excessive stirring after it boils can encourage sugar crystals to form on the sides of the pan, which can then fall into your toffee and make it grainy. If you see crystals forming on the sides, gently brush them down with a pastry brush dipped in a little warm water.
- Allow the mixture to boil undisturbed. The temperature will steadily climb. Keep a close eye on your candy thermometer. You’re aiming for a temperature of 300-305°F (149-152°C), which is the “hard crack” stage.
- As the mixture boils, you’ll notice it changing color. It will start as a pale yellow, then progress to a deeper amber, eventually reaching a beautiful golden-brown. This color change happens quite rapidly towards the end, so stay vigilant! Do not walk away from the stove during this critical phase. It can go from perfect to burnt in a matter of seconds.
- Once the thermometer registers 300-305°F (149-152°C), immediately remove the saucepan from the heat. Carefully remove the candy thermometer.
- Stir in the pure vanilla extract. Be cautious, as the mixture will bubble up vigorously due to the addition of a cooler liquid. Stir quickly until the vanilla is fully incorporated. This adds a wonderful depth of flavor to your Easter Toffee.
- Work quickly but carefully! Immediately pour the hot toffee mixture onto your prepared baking sheet. Use your spatula to spread it into an even, thin layer, about ¼-inch thick, across the entire pan. Don’t worry if it’s not absolutely perfect, but try to get it as uniform as possible for even cooling and breaking.
Layering on the Chocolate Love
Now for the second layer of deliciousness! The residual heat from the toffee base is all we need to melt our chocolate into a smooth, decadent topping for our Easter Toffee.
- Immediately after spreading the hot toffee, evenly sprinkle your semi-sweet chocolate chips (and any other chocolate chips you’re using for the main topping) over the entire surface of the hot toffee. The heat from the toffee will start to melt them right away.
- Let the chocolate chips sit undisturbed for about 3-5 minutes. This gives them enough time to soften and melt from the ambient heat. If you try to spread them too soon, they’ll be stiff.
- After 3-5 minutes, use the back of your spoon or an offset spatula to gently spread the now-melted chocolate evenly over the toffee layer. Aim for a smooth, uniform coating that covers the entire surface. This creates a beautiful, glossy finish for your Easter Toffee.
The Easter Toffee Grand Finale: Decorating!
This is where we bring in the “Easter” theme! Get creative and have fun with these festive toppings. The key is to apply them while the chocolate is still warm and slightly tacky, so they adhere well.
- While the chocolate layer is still warm and wet, generously sprinkle your pastel-colored sprinkles over the entire surface. Don’t be shy here; the more colorful, the more festive your Easter Toffee will look!
- Next, sprinkle the crushed mini chocolate eggs over the sprinkles. The combination of the smooth chocolate, crunchy toffee, and the textural interest of the mini eggs is simply divine. If you’re using other crushed candies or chopped nuts, add them now as well.
- For an extra touch of elegance and visual appeal, consider a white chocolate drizzle. If you’re doing this, melt your white chocolate chips in a small microwave-safe bowl in 20-second intervals, stirring after each, until smooth and creamy. Be careful not to overheat it.
- Once melted, you can either spoon the white chocolate into a small piping bag with a tiny tip (or a zip-top bag with the corner snipped off) and drizzle it artfully back and forth across the decorated toffee, or simply use a fork to create random, appealing patterns. This contrast adds another layer of visual interest to your beautiful Easter Toffee.
- If you have any other small pastel candies or sugar decorations, gently press them into the still-soft chocolate and toppings to secure them. Think about creating a lovely mosaic of Easter colors and textures.
Setting, Breaking, and Storing Your Easter Toffee
Patience is a virtue, especially when it comes to allowing your homemade Easter Toffee to set properly. Rushing this step can result in a sticky mess rather than crisp, clean breaks.
- Allow the decorated Easter Toffee to cool completely and set. You can leave it at room temperature for at least 2-3 hours, or you can expedite the process by placing the baking sheet in the refrigerator for about 30-60 minutes. Ensure the toffee is absolutely firm and hard to the touch before attempting to break it. If it’s still warm or pliable, it won’t snap cleanly.
- Once fully cooled and set, carefully lift the entire sheet of toffee out of the pan using the foil or parchment paper. Peel back the lining from the edges.
- Place the slab of toffee on a clean, sturdy cutting board. Use a sharp, heavy knife or a small, blunt mallet (or the back of a large spoon) to break the toffee into irregular pieces. You can aim for roughly 1- to 2-inch pieces, or just let them break naturally for a rustic charm. If using a knife, you can score lines before applying pressure, which can sometimes help with cleaner breaks. Don’t worry if some pieces are smaller or larger; that’s part of the homemade appeal of this delicious Easter Toffee.
- Storing your glorious Easter Toffee: Store the broken pieces in an airtight container at room temperature for up to 2 weeks. For longer storage, or if your home is particularly warm, you can store it in the refrigerator for up to 3-4 weeks. Layer the toffee pieces between sheets of parchment paper to prevent them from sticking together.
- This Easter Toffee also freezes beautifully! Place the pieces in an airtight freezer-safe container or bag, layered with parchment paper, and it will keep for up to 3 months. Just bring it to room temperature for about 15-20 minutes before serving for the best texture and flavor.
Conclusion:
As we reach the end of this culinary journey, I truly hope that you’re feeling as excited as I am about trying out this extraordinary recipe. I honestly believe that this isn’t just another dessert; it’s an experience, a little piece of joy that you can create right in your own kitchen. I’ve poured my heart into perfecting this recipe because I wanted to share something truly special with all of you, something that consistently garners gasps of delight and requests for second (and third!) servings. It’s the kind of treat that perfectly balances that irresistible buttery crunch with the smooth, rich embrace of melted chocolate, all topped with delightful little surprises that burst with flavor and texture.
What makes this recipe a definite must-try, in my humble opinion, is its delightful simplicity coupled with its incredibly impressive outcome. You don’t need to be a seasoned pastry chef to whip up a batch of this delectable confection. The steps are straightforward, the ingredients are accessible, and the payoff is immense. Imagine the golden hue of perfectly cooked toffee, smelling faintly of sweet butter, spreading across your baking sheet, just waiting for that blanket of chocolate to melt over its warm surface. The anticipation alone is half the fun! And when that chocolate sets, adorned with your chosen toppings, and you break off the first shard, you’ll understand exactly why this recipe holds such a special place in my heart.
Elevate Your Dessert Spread: Serving Suggestions and Creative Variations
While this delightful brittle is absolutely divine enjoyed simply, broken into glorious, jagged pieces and shared straight from a platter, I encourage you to think about how you can elevate its presentation or adapt it for different occasions. For a sophisticated touch, arrange the shards artfully on a large white serving dish, perhaps alongside a bowl of fresh berries or a dollop of whipped cream. It also makes an incredibly elegant accompaniment to a strong cup of coffee or a comforting mug of tea, offering that perfect crunch and sweetness to balance your beverage.
Don’t stop there! Consider crumbling some of the toffee over a scoop of vanilla bean ice cream for an instant upgrade to a classic dessert. It adds an incredible textural contrast and a burst of buttery sweetness that will transform a simple scoop into something truly memorable. You could also use crushed pieces as a topping for cheesecakes, cupcakes, or even a fancy yogurt parfait.
Now, let’s talk about variations – this is where your creativity can truly shine! While the base recipe is perfect as is, feel free to experiment with different types of chocolate. A mix of dark and milk chocolate, or even a layer of white chocolate, can offer a delightful twist. As for toppings, the possibilities are virtually endless. Beyond the classic nuts and sprinkles, consider a sprinkle of flaky sea salt for a sophisticated sweet and salty profile, crushed pretzels for an extra salty crunch, or even dried cranberries or cherries for a fruity counterpoint. For a truly decadent twist, you could swirl in some melted peanut butter or caramel over the chocolate before it sets. This recipe is wonderfully adaptable, allowing you to tailor it precisely to your taste preferences or the theme of your gathering. And honestly, this is the perfect time of year for it. I believe you’ll find that a batch of homemade Easter Toffee is just what your celebration needs to make it extra special and deliciously memorable.
Your Culinary Adventure Awaits! Share Your Sweet Success!
Now, it’s your turn! I genuinely hope this recipe inspires you to step into your kitchen and create something truly wonderful. Don’t be shy; embrace the process, have fun with it, and prepare to be amazed by the results. There’s a unique satisfaction that comes from making something so delicious with your own hands, and I promise, this recipe delivers that feeling in spades. Whether you’re making it for a special occasion, to share with loved ones, or simply to treat yourself (because you absolutely deserve it!), I am confident that this brittle will become a cherished addition to your repertoire.
Most importantly, I would absolutely love to hear about your experience. Did you try any exciting variations? What was your favorite part of making it? Did it become an instant hit with your family and friends? Please, don’t hesitate to share your stories, your photos, and any tips or tricks you discovered along the way. Your feedback truly brightens my day and helps me connect with fellow food enthusiasts like you. So go ahead, give this recipe a try, and let’s spread some sweet joy together!
Easter Toffee: Sweet & Crunchy Holiday Treat!
Indulge in this magical Easter Toffee recipe, featuring a thin, crisp layer of buttery caramel, generously coated with rich, melting chocolate, and adorned with festive pastel sprinkles and crushed mini chocolate eggs. An easy-to-make, irresistible holiday treat perfect for sharing.
Ingredients
-
2 cups (4 sticks) unsalted butter
-
2 cups granulated sugar
-
½ cup water
-
1 tsp pure vanilla extract
-
½ tsp salt
-
Optional: 2 tbsp light corn syrup
-
2 cups semi-sweet chocolate chips
-
Optional: ½ cup white chocolate chips for drizzling
-
½ cup pastel-colored sprinkles
-
½ cup crushed mini chocolate eggs
-
Optional: ¼ cup chopped nuts
-
Optional: Small pastel candies or sugar decorations
Instructions
-
Step 1
Line a 13×9-inch baking sheet with greased foil or parchment. Measure all ingredients and have them ready (mise en place). Ensure candy thermometer is clean and ready, and prepare chocolate and Easter decorations in separate bowls. -
Step 2
In a heavy 3-4 quart saucepan, combine butter, sugar, water, salt, and optional corn syrup. Stir over medium heat until butter melts and sugar dissolves. Clip candy thermometer to pan, ensuring it’s submerged but not touching bottom. Bring mixture to a boil without stirring. -
Step 3
Continue boiling undisturbed until thermometer reaches 300-305°F (149-152°C) (hard crack stage). Watch closely as color changes to golden-brown rapidly at the end. Immediately remove from heat, remove thermometer, and stir in vanilla extract. -
Step 4
Quickly pour hot toffee onto the prepared baking sheet. Use a spatula to spread it into an even, thin layer (about ¼-inch thick) across the pan. -
Step 5
Immediately sprinkle semi-sweet chocolate chips (and any other main chocolate) evenly over the hot toffee. Let sit for 3-5 minutes to melt, then gently spread the melted chocolate into a smooth, uniform layer. -
Step 6
While chocolate is still warm, generously sprinkle pastel sprinkles, then crushed mini chocolate eggs (and any optional chopped nuts/candies) over the surface. For extra elegance, melt white chocolate chips and drizzle artistically. Gently press in any additional small pastel candies or sugar decorations. -
Step 7
Allow toffee to cool completely and set until absolutely firm. This takes 2-3 hours at room temperature, or 30-60 minutes in the refrigerator. Lift the cooled slab from the pan using the liner, peel back the lining, and break into irregular 1-2 inch pieces using a sharp knife or blunt object. -
Step 8
Store broken pieces in an airtight container at room temperature for up to 2 weeks, or in the refrigerator for 3-4 weeks (layered with parchment paper). For longer storage, freeze for up to 3 months; bring to room temperature before serving.
Important Information
Nutrition Facts (Per Serving)
It is important to consider this information as approximate and not to use it as definitive health advice.
Allergy Information
Please check ingredients for potential allergens and consult a health professional if in doubt.


Leave a Comment