
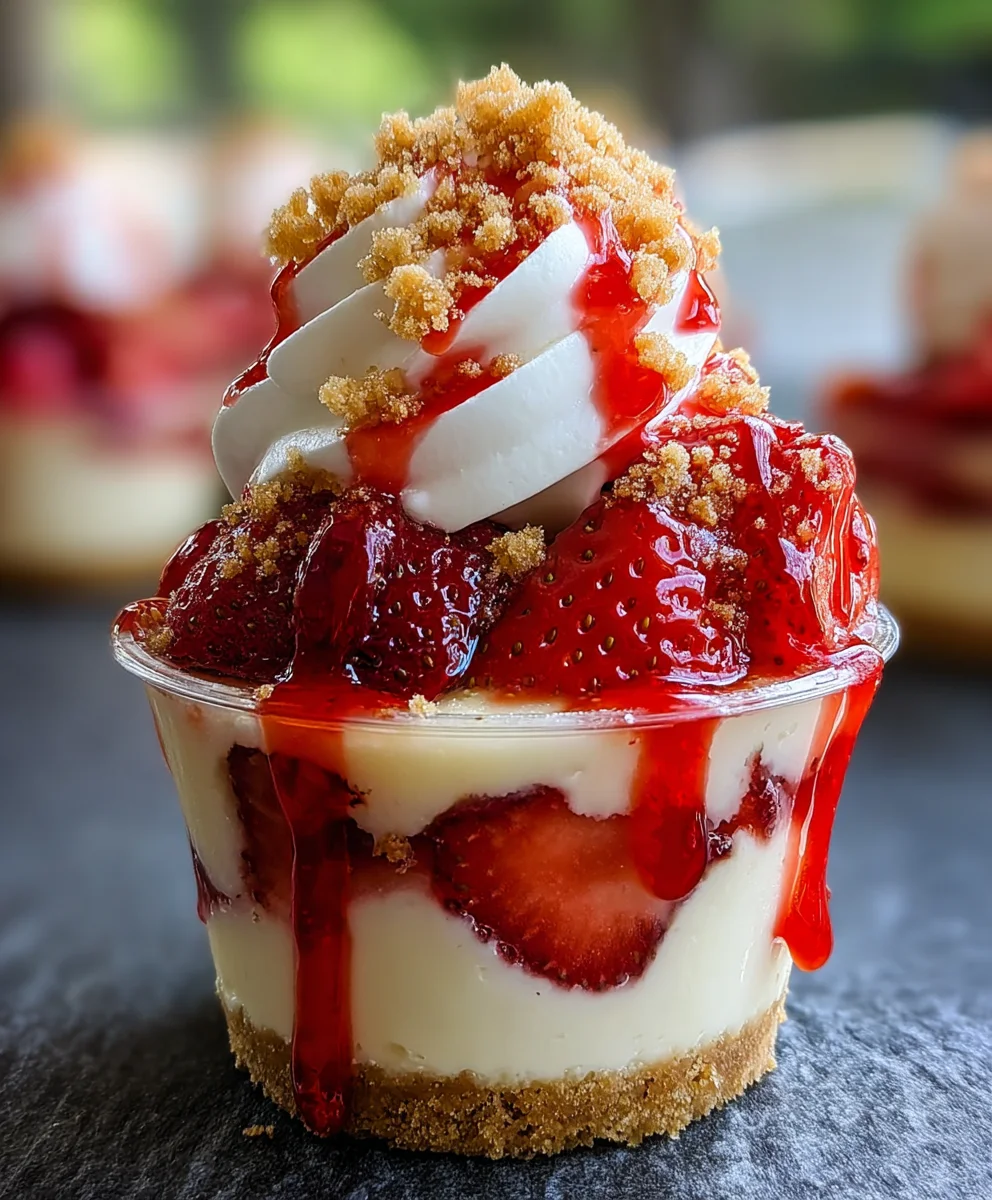
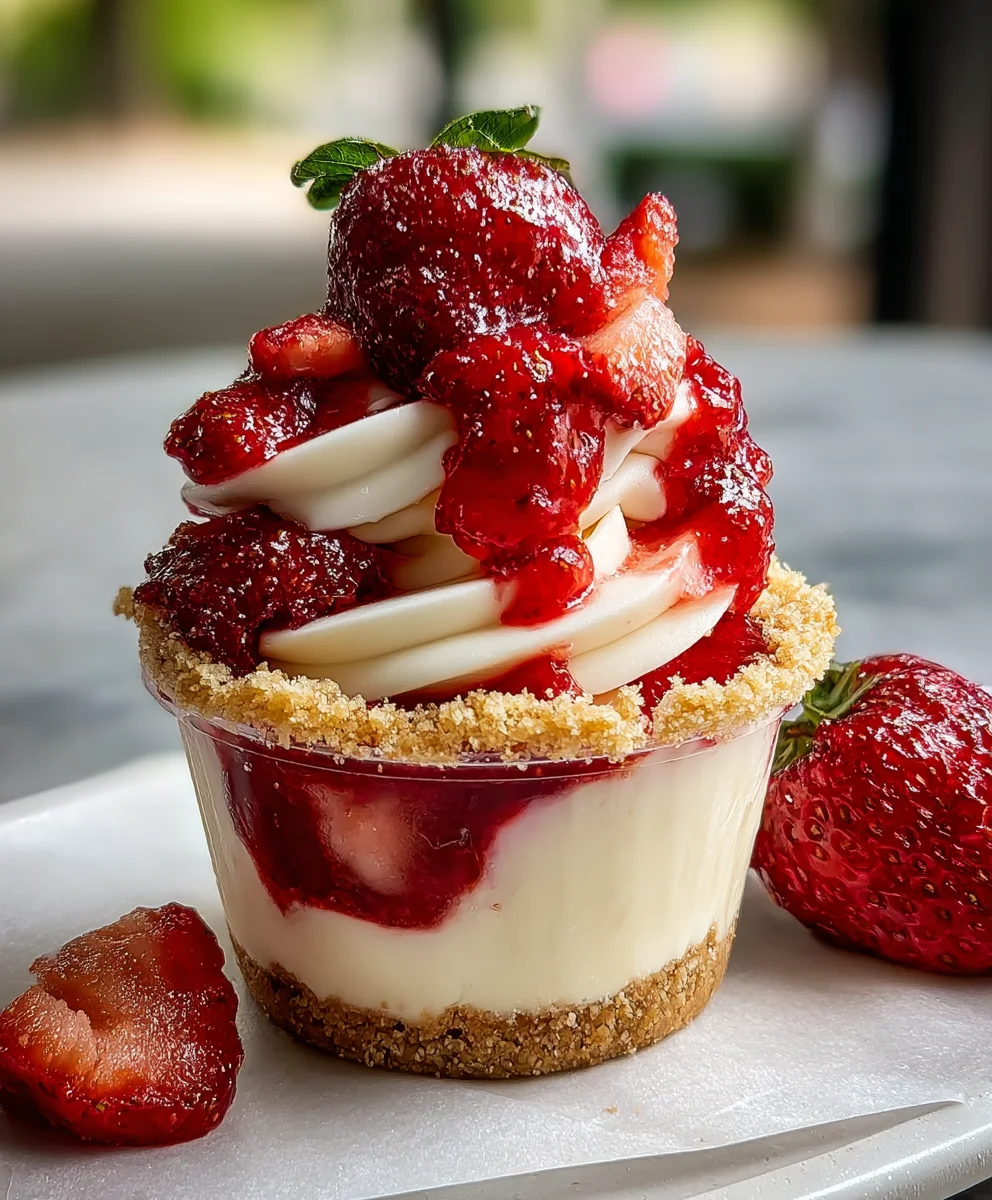
Strawberry Cheesecake Cups are, without a doubt, the quintessential individual dessert that brings a smile to every face. I remember the first time I made these delightful little treats; the sheer joy of achieving all the luxurious flavors of a classic cheesecake, but in a perfectly portioned and effortlessly manageable format, was truly exhilarating. While the rich history of cheesecake stretches back to ancient Greece, evolving through various cultures to become a beloved modern staple, these individual cups represent a brilliant culinary innovation, marrying convenience with timeless elegance. People absolutely adore this dish not just for its irresistible combination of creamy, tangy cheesecake filling and the sweet burst of fresh strawberries but also for the delightful crunch of its graham cracker crust.
There’s a captivating charm in their simplicity; they require no baking, making them an ideal choice for busy schedules or warm summer days when turning on the oven is the last thing you want to do. Each bite of these Strawberry Cheesecake Cups is a harmonious blend of textures and tastes, promising a satisfyingly sweet escape that’s both elegant and wonderfully approachable. I am incredibly excited to share a recipe that I know will become a cherished favorite in your home, just as it has in mine.
Ingredients:
- 1 ½ cups (about 180g) graham cracker crumbs (from approximately 12-14 full graham cracker sheets)
- ¼ cup (56g) unsalted butter, melted
- 2 tablespoons granulated sugar
- 2 (8-ounce) packages full-fat cream cheese, softened to room temperature
- 1 cup (240ml) heavy cream, very cold
- ¾ cup (90g) powdered sugar, sifted
- 1 teaspoon pure vanilla extract
- ½ teaspoon fresh lemon juice (optional, but highly recommended for brightness)
- ¼ teaspoon fine sea salt
- 1 pound fresh strawberries, hulled and sliced or diced
- 2-3 tablespoons granulated sugar (for macerating strawberries)
- 1 tablespoon fresh lemon juice (for strawberries, optional)
Preparing the Perfect Graham Cracker Crust
- Prepare your graham cracker crumbs: First, we need to get our graham crackers into fine crumbs. You have a couple of options here. My personal favorite method for efficiency and consistency is using a food processor. Simply break your graham cracker sheets into smaller pieces and pulse them in the food processor until they form fine, even crumbs. We’re looking for a texture similar to fine sand, without any large chunks. If you don’t have a food processor, no worries! You can place the graham crackers in a large, heavy-duty Ziploc bag, seal it, and then use a rolling pin or the bottom of a heavy pan to crush them. Just make sure to really get in there and break down all the pieces.
- Melt the butter: Next, carefully melt your unsalted butter. You can do this in a small saucepan over low heat, stirring occasionally until it’s completely liquid, or in a microwave-safe bowl in 20-30 second intervals, stirring in between, until it’s fully melted. Be careful not to let it brown, we just want it perfectly clear and melted.
- Combine crust ingredients: In a medium-sized mixing bowl, combine the graham cracker crumbs, two tablespoons of granulated sugar, and your freshly melted butter. Use a fork or a spoon to mix everything together really well. You want to make sure every single crumb is coated with that buttery goodness. The mixture should resemble wet sand and hold together when you pinch it. This ensures a stable and flavorful base for our delicious Strawberry Cheesecake Cups.
- Portion and press the crust: Now it’s time to build the foundation for our cheesecake cups! You’ll need a muffin tin and paper liners, or small dessert cups. If using a muffin tin, place paper liners in each cavity. This recipe typically yields about 12-16 individual cups, depending on how generous you are with your layers. Divide the graham cracker mixture evenly among your chosen cups. I usually use a tablespoon or a small cookie scoop to ensure even portions. Once the crumbs are in the cups, use the back of a spoon, your fingers, or a small, flat-bottomed glass to firmly press the mixture down into an even layer at the bottom of each cup. The firmer you press, the less likely your crust will crumble when you serve it. A compact crust is key for these delightful treats.
- Chill the crust: Once all your crusts are pressed into place, transfer the muffin tin or individual cups to the refrigerator. Let them chill for at least 15-20 minutes. This chilling step is crucial because it allows the butter to solidify, binding the crumbs together and creating a sturdy base that won’t fall apart when you add the filling. It’s a small step that makes a big difference in the final presentation and enjoyment of your Strawberry Cheesecake Cups.
Crafting the Dreamy Cheesecake Filling
- Ensure cream cheese is at room temperature: This is perhaps one of the most important steps for achieving a perfectly smooth and lump-free cheesecake filling. Make sure your two packages of full-fat cream cheese have been sitting out on the counter for at least an hour, preferably two, until they are very soft to the touch. Cold cream cheese will result in a lumpy filling, no matter how much you beat it. Room temperature cream cheese is non-negotiable for a silky-smooth texture.
- Whip the cream cheese: In a large mixing bowl, using an electric mixer (either a stand mixer with the paddle attachment or a hand mixer), beat the softened cream cheese on medium speed for about 2-3 minutes. We want it to become incredibly light, airy, and fluffy, with no visible lumps. Stop occasionally to scrape down the sides and bottom of the bowl with a rubber spatula to ensure everything is evenly incorporated. This initial beating creates the creamy base for our cheesecake filling.
- Add the powdered sugar and flavorings: Once the cream cheese is beautifully smooth, gradually add the sifted powdered sugar to the bowl. Start on low speed to avoid a “sugar cloud” in your kitchen, then increase to medium-low until it’s fully incorporated. Sifting the powdered sugar beforehand is important to prevent any lumps from forming in your filling. After the sugar, add the pure vanilla extract, the optional but recommended ½ teaspoon of fresh lemon juice, and the fine sea salt. Beat on medium speed for another minute or so, until everything is well combined and the mixture is smooth and glossy. Again, remember to scrape down the sides of the bowl to catch any bits that might be clinging there. The lemon juice really brightens up the flavor of the cream cheese, cutting through the richness beautifully.
- Whip the heavy cream: In a separate, very cold mixing bowl (I like to chill my bowl and whisk attachment in the freezer for 10-15 minutes beforehand), pour your very cold heavy cream. Using your electric mixer, beat the heavy cream on medium-high speed until stiff peaks form. This means when you lift the whisk, the cream will hold its shape firmly. Be careful not to over-whip it, or you’ll end up with butter! It typically takes about 2-4 minutes, depending on the power of your mixer and the coldness of your cream. Perfectly whipped cream is essential for a light and airy no-bake cheesecake.
- Gently fold in the whipped cream: Now, we’re going to combine our two main components. Take about one-third of your whipped cream and add it to the cream cheese mixture. Gently fold it in using a rubber spatula. The goal here is to lighten the cream cheese mixture first, making it easier to incorporate the rest of the whipped cream without deflating it too much. Once that first part is mostly combined, add the remaining whipped cream. Continue to gently fold, using an upward motion from the bottom of the bowl and turning the bowl as you go, until no streaks of whipped cream remain and the mixture is homogenous. Do not overmix! Overmixing will deflate the whipped cream and result in a dense filling, rather than the light and fluffy texture we’re aiming for. We want to preserve all that lovely air we just whipped into the cream. The final consistency should be wonderfully light, smooth, and easily spreadable.
Crafting the Fresh Strawberry Topping
- Prepare the strawberries: First things first, wash your pound of fresh strawberries thoroughly under cool running water. Pat them dry with a clean paper towel. Next, we need to hull them, which means removing the green leafy tops and the small white core beneath. You can do this with a small paring knife or a strawberry huller. For our Strawberry Cheesecake Cups, I prefer to slice some of the strawberries and dice others. Slicing them creates beautiful layers, while dicing them provides nice bursts of flavor in every bite. Feel free to slice them all, dice them all, or do a mix – it’s entirely up to your preference for texture. Aim for relatively consistent sizes so they macerate evenly.
- Macerate the strawberries: In a medium bowl, combine your prepared strawberries with 2-3 tablespoons of granulated sugar and 1 tablespoon of fresh lemon juice (this is also optional but truly enhances the strawberry flavor, making it brighter and more vibrant). Gently toss the strawberries until they are well coated. Let them sit at room temperature for at least 15-20 minutes, or even longer in the refrigerator if you’re making them ahead. What happens during this “maceration” process is quite magical: the sugar draws out the natural juices from the strawberries, creating a wonderful, syrupy liquid that perfectly complements the rich cheesecake filling. The strawberries will become softer and even more flavorful. Give them a gentle stir occasionally to ensure all the berries get to soak in that delicious syrup.
- Taste and adjust: Before assembling, give your macerated strawberries a taste. Depending on the sweetness of your berries, you might want to add another tiny pinch of sugar or a splash more lemon juice. We’re looking for a balance of sweet and slightly tart that will shine through in our cheesecake cups. This topping should be bright and bursting with fresh strawberry flavor.
Assembling Your Irresistible Strawberry Cheesecake Cups
- Retrieve chilled crusts: Take your chilled graham cracker crusts out of the refrigerator. They should feel firm and solid, ready to hold our creamy filling.
- Pipe or spoon in the cheesecake filling: This is where it starts to look like a true dessert! You have a couple of options for getting the cheesecake filling into your cups. For a neat and professional look, I highly recommend transferring the cheesecake filling into a large piping bag fitted with a round tip (or simply snip off the end of the bag). Pipe the filling over the chilled crusts, filling each cup about two-thirds of the way full. If you don’t have a piping bag, no worries at all! A spoon or a small cookie scoop works perfectly fine. Just spoon the filling onto the crusts and gently smooth the top with the back of the spoon. Try to be as even as possible across all your cups.
- Add the strawberry topping: Once the cheesecake filling is in place, spoon a generous amount of your macerated strawberries over the top of each cup. Make sure to get some of that delicious strawberry syrup too, as it will trickle down and moisten the cheesecake, creating an even more delightful experience. Arrange a few sliced strawberries on top for a beautiful presentation, or simply pile on the diced ones.
- Optional garnishes: For an extra touch of elegance, you can garnish your Strawberry Cheesecake Cups with a small sprig of fresh mint or a few tiny shavings of white chocolate just before serving. These little additions not only look lovely but can add a fresh aroma or subtle textural contrast.
Chilling for Perfection
- Chill thoroughly: Once all your Strawberry Cheesecake Cups are assembled, it’s crucial to chill them properly. Place the muffin tin or individual cups back into the refrigerator. Cover them loosely with plastic wrap to prevent them from absorbing any unwanted odors from your fridge. Allow them to chill for a minimum of 4 hours, but ideally, overnight. This chilling period is essential for the cheesecake filling to fully set and firm up, ensuring a stable and creamy texture. Rushing this step will result in a softer, less defined cheesecake cup.
- Serving suggestions: When you’re ready to serve these delightful treats, carefully lift them out of the muffin tin by pulling on the paper liners. If using individual cups, they’re ready to go! These Strawberry Cheesecake Cups are best enjoyed cold. The contrast between the firm crust, the creamy, tangy cheesecake filling, and the juicy, sweet strawberries is simply divine.
- Storage: Any leftover Strawberry Cheesecake Cups should be stored in an airtight container in the refrigerator. They will keep beautifully for up to 3-4 days, making them perfect for preparing ahead of time for parties or enjoying as a week-long treat. Just ensure they are well covered to maintain their freshness and prevent them from drying out. Enjoy every spoonful of these irresistible creations!
Conclusion:
And there you have it, my friends! We’ve reached the sweet finale of our culinary journey together, and I truly hope you’re feeling as excited as I am about this incredible dessert. If you’ve followed along, you now possess the secret to creating truly unforgettable Strawberry Cheesecake Cups that are, without a doubt, a must-try for any dessert enthusiast. Why is this recipe so special, you ask? Well, let me tell you.
First and foremost, it’s the sheer delight of the taste. Imagine a velvety-smooth, rich, and tangy cheesecake filling, perfectly balanced with the bright, sweet burst of fresh strawberries, all nestled atop a crisp, buttery graham cracker crust. It’s a symphony of textures and flavors that dance on your palate with every spoonful. This isn’t just a dessert; it’s an experience, a moment of pure, unadulterated bliss that feels both luxurious and comforting. The individual portioning means everyone gets their own perfect treat, eliminating any awkward slicing or serving mishaps. They’re visually stunning, too, making them an ideal showstopper for dinner parties, potlucks, or even just a special treat for yourself after a long week. You’ll be amazed at how something so elegant can be so surprisingly simple to assemble, proving that gourmet flavors don’t always require hours in the kitchen. Seriously, these cups are a game-changer!
Unleash Your Inner Dessert Artist with Serving Suggestions and Variations!
But the magic doesn’t stop at the basic recipe. Oh no, my creative culinary adventurers! These Strawberry Cheesecake Cups are incredibly versatile, offering endless possibilities for personalization. For an extra touch of indulgence, I highly recommend a dollop of freshly whipped cream right before serving, perhaps with a delicate mint sprig for a pop of color and freshness. A drizzle of high-quality chocolate sauce or a sprinkle of white chocolate shavings can elevate them to another level of decadence, playing beautifully against the sweetness of the strawberries. If you’re feeling adventurous, consider a dusting of cocoa powder or even a sprinkle of toasted coconut flakes for a tropical twist.
And let’s talk about variations! While strawberries are absolutely divine, don’t hesitate to experiment with other seasonal fruits. Imagine luscious blueberry cheesecake cups, or perhaps a vibrant mixed berry medley with raspberries and blackberries. Diced peaches, mango, or even kiwi can introduce exciting new flavor profiles. For a different textural experience, swap out the graham cracker crust for crushed Oreos for a chocolatey base, or use shortbread cookies for a buttery, more delicate foundation. You could even incorporate a hint of lemon zest directly into the cheesecake filling for an extra zing, or a touch of almond extract to complement the fruit. For those looking for a slightly different take, a small amount of a fruit compote (homemade or store-bought) can add an extra layer of sweetness and depth on top. The beauty of these cups is their adaptability; they truly are a blank canvas for your dessert dreams. Don’t be afraid to make them your own signature creation!
Your Turn: Try, Share, and Inspire!
Now that you’re armed with all the knowledge and inspiration, there’s only one thing left to do: get into your kitchen and make these delightful treats! I wholeheartedly encourage you to give this recipe for Strawberry Cheesecake Cups a try. You won’t regret it, I promise. There’s a unique satisfaction that comes from creating something so delicious from scratch, and even more joy in sharing it with loved ones. Once you’ve whipped up your batch, I would absolutely love to hear about your experience. Did you stick to the classic? Did you venture into creative variations? What was your favorite part? Share your thoughts, your successes, and even your “lessons learned” in the comments section below. Even better, snap a photo of your beautiful creations and share them on your favorite social media platforms, tagging me if you can! Let’s inspire each other with our culinary adventures. Your feedback and creativity are what make this community so vibrant and exciting. So go ahead, bake up some happiness, and let the deliciousness begin!
Strawberry Cheesecake Cups (No-Bake)
These no-bake Strawberry Cheesecake Cups are a delightful individual dessert, combining creamy, tangy cheesecake filling with a sweet burst of fresh strawberries and a crunchy graham cracker crust. Perfect for busy schedules or warm days, they offer an elegant, yet simple, sweet escape.
Ingredients
-
1 ½ cups graham cracker crumbs
-
¼ cup unsalted butter, melted
-
2 tbsp granulated sugar (for crust)
-
2 (8 oz) packages cream cheese, softened to room temperature
-
1 cup heavy cream, very cold
-
¾ cup powdered sugar, sifted
-
1 tsp pure vanilla extract
-
½ tsp fresh lemon juice (optional, for filling)
-
¼ tsp fine sea salt
-
1 lb fresh strawberries, hulled and sliced or diced
-
2-3 tbsp granulated sugar (for strawberries)
-
1 tbsp fresh lemon juice (optional, for strawberries)
Instructions
-
Step 1
For the crust: Process or crush graham crackers into fine crumbs. In a medium bowl, combine crumbs, 2 tbsp granulated sugar, and melted butter. Mix well until crumbs are fully coated and resemble wet sand. -
Step 2
Portion the crust: Divide the graham cracker mixture evenly among 12-16 muffin cups (lined) or small dessert cups. Press firmly into an even layer at the bottom of each cup. Chill in the refrigerator for at least 15-20 minutes to set. -
Step 3
For the filling: In a large bowl, beat softened cream cheese with an electric mixer on medium speed for 2-3 minutes until light, airy, and lump-free. Scrape down the sides of the bowl. -
Step 4
Gradually add sifted powdered sugar, vanilla extract, optional ½ tsp lemon juice, and sea salt to the cream cheese. Beat on medium speed for another minute until smooth and glossy. Scrape down sides. -
Step 5
In a separate, very cold bowl (preferably chilled), beat very cold heavy cream on medium-high speed until stiff peaks form. Be careful not to over-whip. -
Step 6
Gently fold one-third of the whipped cream into the cream cheese mixture using a rubber spatula to lighten it. Then, gently fold in the remaining whipped cream until just combined and no streaks remain. Do not overmix. -
Step 7
For the strawberry topping: Wash, hull, and slice or dice the fresh strawberries. In a medium bowl, combine prepared strawberries with 2-3 tbsp granulated sugar and 1 tbsp optional fresh lemon juice. Gently toss and let sit at room temperature for 15-20 minutes for juices to release. Taste and adjust sweetness/tartness if needed. -
Step 8
Assemble the cups: Retrieve the chilled crusts. Pipe or spoon the cheesecake filling over the crusts, filling each cup about two-thirds full. Smooth the tops. -
Step 9
Spoon a generous amount of macerated strawberries (including their syrup) over the top of each cheesecake cup. Garnish with a fresh mint sprig or white chocolate shavings, if desired. -
Step 10
Chill thoroughly: Loosely cover the assembled cheesecake cups with plastic wrap and refrigerate for a minimum of 4 hours, or ideally overnight, for the filling to fully set. -
Step 11
Serve and store: Carefully lift cups from muffin tin by pulling on the liners. Serve cold. Store any leftover Strawberry Cheesecake Cups in an airtight container in the refrigerator for up to 3-4 days.
Important Information
Nutrition Facts (Per Serving)
It is important to consider this information as approximate and not to use it as definitive health advice.
Allergy Information
Please check ingredients for potential allergens and consult a health professional if in doubt.


Leave a Comment