
Strawberry brownies are the ultimate indulgence, a delightful fusion of two beloved desserts that promises pure bliss with every bite. Imagin extracte sinking your teeth into a fudgy, rich chocolate brownie, but then, a burst of vibrant, sweet strawberry flavor cuts through the decadent chocolate, creating an absolutely divine experience. It’s no wonder why strawberry brownies have captured so many hearts; they offer that perfect balance of comforting familiarity and exciting novelty. The sweetness of fresh strawberries elevates the classic brownie from simply delicious to utterly sensational, making them a perfect treat for any occasion. Whether you’re craving something deeply chocolatey or a taste of summer sunshine, these strawberry brownies deliver on all fronts, offering a truly memorable dessert that’s both sophisticated and utterly approachable. I can’t wait to share how we make these incredible strawberry brownies!
Strawberry Brownies
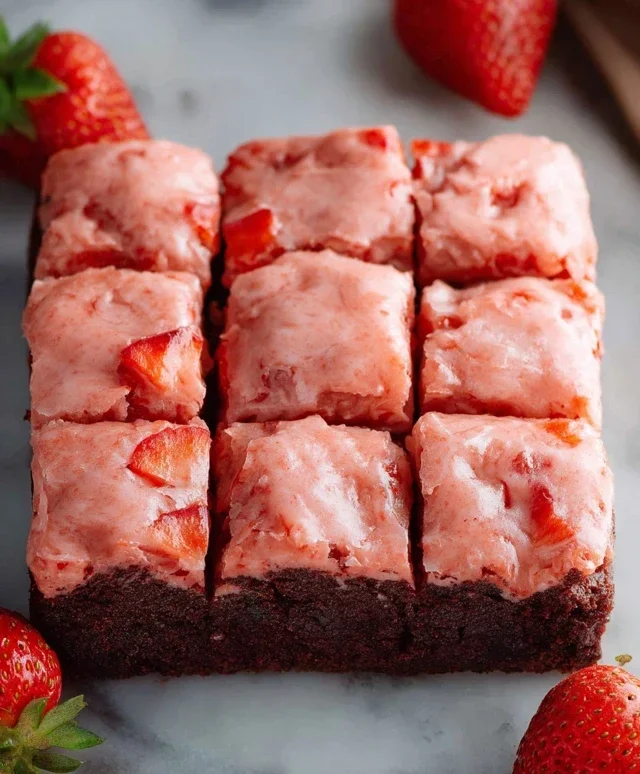
Who says brownies have to be boring? These Strawberry Brownies are a delightful twist on a classic, bringin extractg a burst of fruity sweetness to your favorite fudgy treat. Imagin extracte the rich, chocolatey goodness you love, now infused with the vibrant flavor and gorgeous pink hue of strawberries. These are surprisingly easy to make and are guaranteed to become a new favorite for family gatherings, potlucks, or simply when you’re craving something special.
The secret to these incredibly simple yet undeniably delicious brownies lies in a pantry staple: strawberry cake mix. Yes, you read that right! Using a good quality strawberry cake mix, especially one with pudding included in the mix, provides the perfect foundation for a tender, flavorful brownie base without requiring a complex list of dry ingredients. The addition of a few simple wet ingredients and a luscious strawberry glaze elevates them from a cake mix hack to a truly gourmet dessert.
Let’s get started on creating these delightful Strawberry Brownies!
Ingredients:
Cooking Instructions:
1. Prepare Your Baking Pan and Preheat the Oven: Before you even start mixing your ingredients, it’s crucial to prepare your baking pan. I like to use an 8×8 inch square baking pan. To ensure your brownies come out cleanly and prevent any sticking, grease the pan thoroughly with butter or non-stick cooking spray. For an extra layer of insurance and easier cleanup, you can also line the pan with parchment paper, leaving an overhang on the sides to create “handles” for lifting the brownies out once they’re baked. Next, preheat your oven to 350°F (175°C). Having your oven at the correct temperature before the batter goes in is key to even baking and achieving that perfect brownie texture.
2. Combine the Brownie Batter Ingredients: In a large mixing bowl, combine the contents of the strawberry cake mix box. Add the two large eggs, the 1/3 cup of vegetable or canola oil, and the 1 teaspoon of vanilla extract. If you’re feeling adventurous and want an extra rich and slightly tangy base, this is also the time to add that optional 1 tablespoon of cream cheese. The cream cheese will melt into the batter as it bakes, contributing to a denser, fudgier texture. Now, using a whisk or an electric mixer on low speed, mix these ingredients together until they are just combined. Be careful not to overmix the batter; overmixing can develop the gluten in the flour excessively, leading to tougher brownies. You want a thick, glossy batter.
3. Bake the Brownie Base: Pour the prepared brownie batter into your greased and prepared 8×8 inch baking pan. Use a spatula to spread the batter evenly, ensuring it reaches all the corners of the pan. Once your oven has reached the preheated temperature of 350°F (175°C), carefully place the pan in the center of the oven. Bake for approximately 25-30 minutes. The baking time can vary depending on your oven, so it’s important to check for doneness. You’ll know the brownies are ready when a toothpick inserted into the center comes out with a few moist crum extractbs attached, but not wet batter. If the toothpick comes out completely clean, they might be slightly overbaked.
4. Prepare the Strawberry Glaze: While the brownies are baking, you can prepare the delicious strawberry glaze. In a small bowl, combine the 3/4 cup of powdered sugar, the 2 tablespoons of strawberry preserves, and the 1 ½ tablespoons of milk. If you are using a particularly thick or seedy strawberry preserve, you might want to strain it first for a smoother glaze. Whisk these ingredients together until you have a smooth, pourable glaze. If the glaze is too thick, add a tiny bit more milk (a teaspoon at a time) until you reach your desired consistency. If it’s too thin, you can add a little more powdered sugar. The goal is a glaze that will generously coat the brownies.
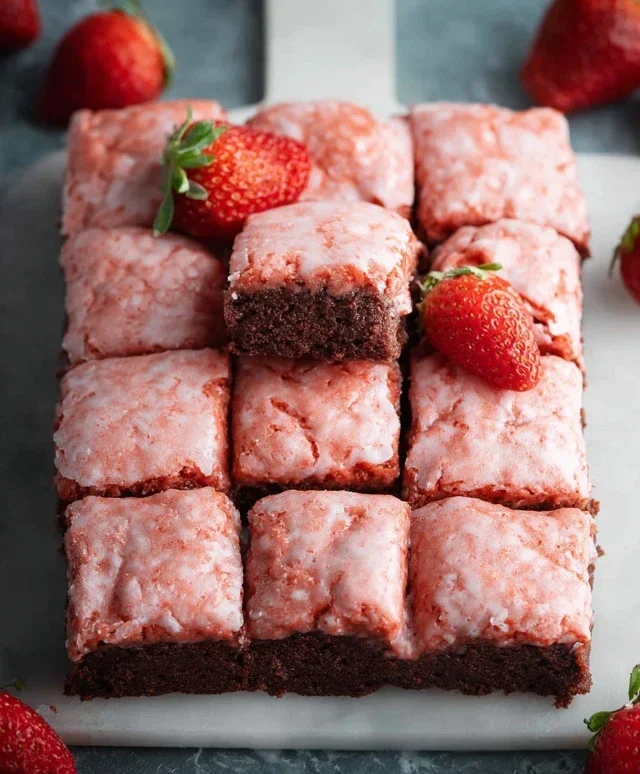
5. Glaze and Cool: Once the brownies have finished baking, carefully remove the pan from the oven. Let the brownies cool in the pan on a wire rack for about 15-20 minutes. This initial cooling period is important for allowing the brownies to set up properly before you attempt to glaze them. After this initial cooling, you can either glaze the brownies directly in the pan, or if you lined them with parchment paper, carefully lift the entire brownie slab out onto the wire rack to cool further before glazing. Once the brownies have cooled enough so they are not piping hot, generously pour and spread the prepared strawberry glaze over the top. Allow the glaze to set completely, which usually takes another 20-30 minutes, before cutting into squares. For the cleanest cuts, I like to use a sharp knife that has been dipped in hot water and wiped dry between each cut. Enjoy these beautiful and delicious Strawberry Brownies!
Conclusion:
And there you have it – a truly delightful recipe for Strawberry Brownies that’s sure to become a new favorite! What makes these so special? It’s the perfect marriage of rich, fudgy brownie goodness with the bright, sweet burst of fresh strawberries. It’s a classic dessert with an exciting fruity twist that’s surprisingly easy to whip up. These brownies are wonderfully versatile; they’re fantastic served warm with a scoop of vanilla ice cream for an decadent treat, or chilled and cut into neat squares for a portable snack or dessert for gatherings. Don’t be afraid to experiment! You can add a swirl of white chocolate to the batter for an extra layer of sweetness, or even fold in a handful of mini chocolate chips alongside the strawberries. The possibilities are endless, and the results are always delicious. I highly encourage you to give these Strawberry Brownies a try – I promise you won’t regret it!
Frequently Asked Questions:
Can I use frozen strawberries?
Yes, you can! If using frozen strawberries, make sure to thaw them completely and drain off as much excess liquid as possible before adding them to the batter. This will prevent your brownies from becoming too wet.
How long do these brownies last?
Stored in an airtight container at room temperature, these Strawberry Brownies will stay fresh for about 3-4 days. For longer storage, you can refrigerate them, which will extend their shelf life to about a week. They also freeze beautifully!
Strawberry Brownies
Delicious and easy strawberry brownies made with strawberry cake mix and fresh strawberry preserves.
Ingredients
-
1 box strawberry cake mix with pudding
-
2 large eggs
-
1/3 cup vegetable oil
-
1 teaspoon vanilla extract
-
3/4 cup powdered sugar
-
2 tablespoon strawberry preserves
-
1 ½ tablespoons milk
-
1 tablespoon cream cheese (optional)
Instructions
-
Step 1
Preheat oven to 350°F (175°C). Grease and flour an 8×8 inch baking pan. -
Step 2
In a large bowl, combine the strawberry cake mix, eggs, vegetable oil, and vanilla extract. Mix until well combined and smooth. -
Step 3
Spread the batter evenly into the prepared baking pan. -
Step 4
In a small bowl, whisk together the powdered sugar, strawberry preserves, and milk until smooth and drizzly. If using, mix in the cream cheese until incorporated. -
Step 5
Drizzle the strawberry glaze over the brownie batter in the pan. Use a toothpick or knife to swirl the glaze into the batter for a marbled effect. -
Step 6
Bake for 30-35 minutes, or until a toothpick inserted into the center comes out clean. -
Step 7
Let cool completely in the pan before cutting into squares.
Important Information
Nutrition Facts (Per Serving)
It is important to consider this information as approximate and not to use it as definitive health advice.
Allergy Information
Please check ingredients for potential allergens and consult a health professional if in doubt.

Leave a Comment