
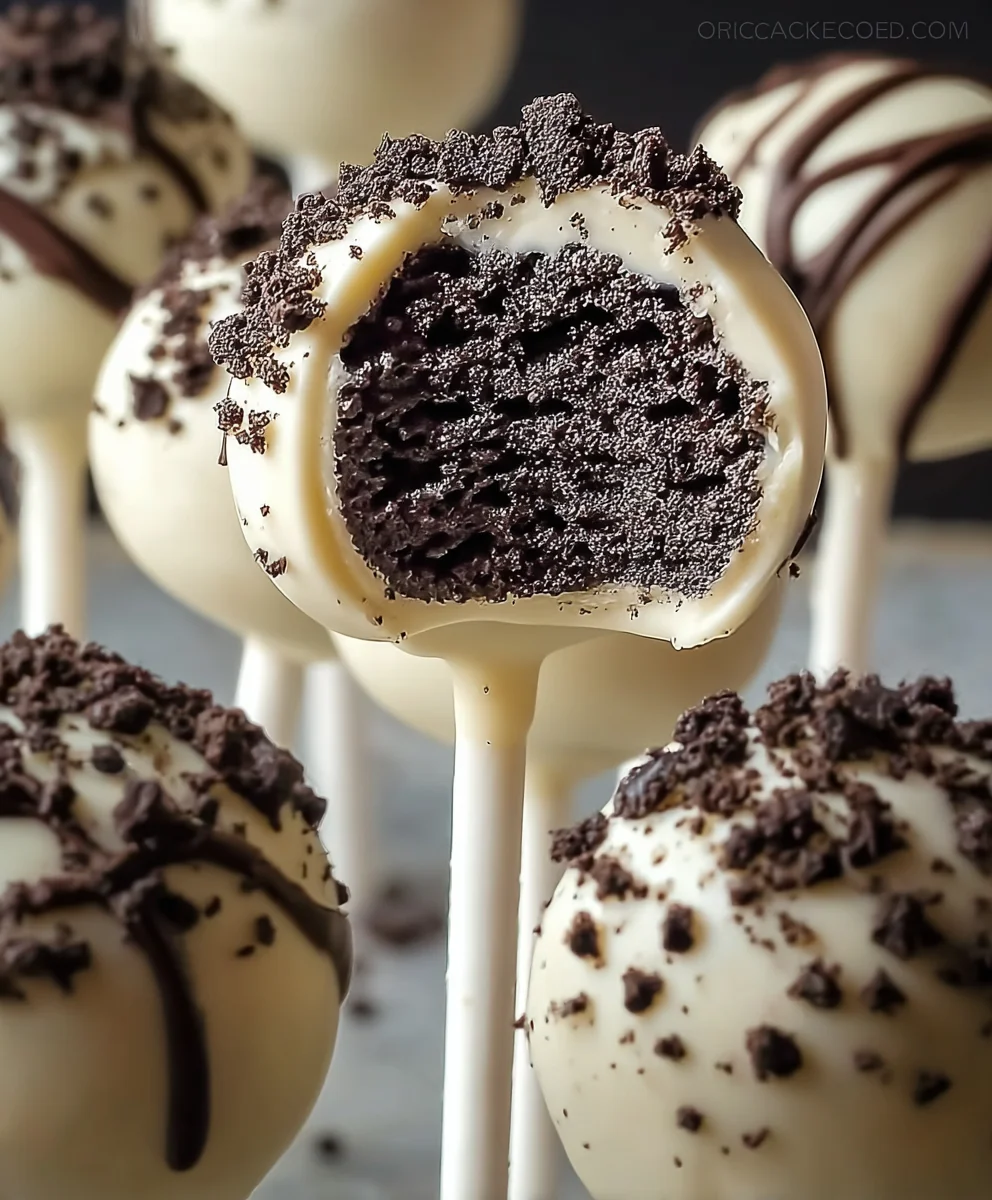
Oreo Cookies Cream Cake Pops are truly a delightful creation that brings together two beloved dessert components into one irresistible, bite-sized treat. I’ve always been fascinated by how a simple idea can evolve into a worldwide phenomenon, and cake pops, with their charming origins often attributed to innovative home bakers, certainly fit that description. Combining the classic, universally adored Oreo cookie—a confection first introduced to the world way back in 1912—with the whimsical fun of a cake pop creates a dessert experience that is both nostalgic and exciting.
Why Everyone Loves These Irresistible Treats
People absolutely adore this dish not just for its incredible taste, featuring that familiar rich chocolate cookie and creamy filling, but also for its wonderfully moist cake texture enrobed in a perfectly set candy shell. They are incredibly convenient for parties, effortless to serve, and frankly, just plain fun to eat! This recipe for Oreo Cookies Cream Cake Pops is designed to bring joy, simplify your dessert preparation, and impress guests with minimal fuss. Prepare to discover your new favorite celebratory snack!

Ingredients:
- 36 full-size Oreo cookies (one standard family pack): I always go for the classic chocolate sandwich cookie. You can experiment with different Oreo flavors, but the original is what makes these Oreo Cookies Cream Cake Pops truly iconic!
- 8 ounces cream cheese: Make sure it’s full-fat and, most importantly, completely softened to room temperature. This is crucial for achieving that wonderfully smooth, pliable texture in your cake pop base.
- 24 ounces white melting wafers or candy melts: High-quality melting wafers will give you the smoothest, most professional-looking coating. You can also use milk chocolate or dark chocolate, depending on your preference, but white chocolate really lets the Oreo flavor shine through.
- 2 tablespoons shortening or coconut oil (optional): This is my secret weapon for thinning out the melting wafers just slightly, making them easier to dip and ensuring a super-smooth finish.
- Various sprinkles, additional crushed Oreo cookies, or chocolate drizzles (for decoration): Let your creativity run wild here! I love using contrasting sprinkles or a simple drizzle of dark chocolate to make these Oreo Cookies Cream Cake Pops pop even more.
- Lollipop sticks (4-inch or 6-inch): You’ll need about 36 of these.
Equipment You’ll Need:
- Food processor: Essential for quickly and efficiently crushing your Oreo cookies into fine crumbs. If you don’t have one, a large Ziploc bag and a rolling pin will work, but it takes a bit more elbow grease!
- Large mixing bowl: For combining the crushed Oreos and cream cheese.
- Baking sheets: You’ll need at least two, lined with parchment paper, to hold your formed cake pop balls and later, the finished pops.
- Parchment paper or wax paper: To prevent sticking.
- Small, microwave-safe bowl or a double boiler setup: For melting your candy wafers. I prefer a double boiler for more control, but the microwave is quicker if you’re careful.
- Tall, narrow glass or mug: Perfect for holding the melted candy coating, making dipping much easier and ensuring the cake pops are fully submerged.
- Spoon or silicone spatula: For stirring melted chocolate and assisting with dipping.
- Styrofoam block or a cake pop stand: Absolutely necessary for holding your finished Oreo Cookies Cream Cake Pops upright while the coating sets. Trust me, trying to lay them down will ruin your beautiful coating!
- Small ziploc bag or piping bag with a fine tip (optional): For chocolate drizzles.
Phase 1: Preparing the Oreo Cookie Crumb Base
- Crush the Oreo Cookies: This is where the magic begins! Take all 36 full-size Oreo cookies, cream filling and all, and place them into the bowl of your food processor. I find that leaving the cream filling in actually adds to the richness and helps bind everything together, giving our Oreo Cookies Cream Cake Pops that signature flavor. Pulse the cookies until they are finely ground into even crumbs. You want them to resemble fine sand – no large chunks allowed! This step is critical for a smooth texture. If you don’t have a food processor, no worries! Place the cookies in a large, sturdy Ziploc bag, seal it well, and use a rolling pin to crush them. Just be patient and ensure all cookies are uniformly crushed.
- Combine with Cream Cheese: Transfer all of your finely crushed Oreo crumbs into a large mixing bowl. Now, add the 8 ounces of softened cream cheese. Remember, the cream cheese absolutely must be at room temperature. If it’s too cold, it will be hard to mix evenly, leading to lumps and a less uniform cake pop base. I like to use a sturdy spoon or a rubber spatula to start mixing. At first, it might seem like there’s not enough cream cheese to bind all those crumbs, but keep going!
- Mix Until Fully Incorporated: Continue to mix the Oreo crumbs and cream cheese until they are thoroughly combined. You might even want to get your hands in there for the last bit of mixing; it’s the best way to ensure everything is perfectly blended. You’re looking for a consistency that is firm, pliable, and holds its shape when pressed together, almost like a thick dough. There should be no dry crumbs remaining and no visible streaks of cream cheese. This is the foundation of your delicious Oreo Cookies Cream Cake Pops, so make sure it’s perfect!
Phase 2: Forming the Oreo Cake Pop Balls
- Prepare Your Workspace: Line a large baking sheet with parchment paper or wax paper. This will prevent your formed cake pop balls from sticking. Having a clean, organized workspace makes this process much smoother.
- Scoop and Roll: Using a small cookie scoop (about 1.5 tablespoons) or simply measuring with your hands, take small portions of the Oreo mixture. Roll each portion between your palms to form smooth, dense balls. I aim for balls that are roughly 1 to 1.5 inches in diameter, or about the size of a golf ball. Consistency in size is key here, as it ensures uniform dipping and drying times later on. Make sure to roll them firmly so they don’t crumble apart.
- Arrange on Baking Sheet: Place each perfectly rolled Oreo cake pop ball onto your prepared baking sheet. Leave a little space between each one. You should get approximately 36 cake pop balls from this recipe, matching the number of Oreos you started with. It’s a satisfying moment to see all those little rounds lined up!
Phase 3: Chilling the Cake Pop Balls
- Initial Chill for Firmness: Once all your cake pop balls are formed and neatly arranged on the baking sheet, it’s time to chill them. Place the baking sheet into the refrigerator for at least 30 minutes. This chilling step is absolutely crucial for the success of your Oreo Cookies Cream Cake Pops. It helps the balls firm up significantly, which prevents them from crumbling when you insert the lollipop sticks and helps them maintain their shape during the dipping process.
- Prepare for Dipping: While the balls are chilling, gather your lollipop sticks and your melting wafers. You’ll want to be ready to go as soon as the balls are firm enough.
- The Lollipop Stick Technique: After the initial chill, remove the baking sheet from the refrigerator. Take one lollipop stick and dip the very tip (about half an inch) into a small amount of the melted candy coating (you can melt a tiny bit in a separate small bowl now, or wait until the next step). Insert the dipped end of the stick about halfway into the center of an Oreo cake pop ball. The melted coating acts like a “glue,” helping the stick adhere firmly to the cake pop. Repeat this process for all of your cake pop balls.
- Second Chill for Setting the Sticks: Once all sticks are inserted, return the baking sheet with the stick-inserted cake pops to the refrigerator for another 15-20 minutes. This second chill allows the candy coating “glue” around the sticks to fully set, ensuring your Oreo Cookies Cream Cake Pops won’t fall off their sticks when you dip them. Don’t skip this step! It’s the difference between beautifully dipped pops and frustrating, fallen pops.
Phase 4: Preparing the Coating and Decorating Station
-
Melt the Candy Coating: Now for the fun part – getting ready to dip! You have a couple of options here.
- Microwave Method: Place your 24 ounces of white melting wafers into a microwave-safe bowl. Microwave on 50% power for 30-second intervals, stirring thoroughly after each interval. It’s very important not to overheat the coating, as it can seize up and become unusable. Stir until smooth and completely melted. If the coating seems too thick, you can stir in the optional 1-2 tablespoons of shortening or coconut oil, a teaspoon at a time, until you reach a consistency that is fluid enough for dipping but still thick enough to coat evenly.
- Double Boiler Method (my preferred method for ultimate smoothness): Fill a saucepan with about an inch or two of water and bring it to a simmer. Place a heat-safe bowl (make sure it’s larger than the saucepan’s opening so it doesn’t touch the water) on top of the saucepan. Add your melting wafers to the top bowl. The steam from the simmering water will gently melt the wafers. Stir continuously until completely smooth. Again, add shortening or coconut oil if needed to achieve the desired dipping consistency.
The ideal consistency should be like warm, thick paint – smooth, flowing, and free of lumps.
- Set Up Your Dipping Station: Pour the melted candy coating into a tall, narrow glass or mug. This depth makes it much easier to fully submerge your cake pops without tilting the glass too much. Have your prepared styrofoam block or cake pop stand ready nearby. Also, prepare your decorating elements: if you’re using sprinkles, put them in a shallow bowl. If you’re doing a drizzle, have that chocolate melted and ready in a piping bag or a separate bowl with a spoon. Time is of the essence once the cake pops are dipped!
Phase 5: Dipping and Decorating Your Oreo Cookies Cream Cake Pops
- Dip One by One: Take one chilled cake pop ball on its stick from the refrigerator. Hold the stick firmly and carefully lower the cake pop ball into the melted coating, submerging it completely.
- Remove Excess Coating: Lift the cake pop straight up out of the coating. Gently tap the stick against the rim of the glass or bowl, allowing any excess coating to drip back into the container. You can also gently spin the stick between your fingers to help even out the coating and remove drips. Don’t tap too aggressively, or the cake pop might fall off! Continue tapping and spinning until the dripping slows to just a few small drips. This usually takes about 10-15 seconds.
- Decorate Immediately (Optional): If you’re adding sprinkles, apply them right away while the coating is still wet. Hold the cake pop over your bowl of sprinkles and gently rotate it, showering it with your chosen decorations. If you’re doing a drizzle, you’ll wait until the coating is mostly set, then apply the drizzle. For additional crushed Oreos, gently press them onto the wet coating. These little touches really elevate the appearance of your Oreo Cookies Cream Cake Pops!
- Insert into Styrofoam Block to Set: Once dipped and decorated (if applicable), carefully insert the stick of the finished cake pop into your styrofoam block or cake pop stand. Make sure it stands upright without touching anything else. This allows the coating to set smoothly and evenly without getting flattened on one side.
- Repeat the Process: Continue dipping and decorating all of your Oreo Cookies Cream Cake Pops. As you work, keep an eye on your melted coating. If it starts to thicken too much, gently rewarm it in the microwave (on low power) or over the double boiler, stirring in a tiny bit more shortening or coconut oil if necessary to maintain that perfect dipping consistency. Work relatively quickly but carefully to ensure the cake pop balls remain chilled enough inside to prevent melting or falling apart. You’ll get into a rhythm, I promise!
Phase 6: Final Setting and Storage Tips
- Allow Coating to Fully Set: Once all your Oreo Cookies Cream Cake Pops are dipped and decorated, leave them in the styrofoam block at room temperature or, for quicker setting, transfer them back to the refrigerator for about 15-30 minutes. The coating should be completely firm to the touch before handling or packaging. This is a moment of pure anticipation as your beautiful creations firm up!
- Storage: Store your finished Oreo Cookies Cream Cake Pops in an airtight container in the refrigerator. Because they contain cream cheese, refrigeration is essential to keep them fresh and delicious. They will typically last for up to one week, though I doubt they’ll stick around that long!
- Serving Suggestion: For the best flavor and texture, I like to take them out of the refrigerator about 15-20 minutes before serving, allowing them to come closer to room temperature. This makes the cake pop filling softer and even more delightful to bite into. Enjoy the fruits of your labor – these homemade Oreo Cookies Cream Cake Pops are always a huge hit!
Conclusion:
So, my fellow dessert enthusiasts, we’ve come to the sweet culmination of our culinary adventure! I truly hope you’ve enjoyed delving into the simple yet utterly delightful process of creating what I believe is one of the most irresistible treats you’ll ever bake. This isn’t just another recipe; it’s an experience, a moment of pure joy both in the making and the tasting. When you bite into one of these, you’re not just savoring a dessert; you’re indulging in a little piece of edible happiness, a perfect balance of creamy, crunchy, and chocolatey goodness that truly speaks to the soul.
Why This Recipe Is an Absolute Must-Try:
What makes these cake pops stand out from the crowd? It’s the magical fusion of textures and flavors, of course! We’re talking about the iconic crunch of crushed Oreo cookies blended seamlessly with the rich, tangy creaminess of cream cheese, all enveloped in a decadent chocolate shell. Each bite offers a delightful contrast – the dense, moist cake-like interior, the smooth chocolate coating, and the playful sprinkle of extra cookie crumbs or vibrant decorations. It’s a treat that feels sophisticated enough for a special occasion yet is wonderfully approachable to make. Trust me, the sheer “wow” factor these bring to any table is unmatched. They’re fantastic for seasoned bakers looking for a fun new project, and they’re equally perfect for beginners wanting to impress without hours of complicated steps. Imagine the smiles when you present a platter of these beauties – they’re conversation starters, memory makers, and simply an explosion of flavor in miniature form. This recipe truly transforms humble ingredients into something extraordinary, promising a delightful sensory experience with every single pop. It’s the kind of dessert that satisfies every craving, from the nostalgic comfort of Oreos to the sophisticated indulgence of a rich, creamy confection. You’ll find yourself reaching for just one more, and then another!
Unleash Your Creativity: Serving Suggestions & Brilliant Variations!
Now, let’s talk about how you can make these even more spectacular, or tailor them to your personal taste and occasion. While they are absolutely divine as is, served chilled on a platter, there are countless ways to elevate your dessert game. For serving, consider arranging them artistically on a tiered stand for a party centerpiece, or individually wrapping them in cello bags with pretty ribbons for charming party favors or thoughtful homemade gifts. Imagine gifting a box of these to a friend – pure delight! They also make excellent additions to a dessert bar, offering a bite-sized treat that’s easy to grab and enjoy. As for variations, the sky’s the limit! Try using different types of chocolate for your coating: a rich dark chocolate for a more intense flavor, or a vibrant white chocolate that you can color with food-safe gel dyes to match any theme – think pastel colors for Easter, or bold hues for a birthday bash. Experiment with toppings beyond simple sprinkles; think finely chopped nuts, toasted coconut flakes, mini chocolate chips, or even a drizzle of contrasting chocolate for an elegant finish. For an extra layer of flavor within the cake pop itself, you could add a tiny splash of vanilla extract, peppermint extract during the holidays, or a hint of almond extract to the cream cheese mixture, elevating the taste profile. And don’t feel limited to classic Oreos; explore other delicious cookie varieties or even different flavored Oreos like mint, peanut butter, or golden Oreos for an exciting twist. You could even shape them into mini cakes instead of pops for a slightly different presentation, perfect for a plated dessert. These modifications allow you to personalize your creations, making each batch uniquely yours and showcasing your culinary flair.
So, what are you waiting for? I’ve shared all my tips and tricks, and now it’s your turn to step into the kitchen and work your magic. I promise you, the joy of creating these delightful morsels is just as rewarding as indulging in them. Don’t be shy; embrace the fun, get a little messy, and prepare to be amazed by the delicious outcome. This recipe is a gateway to fun, creative baking, and I can’t wait for you to experience the satisfaction of making something so incredibly delicious from scratch. Once you’ve whipped up your own batch of these incredible Oreo Cookies Cream Cake Pops, I would absolutely love to hear all about your experience. Did you try a fun variation? Did they disappear in minutes at your gathering? Please, share your stories, your photos, and your triumphs! Tag me on social media or drop a comment below – I thrive on seeing your culinary successes and hearing your feedback. Your journey in the kitchen inspires me, and I can’t wait to see the delicious creations you’ll bring to life. Happy baking, my friends, and enjoy every single delightful bite!
Oreo Cookies Cream Cake Pops
Oreo Cookies Cream Cake Pops are a delightful, bite-sized treat combining classic Oreo cookies with a moist cake texture, enrobed in a smooth candy shell. Perfect for parties, they’re fun to eat and easy to serve.
Ingredients
-
36 full-size Oreo cookies
-
8 ounces cream cheese, full-fat, softened
-
24 ounces white melting wafers or candy melts
-
2 tablespoons shortening or coconut oil (optional)
-
1/2 cup crushed Oreo cookies (for decoration)
-
Various sprinkles (for decoration)
-
Chocolate drizzles (optional, for decoration)
-
36 lollipop sticks (4-inch or 6-inch)
Instructions
-
Step 1
Finely crush 36 full-size Oreo cookies (with cream filling) in a food processor until fine crumbs. Transfer crumbs to a large bowl. Add 8 oz softened, full-fat cream cheese. Mix thoroughly until a firm, pliable dough forms with no dry crumbs or cream cheese streaks. -
Step 2
Line a baking sheet with parchment paper. Scoop 1.5-tablespoon portions of the mixture and roll into smooth, dense 1-1.5 inch balls. Place balls onto the prepared baking sheet, leaving space between them. -
Step 3
Refrigerate formed balls for at least 30 minutes. Melt a small amount of candy coating. Dip the tip (0.5 inch) of each lollipop stick into the melted coating and insert it halfway into each chilled cake pop ball. Return stick-inserted cake pops to the refrigerator for another 15-20 minutes to set the sticks firmly. -
Step 4
Melt 24 oz white melting wafers (and optional 1-2 tbsp shortening/coconut oil) in a microwave or double boiler until smooth, like warm, thick paint. Pour melted coating into a tall, narrow glass. Have a styrofoam block/cake pop stand and decorations (sprinkles, 1/2 cup crushed Oreos, optional chocolate drizzle) ready. -
Step 5
Take one chilled cake pop. Submerge it completely in melted coating. Lift pop, gently tap stick against the glass rim, and spin to remove excess coating (10-15 seconds). Immediately apply sprinkles or 1/2 cup crushed Oreos while the coating is wet. For chocolate drizzle, wait until the coating is mostly set. Insert finished cake pop stick into a styrofoam block/stand upright to set evenly. Repeat for all pops, rewarming coating as needed. -
Step 6
Allow coating to fully set, either at room temperature or in the refrigerator for 15-30 minutes. Store finished cake pops in an airtight container in the refrigerator for up to 1 week. For best flavor, take out 15-20 minutes before serving.
Important Information
Nutrition Facts (Per Serving)
It is important to consider this information as approximate and not to use it as definitive health advice.
Allergy Information
Please check ingredients for potential allergens and consult a health professional if in doubt.


Leave a Comment