
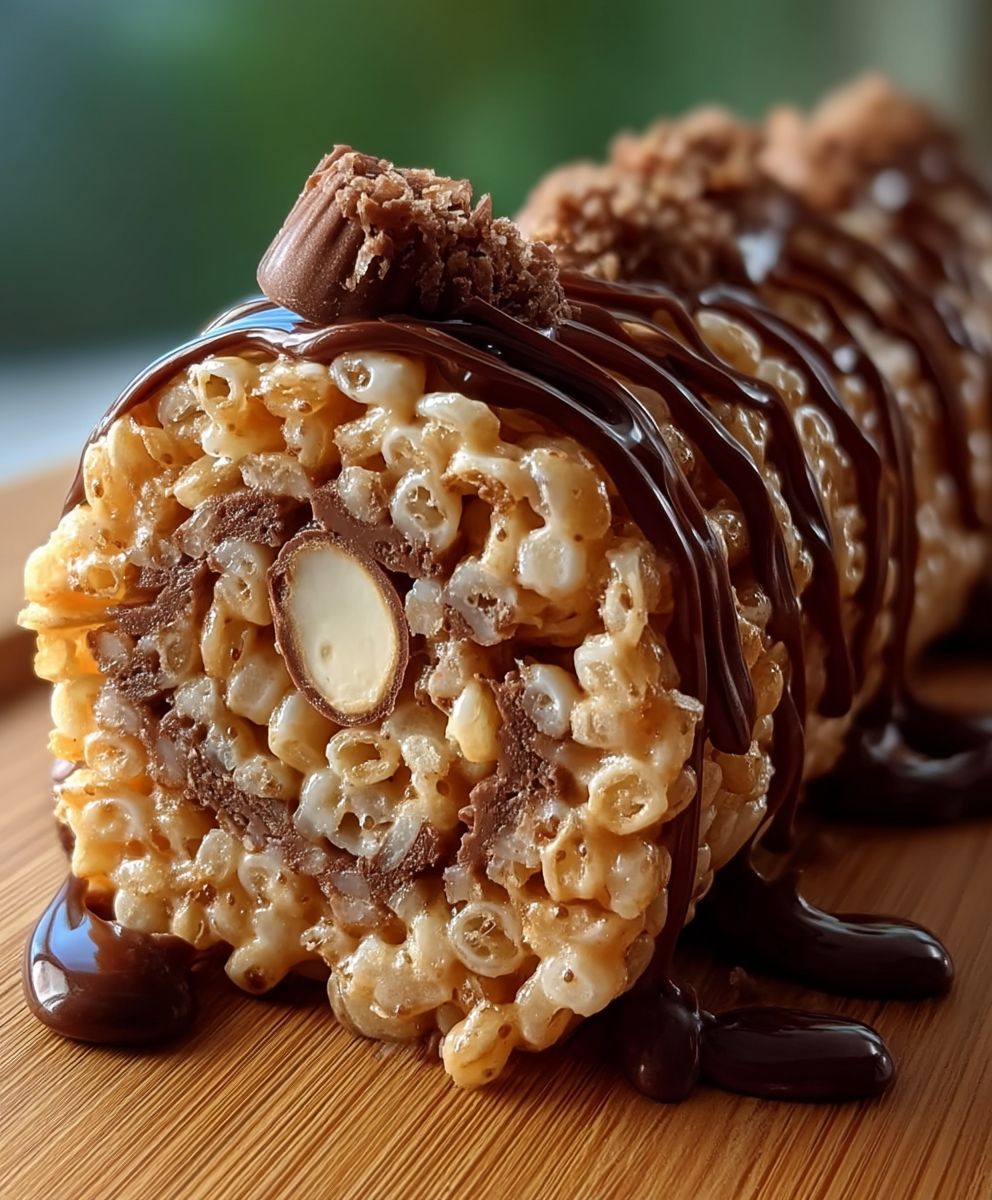
Chocolate Peanut Butter Krispies: Prepare to be transported back to your childhood with a grown-up twist on a timeless classic! Remember those after-school snacks that brought pure, unadulterated joy? Well, we’ve taken that nostalgic goodness and elevated it to a whole new level of deliciousness. These aren’t just any rice krispie treats; they’re a symphony of rich chocolate, creamy peanut butter, and that satisfying crunch that we all know and love.
While the exact origins of the classic rice krispie treat are debated, its popularity exploded in the early 20th century, becoming a staple in lunchboxes and bake sales across America. Our version, the chocolate peanut butter krispies, builds upon that legacy, adding a decadent layer of flavor that’s simply irresistible. The combination of chocolate and peanut butter is a match made in culinary heaven, a pairing that has captivated taste buds for generations.
What makes these treats so universally adored? It’s the perfect balance of textures the airy crispness of the cereal, the smooth creaminess of the peanut butter, and the melt-in-your-mouth chocolate. Plus, they’re incredibly easy to make, requiring no baking and minimal ingredients. Whether you’re looking for a quick and satisfying dessert, a fun activity to do with the kids, or a nostalgic treat to share with friends, these chocolate peanut butter krispies are guaranteed to be a crowd-pleaser. Get ready to experience a burst of flavor and a wave of happy memories with every single bite!
Ingredients:
- 1 cup (2 sticks) unsalted butter
- 1 cup granulated sugar
- 1 cup light corn syrup
- 1 teaspoon vanilla extract
- 1 cup creamy peanut butter
- 6 cups Rice Krispies cereal
- 12 ounces semi-sweet chocolate chips
- 2 tablespoons vegetable shortening
- Optional: Sprinkles for decoration
- Optional: Coarse sea salt for sprinkling
Preparing the Peanut Butter Krispie Base:
- Melt the Butter: In a large, heavy-bottomed saucepan, melt the butter over medium heat. Make sure to watch it carefully so it doesn’t burn. You want it completely melted and smooth.
- Add Sugar and Corn Syrup: Once the butter is melted, add the granulated sugar and light corn syrup to the saucepan. Stir constantly until the sugar is completely dissolved. This is important to prevent a grainy texture in your krispie treats.
- Bring to a Boil: Continue stirring and bring the mixture to a gentle boil. Let it boil for exactly one minute, stirring constantly. This step helps to create the right consistency for the krispie treats. Use a timer to ensure accuracy!
- Remove from Heat: After boiling for one minute, immediately remove the saucepan from the heat. It’s crucial to take it off the heat promptly to prevent the mixture from becoming too hard.
- Stir in Vanilla and Peanut Butter: Add the vanilla extract and peanut butter to the hot mixture. Stir vigorously until the peanut butter is completely melted and evenly distributed throughout the mixture. The mixture should be smooth and creamy. Make sure there are no streaks of peanut butter remaining.
- Incorporate the Rice Krispies: Pour the Rice Krispies cereal into the saucepan. Gently fold the cereal into the peanut butter mixture until all the cereal is evenly coated. Be careful not to crush the cereal while mixing. You want to maintain the crispness of the Rice Krispies. Use a large spatula or wooden spoon for this step.
Pressing the Krispie Mixture:
- Prepare the Pan: Grease a 9×13 inch baking pan with butter or cooking spray. You can also line the pan with parchment paper, leaving an overhang on the sides, for easy removal of the krispie treats later. This is highly recommended!
- Transfer the Mixture: Pour the peanut butter Rice Krispies mixture into the prepared baking pan.
- Press Evenly: Using a spatula, your fingers (lightly greased), or a piece of parchment paper, gently press the mixture evenly into the pan. Avoid pressing too hard, as this can make the krispie treats dense and hard. You want them to be firm but still slightly soft and chewy.
Preparing the Chocolate Topping:
- Melt the Chocolate: In a heat-safe bowl set over a saucepan of simmering water (double boiler method), or in the microwave in 30-second intervals, melt the semi-sweet chocolate chips and vegetable shortening. Stir frequently until the chocolate is completely melted and smooth. The vegetable shortening helps to create a glossy and smooth chocolate topping. If using the microwave, be sure to stir between each interval to prevent burning.
- Ensure Smooth Consistency: Make sure there are no lumps in the melted chocolate. If necessary, add a tiny bit more vegetable shortening to achieve a perfectly smooth and pourable consistency.
Assembling and Finishing:
- Pour the Chocolate: Pour the melted chocolate evenly over the peanut butter Rice Krispies base in the pan.
- Spread Evenly: Use a spatula or the back of a spoon to spread the chocolate smoothly and evenly over the entire surface of the krispie treats.
- Add Optional Toppings: If desired, immediately sprinkle the chocolate topping with sprinkles or coarse sea salt. The sprinkles will adhere best if added while the chocolate is still wet. The sea salt adds a delightful salty-sweet contrast.
- Chill to Set: Place the pan in the refrigerator for at least 30 minutes, or until the chocolate is completely set. This will make it easier to cut the krispie treats into squares.
- Cut and Serve: Once the chocolate is set, remove the pan from the refrigerator. If you lined the pan with parchment paper, lift the krispie treats out of the pan using the overhang. Cut the krispie treats into squares or rectangles using a sharp knife.
Tips for Perfect Chocolate Peanut Butter Krispies:
- Use Fresh Ingredients: Using fresh ingredients, especially fresh Rice Krispies cereal, will result in the best flavor and texture. Stale cereal can make the krispie treats tough.
- Don’t Overcook the Sugar Mixture: Overcooking the sugar mixture can result in hard and brittle krispie treats. Be sure to boil it for only one minute.
- Don’t Overmix: Overmixing the Rice Krispies into the peanut butter mixture can cause the cereal to become crushed and the krispie treats to be dense. Gently fold the cereal in until just combined.
- Grease Your Hands: When pressing the mixture into the pan, lightly grease your hands with butter or cooking spray to prevent the mixture from sticking.
- Use a Double Boiler or Microwave Carefully: When melting the chocolate, use a double boiler or microwave in short intervals to prevent burning. Burnt chocolate will have a bitter taste.
- Storage: Store the chocolate peanut butter krispie treats in an airtight container at room temperature for up to 3 days. They can also be stored in the refrigerator for longer storage, but they may become slightly harder.
- Variations: Get creative with your krispie treats! You can add other ingredients to the peanut butter mixture, such as chopped nuts, mini chocolate chips, or marshmallows. You can also use different types of chocolate for the topping, such as milk chocolate or white chocolate.
- Peanut Butter Alternatives: If you have peanut allergies, you can substitute the peanut butter with other nut butters, such as almond butter or cashew butter. You can also use sunflower seed butter for a nut-free option.
- Adjust Sweetness: If you prefer a less sweet treat, you can reduce the amount of sugar in the recipe. Start by reducing it by 1/4 cup and adjust to your taste.
- Experiment with Flavors: Add a pinch of cinnamon or a dash of espresso powder to the chocolate topping for a unique flavor twist.
Troubleshooting:
Krispie Treats are Too Hard:
This is usually caused by overcooking the sugar mixture or pressing the mixture too firmly into the pan. Be sure to boil the sugar mixture for only one minute and gently press the mixture into the pan.
Krispie Treats are Too Soft:
This can be caused by not boiling the sugar mixture long enough or using too much butter. Be sure to boil the sugar mixture for exactly one minute and use the correct amount of butter.
Chocolate Topping is Not Smooth:
This can be caused by overheating the chocolate or not using enough vegetable shortening. Be sure to melt the chocolate slowly and stir frequently. Add a little more vegetable shortening if needed to achieve a smooth consistency.
Chocolate Topping is Cracking:
This can happen if the chocolate topping is too thick or if the krispie treats are too cold. Allow the krispie treats to come to room temperature slightly before adding the chocolate topping. You can also add a little more vegetable shortening to the chocolate to make it more pliable.
Conclusion:
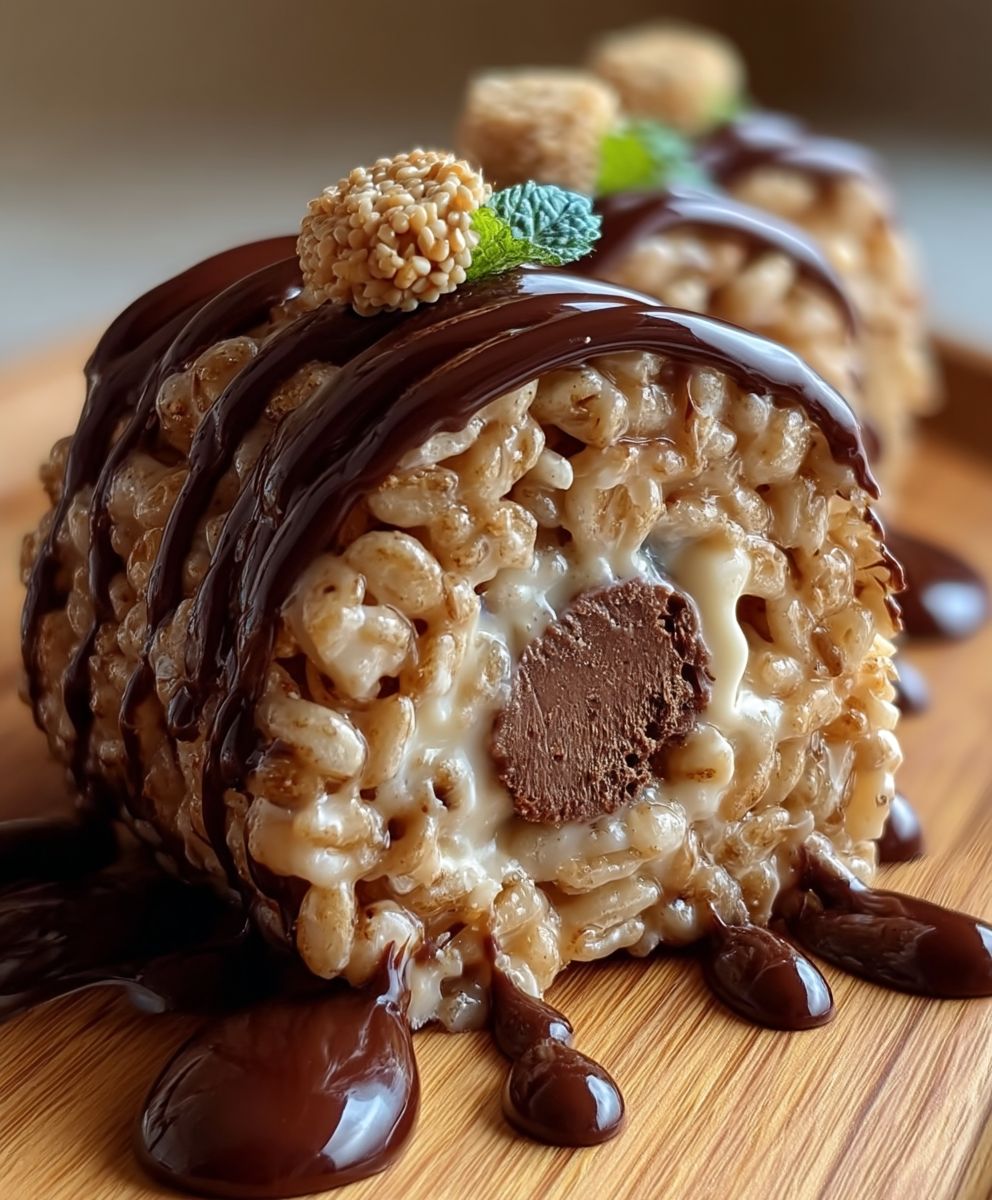
And there you have it! These Chocolate Peanut Butter Krispies are truly a must-try for anyone who loves a quick, easy, and utterly satisfying treat. The combination of rich chocolate, creamy peanut butter, and the delightful crunch of Rice Krispies cereal is simply irresistible. Its a nostalgic flavor explosion that will transport you back to childhood while still feeling like a sophisticated indulgence.
But why is this recipe so special? It’s more than just a dessert; it’s an experience. It’s the joy of creating something delicious with minimal effort, the satisfaction of seeing the smiles on the faces of those who devour it, and the sheer pleasure of sinking your teeth into that perfect balance of textures and flavors. This isn’t just another recipe; it’s a guaranteed crowd-pleaser, perfect for potlucks, bake sales, or simply a sweet treat to brighten your day.
Beyond the basic recipe, the possibilities are endless! Feel free to get creative and experiment with different variations. For a richer, more decadent experience, try using dark chocolate instead of milk chocolate. Or, if you’re feeling adventurous, add a sprinkle of sea salt on top to enhance the sweetness and create a delightful salty-sweet contrast. You could also incorporate chopped nuts, such as peanuts, walnuts, or pecans, for added crunch and flavor. For a festive touch, consider adding sprinkles or colored candies to match the occasion.
Serving suggestions? These Chocolate Peanut Butter Krispies are fantastic on their own, but they also pair beautifully with a scoop of vanilla ice cream or a glass of cold milk. You can even crumble them over yogurt or oatmeal for a delicious and satisfying breakfast treat. For a more elegant presentation, cut them into smaller squares and arrange them on a platter with fresh berries. They also make a wonderful addition to a dessert buffet or a homemade gift basket.
Don’t be intimidated by the simplicity of this recipe. It’s designed to be foolproof, even for novice bakers. The key is to work quickly once the melted chocolate and peanut butter are combined with the cereal, as the mixture will start to set relatively fast. But even if you make a mistake, don’t worry! These Chocolate Peanut Butter Krispies are incredibly forgiving, and they’ll still taste amazing, even if they’re not perfectly shaped.
I truly believe that this recipe will become a staple in your kitchen. It’s the perfect solution for those moments when you’re craving something sweet but don’t want to spend hours baking. It’s also a great way to get kids involved in the kitchen, as they’ll love helping to mix and shape the treats.
So, what are you waiting for? Gather your ingredients, put on your apron, and get ready to create some magic! I’m confident that you’ll love these Chocolate Peanut Butter Krispies as much as I do.
And most importantly, I want to hear about your experience! Did you try the recipe? Did you make any variations? What did your family and friends think? Share your photos and stories in the comments below. I can’t wait to see what you create! Happy baking!
Chocolate Peanut Butter Krispies: The Ultimate No-Bake Dessert
Chewy, crunchy Rice Krispie treats with peanut butter and a smooth chocolate topping. A classic dessert with a delightful twist!
Ingredients
- 1 cup (2 sticks) unsalted butter
- 1 cup granulated sugar
- 1 cup light corn syrup
- 1 teaspoon vanilla extract
- 1 cup creamy peanut butter
- 6 cups Rice Krispies cereal
- 12 ounces semi-sweet chocolate chips
- 2 tablespoons vegetable shortening
- Optional: Sprinkles for decoration
- Optional: Coarse sea salt for sprinkling
Instructions
- Melt the Butter: In a large, heavy-bottomed saucepan, melt the butter over medium heat until smooth.
- Add Sugar and Corn Syrup: Add the granulated sugar and light corn syrup to the saucepan. Stir constantly until the sugar is completely dissolved.
- Bring to a Boil: Continue stirring and bring the mixture to a gentle boil. Let it boil for exactly one minute, stirring constantly. Use a timer.
- Remove from Heat: Immediately remove the saucepan from the heat.
- Stir in Vanilla and Peanut Butter: Add the vanilla extract and peanut butter to the hot mixture. Stir vigorously until the peanut butter is completely melted and evenly distributed.
- Incorporate the Rice Krispies: Pour the Rice Krispies cereal into the saucepan. Gently fold the cereal into the peanut butter mixture until all the cereal is evenly coated. Be careful not to crush the cereal.
- Prepare the Pan: Grease a 9×13 inch baking pan with butter or cooking spray. You can also line the pan with parchment paper, leaving an overhang on the sides, for easy removal of the krispie treats later. This is highly recommended!
- Transfer the Mixture: Pour the peanut butter Rice Krispies mixture into the prepared baking pan.
- Press Evenly: Using a spatula, your fingers (lightly greased), or a piece of parchment paper, gently press the mixture evenly into the pan. Avoid pressing too hard.
- Melt the Chocolate: In a heat-safe bowl set over a saucepan of simmering water (double boiler method), or in the microwave in 30-second intervals, melt the semi-sweet chocolate chips and vegetable shortening. Stir frequently until the chocolate is completely melted and smooth.
- Ensure Smooth Consistency: Make sure there are no lumps in the melted chocolate. If necessary, add a tiny bit more vegetable shortening to achieve a perfectly smooth and pourable consistency.
- Pour the Chocolate: Pour the melted chocolate evenly over the peanut butter Rice Krispies base in the pan.
- Spread Evenly: Use a spatula or the back of a spoon to spread the chocolate smoothly and evenly over the entire surface of the krispie treats.
- Add Optional Toppings: If desired, immediately sprinkle the chocolate topping with sprinkles or coarse sea salt.
- Chill to Set: Place the pan in the refrigerator for at least 30 minutes, or until the chocolate is completely set.
- Cut and Serve: Once the chocolate is set, remove the pan from the refrigerator. If you lined the pan with parchment paper, lift the krispie treats out of the pan using the overhang. Cut the krispie treats into squares or rectangles using a sharp knife.
Notes
- Use fresh Rice Krispies for the best texture.
- Don’t overcook the sugar mixture or overmix the cereal.
- Grease your hands when pressing the mixture into the pan to prevent sticking.
- Melt chocolate carefully to avoid burning.
- Store in an airtight container at room temperature for up to 3 days.
- Get creative with variations by adding nuts, mini chocolate chips, or different types of chocolate.
- For peanut allergies, substitute with other nut butters or sunflower seed butter.
- Adjust sweetness by reducing the amount of sugar.
- Experiment with flavors by adding cinnamon or espresso powder to the chocolate topping.

Leave a Comment