
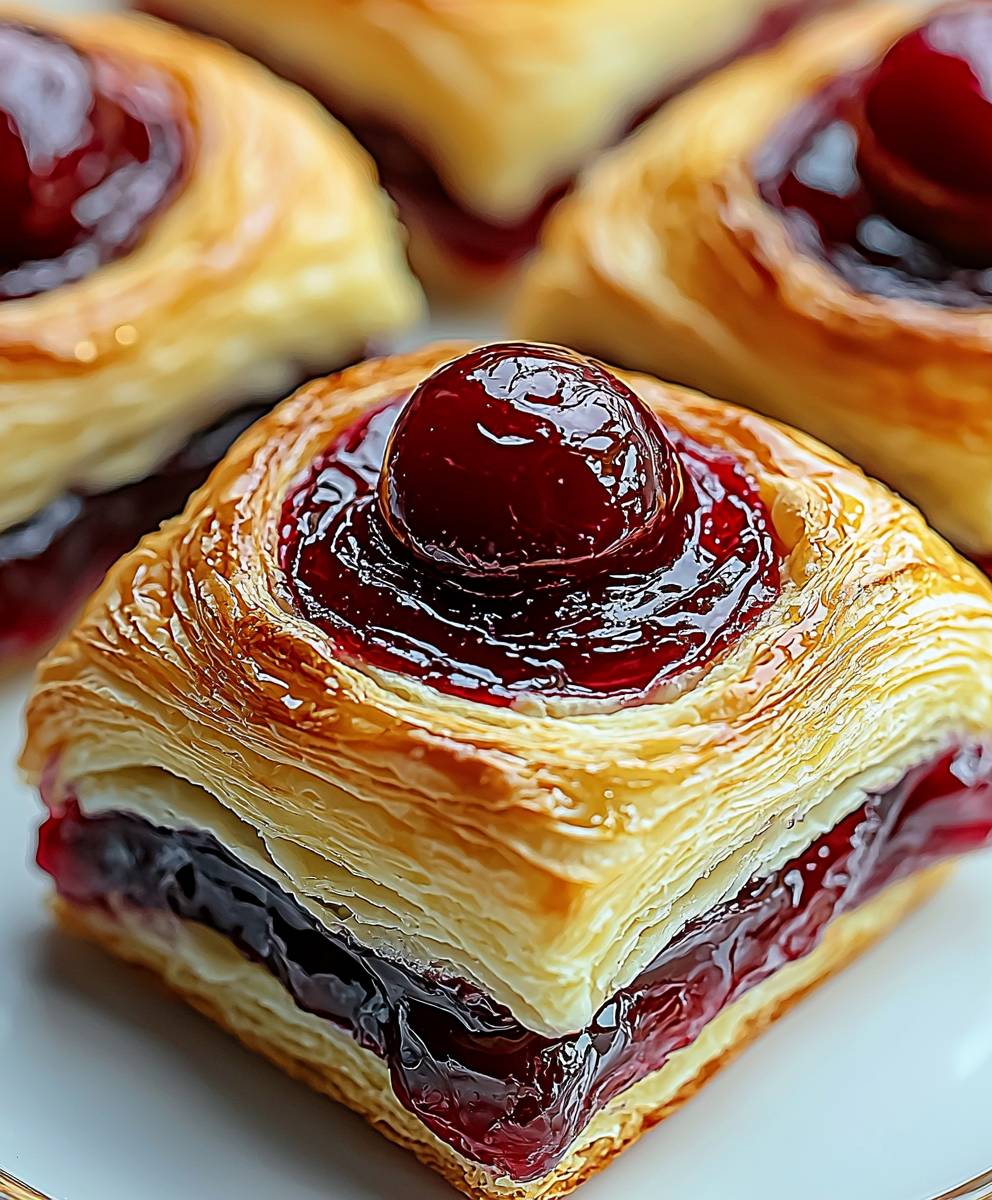
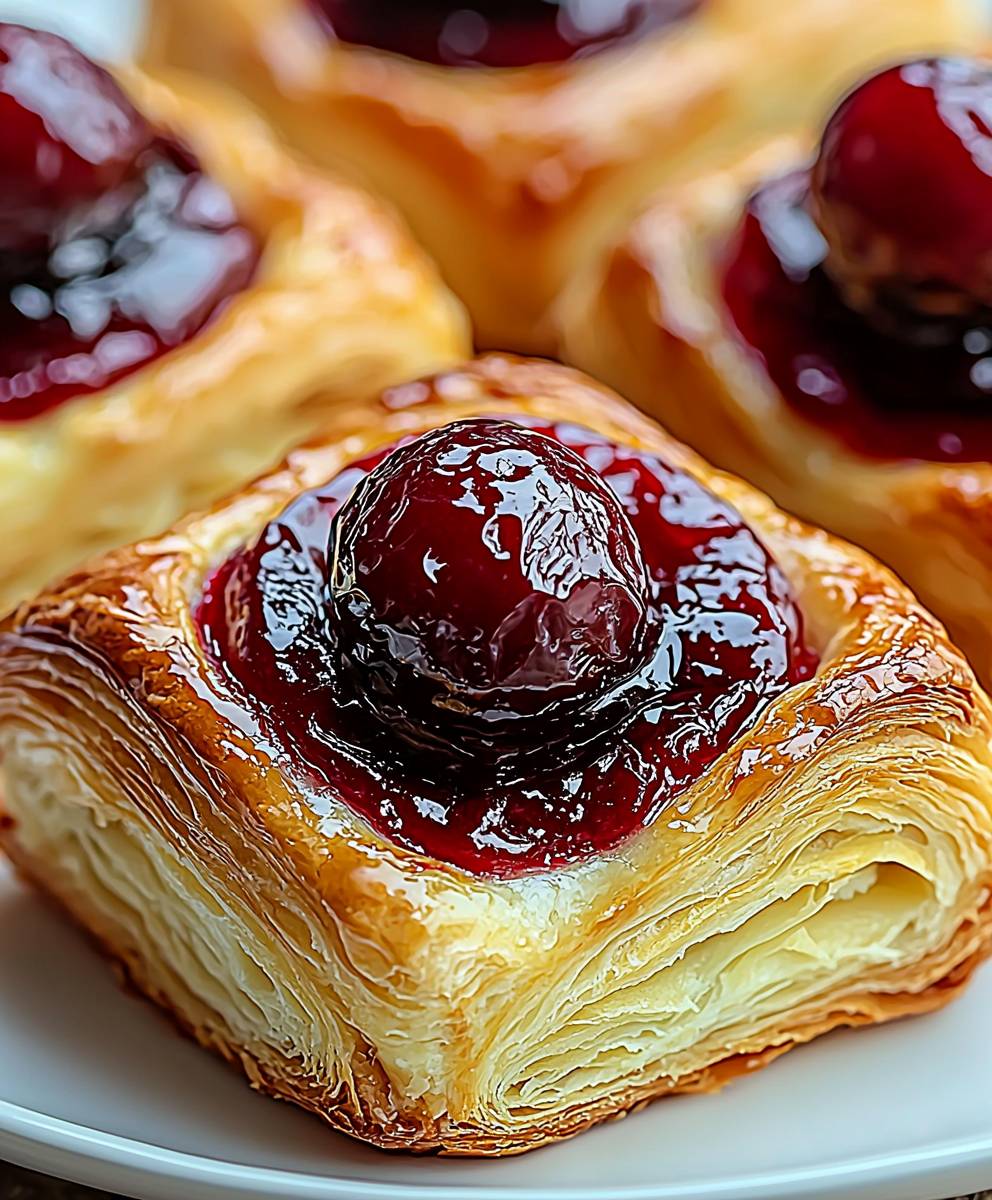
Cherry Cream Cheese Danish: Just the name conjures up images of flaky pastry, sweet cream cheese, and bursts of juicy cherry flavor, doesn’t it? I can almost smell the warm, buttery aroma wafting from the oven! This isn’t just a recipe; it’s an invitation to create a little bit of bakery magic in your own kitchen.
The Danish pastry, or “wienerbrød” as it’s known in Denmark, has a fascinating history. It actually originated in Austria in the 19th century and was brought to Denmark by Austrian bakers. Over time, the Danes perfected the recipe, adding their own unique touches and fillings. The Cherry Cream Cheese Danish is a delightful variation on this classic, combining the traditional flaky dough with a tangy cream cheese filling and the sweet-tartness of cherries.
What’s not to love? The combination of textures is simply divine the crisp, golden-brown layers of the pastry give way to a smooth, creamy filling, punctuated by the soft, yielding cherries. And the taste? A symphony of sweet, tangy, and buttery notes that will have you reaching for another bite. Whether you’re serving it for a special brunch, a holiday gathering, or simply as a weekend treat, this Cherry Cream Cheese Danish is guaranteed to be a crowd-pleaser. Plus, while it might seem intimidating, I’m going to show you how to make it surprisingly easy!
Ingredients:
- For the Dough:
- 2 1/4 cups (281g) all-purpose flour, plus more for dusting
- 1/4 cup (50g) granulated sugar
- 1/2 teaspoon salt
- 1/4 ounce (7g) active dry yeast (about 2 1/4 teaspoons)
- 1/2 cup (120ml) lukewarm milk (about 105-115°F)
- 1/4 cup (60ml) lukewarm water (about 105-115°F)
- 1 large egg, lightly beaten
- 6 tablespoons (85g) unsalted butter, cold and cut into small cubes
- For the Cream Cheese Filling:
- 8 ounces (226g) cream cheese, softened
- 1/4 cup (50g) granulated sugar
- 1 large egg yolk
- 1 teaspoon vanilla extract
- 1 tablespoon all-purpose flour
- For the Cherry Filling:
- 1 (14 ounce) can cherry pie filling
- 1 tablespoon cornstarch
- 1 tablespoon lemon juice
- For the Egg Wash:
- 1 large egg, lightly beaten
- 1 tablespoon milk
- For the Glaze (Optional):
- 1 cup (120g) powdered sugar
- 2-3 tablespoons milk, or more as needed
- 1/2 teaspoon vanilla extract (optional)
Preparing the Dough:
- Combine Dry Ingredients: In a large bowl, whisk together the flour, sugar, and salt.
- Activate the Yeast: In a separate small bowl, dissolve the yeast in the lukewarm milk and water mixture. Let it stand for 5-10 minutes, or until foamy. This indicates that the yeast is active and ready to use. If it doesn’t foam, your yeast might be old and you’ll need to start over with fresh yeast.
- Combine Wet and Dry Ingredients: Add the beaten egg and the yeast mixture to the dry ingredients. Mix with a wooden spoon or a stand mixer fitted with a dough hook until a shaggy dough forms.
- Incorporate the Butter: Gradually add the cold, cubed butter to the dough, a few pieces at a time. Mix on low speed (or by hand) until the butter is incorporated. The dough will be quite sticky at this point, and that’s perfectly fine. Don’t overmix! You want small pieces of butter still visible. This is what creates flaky layers.
- First Rise (Bulk Fermentation): Cover the bowl with plastic wrap or a clean kitchen towel and let it rise in a warm place for 1-1.5 hours, or until doubled in size. The rising time will depend on the temperature of your kitchen. A warmer environment will speed up the process.
- Punch Down and Chill: Gently punch down the dough to release the air. Wrap it tightly in plastic wrap and refrigerate for at least 2 hours, or preferably overnight. This chilling period is crucial for developing flavor and making the dough easier to handle.
Preparing the Fillings:
- Cream Cheese Filling: In a medium bowl, beat the softened cream cheese and sugar together until smooth and creamy. Add the egg yolk and vanilla extract and beat until well combined. Stir in the flour until just combined. Be careful not to overmix. Set aside.
- Cherry Filling: In a small saucepan, combine the cherry pie filling, cornstarch, and lemon juice. Cook over medium heat, stirring constantly, until the mixture thickens slightly, about 3-5 minutes. Remove from heat and let cool completely. Cooling the cherry filling prevents it from becoming too runny during baking.
Assembling and Baking the Danishes:
- Roll Out the Dough: On a lightly floured surface, roll out the chilled dough into a large rectangle, about 12×18 inches.
- Spread Cream Cheese Filling: Spread the cream cheese filling evenly over the dough, leaving a 1-inch border along all edges.
- Spoon Cherry Filling: Spoon the cooled cherry filling over the cream cheese filling in dollops. Don’t spread it out completely; leave some gaps of cream cheese filling visible.
- Fold the Dough: Fold one long side of the dough over the filling, covering about two-thirds of the filling. Then, fold the other long side over the first fold, creating a three-layer rectangle.
- Cut into Strips: Using a sharp knife or pizza cutter, cut the dough into 1-inch wide strips.
- Twist and Shape: Gently twist each strip a few times. Then, form each twisted strip into a circle or a loose knot. Tuck the ends underneath to secure the shape.
- Second Rise (Proofing): Place the shaped danishes on a baking sheet lined with parchment paper, leaving some space between each one. Cover loosely with plastic wrap or a clean kitchen towel and let them rise in a warm place for 30-45 minutes, or until slightly puffed.
- Preheat Oven: While the danishes are proofing, preheat your oven to 375°F (190°C).
- Egg Wash: In a small bowl, whisk together the egg and milk for the egg wash.
- Brush with Egg Wash: Gently brush the tops of the proofed danishes with the egg wash. This will give them a beautiful golden-brown color.
- Bake: Bake for 18-22 minutes, or until the danishes are golden brown and the filling is set.
- Cool: Remove the danishes from the oven and let them cool on the baking sheet for a few minutes before transferring them to a wire rack to cool completely.
Preparing the Glaze (Optional):
- Combine Ingredients: In a small bowl, whisk together the powdered sugar, 2 tablespoons of milk, and vanilla extract (if using) until smooth. Add more milk, one teaspoon at a time, until you reach your desired consistency. The glaze should be thick enough to coat the danishes but thin enough to drizzle easily.
- Drizzle Glaze: Once the danishes are completely cool, drizzle the glaze over the tops.
- Set Glaze: Let the glaze set for a few minutes before serving.
Tips for Success:
- Use Cold Butter: Cold butter is essential for creating flaky layers in the dough. Make sure the butter is very cold before incorporating it into the dough.
- Don’t Overmix the Dough: Overmixing the dough will develop the gluten too much, resulting in a tough danish. Mix just until the ingredients are combined.
- Chill the Dough: Chilling the dough allows the gluten to relax and makes it easier to handle. It also helps to develop flavor.
- Proofing is Key: Proofing the danishes before baking allows them to rise properly and become light and airy.
- Adjust Baking Time: Baking times may vary depending on your oven. Keep an eye on the danishes and adjust the baking time as needed.
- Get Creative with Fillings: Feel free to experiment with different fillings, such as apple, blueberry, or chocolate.
- Storage: Store leftover danishes in an airtight container at room temperature for up to 2 days, or in the refrigerator for up to 4 days. They are best enjoyed fresh.
Troubleshooting:
- Dough is too sticky: If your dough is too sticky to handle, add a little more flour, one tablespoon at a time, until it becomes manageable.
- Dough is not rising: If your dough is not rising, make sure your yeast is active and that you are proofing it in a warm place.
- Filling is leaking out: If your filling is leaking out during baking, make sure you have sealed the edges of the danishes properly. You can also try using a thicker filling.
- Danishes are browning too quickly: If your danishes are browning too quickly, tent them with aluminum foil during the last few minutes of baking.
Conclusion:
This Cherry Cream Cheese Danish recipe isn’t just another pastry; it’s a delightful experience waiting to happen in your kitchen. The combination of flaky, buttery dough, the tangy cream cheese filling, and the sweet burst of cherries creates a symphony of flavors and textures that will leave you craving more. Trust me, once you take that first bite, you’ll understand why I’m so passionate about sharing this recipe with you. It’s the perfect treat for a weekend brunch, a special occasion, or simply a moment of self-indulgence. But what truly makes this Cherry Cream Cheese Danish a must-try is its versatility. While the classic cherry filling is undeniably delicious, don’t be afraid to experiment and put your own spin on it. Imagine swapping the cherries for blueberries, raspberries, or even a mix of your favorite berries. A hint of almond extract in the cream cheese filling can add a sophisticated touch, or a sprinkle of lemon zest can brighten the flavors even further.Serving Suggestions and Variations:
* Warm and Cozy: Serve the danishes warm from the oven with a scoop of vanilla ice cream or a dollop of whipped cream. The contrast of temperatures and textures is simply divine. * Brunch Staple: Arrange the danishes on a platter alongside fresh fruit, yogurt, and other breakfast favorites for a truly memorable brunch spread. * Coffee Companion: Enjoy a danish with your morning coffee or afternoon tea for a delightful pick-me-up. * Chocolate Indulgence: Add chocolate chips to the cream cheese filling or drizzle melted chocolate over the finished danishes for a decadent treat. * Savory Twist: For a savory variation, try using a filling of spinach, feta cheese, and sun-dried tomatoes. I’ve poured my heart into perfecting this recipe, and I’m confident that you’ll be thrilled with the results. The steps are straightforward, and the ingredients are readily available. Even if you’re a beginner baker, don’t be intimidated! Just follow the instructions carefully, and you’ll be rewarded with a batch of homemade danishes that are far superior to anything you can buy in a store. So, what are you waiting for? Gather your ingredients, preheat your oven, and get ready to embark on a baking adventure. I promise you, the aroma of these danishes baking in your kitchen will fill your home with warmth and happiness. And the taste? Well, that’s something you’ll have to experience for yourself. I’m incredibly excited to hear about your baking journey and see your creations! Please, don’t hesitate to share your photos and stories with me. Let me know what variations you tried, what worked well, and what you might do differently next time. Your feedback is invaluable, and it helps me continue to improve and share even more delicious recipes with you. You can tag me on social media using [Your Social Media Handle] or leave a comment on the blog post. Happy baking, and I can’t wait to see your Cherry Cream Cheese Danish masterpieces! Remember, baking is all about having fun and creating something delicious to share with the people you love. Enjoy the process, and savor every bite! Print
Cherry Cream Cheese Danish: A Delicious & Easy Recipe
- Total Time: 240 minutes
- Yield: 18–24 danishes 1x
Description
Flaky, homemade cherry cream cheese danishes with a sweet glaze. Perfect for breakfast, brunch, or a special treat!
Ingredients
- 2 1/4 cups (281g) all-purpose flour, plus more for dusting
- 1/4 cup (50g) granulated sugar
- 1/2 teaspoon salt
- 1/4 ounce (7g) active dry yeast (about 2 1/4 teaspoons)
- 1/2 cup (120ml) lukewarm milk (about 105-115°F)
- 1/4 cup (60ml) lukewarm water (about 105-115°F)
- 1 large egg, lightly beaten
- 6 tablespoons (85g) unsalted butter, cold and cut into small cubes
- 8 ounces (226g) cream cheese, softened
- 1/4 cup (50g) granulated sugar
- 1 large egg yolk
- 1 teaspoon vanilla extract
- 1 tablespoon all-purpose flour
- 1 (14 ounce) can cherry pie filling
- 1 tablespoon cornstarch
- 1 tablespoon lemon juice
- 1 large egg, lightly beaten
- 1 tablespoon milk
- 1 cup (120g) powdered sugar
- 2–3 tablespoons milk, or more as needed
- 1/2 teaspoon vanilla extract (optional)
Instructions
- Prepare the Dough:
- Combine Dry Ingredients: In a large bowl, whisk together the flour, sugar, and salt.
- Activate the Yeast: In a separate small bowl, dissolve the yeast in the lukewarm milk and water mixture. Let it stand for 5-10 minutes, or until foamy.
- Combine Wet and Dry Ingredients: Add the beaten egg and the yeast mixture to the dry ingredients. Mix with a wooden spoon or a stand mixer fitted with a dough hook until a shaggy dough forms.
- Incorporate the Butter: Gradually add the cold, cubed butter to the dough, a few pieces at a time. Mix on low speed (or by hand) until the butter is incorporated.
- First Rise (Bulk Fermentation): Cover the bowl with plastic wrap or a clean kitchen towel and let it rise in a warm place for 1-1.5 hours, or until doubled in size.
- Punch Down and Chill: Gently punch down the dough to release the air. Wrap it tightly in plastic wrap and refrigerate for at least 2 hours, or preferably overnight.
- Prepare the Fillings:
- Cream Cheese Filling: In a medium bowl, beat the softened cream cheese and sugar together until smooth and creamy. Add the egg yolk and vanilla extract and beat until well combined. Stir in the flour until just combined. Set aside.
- Cherry Filling: In a small saucepan, combine the cherry pie filling, cornstarch, and lemon juice. Cook over medium heat, stirring constantly, until the mixture thickens slightly, about 3-5 minutes. Remove from heat and let cool completely.
- Assemble and Bake the Danishes:
- Roll Out the Dough: On a lightly floured surface, roll out the chilled dough into a large rectangle, about 12×18 inches.
- Spread Cream Cheese Filling: Spread the cream cheese filling evenly over the dough, leaving a 1-inch border along all edges.
- Spoon Cherry Filling: Spoon the cooled cherry filling over the cream cheese filling in dollops.
- Fold the Dough: Fold one long side of the dough over the filling, covering about two-thirds of the filling. Then, fold the other long side over the first fold, creating a three-layer rectangle.
- Cut into Strips: Using a sharp knife or pizza cutter, cut the dough into 1-inch wide strips.
- Twist and Shape: Gently twist each strip a few times. Then, form each twisted strip into a circle or a loose knot. Tuck the ends underneath to secure the shape.
- Second Rise (Proofing): Place the shaped danishes on a baking sheet lined with parchment paper, leaving some space between each one. Cover loosely with plastic wrap or a clean kitchen towel and let them rise in a warm place for 30-45 minutes, or until slightly puffed.
- Preheat Oven: While the danishes are proofing, preheat your oven to 375°F (190°C).
- Egg Wash: In a small bowl, whisk together the egg and milk for the egg wash.
- Brush with Egg Wash: Gently brush the tops of the proofed danishes with the egg wash.
- Bake: Bake for 18-22 minutes, or until the danishes are golden brown and the filling is set.
- Cool: Remove the danishes from the oven and let them cool on the baking sheet for a few minutes before transferring them to a wire rack to cool completely.
- Prepare the Glaze (Optional):
- Combine Ingredients: In a small bowl, whisk together the powdered sugar, 2 tablespoons of milk, and vanilla extract (if using) until smooth. Add more milk, one teaspoon at a time, until you reach your desired consistency.
- Drizzle Glaze: Once the danishes are completely cool, drizzle the glaze over the tops.
- Set Glaze: Let the glaze set for a few minutes before serving.
Notes
- Use cold butter for flaky layers.
- Don’t overmix the dough.
- Chilling the dough is crucial.
- Proofing is key for a light and airy texture.
- Adjust baking time as needed.
- Get creative with fillings!
- Store leftovers in an airtight container at room temperature for up to 2 days, or in the refrigerator for up to 4 days.
- Prep Time: 45 minutes
- Cook Time: 22 minutes

Leave a Comment