
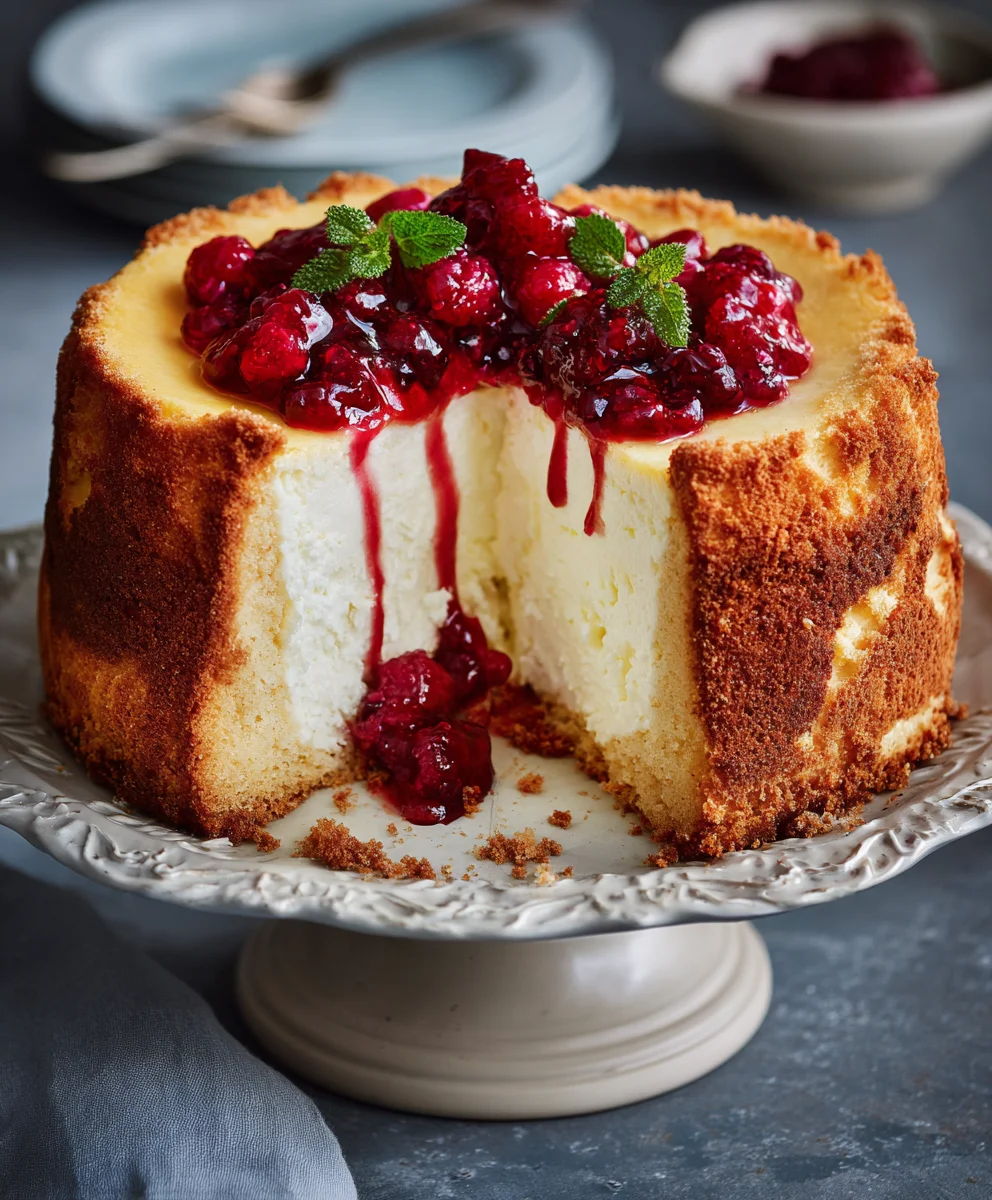
Cheesecake With Pound Cake Center – a phrase that might just redefine your dessert expectations! I am absolutely thrilled to introduce you to a culinary masterpiece that seamlessly blends two beloved classics into one show-stopping creation. Imagine the rich, velvety texture of a perfectly baked cheesecake, offering that quintessential tangy-sweet profile, now embracing a tender, buttery core of golden pound cake. This isn’t just a dessert; it’s an experience, a delightful surprise in every slice that promises to captivate your taste buds and impress your guests with its unique charm.
While cheesecake itself boasts a history stretching back to ancient Greece, and the humble pound cake has graced American tables for centuries with its simple elegance, the innovative concept of combining them creates something entirely new and exciting. This brilliant fusion addresses the delightful dilemma of choosing between two favorites, offering the best of both worlds in a single, magnificent dessert.
People absolutely adore this Cheesecake With Pound Cake Center for its incredible textural contrast and harmonious flavor profile.
The creamy, cool cheesecake exterior gives way to a warm, comforting, and dense pound cake interior, creating a symphony of textures that is truly unforgettable. It’s a dessert that speaks of celebration, innovation, and an undeniable passion for baking, making it an ideal centerpiece for any special occasion or a luxurious treat to elevate an ordinary day. I genuinely believe this unique creation will become a cherished recipe in your culinary repertoire.
Ingredients:
-
For the Pound Cake Center:
- ½ cup (1 stick) unsalted butter, softened to room temperature
- ¾ cup granulated sugar
- 2 large eggs, at room temperature
- 1 teaspoon pure vanilla extract
- 1 ½ cups all-purpose flour, sifted
- 1 ½ teaspoons baking powder
- ½ teaspoon salt
- ½ cup whole milk, at room temperature
-
For the Graham Cracker Crust:
- 1 ½ cups graham cracker crumbs (about 10-12 full graham cracker sheets)
- ¼ cup granulated sugar
- 6 tablespoons unsalted butter, melted
-
For the Cheesecake Filling:
- 4 (8-ounce) packages full-fat cream cheese, softened to room temperature
- 1 ½ cups granulated sugar
- ¼ cup all-purpose flour
- 2 teaspoons pure vanilla extract
- ¼ teaspoon salt
- 4 large eggs, at room temperature
- 1 cup sour cream, at room temperature
- ¼ cup heavy cream, at room temperature
-
For the Optional Berry Topping:
- 2 cups mixed berries (fresh or frozen, like strawberries, blueberries, raspberries)
- ½ cup granulated sugar
- 2 tablespoons fresh lemon juice
- 1 tablespoon cornstarch mixed with 2 tablespoons cold water (slurry)
Phase 1: Preparing the Pound Cake Center
First things first, let’s get that lovely pound cake center baked and ready. This is what truly makes our Cheesecake With Pound Cake Center so unique and delightful!
- Preheat Oven and Prepare Pan: Preheat your oven to 325°F (160°C). Grease and flour a small loaf pan (about 8×4 inches) or a 6-inch round cake pan. If you’re using a 6-inch round, make sure it’s at least 2 inches deep. This will be the home for our delicious pound cake.
- Cream Butter and Sugar: In a large mixing bowl, using an electric mixer on medium speed, cream together the softened ½ cup butter and ¾ cup granulated sugar until light and fluffy. This usually takes about 3-5 minutes. Make sure to scrape down the sides of the bowl periodically to ensure everything is well incorporated. Don’t rush this step, as proper creaming creates air pockets that lead to a tender crumb.
- Add Eggs and Vanilla: Beat in the 2 large eggs, one at a time, mixing well after each addition. Once both eggs are incorporated, stir in the 1 teaspoon pure vanilla extract. The mixture might look slightly curdled at this point, but don’t worry, it will come together.
- Combine Dry Ingredients: In a separate medium bowl, whisk together the 1 ½ cups sifted all-purpose flour, 1 ½ teaspoons baking powder, and ½ teaspoon salt. Sifting the flour beforehand really helps in achieving a light and airy texture, which is perfect for our pound cake.
- Alternate Adding Dry and Wet Ingredients: With the mixer on low speed, gradually add the dry ingredients to the wet ingredients, alternating with the ½ cup whole milk. Begin and end with the dry ingredients. For example, add about a third of the flour mixture, mix until just combined, then add half of the milk, mix, then another third of flour, the rest of the milk, and finally the remaining flour. Be careful not to overmix; mix only until just combined to prevent a tough pound cake.
- Bake the Pound Cake: Pour the batter into your prepared small loaf pan or 6-inch round cake pan. Smooth the top with a spatula. Bake for 35-45 minutes, or until a wooden skewer inserted into the center comes out clean. The top should be golden brown and spring back when lightly touched.
-
Cool the Pound Cake: Once baked, remove the pound cake from the oven and let it cool in the pan for about 15-20 minutes before carefully inverting it onto a wire rack to cool completely. It’s crucial that the pound cake is entirely cool before we incorporate it into the cheesecake. This prevents any unwanted sogginess.
Tip for Success: Achieving the Perfect Pound Cake
Using room temperature ingredients for your pound cake is not just a suggestion; it’s a game-changer! When butter, eggs, and milk are at room temperature, they emulsify much better, creating a smoother batter and a more uniform, tender crumb. Cold ingredients can lead to a lumpy batter and a denser cake. Give them at least 30 minutes to an hour on the counter before you start mixing!
Phase 2: Preparing the Graham Cracker Crust
A good cheesecake starts with a solid, flavorful crust. This graham cracker crust is simple, buttery, and the perfect foundation for our grand Cheesecake With Pound Cake Center.
- Preheat Oven and Prepare Springform Pan: Adjust your oven rack to the middle position and preheat the oven to 350°F (175°C). For this cheesecake, we’ll be using a 9-inch springform pan. Line the bottom of the pan with parchment paper. This will make removing the cheesecake much easier. Wrap the exterior of the springform pan tightly with several layers of heavy-duty aluminum foil. This is absolutely essential for creating a water bath later and preventing any water from seeping into your crust.
- Make Graham Cracker Crumbs: In a medium bowl, combine the 1 ½ cups graham cracker crumbs (you can make these by pulsing whole graham crackers in a food processor or crushing them by hand in a sealed bag).
- Mix Crust Ingredients: Add the ¼ cup granulated sugar to the crumbs and mix well. Pour in the 6 tablespoons of melted unsalted butter and stir until all the crumbs are moistened and resemble wet sand.
- Press into Pan: Press the mixture evenly into the bottom of the prepared 9-inch springform pan. You can use the bottom of a glass or your fingers to get a firm, even layer. Make sure it’s packed tightly, especially around the edges.
- Pre-bake the Crust: Bake the crust for 8-10 minutes. This pre-baking step helps to set the crust and makes it nice and crispy, preventing it from becoming soggy later. Remove from the oven and let it cool on a wire rack while you prepare the filling. Reduce oven temperature to 325°F (160°C) for the cheesecake.
Phase 3: Preparing the Cheesecake Filling
This is where the magic happens for our creamy cheesecake. Remember, low and slow mixing is the secret to a crack-free, silky smooth cheesecake texture. We’re building towards a truly magnificent Cheesecake With Pound Cake Center.
- Cream Cream Cheese: In a very large mixing bowl, using an electric mixer on low speed, beat the 4 (8-ounce) packages of softened cream cheese until completely smooth and free of any lumps. This can take about 3-4 minutes. Scrape down the sides and bottom of the bowl frequently. Ensuring your cream cheese is truly at room temperature is paramount here; it allows for a lump-free base.
- Add Sugar and Flour: Gradually add the 1 ½ cups granulated sugar to the cream cheese, beating on low speed until just combined. Then, slowly add the ¼ cup all-purpose flour, mixing until no streaks of flour remain. The flour acts as a stabilizer, helping to prevent cracks in the cheesecake.
- Incorporate Vanilla and Salt: Stir in the 2 teaspoons pure vanilla extract and ¼ teaspoon salt. These simple additions truly enhance the overall flavor profile.
- Add Eggs: Add the 4 large eggs, one at a time, beating on low speed only until each egg is just incorporated before adding the next. Overmixing eggs will incorporate too much air into the batter, which can cause the cheesecake to puff up too much during baking and then crack upon cooling. Patience is a virtue here!
- Stir in Sour Cream and Heavy Cream: Finally, gently fold in the 1 cup sour cream and ¼ cup heavy cream. Mix until just smooth. The sour cream adds a wonderful tang and extra creaminess, while the heavy cream contributes to the rich, luxurious texture. Give the bowl one last good scrape with a rubber spatula to ensure everything is perfectly combined without overmixing.
Phase 4: Assembling and Baking the Cheesecake
Now for the exciting part – bringing our two main components together to create the magnificent Cheesecake With Pound Cake Center! The water bath is your best friend for a smooth, even bake.
- Prepare for Pound Cake Placement: Take your cooled pound cake center. If you used a loaf pan, you’ll want to cut it to fit. A good general rule is to aim for a piece that’s roughly 6 inches long and about 3 inches wide, or whatever allows it to sit snugly in the center of your 9-inch springform pan without touching the sides. If you baked it in a 6-inch round pan, you can simply place the entire round cake in the center. Don’t worry if it’s not absolutely perfect; the cheesecake filling will embrace it.
- Pour Initial Filling Layer: Pour about one-third of the cheesecake filling over the pre-baked graham cracker crust in the prepared springform pan. Spread it gently with a spatula to create an even layer.
- Place Pound Cake Center: Carefully center your cooled pound cake on top of this initial layer of cheesecake filling. Press it down very gently, just enough so it feels stable.
- Add Remaining Filling: Pour the remaining cheesecake filling around and over the pound cake, ensuring the pound cake is mostly covered by the cheesecake batter. Use a spatula to gently smooth the top. A little of the pound cake top might peek through, and that’s perfectly fine and adds to the charm!
- Prepare the Water Bath: Place your foil-wrapped springform pan inside a larger roasting pan. Carefully pour hot water into the roasting pan, ensuring the water comes about halfway up the sides of the springform pan. The water bath is crucial for preventing cracks and ensuring a moist, evenly baked cheesecake. The steam from the hot water helps regulate the temperature and keeps the cheesecake from drying out.
- Bake the Cheesecake: Carefully transfer the roasting pan with the cheesecake to your preheated 325°F (160°C) oven. Bake for 1 hour to 1 hour 30 minutes. The cheesecake is done when the edges are set, but the center (about a 2-inch diameter) still jiggles slightly when the pan is gently shaken. It might look a bit puffy, but it will settle as it cools.
Phase 5: Cooling and Chilling the Cheesecake
Patience is the name of the game here! Proper cooling is just as important as baking for that perfect, creamy, crack-free Cheesecake With Pound Cake Center.
- Cool in Oven: Once the cheesecake is baked, turn off the oven but leave the cheesecake in the water bath inside the oven with the door slightly ajar (you can prop it with a wooden spoon) for 1 hour. This slow cooling prevents drastic temperature changes that can lead to cracks.
- Cool at Room Temperature: After 1 hour in the oven, carefully remove the springform pan from the water bath (be very cautious with the hot water!) and remove the foil. Place the cheesecake on a wire rack to cool completely at room temperature for another 2-3 hours.
- Chill Thoroughly: Once cooled to room temperature, cover the springform pan loosely with plastic wrap and transfer the cheesecake to the refrigerator to chill for at least 6-8 hours, or preferably overnight. This long chilling time is absolutely critical for the cheesecake to firm up, develop its full flavor, and slice beautifully. Do not skip this step!
- Prepare for Serving: When ready to serve, run a thin knife around the edge of the cheesecake before releasing the springform pan. Slice with a hot, clean knife for perfect pieces. Wipe the knife clean between each slice for the best presentation.
Phase 6: Optional Berry Topping (Highly Recommended!)
While our Cheesecake With Pound Cake Center is incredible on its own, a fresh berry topping adds a burst of color and a delightful fruity counterpoint.
- Combine Ingredients: In a medium saucepan, combine the 2 cups mixed berries, ½ cup granulated sugar, and 2 tablespoons fresh lemon juice. If using frozen berries, there’s no need to thaw them first.
- Cook the Berries: Bring the mixture to a simmer over medium heat, stirring occasionally. Let it simmer gently for about 5-7 minutes, or until the berries have softened and released their juices, and the sugar has dissolved.
- Thicken the Topping: Give the cornstarch slurry (1 tablespoon cornstarch mixed with 2 tablespoons cold water) a quick stir, then slowly pour it into the simmering berry mixture while continuously stirring. Continue to cook and stir for another 1-2 minutes, until the sauce has thickened to your desired consistency. It should be glossy and coat the back of a spoon.
- Cool the Topping: Remove the berry topping from the heat and let it cool completely to room temperature before serving. As it cools, it will thicken further.
- Serve: Spoon the cooled berry topping over individual slices of your magnificent Cheesecake With Pound Cake Center just before serving. Enjoy the delightful combination of creamy cheesecake, tender pound cake, and vibrant fruit!
Congratulations! You’ve just created a truly show-stopping dessert that combines two beloved classics into one extraordinary treat. This Cheesecake With Pound Cake Center is sure to impress everyone who tastes it!
A Note on Cream Cheese Quality:
For the absolute best results with your cheesecake, always opt for full-fat, block cream cheese. The texture and richness it provides are unmatched. Avoid whipped or low-fat varieties, as they can alter the final texture and density of your cheesecake, potentially leading to a less creamy and more watery result. Full-fat cream cheese is the secret weapon for a truly luxurious cheesecake.
Understanding Your Oven:
Every oven is a little different, and knowing your oven’s quirks is incredibly helpful when baking. Some ovens run hotter or cooler than the set temperature. If you find your cheesecake bakes too quickly or too slowly, consider investing in an oven thermometer to ensure accuracy. This small tool can make a big difference in the consistent success of your baking projects, especially for a delicate item like cheesecake.
Storing Your Masterpiece:
Your finished Cheesecake With Pound Cake Center should be stored in the refrigerator, covered loosely with plastic wrap or in an airtight container. It will keep beautifully for 4-5 days. For longer storage, you can freeze individual slices for up to 1 month. To thaw, simply place a slice in the refrigerator overnight. The flavors will meld and intensify over time, so it often tastes even better the next day!
This recipe for Cheesecake With Pound Cake Center is designed to guide you through every step, ensuring that even a novice baker can achieve a stunning, bakery-quality dessert. The unique combination of textures and flavors makes it a truly memorable treat. Enjoy the process and the delicious outcome!
Final Touches for Presentation:
Beyond the optional berry topping, you can elevate the presentation of your Cheesecake With Pound Cake Center with a dusting of powdered sugar just before serving, or a few fresh mint leaves for a pop of green. A drizzle of chocolate ganache or a simple caramel sauce would also be a fantastic addition, offering another layer of flavor and visual appeal. Don’t be afraid to experiment with your favorite garnishes to make it truly your own!
Making a cheesecake, especially one as intricate as a Cheesecake With Pound Cake Center, is a labor of love, but the payoff is immense. The rich, creamy texture of the cheesecake, perfectly complemented by the tender, moist pound cake nestled within, creates a symphony of flavors and textures that is truly unparalleled. This dessert is perfect for special occasions, holidays, or whenever you want to indulge in something truly extraordinary.
Remember, baking is as much an art as it is a science. While precision is important, especially with cheesecakes, don’t be afraid to trust your instincts and enjoy the process. The aroma filling your kitchen as this bakes is a reward in itself!
This comprehensive guide to crafting a spectacular Cheesecake With Pound Cake Center ensures you have all the knowledge and steps necessary to create a truly unforgettable dessert. Happy baking!

Conclusion:
And there you have it, my friends! We’ve journeyed through the creation of what I truly believe is one of the most remarkable desserts you’ll ever encounter. This isn’t just another cheesecake recipe; it’s an experience, a masterpiece of textures and flavors that will undoubtedly leave a lasting impression on anyone lucky enough to try it. The sheer ingenuity of combining a rich, dense pound cake right at the heart of a velvety, tangy cheesecake creates an unparalleled culinary delight. Every single bite offers a harmonious interplay – the slight crumb of the cake perfectly complementing the smooth, creamy dreaminess of the cheesecake. It’s truly a showstopper, designed to impress and satisfy even the most discerning palates. This is more than just a dessert; it’s a celebration of baking innovation, and I can assure you, it will become a staple in your repertoire once you taste its magic.
What makes this particular creation a must-try, you ask? It’s the ingenious architecture, the delightful surprise nestled within. While a classic cheesecake is wonderful, this version elevates it to an entirely new level. Imagine cutting into a perfectly golden-brown crust, through a thick layer of creamy cheesecake, and then discovering a tender, moist slice of pound cake waiting for you. It’s that unexpected layer of richness and a different kind of sweetness that truly sets it apart. It offers a robustness and depth that a standard cheesecake simply can’t provide. Plus, the structure means it often holds its shape beautifully, making for stunning presentation slices every time. The effort, I promise you, is incredibly rewarding, yielding a dessert that is both visually stunning and exquisitely delicious. It’s the perfect blend of classic comfort and sophisticated elegance.
Now, once you’ve pulled this magnificent dessert from the oven and allowed it to cool to perfection, the serving possibilities are endless, limited only by your imagination. For a truly classic and refreshing experience, I love to serve a slice alongside a generous dollop of freshly whipped cream and a vibrant medley of seasonal berries – think plump strawberries, juicy blueberries, and tart raspberries. The slight acidity of the fruit cuts through the richness beautifully, creating a perfect balance. For those with a sweeter tooth, a drizzle of warm caramel sauce or a rich chocolate ganache can transform it into an even more decadent treat. Consider a dusting of cocoa powder or a sprinkle of toasted nuts for added texture and visual appeal. And for a truly sophisticated touch, pair a slice with a delicate espresso or a dessert wine; the notes will perfectly complement the complex flavors of this incredible dessert. You could even prepare a simple fruit compote, like cherry or peach, to spoon alongside each serving for an extra layer of gourmet indulgence.
But don’t stop there! This recipe is also wonderfully versatile for variations. Feel free to experiment with the pound cake itself. You could infuse it with lemon zest for a brighter profile, or perhaps marble it with chocolate for an added layer of indulgence. If you’re feeling adventurous, consider a spice pound cake for a fall-inspired treat, or even a almond pound cake for a nutty twist. The cheesecake layer is equally adaptable. Try adding a hint of orange blossom water or rose water for an exotic touch, or perhaps stir in some finely chopped white chocolate for an even richer, creamier texture. A swirl of raspberry puree through the cheesecake mixture before baking could also add a beautiful color and a tart counterpoint. For the crust, while a simple graham cracker crust is divine, don’t hesitate to try a crushed Oreo crust for a darker, more intense flavor, or even a shortbread crust for a buttery foundation. Imagine a pumpkin spice Cheesecake With Pound Cake Center in the autumn, or a key lime infused version for a refreshing summer dessert! The possibilities truly are limitless once you understand the core mechanics of this recipe.
So, what are you waiting for? I wholeheartedly encourage you to roll up your sleeves, gather your ingredients, and dive into the delightful challenge of creating this show-stopping dessert. Trust me when I say that the moment you slice into your very own Cheesecake With Pound Cake Center, you’ll feel an immense sense of accomplishment, followed by pure bliss with the first bite. Don’t be shy about customizing it to your own taste, making it truly yours. Once you’ve conquered this culinary triumph, I would absolutely love to hear about your experience! Please, share your photos, your triumphs, and any ingenious variations you come up with. Did you serve it with a specific topping that wowed your guests? Did you try a unique flavor combination for the pound cake or the cheesecake? Your insights and creativity are what make this baking community so vibrant. Go on, give it a try – your taste buds will thank you, and your friends and family will undoubtedly be clamoring for more! Happy baking!
Cheesecake With Pound Cake Center
This showstopper cheesecake came about completely by accident last Christmas when I couldn’t decide between making my family’s traditional pound cake or my husband’s favorite cheesecake. Instead of choosing, I combined them into one magnificent dessert that’s become our most requested special occasion treat! The buttery pound cake hidden inside creates this amazing textural surprise that makes everyone’s eyes widen when they cut into it. Topped with homemade caramel sauce, it’s the perfect balance of creamy, dense, and sweet.
Ingredients
-
½ cup (1 stick) unsalted butter
-
¾ cup granulated sugar
-
2 large eggs
-
1 teaspoon pure vanilla extract
-
1 ½ cups all-purpose flour
-
1 ½ teaspoons baking powder
-
½ teaspoon salt
-
½ cup whole milk
-
1 ½ cups graham cracker crumbs
-
¼ cup granulated sugar
-
6 tablespoons unsalted butter
-
4 (8-ounce) packages full-fat cream cheese
-
1 ½ cups granulated sugar
-
¼ cup all-purpose flour
-
2 teaspoons pure vanilla extract
-
¼ teaspoon salt
-
4 large eggs
-
1 cup sour cream
-
¼ cup heavy cream
-
2 cups mixed berries (fresh or frozen)
-
½ cup granulated sugar
-
2 tablespoons fresh lemon juice
-
1 tablespoon cornstarch mixed with 2 tablespoons cold water (slurry)
Instructions
-
Step 1
Preheat oven to 325°F (160°C). Grease and flour a small loaf pan or 6-inch round pan. Cream ½ cup butter and ¾ cup sugar. Beat in 2 eggs, then 1 tsp vanilla. Whisk 1 ½ cups flour, 1 ½ tsp baking powder, and ½ tsp salt. Alternately add dry ingredients and ½ cup milk to wet mixture; mix until just combined. Pour into prepared pan, bake 35-45 minutes until a skewer comes out clean. Cool 15-20 min in pan, then cool completely on a wire rack. -
Step 2
Preheat oven to 350°F (175°C). Line a 9-inch springform pan with parchment, wrap exterior tightly with foil. Combine 1 ½ cups graham cracker crumbs, ¼ cup sugar, and 6 tbsp melted butter. Press into pan. Bake 8-10 minutes. Cool. Reduce oven to 325°F (160°C). -
Step 3
In a large bowl, beat 4 (8-ounce) full-fat cream cheese packages until smooth. Gradually add 1 ½ cups sugar, then ¼ cup flour, mixing until just combined. Stir in 2 tsp vanilla and ¼ tsp salt. Add 4 eggs, one at a time, mixing until just incorporated. Gently fold in 1 cup sour cream and ¼ cup heavy cream until smooth. -
Step 4
Cut cooled pound cake to fit center of springform pan (approx. 6 inches long/3 inches wide or 6-inch round). Pour 1/3 of cheesecake filling over crust, spread evenly. Center pound cake on filling. Pour remaining filling around and over pound cake. Place foil-wrapped springform pan in a roasting pan. Add hot water to roasting pan, halfway up springform sides. Bake at 325°F (160°C) for 1 to 1.5 hours, until edges are set and center slightly jiggles. -
Step 5
Turn off oven, leave cheesecake in water bath with door ajar for 1 hour. Remove, unwrap foil, and cool on wire rack at room temperature for 2-3 hours. Cover loosely and refrigerate for at least 6-8 hours or overnight. Run knife around edge before releasing pan. Slice with a hot, clean knife. -
Step 6
In a saucepan, combine 2 cups mixed berries, ½ cup sugar, and 2 tbsp lemon juice. Simmer 5-7 minutes. Stir in cornstarch slurry (1 tbsp cornstarch + 2 tbsp cold water); cook 1-2 minutes until thickened. Cool completely. Spoon over individual cheesecake slices before serving.
Important Information
Nutrition Facts (Per Serving)
It is important to consider this information as approximate and not to use it as definitive health advice.
Allergy Information
Please check ingredients for potential allergens and consult a health professional if in doubt.

Leave a Comment