
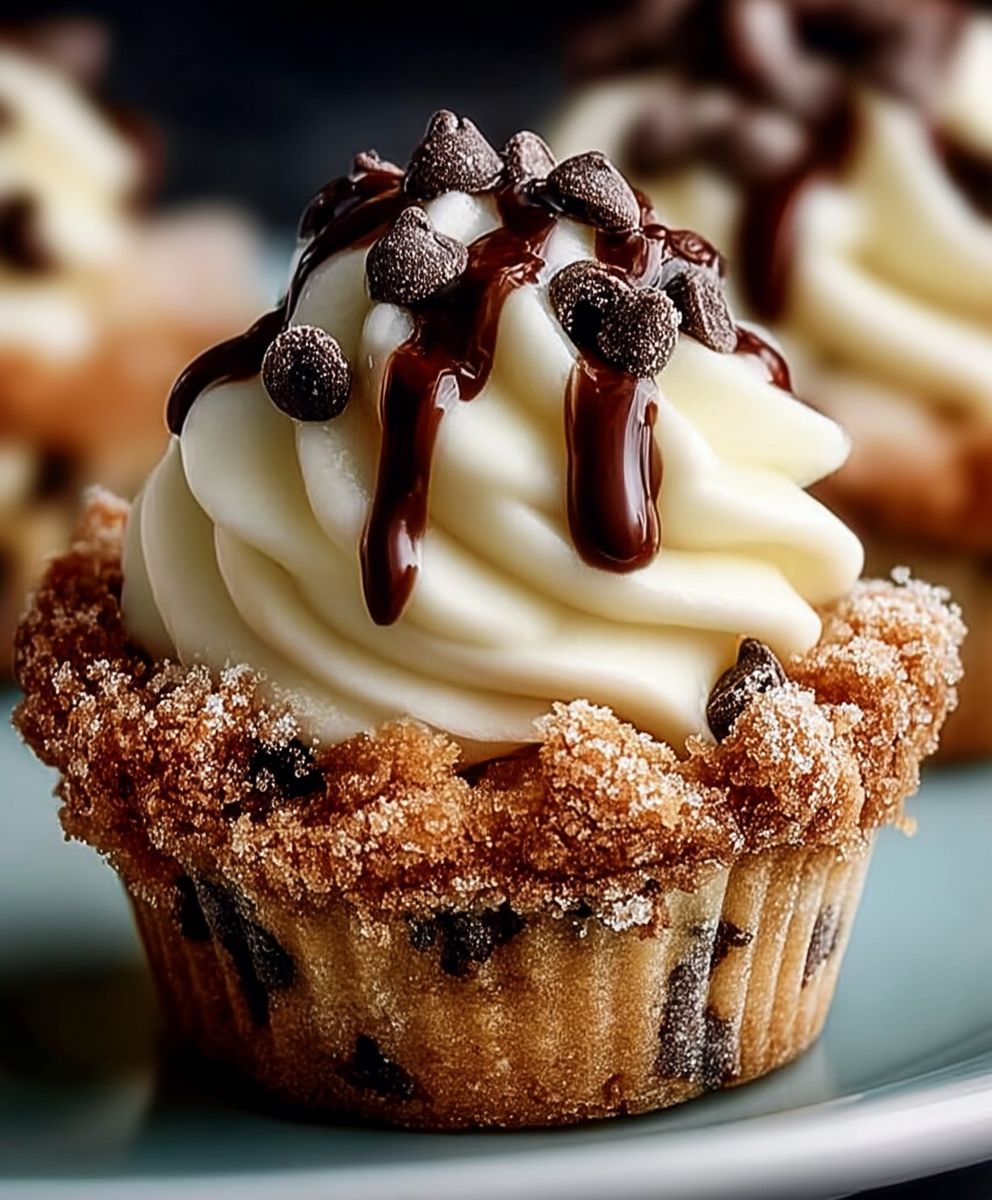
Cannoli cookie cups: Prepare to be amazed! Imagine the creamy, sweet, ricotta-filled goodness of a classic cannoli, nestled inside a perfectly crisp and buttery cookie cup. It’s a handheld dessert dream come true, and trust me, you’re going to want to make these immediately.
Cannoli, with their roots in Sicily, have a rich history dating back centuries. Some believe they were originally created as a fertility symbol during Carnevale, while others say they were a treat enjoyed by women in convents. Regardless of their exact origins, cannoli have become a beloved Italian pastry enjoyed worldwide. But let’s be honest, sometimes those delicate shells can be a bit messy, right?
That’s where these cannoli cookie cups come in! They offer all the delightful flavors and textures of a traditional cannoli the sweet ricotta filling, the hint of citrus, and the satisfying crunch but in a much more convenient and portable form. People adore this dish because it’s the perfect balance of sweet and creamy, with a delightful textural contrast. Plus, they’re incredibly easy to make and are always a crowd-pleaser at parties and gatherings. Get ready to impress your friends and family with this unique and delicious twist on a classic dessert!
Ingredients:
- For the Cookie Cups:
- 2 1/4 cups all-purpose flour
- 1 teaspoon baking powder
- 1/2 teaspoon baking soda
- 1/4 teaspoon salt
- 1 cup (2 sticks) unsalted butter, softened
- 3/4 cup granulated sugar
- 3/4 cup packed light brown sugar
- 2 large eggs
- 1 teaspoon vanilla extract
- For the Cannoli Filling:
- 15 ounces whole milk ricotta cheese, drained overnight
- 1 cup powdered sugar
- 1 teaspoon vanilla extract
- 1/2 teaspoon ground cinnamon
- 1/4 cup mini chocolate chips
- 2 tablespoons candied orange peel, finely chopped (optional)
- For Garnish:
- Powdered sugar, for dusting
- Mini chocolate chips
- Chopped pistachios
- Candied orange peel, finely chopped (optional)
Making the Cookie Cups
- Prepare the Dry Ingredients: In a medium bowl, whisk together the flour, baking powder, baking soda, and salt. Make sure everything is evenly distributed. This ensures a consistent texture in your cookie cups.
- Cream the Butter and Sugars: In a large bowl, using an electric mixer, cream together the softened butter, granulated sugar, and brown sugar until light and fluffy. This usually takes about 3-5 minutes. Don’t rush this step! The creaming process incorporates air, which is essential for a tender cookie. Scrape down the sides of the bowl occasionally to ensure everything is evenly mixed.
- Add the Eggs and Vanilla: Beat in the eggs one at a time, then stir in the vanilla extract. Make sure each egg is fully incorporated before adding the next. This prevents the batter from curdling.
- Combine Wet and Dry Ingredients: Gradually add the dry ingredients to the wet ingredients, mixing on low speed until just combined. Be careful not to overmix! Overmixing develops the gluten in the flour, resulting in tough cookies. Mix until you no longer see streaks of flour.
- Chill the Dough: Wrap the dough in plastic wrap and chill in the refrigerator for at least 30 minutes. This step is crucial! Chilling the dough prevents the cookies from spreading too much during baking and makes the dough easier to handle. You can chill it for longer, even overnight, if needed.
- Preheat the Oven and Prepare the Muffin Tin: Preheat your oven to 350°F (175°C). Grease a 24-cup mini muffin tin. Alternatively, you can use paper liners, but the cookies might not hold their shape as well.
- Shape the Cookie Cups: Roll the chilled dough into 1-inch balls. Place each ball into a mini muffin cup.
- Bake the Cookie Cups: Bake for 10-12 minutes, or until the edges are lightly golden brown. Keep a close eye on them, as baking times can vary depending on your oven.
- Shape the Cups: Immediately after removing the muffin tin from the oven, use a small spoon or a tart shaper to gently press down the center of each cookie to create a cup shape. Be careful, as the cookies will be hot! Work quickly, as the cookies will firm up as they cool. If they start to cool too much, you can briefly return them to the oven to soften them slightly.
- Cool Completely: Let the cookie cups cool completely in the muffin tin before removing them. This will prevent them from breaking. Once cooled, gently remove them from the tin.
Preparing the Cannoli Filling
- Drain the Ricotta Cheese: This is the most important step for a creamy, non-watery filling. Place the ricotta cheese in a cheesecloth-lined sieve set over a bowl. Cover and refrigerate overnight. This allows excess moisture to drain out. If you’re short on time, you can press the ricotta with paper towels to remove some of the moisture, but overnight draining is ideal.
- Combine Ingredients: In a medium bowl, combine the drained ricotta cheese, powdered sugar, vanilla extract, and cinnamon. Beat with an electric mixer until smooth and creamy.
- Fold in Chocolate Chips and Candied Orange Peel: Gently fold in the mini chocolate chips and candied orange peel (if using).
- Chill the Filling: Cover the filling and chill in the refrigerator for at least 30 minutes to allow the flavors to meld. This also helps the filling to firm up slightly, making it easier to pipe.
Assembling the Cannoli Cookie Cups
- Prepare for Filling: Transfer the cannoli filling to a piping bag fitted with a large round tip. If you don’t have a piping bag, you can use a resealable plastic bag with a corner snipped off.
- Fill the Cookie Cups: Pipe the cannoli filling into each cookie cup. Fill them generously!
- Garnish: Dust the filled cookie cups with powdered sugar. Sprinkle with mini chocolate chips, chopped pistachios, and candied orange peel (if using). Get creative with your garnishes!
- Serve Immediately: For the best texture, serve the cannoli cookie cups immediately. If you need to make them ahead of time, store the cookie cups and filling separately and assemble them just before serving to prevent the cookies from becoming soggy.

Conclusion:
And there you have it! These Cannoli Cookie Cups are truly a must-try. I know, I know, I’m biased, but trust me on this one. The combination of the crisp, buttery cookie base with that creamy, sweet, and slightly tangy cannoli filling is simply divine. It’s like a little bite of Italy right in your own kitchen, and who wouldn’t want that?
What makes these little cups so special is their versatility. They’re perfect for a casual weeknight dessert, but elegant enough to serve at a dinner party. Imagine presenting a platter of these beauties at your next gathering your guests will be so impressed! Plus, they’re surprisingly easy to make, especially considering how impressive they look and taste. You don’t need to be a master baker to pull these off, I promise.
But the best part? You can totally customize them to your liking! Feeling adventurous? Try adding a hint of citrus zest to the cookie dough for a bright, refreshing twist. Or, for the chocolate lovers out there (like myself!), drizzle some melted dark chocolate over the finished cups for an extra layer of decadence. You could even sprinkle some chopped pistachios or mini chocolate chips on top for added texture and visual appeal.
Speaking of variations, consider experimenting with different fillings. While the classic ricotta filling is always a winner, you could try adding a touch of mascarpone cheese for an even richer, creamier texture. Or, for a lighter option, use a low-fat ricotta cheese and sweeten it with a sugar substitute. You can also incorporate different flavor extracts, such as almond or vanilla, to customize the filling to your preferences.
For serving suggestions, these Cannoli Cookie Cups are delicious on their own, but they also pair beautifully with a scoop of vanilla ice cream or a dollop of whipped cream. A sprinkle of powdered sugar adds a touch of elegance, and a few fresh berries on the side provide a pop of color and freshness. They’re also fantastic with a cup of strong coffee or a glass of sweet dessert wine.
I truly believe that these Cannoli Cookie Cups will become a new favorite in your household. They’re the perfect balance of sweet, creamy, and crunchy, and they’re guaranteed to satisfy your sweet tooth. So, what are you waiting for? Gather your ingredients, preheat your oven, and get ready to bake up a batch of these irresistible treats.
I’m so excited for you to try this recipe! And I can’t wait to hear what you think. Once you’ve made them, please come back and leave a comment below. Let me know how they turned out, what variations you tried, and any tips or tricks you discovered along the way. Your feedback is invaluable, and it helps me to create even better recipes for you in the future.
Don’t forget to share your creations on social media too! Tag me in your photos and use the hashtag #CannoliCookieCups so I can see your beautiful creations. I love seeing how you personalize my recipes and make them your own. Happy baking!
Cannoli Cookie Cups: The Ultimate Italian Dessert Recipe
Mini cookie cups filled with creamy cannoli filling. A fun, easy twist on classic Italian dessert!
Ingredients
- 2 1/4 cups all-purpose flour
- 1 teaspoon baking powder
- 1/2 teaspoon baking soda
- 1/4 teaspoon salt
- 1 cup (2 sticks) unsalted butter, softened
- 3/4 cup granulated sugar
- 3/4 cup packed light brown sugar
- 2 large eggs
- 1 teaspoon vanilla extract
- 15 ounces whole milk ricotta cheese, drained overnight
- 1 cup powdered sugar
- 1 teaspoon vanilla extract
- 1/2 teaspoon ground cinnamon
- 1/4 cup mini chocolate chips
- 2 tablespoons candied orange peel, finely chopped (optional)
- Powdered sugar, for dusting
- Mini chocolate chips
- Chopped pistachios
- Candied orange peel, finely chopped (optional)
Instructions
- Prepare the Dry Ingredients: In a medium bowl, whisk together the flour, baking powder, baking soda, and salt. Make sure everything is evenly distributed. This ensures a consistent texture in your cookie cups.
- Cream the Butter and Sugars: In a large bowl, using an electric mixer, cream together the softened butter, granulated sugar, and brown sugar until light and fluffy. This usually takes about 3-5 minutes. Don’t rush this step! The creaming process incorporates air, which is essential for a tender cookie. Scrape down the sides of the bowl occasionally to ensure everything is evenly mixed.
- Add the Eggs and Vanilla: Beat in the eggs one at a time, then stir in the vanilla extract. Make sure each egg is fully incorporated before adding the next. This prevents the batter from curdling.
- Combine Wet and Dry Ingredients: Gradually add the dry ingredients to the wet ingredients, mixing on low speed until just combined. Be careful not to overmix! Overmixing develops the gluten in the flour, resulting in tough cookies. Mix until you no longer see streaks of flour.
- Chill the Dough: Wrap the dough in plastic wrap and chill in the refrigerator for at least 30 minutes. This step is crucial! Chilling the dough prevents the cookies from spreading too much during baking and makes the dough easier to handle. You can chill it for longer, even overnight, if needed.
- Preheat the Oven and Prepare the Muffin Tin: Preheat your oven to 350°F (175°C). Grease a 24-cup mini muffin tin. Alternatively, you can use paper liners, but the cookies might not hold their shape as well.
- Shape the Cookie Cups: Roll the chilled dough into 1-inch balls. Place each ball into a mini muffin cup.
- Bake the Cookie Cups: Bake for 10-12 minutes, or until the edges are lightly golden brown. Keep a close eye on them, as baking times can vary depending on your oven.
- Shape the Cups: Immediately after removing the muffin tin from the oven, use a small spoon or a tart shaper to gently press down the center of each cookie to create a cup shape. Be careful, as the cookies will be hot! Work quickly, as the cookies will firm up as they cool. If they start to cool too much, you can briefly return them to the oven to soften them slightly.
- Cool Completely: Let the cookie cups cool completely in the muffin tin before removing them. This will prevent them from breaking. Once cooled, gently remove them from the tin.
- Drain the Ricotta Cheese: This is the most important step for a creamy, non-watery filling. Place the ricotta cheese in a cheesecloth-lined sieve set over a bowl. Cover and refrigerate overnight. This allows excess moisture to drain out. If you’re short on time, you can press the ricotta with paper towels to remove some of the moisture, but overnight draining is ideal.
- Combine Ingredients: In a medium bowl, combine the drained ricotta cheese, powdered sugar, vanilla extract, and cinnamon. Beat with an electric mixer until smooth and creamy.
- Fold in Chocolate Chips and Candied Orange Peel: Gently fold in the mini chocolate chips and candied orange peel (if using).
- Chill the Filling: Cover the filling and chill in the refrigerator for at least 30 minutes to allow the flavors to meld. This also helps the filling to firm up slightly, making it easier to pipe.
- Prepare for Filling: Transfer the cannoli filling to a piping bag fitted with a large round tip. If you don’t have a piping bag, you can use a resealable plastic bag with a corner snipped off.
- Fill the Cookie Cups: Pipe the cannoli filling into each cookie cup. Fill them generously!
- Garnish: Dust the filled cookie cups with powdered sugar. Sprinkle with mini chocolate chips, chopped pistachios, and candied orange peel (if using). Get creative with your garnishes!
- Serve Immediately: For the best texture, serve the cannoli cookie cups immediately. If you need to make them ahead of time, store the cookie cups and filling separately and assemble them just before serving to prevent the cookies from becoming soggy.
Notes
- Draining the ricotta cheese overnight is crucial for the best cannoli filling texture.
- Chilling the cookie dough prevents excessive spreading during baking.
- For optimal freshness, assemble the cookie cups just before serving.
- Get creative with your garnishes!


Leave a Comment