
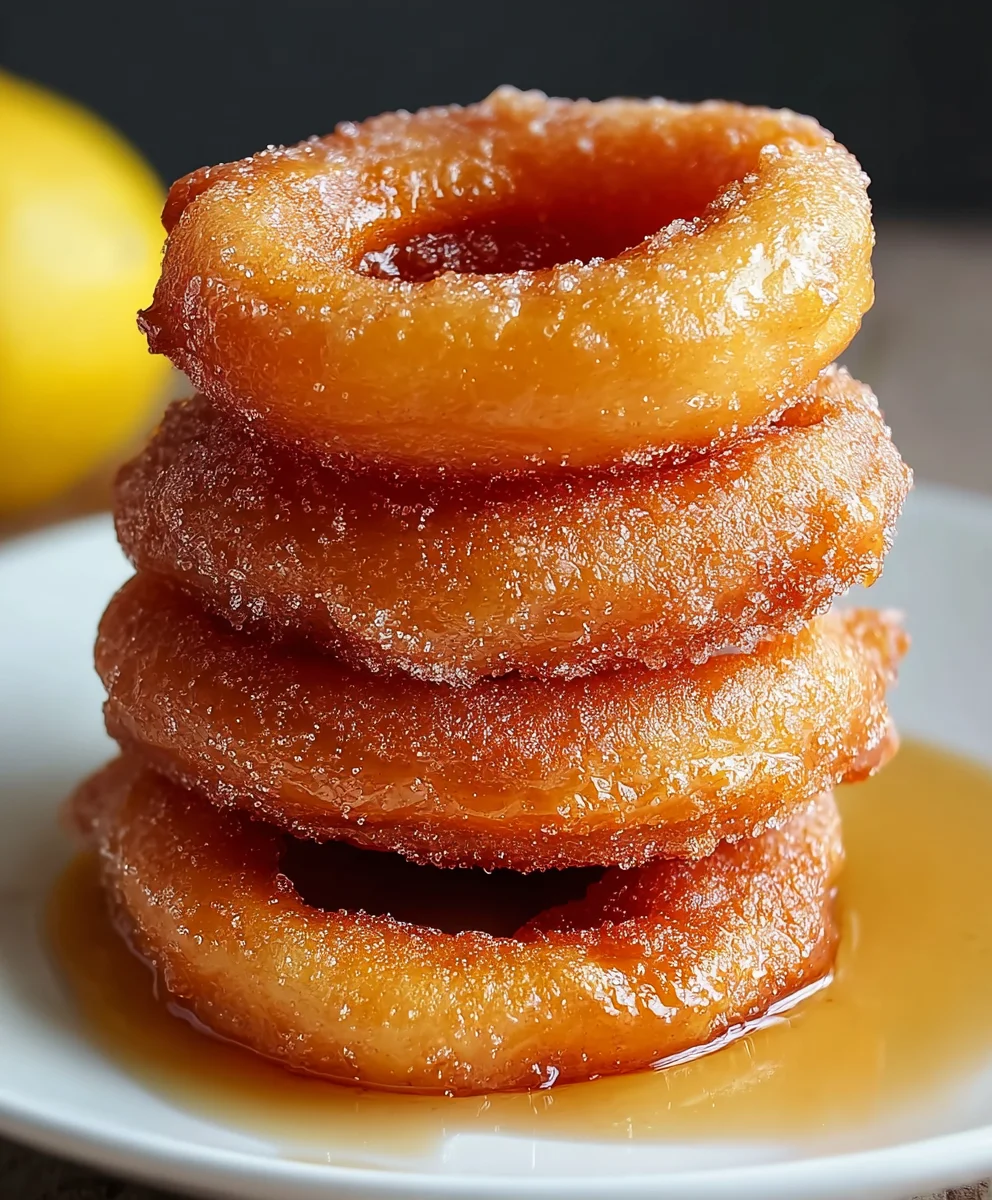
Fried Apple Rings are an exquisite culinary delight that promises to transport your taste buds straight to a cozy, nostalgic autumn afternoon. Imagine biting into a perfectly golden, crispy exterior, giving way to a tender, warm, and subtly sweet apple slice. This delightful treat, often a cherished part of harvest traditions and comfort food repertoires, brings a touch of simple elegance to any occasion. While their precise origin is often debated, dishes featuring fried fruit have long been a staple in many cultures, celebrated for their ability to transform everyday ingredients into something truly special.
Why We Can’t Get Enough of Fried Apple Rings
People universally adore these rings not just for their irresistible contrast of textures – the satisfying crunch giving way to the yielding softness – but also for their wonderfully balanced sweet and tart flavor profile. They offer a delightful versatility, serving beautifully as an indulgent breakfast item, a charming dessert, or even a comforting snack. I find immense joy in creating these incredible Fried Apple Rings, and I am thrilled to guide you through the process of crafting this beloved dish in your very own kitchen. Get ready to experience a simple yet profound culinary pleasure!
Ingredients:
- For the Fried Apple Rings:
- 3-4 medium-sized firm apples (such as Honeycrisp, Gala, Fuji, or Granny Smith – I personally love a mix for a balance of sweet and tart!)
- 6 cups vegetable oil, canola oil, or peanut oil, for frying (I usually go with vegetable oil as it’s quite neutral and has a high smoke point)
- For the Batter:
- 1 ½ cups all-purpose flour
- 2 tablespoons granulated sugar
- 1 teaspoon baking powder (this is key for that lovely, puffy texture)
- ½ teaspoon ground cinnamon (a little warmth goes a long way)
- ¼ teaspoon salt (to balance the sweetness and enhance flavors)
- 1 large egg
- 1 cup milk (any kind works, but I usually use whole milk for richness)
- 1 tablespoon unsalted butter, melted (adds a beautiful richness to the batter)
- 1 teaspoon vanilla extract (pure vanilla is always my preference for the best flavor)
- For the Cinnamon Sugar Coating:
- ½ cup granulated sugar
- 1 tablespoon ground cinnamon (adjust to your preference; I like a generous amount!)
Preparing Your Apples: The Foundation for Perfect Fried Apple Rings
- Choose Your Apples Wisely: The very first step to making truly exceptional Fried Apple Rings is selecting the right apples. I always recommend using firm, crisp apples that hold their shape well when cooked. My go-to varieties are Honeycrisp, Gala, Fuji, or even Granny Smith if you prefer a tart counterpoint to the sweet batter and coating. Avoid softer apples like Red Delicious, as they can become mushy during frying, which we definitely don’t want. Aim for apples that are similar in size so your rings cook evenly.
- Wash and Dry Thoroughly: Before anything else, give your apples a good wash under cool running water. I like to gently scrub them to remove any wax or dirt. Pat them completely dry with a clean kitchen towel. Any excess moisture can affect how the batter adheres and how the apples fry.
- Peel for Smoothness: Next, carefully peel all of your apples. While some recipes might suggest leaving the skin on for texture, I find that for these particular Fried Apple Rings, a peeled apple creates a much smoother eating experience, allowing the crispy batter and tender apple to truly shine. Use a sharp vegetable peeler to make this process quick and easy, taking care to remove all of the skin without taking too much of the apple flesh.
- Core with Precision: This is a crucial step for creating those iconic ring shapes. Using an apple corer, carefully remove the core from each apple. Push the corer straight through the center of the apple, ensuring you remove all the seeds and the fibrous core. If you don’t have an apple corer, you can carefully use a small paring knife to cut around the core, then use a melon baller or a small spoon to scoop it out, but an apple corer truly makes perfect rings.
- Slice into Rings: Now for the transformation! Lay each cored apple on its side and slice it into approximately ¼-inch thick rings. I find that this thickness is ideal – thin enough to cook through and become tender, but thick enough to maintain its structure and not become flimsy. If they’re too thin, they might break apart; too thick, and they might not cook evenly or feel too dense. Aim for consistency across all your slices for uniform cooking. As you slice them, you’ll see the beautiful “ring” shape emerge – this is what makes Fried Apple Rings so visually appealing and fun to eat!
- Prepare for Batter: Once sliced, set your apple rings aside. I sometimes like to gently blot them again with a paper towel if they’ve released any moisture. You want them as dry as possible to ensure maximum batter adhesion. Don’t let them sit for too long, as some apples can start to brown; we want to get them into that delicious batter as soon as possible.
Crafting the Golden Batter: Our Secret to Crispy Fried Apple Rings
- Combine Dry Ingredients: In a large mixing bowl, I like to start by whisking together all of my dry ingredients. This includes the all-purpose flour, granulated sugar, baking powder, ground cinnamon, and salt. Whisk them vigorously for about 30 seconds to a minute, ensuring they are thoroughly combined. This step is important because it evenly distributes the leavening agent (baking powder) and the spices throughout the flour, preventing lumps of concentrated flavor later on. When I’m making Fried Apple Rings, I want every bite to have that perfect balance.
- Whisk Wet Ingredients Separately: In a separate, medium-sized bowl, I combine my wet ingredients. Crack the large egg into the bowl, then add the milk, melted butter, and vanilla extract. Whisk these together until they are smooth and well-incorporated. The melted butter adds a wonderful richness to the batter that truly elevates the flavor of these Fried Apple Rings, giving them a luxurious texture.
- Combine Wet and Dry: Now for the magic! Pour the wet ingredient mixture into the bowl with your dry ingredients. Using a whisk, mix them gently until just combined. It’s very important not to overmix the batter. Overmixing can develop the gluten in the flour too much, leading to tough or rubbery Fried Apple Rings, and we’re aiming for light and crispy. A few small lumps are perfectly fine and often preferred; they usually disappear during a brief rest. The batter should have a consistency similar to pancake batter – thick enough to coat the apple rings, but thin enough to drip off slowly. If it seems too thick, you can add a tablespoon or two more milk; if it’s too thin, a tablespoon of flour can help.
- Let the Batter Rest (Optional, but Recommended): Once your batter is mixed, I often find it beneficial to let it rest for about 10-15 minutes at room temperature. This allows the flour to fully hydrate and the baking powder to start activating, contributing to a lighter, airier batter. It also gives any small lumps a chance to dissolve naturally. While not strictly necessary, this small resting period can make a noticeable difference in the final texture of your Fried Apple Rings. Cover the bowl with a clean cloth or plastic wrap during this time.
Setting Up for Frying: Safety and Success with Fried Apple Rings
- Choose Your Frying Vessel: Select a heavy-bottomed pot or Dutch oven that is deep enough to safely hold the oil and submerge your apple rings without overflowing. I usually use a 4-5 quart Dutch oven. Its heavy base helps distribute heat evenly and maintain a consistent oil temperature, which is paramount for perfectly cooked Fried Apple Rings.
- Add the Frying Oil: Pour about 6 cups of vegetable, canola, or peanut oil into your chosen pot. You’ll want enough oil so that your apple rings can be fully submerged while frying. Typically, this means filling the pot about 3-4 inches deep, but never more than halfway full to prevent dangerous splatters and boil-overs once food is added.
- Heat the Oil Gradually: Place the pot over medium-high heat. Now, this is where patience and a good thermometer come in. I highly recommend using a deep-fry thermometer or an instant-read thermometer clipped to the side of the pot. We are aiming for an oil temperature of 350-375°F (175-190°C). Heating the oil gradually prevents scorching and allows you to reach the desired temperature more accurately.
- Monitor Temperature Closely: Maintaining the correct oil temperature is perhaps the most crucial aspect of making amazing Fried Apple Rings. If the oil isn’t hot enough, the batter will absorb too much oil, resulting in greasy, soggy rings. If it’s too hot, the batter will brown too quickly on the outside, leaving the inside undercooked, and the apple might not soften properly. Keep a close eye on your thermometer. As you add apple rings, the temperature will drop, so be prepared to adjust your heat accordingly.
- Prepare Your Landing Zone: While the oil heats, set up your drainage station. I always place a wire rack over a baking sheet lined with several layers of paper towels. This setup allows the excess oil to drip off the fried rings and collect below, ensuring your Fried Apple Rings stay crispy, not oily. Have this ready and waiting, because once the rings are fried, you’ll want to transfer them immediately.
- Set Up the Coating Station: In a shallow dish or a wide, rimmed plate, combine the ½ cup granulated sugar and 1 tablespoon ground cinnamon for your coating. Whisk these together thoroughly so the cinnamon is evenly distributed throughout the sugar. This will be where your hot, freshly fried apple rings get their irresistible sweet and spiced finish. Having this ready saves time and ensures you coat the rings while they are still warm, which helps the sugar adhere best.
The Frying Process: Achieving Irresistibly Golden Fried Apple Rings
- Check Oil Temperature Again: Before you even think about dipping your first apple ring, double-check that your oil is precisely within the target range of 350-375°F (175-190°C). This consistency is the golden rule for perfect Fried Apple Rings.
- Dip the Apple Rings: Working with one apple ring at a time, gently drop it into the prepared batter. Use a fork or tongs to ensure it’s fully coated on both sides. I like to let any excess batter drip off for a second or two before transferring, preventing gloppy drips in the oil. You want a nice, even coating that isn’t too thick.
- Carefully Place in Hot Oil: Using your tongs, carefully lower the battered apple ring into the hot oil. Always place it away from you to prevent splattering.
- Fry in Batches: This is incredibly important for maintaining oil temperature and achieving even cooking. Fry only 2-3 apple rings at a time, depending on the size of your pot. Do not overcrowd the pot! Overcrowding will cause the oil temperature to drop significantly, resulting in greasy, pale Fried Apple Rings that won’t get that desired crispy, golden-brown crust.
- Fry Until Golden: Let the Fried Apple Rings cook for about 2-3 minutes per side, or until they are beautifully golden brown and crispy. As they fry, you’ll see the batter puff up and become wonderfully airy. Use your tongs to carefully flip them over halfway through the cooking process to ensure even browning on both sides. The apple inside will soften to a tender, delightful consistency.
- Monitor and Adjust Heat: Throughout the frying process, keep a keen eye on your thermometer. As you add cold apple rings, the oil temperature will naturally decrease. You may need to slightly increase the heat source for a moment to bring it back up, then reduce it again to maintain a steady temperature. This continuous adjustment is key for consistent results across all your batches of Fried Apple Rings.
- Remove and Drain: Once the Fried Apple Rings are golden brown and cooked to perfection, use your tongs to carefully lift them out of the hot oil. Hold them over the pot for a few seconds to allow any major drips of oil to fall back into the pot. Immediately transfer them to your prepared wire rack set over paper towels. This allows excess oil to drain away, keeping your rings delightfully crispy.
The Cinnamon Sugar Coating: The Sweet Finish for Your Fried Apple Rings
- Prepare the Cinnamon Sugar: If you haven’t already, ensure your cinnamon sugar mixture (½ cup granulated sugar + 1 tablespoon ground cinnamon) is well-combined in a shallow dish or plate. This is what gives our Fried Apple Rings their signature sweet and spiced finish.
- Coat While Warm: This step is critical for proper adhesion. As soon as you remove a batch of freshly fried and drained Fried Apple Rings from the cooling rack – while they are still very warm, even hot – gently place them into the cinnamon sugar mixture.
- Roll to Coat: Carefully roll each warm apple ring in the cinnamon sugar, ensuring it’s fully coated on all sides. The warmth of the fried batter will cause the sugar to stick beautifully, creating a shimmering, sweet, and aromatic crust. I often use my fingers or a spoon to help sprinkle the mixture over every surface.
- Shake Off Excess: Once thoroughly coated, gently tap off any excess cinnamon sugar. You want a good, even layer, but not so much that it’s clumpy.
- Transfer to Serving Platter: As each batch of Fried Apple Rings is coated, transfer them to a clean serving platter or plate. Repeat the frying and coating process with the remaining apple rings until all of them are transformed into these delectable treats.
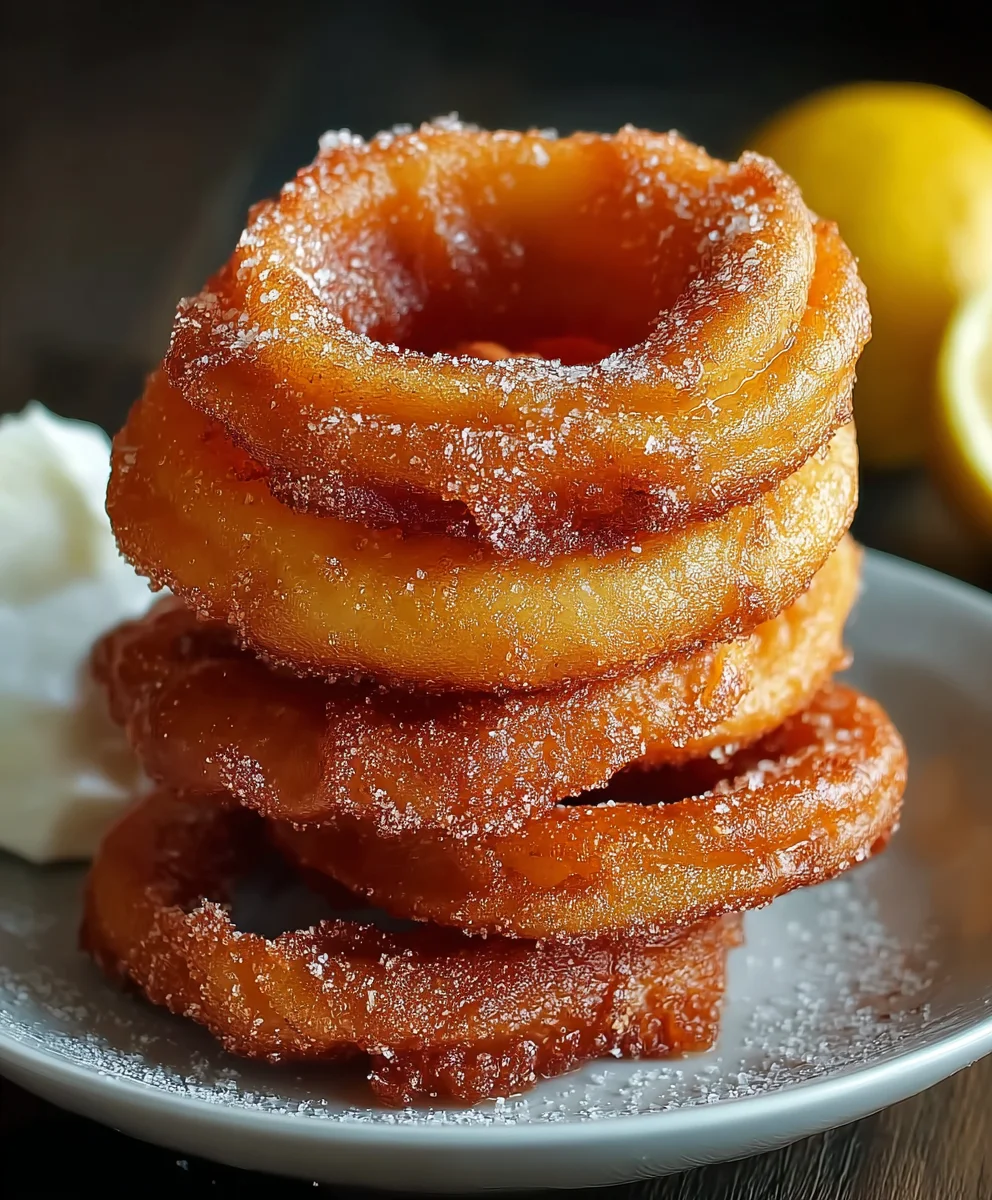
- Serving Suggestions: I absolutely adore serving these Fried Apple Rings warm, fresh from the pan. They are wonderful on their own, but if you want to elevate the experience, consider a light dusting of powdered sugar, a drizzle of warm caramel sauce, a scoop of vanilla ice cream, or even a dollop of whipped cream. They make an exquisite dessert, a delightful breakfast treat, or a luxurious snack. The combination of crispy, cinnamon-spiced batter, and tender, sweet apple is truly irresistible. For an extra touch, I sometimes melt a little butter and brush it lightly over the warm rings before coating them in sugar; it just helps the cinnamon sugar cling even better and adds another layer of richness to these truly special Fried Apple Rings.
- Storage (if there are any left!): While Fried Apple Rings are definitely best enjoyed immediately, any leftovers can be stored in an airtight container at room temperature for up to a day, though they will lose some of their crispness. To revive them slightly, you can gently warm them in a toaster oven for a few minutes. However, trust me, you likely won’t have any left to store once everyone gets a taste!
After walking you through the simple steps of creating these golden-brown delights, I truly hope you’re feeling inspired to get into your kitchen and experience the magic for yourself. What makes this recipe an absolute must-try isn’t just its straightforward approach, but the sheer joy and comfort it brings with every bite. We’re talking about perfectly tender apple slices, encased in a light, subtly sweet batter, fried until crisp and golden. The contrast in textures – the soft, warm apple against the slight crunch of the exterior – is simply divine. It’s a versatile treat that bridges the gap between a casual snack and an elegant dessert, effortlessly fitting into any part of your day. I promise you, the aroma filling your kitchen alone is worth the effort, conjuring up feelings of home and happiness.
There’s something incredibly satisfying about transforming a humble apple into such an extraordinary indulgence. These aren’t just any apple treats; these
Fried Apple Rings
are a revelation. They embody everything wonderful about simple, honest cooking: fresh ingredients, minimal fuss, and maximum flavor. Forget complicated desserts; this recipe proves that true deliciousness often lies in elegant simplicity. Each ring is a little disc of pure joy, offering a perfect balance of natural sweetness from the apple and a hint of warmth from carefully chosen spices. It’s an experience that delights both the palate and the soul, reminding us that sometimes the most comforting foods are those we make with our own hands, sharing their warmth with those we love.
Now, let’s talk about how to elevate your Fried Apple Rings experience even further. While they are absolutely phenomenal on their own – perhaps dusted with a little powdered sugar or a sprinkle of cinnamon – there are so many delightful ways to serve them. Imagine them warm, alongside a scoop of vanilla bean ice cream, allowing the ice cream to gently melt around the edges, creating a creamy, dreamy sauce. A dollop of freshly whipped cream, perhaps infused with a touch of maple syrup or a hint of orange zest, would also be magnificent. For those with a sweet tooth, a drizzle of warm caramel sauce or even a light chocolate ganache could turn them into an incredibly decadent dessert. Don’t forget their potential for breakfast or brunch; they’d be a fantastic accompaniment to pancakes or waffles, offering a fruity, warm counterpoint to a stack of fluffy goodness. And for a truly unique twist, try serving them with a side of plain Greek yogurt mixed with a touch of honey – the tanginess beautifully cuts through the sweetness.
But the fun doesn’t stop there! The beauty of this recipe lies in its adaptability. Don’t be afraid to experiment with different varieties of apples. Granny Smith will offer a more tart counterpoint, while a sweeter apple like Honeycrisp or Gala will yield a dessert that’s naturally sweeter and softer. You could also play with the spices in the batter; a pinch of nutmeg, a whisper of cardamom, or even a touch of allspice could add another layer of aromatic complexity. For a holiday feel, consider adding a tiny bit of ground cloves. If you’re feeling adventurous, try making a simple glaze with powdered sugar and a few drops of lemon juice or apple cider for an extra tangy finish. Or, for a savory-sweet pairing, serve them alongside a slice of crisp bacon – trust me on this one, it’s surprisingly delicious! The possibilities are truly endless, limited only by your imagination and what you have on hand.
I genuinely encourage you to give this recipe a try this week. It’s an incredibly rewarding experience, and I’m confident that these Fried Apple Rings will become a cherished treat in your home. They’re perfect for a cozy night in, a spontaneous gathering with friends, or simply a well-deserved personal indulgence. Don’t be intimidated; the process is straightforward, and the results are consistently spectacular. Once you’ve had a chance to create your own batch, I would absolutely love to hear about your experience! Please share your thoughts in the comments below, let me know what apple varieties you used, or any creative serving suggestions you came up with. Did you make any exciting variations? Did they bring a smile to your face, or perhaps to the faces of your loved ones? Your feedback and shared culinary adventures truly inspire me, and I can’t wait to see how these delightful treats become a part of your own kitchen stories. Happy cooking, and even happier eating!
Best Fried Apple Rings Recipe: Sweet, Crispy, & Easy
Fried Apple Rings are an exquisite culinary delight that promises to transport your taste buds straight to a cozy, nostalgic autumn afternoon. Imagine biting into a perfectly golden, crispy exterior, giving way to a tender, warm, and subtly sweet apple slice. People universally adore these rings not just for their irresistible contrast of textures – the satisfying crunch giving way to the yielding softness – but also for their wonderfully balanced sweet and tart flavor profile. What I love most about this recipe is how easy it is. Using pancake mix as the base for the batter is my little shortcut that saves so much time. The combination of warm spices and sweet apples creates that cozy autumn feeling we all crave. My kitchen smells absolutely amazing every time I make these.
Ingredients
-
3-4 medium-sized firm apples (e.g., Honeycrisp, Gala, Fuji, or Granny Smith)
-
6 cups vegetable oil, canola oil, or peanut oil, for frying
-
1 ½ cups pancake mix
-
½ teaspoon ground cinnamon (for batter)
-
¼ teaspoon salt (for batter)
-
1 large egg
-
1 cup milk
-
1 tablespoon unsalted butter, melted
-
1 teaspoon vanilla extract
-
½ cup granulated sugar (for coating)
-
1 tablespoon ground cinnamon (for coating)
Instructions
-
Step 1
Wash, dry, peel, and core 3-4 apples. Slice each apple into approximately ¼-inch thick rings. Gently blot the apple rings dry with a paper towel to remove any excess moisture. -
Step 2
In a large bowl, whisk together 1 ½ cups pancake mix, ½ tsp ground cinnamon, and ¼ tsp salt. In a separate medium-sized bowl, whisk together 1 large egg, 1 cup milk, 1 tablespoon melted unsalted butter, and 1 teaspoon vanilla extract until smooth. Pour the wet ingredients into the dry ingredients and mix gently until just combined. Avoid overmixing; a few small lumps are acceptable. Let the batter rest at room temperature for 10-15 minutes while you prepare for frying. -
Step 3
Select a heavy-bottomed pot or Dutch oven and add 6 cups of vegetable, canola, or peanut oil, ensuring it’s no more than halfway full. Heat the oil over medium-high heat until it reaches a temperature of 350-375°F (175-190°C), using a deep-fry or instant-read thermometer. While the oil heats, prepare a draining station by placing a wire rack over a baking sheet lined with paper towels. In a shallow dish, combine ½ cup granulated sugar and 1 tablespoon ground cinnamon for the coating, whisking until well mixed. -
Step 4
Once the oil is at the correct temperature, dip one apple ring into the prepared batter, ensuring it’s fully coated and letting any excess drip off. Carefully lower the battered apple ring into the hot oil, placing it away from you. Fry 2-3 rings at a time to avoid overcrowding the pot, which can lower the oil temperature. Fry for about 2-3 minutes per side, or until the rings are beautifully golden brown and crispy. Monitor the oil temperature closely, adjusting the heat as needed to maintain a steady temperature. -
Step 5
Once fried, use tongs to carefully lift the apple rings from the oil, allowing any major excess oil to drip back into the pot. Immediately transfer them to the prepared wire rack. While still very warm, gently place each fried apple ring into the cinnamon sugar mixture and roll to coat thoroughly on all sides. Shake off any excess. Transfer coated rings to a clean serving platter. Repeat the frying and coating process with the remaining apple rings. Serve immediately, perhaps with a dusting of powdered sugar, caramel sauce, or a scoop of vanilla ice cream. Store any rare leftovers in an airtight container at room temperature for up to one day.
Important Information
Nutrition Facts (Per Serving)
It is important to consider this information as approximate and not to use it as definitive health advice.
Allergy Information
Please check ingredients for potential allergens and consult a health professional if in doubt.
Leave a Comment