
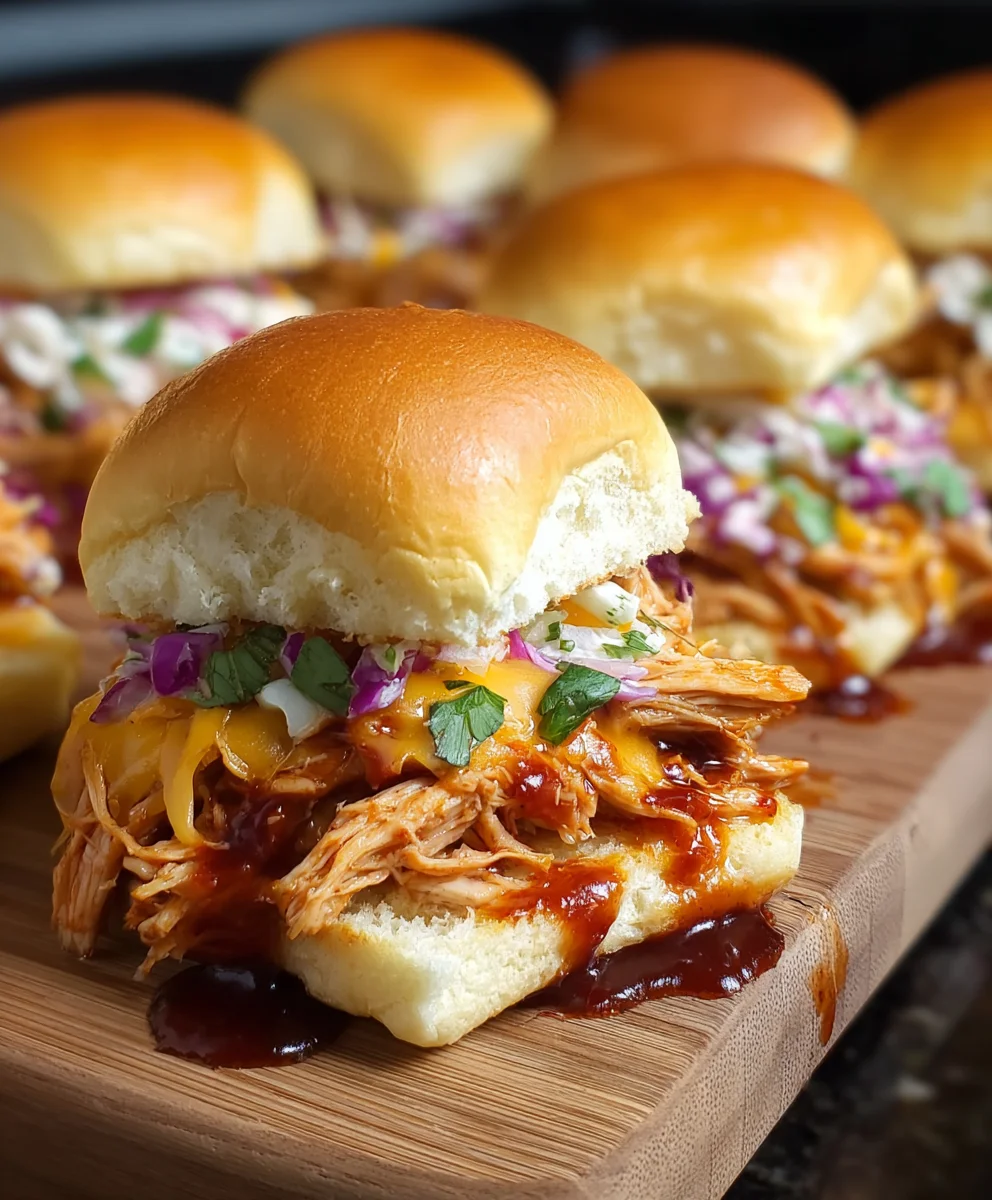
Bbq Chicken Sliders are, without a doubt, the ultimate crowd-pleaser for any gathering, from casual backyard barbecues to sophisticated game-day parties. I’ve always found myself drawn to dishes that offer a perfect blend of comfort and culinary flair, and these miniature marvels hit every note with undeniable charm. There’s something inherently appealing about a dish that combines the rich, smoky flavors of slow-cooked barbecue chicken with the convenience of a bite-sized bun. Historically, sliders emerged from the concept of small, easy-to-handle sandwiches, evolving from the classic hamburger into a versatile canvas for countless fillings. The beloved tradition of barbecue, with its deep roots in American culinary culture, finds a delightful modern expression when paired with the slider format. This fusion creates a uniquely satisfying experience that bridges the gap between traditional and contemporary.
People simply adore Bbq Chicken Sliders for a myriad of reasons. Firstly, the taste is irresistible: tender, shredded chicken coated in a tangy, sweet, and smoky barbecue sauce, often complemented by a hint of spice. This complex flavor profile is perfectly balanced by the soft, slightly sweet slider bun, creating a harmonious bite every time. Secondly, the texture contrast is fantastic—the yielding chicken and bun against, perhaps, a crunchy pickle or a creamy slaw adds another layer of enjoyment. Finally, their convenience is unmatched. They are incredibly easy to eat, making them ideal for mingling and entertaining without the fuss of cutlery. I believe they represent the pinnacle of delicious, shareable food, promising a burst of flavor with every delightful bite. Get ready to impress your guests and satisfy every craving with this iconic recipe!
Ingredients:
- For the Pulled Chicken:
- 2 lbs boneless, skinless chicken thighs or breasts (I personally prefer thighs for their juiciness!)
- 1 tablespoon olive oil or avocado oil
- 1 teaspoon smoked paprika
- 1 teaspoon garlic powder
- 1/2 teaspoon onion powder
- 1/2 teaspoon salt
- 1/4 teaspoon black pepper
- 1/2 cup chicken broth (or water)
- For the Homemade BBQ Sauce (Highly Recommended!):
- 1 1/2 cups ketchup (your favorite brand works best)
- 1/4 cup apple cider vinegar
- 1/4 cup dark brown sugar, packed
- 2 tablespoons Worcestershire sauce
- 1 tablespoon Dijon mustard
- 1 teaspoon smoked paprika (yes, more for that smoky depth!)
- 1/2 teaspoon garlic powder
- 1/2 teaspoon onion powder
- 1/4 teaspoon cayenne pepper (adjust to your spice preference, or omit if you’re sensitive to heat)
- Pinch of black pepper
- For the Sliders Assembly:
- 24 count Hawaiian sweet slider buns (or similar soft dinner rolls)
- 1 tablespoon unsalted butter, melted
- Optional: 1 teaspoon garlic powder (to mix with butter for a savory topping)
- 1 cup shredded Colby Jack or Cheddar cheese (or your favorite melting cheese), optional
- 1 cup prepared coleslaw (store-bought or homemade, for a fresh crunch!)
- Dill pickle slices, for serving (trust me on this, they cut through the richness beautifully)
- Thinly sliced red onion, for those who love a little bite
- Fresh parsley or cilantro, chopped, for garnish (optional)
Prepping and Cooking the Perfect Pulled Chicken
Creating truly delicious Bbq Chicken Sliders starts with perfectly cooked, tender, and flavorful pulled chicken. I’m going to walk you through my favorite method using an Instant Pot, which makes quick work of it, but I’ll also touch on alternatives if you don’t have one.
- Prepare Your Chicken: First things first, get your chicken ready. If you’re using chicken thighs, trim any excess fat you might find. For chicken breasts, you can leave them whole. Pat the chicken pieces dry with paper towels; this helps the seasonings adhere better.
- Season the Chicken: In a small bowl, combine your smoked paprika, garlic powder, onion powder, salt, and black pepper. Sprinkle this seasoning generously over all sides of your chicken pieces, ensuring they’re well coated. Take your time with this step, as these initial seasonings lay the foundation for a deeply flavorful chicken base that will shine through in your Bbq Chicken Sliders.
- Sear for Flavor (Optional but Recommended): Heat the olive oil in your Instant Pot on the “Sauté” setting (or in a large skillet over medium-high heat if using an alternative cooking method). Once hot, carefully place the seasoned chicken pieces in a single layer. Sear for 2-3 minutes per side until they develop a nice golden-brown crust. This step, known as the Maillard reaction, adds incredible depth of flavor that you won’t get from just boiling or steaming. It’s a small effort for a big flavor payoff!
- Pressure Cook the Chicken: Pour the 1/2 cup of chicken broth (or water) into the Instant Pot, ensuring you scrape up any browned bits from the bottom of the pot with a wooden spoon – this prevents a “burn” notice and incorporates all that delicious flavor into the cooking liquid. Place the seared chicken back into the pot. Secure the lid and set the valve to “Sealing.” Cook on “Manual” or “Pressure Cook” for 10-12 minutes for chicken breasts, or 15-18 minutes for chicken thighs, depending on their thickness.
- Natural Release and Shredding: Once the cooking cycle is complete, allow for a natural pressure release for 10 minutes. This means you just let the pot sit without doing anything after the timer goes off. After 10 minutes, you can carefully turn the valve to “Venting” to quick release any remaining pressure. Once the pin drops, open the lid. Carefully transfer the cooked chicken to a large bowl.
- Shred the Chicken: Using two forks, shred the chicken into bite-sized pieces. It should be incredibly tender and fall apart easily. If you prefer a very fine shred, you can even use a hand mixer on low speed for a few seconds – it works wonders! Drain off any excess liquid from the chicken bowl if it seems too wet.
- Mix with BBQ Sauce: Now for the magic! Pour about 1 to 1.5 cups of your glorious homemade BBQ sauce (or your favorite store-bought sauce if you’re short on time, but I hope you make the homemade version!) over the shredded chicken. Stir it thoroughly until every piece of chicken is coated in that luscious, tangy, and sweet sauce. This is your flavorful filling for the Bbq Chicken Sliders.
- Alternative Cooking Methods for Chicken:
- Slow Cooker: Place seasoned chicken and 1/2 cup broth in a slow cooker. Cook on low for 3-4 hours or high for 2-3 hours, until easily shreddable. Drain excess liquid before shredding and mixing with BBQ sauce.
- Oven: Preheat oven to 375°F (190°C). Place seasoned chicken in a baking dish with 1/2 cup broth. Cover with foil and bake for 25-35 minutes, or until internal temperature reaches 165°F (74°C) and chicken is tender enough to shred.
Crafting Your Homemade BBQ Sauce (Optional, but truly transforms your Bbq Chicken Sliders!)
While a good quality store-bought BBQ sauce can certainly get the job done, taking a few extra minutes to whip up your own homemade version elevates your Bbq Chicken Sliders to an entirely new level. It allows you to control the sweetness, tanginess, and spice, creating a truly bespoke flavor profile that perfectly complements the tender chicken.
- Combine Wet Ingredients: In a medium saucepan, combine the ketchup, apple cider vinegar, dark brown sugar, Worcestershire sauce, and Dijon mustard. Stir well with a whisk to ensure everything is thoroughly mixed and the brown sugar begins to dissolve.
- Add Dry Spices: Now, let’s infuse some serious flavor! Add the smoked paprika, garlic powder, onion powder, cayenne pepper (if using, remember you can adjust the heat level to your liking), and a pinch of black pepper to the saucepan. Stir again until all the spices are fully incorporated into the liquid. The aroma at this stage is already starting to get really enticing!
- Simmer and Thicken: Bring the mixture to a gentle simmer over medium heat, stirring occasionally. Once it starts to bubble, reduce the heat to low. Allow the sauce to simmer uncovered for at least 15-20 minutes, or even up to 30 minutes, stirring more frequently as it thickens. The key here is patience. As the sauce simmers, the flavors will meld and deepen, and the sauce will reduce slightly, becoming richer and more concentrated. You’re looking for a consistency that coats the back of a spoon.
- Taste and Adjust: This is the crucial step where you make the sauce truly your own. Carefully taste the BBQ sauce. Does it need more sweetness? Add a tiny bit more brown sugar. Could it use more tang? A splash more apple cider vinegar might be in order. Craving more heat? A little extra cayenne or a dash of hot sauce will do the trick. Don’t be shy about making it perfect for your palate! Remember, this sauce is the heart of your Bbq Chicken Sliders, so make it sing.
- Cool and Store: Once you’re happy with the flavor and consistency, remove the sauce from the heat. Let it cool slightly before using. You can make this BBQ sauce several days in advance and store it in an airtight container in the refrigerator, and truthfully, the flavors often deepen and improve overnight!
Assembling Your Irresistible Bbq Chicken Sliders
Now that your chicken is perfectly sauced and your BBQ sauce is singing, it’s time for the fun part: bringing all the components together to create these delightful Bbq Chicken Sliders. The layering is simple, but each element plays a vital role in creating a balanced and utterly satisfying bite.
- Prepare Your Baking Dish and Buns: Preheat your oven to 350°F (175°C). Take a large baking dish (a 9×13 inch dish is usually perfect for a 24-count pack of slider buns). Carefully slice the entire block of Hawaiian sweet rolls horizontally through the middle, keeping the top and bottom halves intact. This is a brilliant shortcut that makes assembly much faster and cleaner. Place the bottom half of the rolls into your prepared baking dish.
- First Layer: The Saucy Chicken: Evenly spread your delicious sauced pulled chicken over the bottom layer of the slider buns. Don’t be shy with the chicken; you want a generous layer that will make every bite of your Bbq Chicken Sliders substantial and flavorful. Ensure it goes right to the edges so no one misses out on that amazing BBQ goodness.
- Add the Cheese (Optional, but highly recommended!): If you’re using cheese, now’s the time to scatter it evenly over the chicken. The warmth of the oven will melt it into a gooey, savory blanket that perfectly complements the BBQ chicken. Colby Jack or Cheddar are my go-to’s, but feel free to experiment with Monterey Jack, provolone, or even a smoked Gouda for a different twist.
- Top with Freshness (Optional, for pre-baking): While I usually add the coleslaw and pickles after baking to maintain their crispness, some people enjoy a warm coleslaw or pickles. If you prefer that, you can add a thin layer of coleslaw over the cheese now. Personally, I prefer to keep these elements fresh for serving.
- Place the Top Buns: Carefully place the top half of the slider buns over the chicken and cheese layer, ensuring they are aligned properly.
- Prepare the Buttery Topping: In a small bowl, melt your tablespoon of unsalted butter. If you’re using the optional garlic powder, stir it into the melted butter now. This garlic butter adds an incredible aroma and a lovely golden finish to the tops of your Bbq Chicken Sliders.
- Brush the Tops: Using a pastry brush, generously brush the tops of the slider buns with the melted butter (or garlic butter). This not only adds flavor but also helps the buns crisp up slightly and turn a beautiful golden-brown in the oven.
Baking and Serving Your Perfect Bbq Chicken Sliders
You’re almost there! The final steps involve a quick bake in the oven to melt the cheese and warm everything through, followed by the exciting moment of adding fresh toppings and serving your incredible Bbq Chicken Sliders. The aroma that will fill your kitchen during this phase is simply divine!
- Cover and Bake: Loosely cover the baking dish with aluminum foil. This step is important because it traps steam, ensuring that the buns stay soft and don’t dry out while the cheese melts and the chicken warms through. Place the covered dish into your preheated 350°F (175°C) oven. Bake for 15 minutes.
- Uncover and Finish Baking: After 15 minutes, carefully remove the foil. This allows the tops of the buns to get golden brown and slightly crispy. Continue baking for another 5-10 minutes, or until the cheese is bubbly and fully melted, and the tops of the buns are a beautiful golden-brown. Keep a close eye on them during this final stage to prevent over-browning. The sight of these golden Bbq Chicken Sliders, glistening with butter and promising tender chicken within, is truly a treat for the eyes!
- Rest and Slice: Once baked to perfection, remove the baking dish from the oven. Let the sliders rest for about 5 minutes. This brief resting period allows the cheese to set slightly, making them easier to slice, and prevents you from burning your fingers! Using a serrated knife, slice the entire block of sliders along the pre-cut lines of the buns into individual portions.
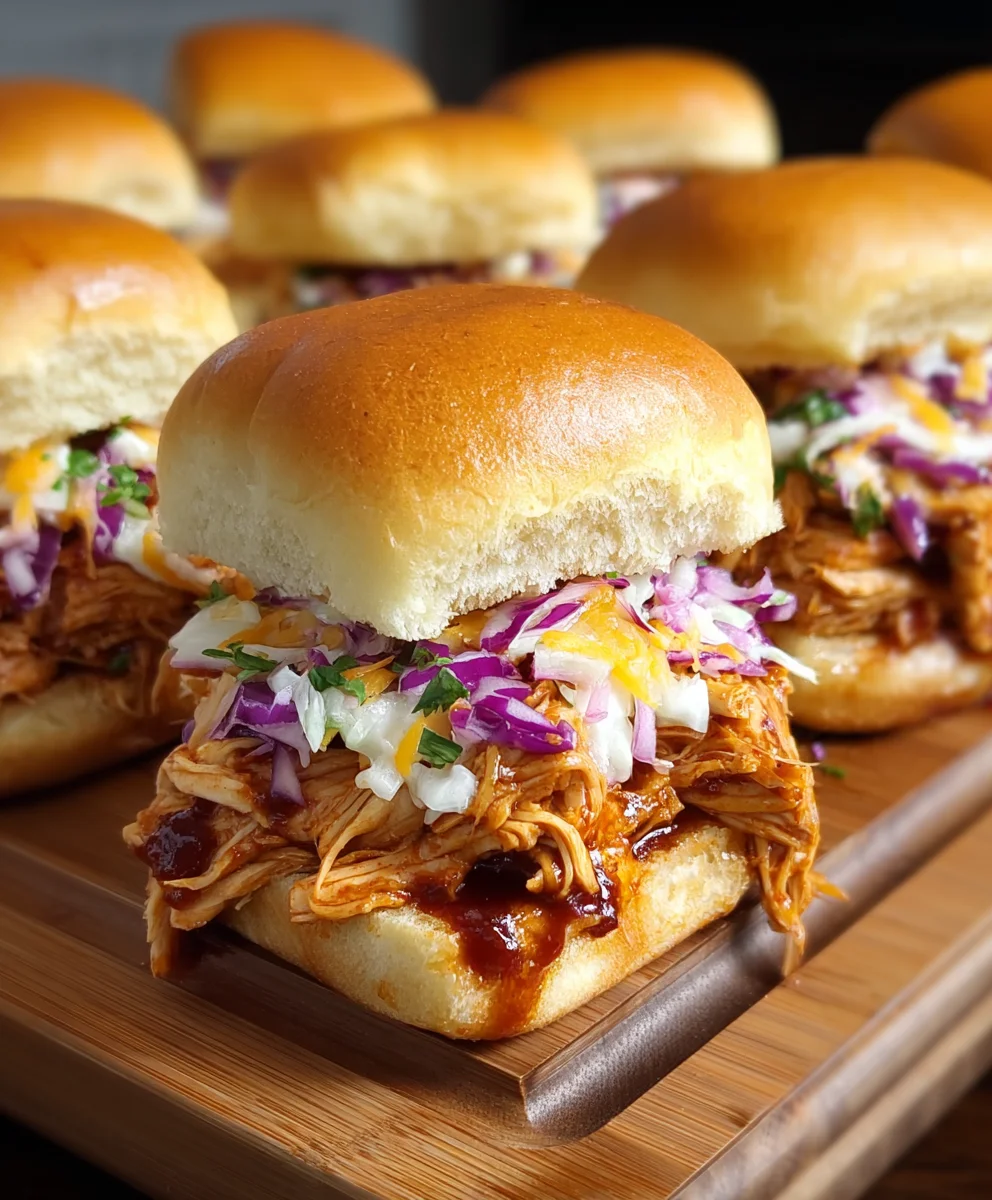
- Garnish and Serve Immediately: Arrange the individual Bbq Chicken Sliders on a platter. Now, for the fresh toppings that provide crucial contrast! Top each slider with a generous spoonful of crisp coleslaw. The cool, crunchy slaw is an absolute game-changer, cutting through the richness of the BBQ chicken beautifully. Add a few dill pickle slices for that essential tangy counterpoint and a thin ring of red onion for a slight pungent bite if you love it. A sprinkle of fresh parsley or cilantro, if you like, adds a touch of color and freshness.
- Enjoy Your Creation: Serve these delightful Bbq Chicken Sliders immediately while they are warm and the cheese is still wonderfully gooey. They are perfect for game days, parties, or a fun family meal. Prepare for rave reviews – these sliders are always a crowd-pleaser and disappear quickly!
Tips for Perfect Bbq Chicken Sliders Every Time
Achieving truly outstanding Bbq Chicken Sliders isn’t just about following the steps; it’s about understanding the nuances and having a few tricks up your sleeve. Here are some of my personal tips to ensure your sliders are always a resounding success:
- Don’t Skimp on the Chicken Quality: While chicken breasts are fine, I find that boneless, skinless chicken thighs truly shine in this recipe. Their higher fat content keeps the pulled chicken incredibly moist and flavorful, even after shredding and simmering in the sauce. They are less likely to dry out, which is key for juicy Bbq Chicken Sliders.
- Homemade BBQ Sauce is a Game Changer: I cannot stress this enough. While convenient, store-bought sauces often contain high fructose corn syrup and lack the depth of flavor you can achieve at home. Making your own allows you to adjust the sweetness, acidity, and heat precisely. Plus, the fresh aroma of simmering homemade BBQ sauce is an experience in itself! You can even make a big batch and freeze it for future use.
- The Power of the Sear: Whether you’re using an Instant Pot, slow cooker, or oven for your chicken, taking a few minutes to sear the chicken before cooking is a step often skipped but highly impactful. This browning creates a caramelized crust, introducing complex, savory notes through the Maillard reaction that will elevate the overall flavor of your pulled chicken for the Bbq Chicken Sliders.
- Optimal Shredding Consistency: When shredding the chicken, aim for a mix of textures. Some finely shredded pieces combined with a few slightly larger, more robust strands provide a more interesting mouthfeel. Over-shredding can sometimes lead to a mushy texture, so be mindful.
- Embrace the Hawaiian Rolls: Hawaiian sweet rolls are specifically called for in many slider recipes for a reason. Their inherent sweetness and soft, fluffy texture perfectly complement the savory, tangy BBQ chicken. They hold up well to the saucy filling without becoming soggy too quickly, making them ideal for these Bbq Chicken Sliders.
- The Importance of the Butter Wash: Brushing the tops of the slider buns with melted butter (especially garlic butter!) before baking isn’t just for aesthetics. It adds a crucial layer of flavor, helps the buns toast to a beautiful golden brown, and creates a slight crispness on the exterior that contrasts wonderfully with the soft interior and moist filling.
- Fresh Toppings Are Non-Negotiable: While the warm, cheesy chicken is the star, the cold, crisp toppings like coleslaw, fresh pickles, and thinly sliced red onion are vital for balance. They provide a much-needed textural contrast and a refreshing tang that cuts through the richness of the BBQ sauce, preventing the sliders from feeling too heavy. Don’t add them until just before serving to maintain their freshness.
- Consider Your Cheese Choice: Colby Jack is a great all-rounder for melting, but don’t hesitate to experiment. A sharp cheddar can add more pungency, while a mild provolone offers a delicate melt. For an extra smoky kick, try smoked Gouda!
- Make Ahead Option: The pulled BBQ chicken can be made a day or two in advance and stored in the refrigerator. This makes assembling the Bbq Chicken Sliders on the day of serving incredibly quick and easy, allowing you more time to enjoy your guests or relax. Just reheat the chicken gently before assembling.
- Serving Suggestions for a Crowd: When serving for a party, consider having extra bowls of coleslaw, pickles, and red onion on the side so guests can customize their sliders. A side of sweet potato fries or a simple green salad would complete the meal beautifully.
Conclusion:
And there you have it! I truly believe that this recipe for Bbq Chicken Sliders isn’t just another dish; it’s an experience waiting to happen in your kitchen. From the very first bite, you’ll understand why I’m so enthusiastic about it. It’s the perfect harmony of smoky, sweet, and tangy flavors, all nestled within a soft, pillowy bun that makes for an absolutely irresistible treat. What makes this recipe an absolute must-try is its incredible balance of simplicity and gourmet appeal. You don’t need to be a seasoned chef to achieve spectacular results, yet the outcome tastes like something straight out of a high-end BBQ joint. It’s genuinely one of those recipes that delivers maximum flavor with minimal fuss, making it ideal for everything from busy weeknight dinners to impressive party spreads.
I find that the versatility of these sliders is one of their greatest strengths. They are incredibly adaptable to various tastes and occasions. While they are phenomenal on their own, don’t hesitate to elevate them further with some delightful accompaniments. For a classic backyard BBQ feel, I love serving these sliders alongside a creamy coleslaw or a tangy potato salad. The cool, crisp texture of the slaw offers a wonderful contrast to the warm, savory chicken, creating a perfectly balanced meal. Baked beans with a touch of brown sugar and bacon always make a fantastic pairing, adding another layer of comforting, hearty goodness. And for those who enjoy a bit of freshness, a simple side salad with a light vinaigrette can cut through the richness beautifully, making the whole meal feel complete and satisfying.
Elevate Your Sliders: Topping & Variation Ideas
Beyond the sides, consider the endless possibilities for toppings and variations to truly make these sliders your own. For a delightful crunch and a zingy flavor, a slice of dill pickle or some pickled red onions are absolute game-changers. If you love a bit of heat, a few thinly sliced jalapeños or a drizzle of spicy BBQ sauce can add an exciting kick. Don’t shy away from adding cheese! A thin slice of cheddar or Monterey Jack, melted perfectly over the warm chicken, elevates the sliders to an even more decadent level. For those who enjoy a different texture, crispy fried onions or even a sprinkle of fresh cilantro can add layers of flavor and visual appeal.
Creative Serving & Preparation Twists
And let’s talk about the chicken itself. While my recipe details a fantastic method for preparing the BBQ chicken, you could also experiment with different cooking techniques. If you have leftover grilled chicken, shredding it and tossing it in your favorite BBQ sauce works just as wonderfully. For a smoky depth, consider slow-cooking or even smoking your chicken before shredding it. The base concept of these Bbq Chicken Sliders is incredibly forgiving and open to interpretation. If you’re catering to a crowd with varied preferences, you could even offer a “slider bar” with different sauces, cheeses, and toppings, allowing everyone to customize their perfect slider. For a fun, healthier twist, you could even serve the BBQ chicken in lettuce cups instead of buns, turning them into low-carb, flavor-packed bites.
Ultimately, my biggest hope is that you’ll give this recipe a try. I truly believe it will become a go-to in your culinary repertoire. It’s perfect for game day gatherings, casual family dinners, potlucks, or simply when you’re craving something incredibly delicious and satisfying. The aroma alone as it cooks will draw everyone to the kitchen, promising a memorable meal. Don’t be afraid to experiment, make it your own, and most importantly, have fun with it! Cooking should be an enjoyable, creative process, and this recipe offers ample opportunity for both.
Once you’ve whipped up a batch of these mouthwatering sliders, I would absolutely love to hear about your experience. Did you add any unique toppings? What sides did you pair them with? Did your family rave about them as much as mine does? Please share your culinary adventures! Your feedback and creative twists inspire not only me but also our entire community of fellow food lovers. So, preheat your oven, gather your ingredients, and get ready to enjoy some of the best BBQ Chicken Sliders you’ve ever tasted. Happy cooking!
BBQ Chicken Sliders
BBQ Chicken Sliders are, without a doubt, the ultimate crowd-pleaser for any gathering. This recipe combines the rich, smoky flavors of slow-cooked barbecue chicken with the convenience of a bite-sized bun. These sliders feature smoky BBQ chicken, melted cheddar cheese, crisp coleslaw, and soft garlic butter buns. Perfect for quick dinners, game days, or festive gatherings. With a prep time of just 5 minutes and a cook time of 10 minutes, they’re a fast and flavorful option. Customize ingredients, reheat seamlessly, or assemble in advance for easy hosting. Convenient, tasty, and sure to impress on any occasion!
Ingredients
-
2 lbs boneless, skinless chicken thighs or breasts
-
1 tbsp olive or avocado oil
-
1 tsp smoked paprika
-
1 tsp garlic powder
-
1/2 tsp onion powder
-
1/2 tsp salt
-
1/4 tsp black pepper
-
1/2 cup chicken broth
-
1 1/2 cups ketchup
-
1/4 cup apple cider vinegar
-
1/4 cup dark brown sugar, packed
-
2 tbsp Worcestershire sauce
-
1 tbsp Dijon mustard
-
1 tsp smoked paprika (for sauce)
-
1/2 tsp garlic powder (for sauce)
-
1/2 tsp onion powder (for sauce)
-
1/4 tsp cayenne pepper (optional)
-
Pinch black pepper (for sauce)
-
24 Hawaiian sweet slider buns
-
1 tbsp unsalted butter, melted
-
Optional: 1 tsp garlic powder (for butter wash)
-
1 cup shredded Colby Jack or Cheddar cheese (optional)
-
1 cup prepared coleslaw
-
Dill pickle slices
-
Thinly sliced red onion
-
Fresh parsley or cilantro, chopped (optional)
Instructions
-
Step 1
Pat chicken dry. Season with 1 tsp smoked paprika, 1 tsp garlic powder, 1/2 tsp onion powder, 1/2 tsp salt, and 1/4 tsp black pepper. Sear in 1 tbsp olive oil. Add 1/2 cup chicken broth. Cook until easily shreddable (e.g., Instant Pot 10-18 min, Slow Cooker 2-4 hrs, Oven 25-35 min at 375°F/190°C). Shred chicken, drain excess liquid, and mix with 1 to 1.5 cups BBQ sauce. -
Step 2
Combine ketchup, apple cider vinegar, brown sugar, Worcestershire sauce, Dijon mustard, 1 tsp smoked paprika, 1/2 tsp garlic powder, 1/2 tsp onion powder, 1/4 tsp cayenne (optional), and pinch black pepper in a saucepan. Simmer over low heat for 15-30 minutes, stirring occasionally, until sauce thickens and coats the back of a spoon. Taste and adjust seasonings. -
Step 3
Preheat oven to 350°F (175°C). Slice 24 Hawaiian rolls horizontally, keeping top and bottom halves intact. Place bottom halves in a 9×13 inch baking dish. Evenly spread the sauced pulled chicken over the bottom buns. If using, scatter 1 cup shredded Colby Jack or Cheddar cheese over the chicken. -
Step 4
Carefully place the top halves of the buns over the chicken and cheese. In a small bowl, melt 1 tbsp unsalted butter; optionally stir in 1 tsp garlic powder. Brush butter mixture generously over the tops of the slider buns. Cover the baking dish loosely with aluminum foil and bake for 15 minutes. Remove foil and bake for another 5-10 minutes, or until cheese is bubbly and buns are golden brown. -
Step 5
Remove from oven and let sliders rest for 5 minutes. Use a serrated knife to slice the block of sliders into individual portions. Garnish each slider with crisp coleslaw, dill pickle slices, thinly sliced red onion (optional), and fresh parsley or cilantro (optional). Serve immediately while warm.
Important Information
Nutrition Facts (Per Serving)
It is important to consider this information as approximate and not to use it as definitive health advice.
Allergy Information
Please check ingredients for potential allergens and consult a health professional if in doubt.

Leave a Comment