
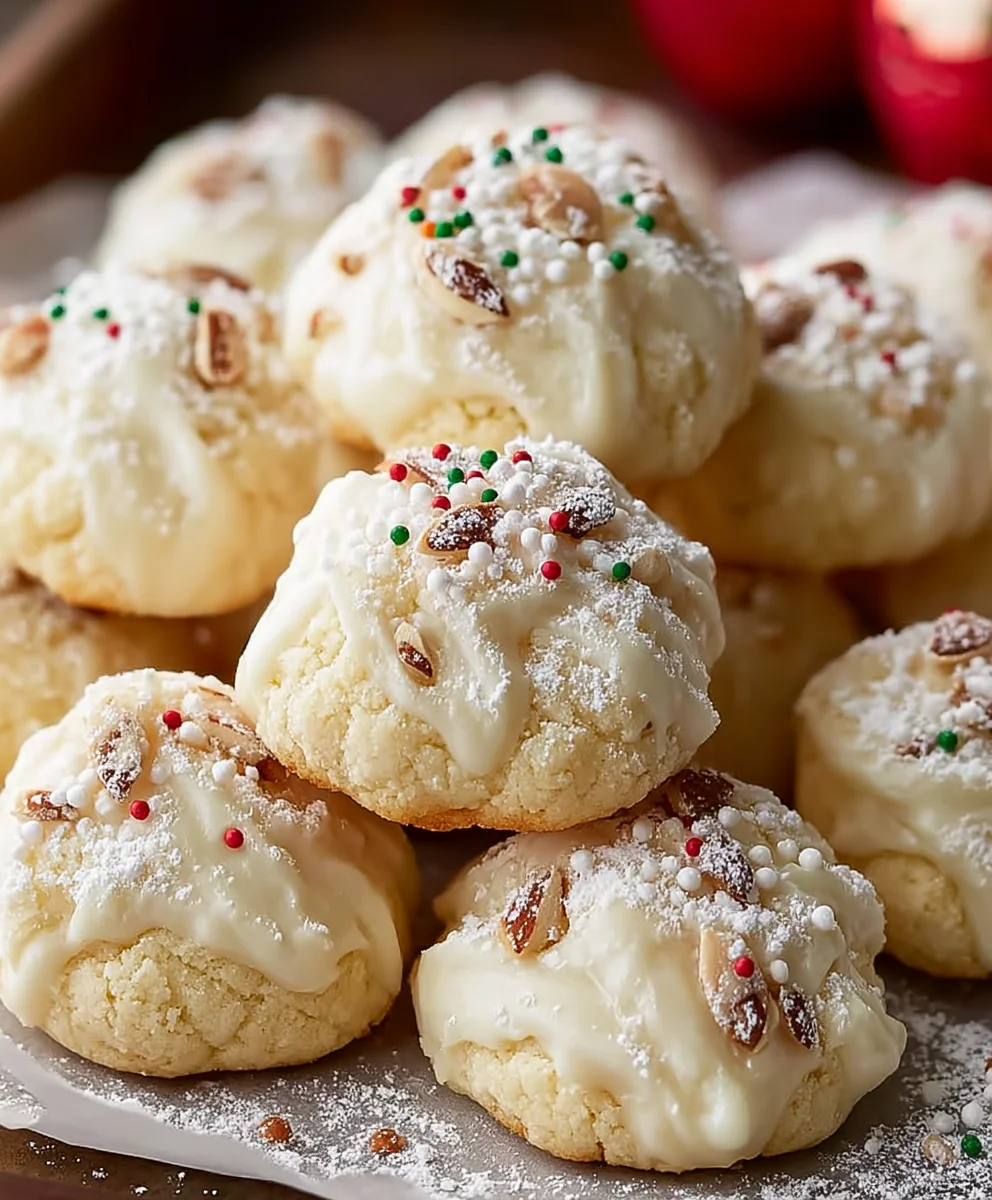
Italian Christmas Cookies are more than just a sweet treat; they’re a fragrant hug from generations past, a vibrant splash of color on any holiday table, and the undeniable scent of festive joy. For many of us, the arrival of these delightful cookies signals the true begin extractning of the Christmas season. There’s something incredibly comforting and nostalgic about them. Perhaps it’s the delicate almond or lemon zest that perfumes the air as they bake, or the joyful tradition of decorating them with colorful sprinkles and icing that brings families together. What truly makes these Italian Christmas Cookies special is their perfect balance of tender, slightly chewy texture and a subtle sweetness that never overwhelms. They’re not overly fussy, allowing the quality of simple ingredients to shine, yet the finished product feels wonderfully elegant and celebratory. Get ready to bake up some magic!
Ingredients:
- 4 large eggs
- 1 cup granulated sugar
- 1/2 cup unsalted butter, softened
- 2 teaspoons vanilla or almond extract (or a mix of both for a nuanced flavor!)
- 3 1/2 cups all-purpose flour
- 4 teaspoons baking powder
- 2 cups powdered sugar
- 1/2 teaspoon vanilla extract (for the glaze)
- 3 tablespoons milk (for the glaze)
- Nonpareil sprinkles for decoration
Preparing the Italian Christmas Cookie Dough
The foundation of our delicious Italian Christmas Cookies lies in a tender, slightly sweet dough that’s easy to work with. To begin extract, in a large mixing bowl, I like to whisk together the 4 large eggs until they are lightly beaten. This ensures they are evenly distributed and will incorporate smoothly into the batter. Next, I add the 1 cup of granulated sugar to the beaten eggs. Using an electric mixer, I beat these together on medium speed for about 2-3 minutes, or until the mixture becomes pnon-alcoholic ale yellow and slightly thickened. This process, often called creaming, is crucial for developing a lighter texture in the finished cookie.
Now, it’s time to introduce the fat. I add the 1/2 cup of softened unsalted butter to the egg and sugar mixture. Make sure your butter is truly softened, not melted, as this will affect how well it emulsifies with the other ingredients. I continue to beat the mixture until it’s light and fluffy. Following that, I stir in the 2 teaspoons of vanilla or almond extract. I personally love the subtle warmth of almond extract in these cookies, but a good quality vanilla extract works wonderfully too, or you can use a combination of both for a delightful complexity.
In a separate medium bowl, I whisk together the dry ingredients: 3 1/2 cups of all-purpose flour and 4 teaspoons of baking powder. Whisking them together before adding them to the wet ingredients helps to distribute the leavening agent evenly, ensuring consistent rise and texture across all the cookies. I gradually add this dry mixture to the wet ingredients, mixing on low speed until just combined. It’s important not to overmix the dough at this stage, as overmixing can develop the gluten in the flour, resulting in tougher cookies. The dough will be soft and slightly sticky at this point, which is exactly what we’re aiming for.
Chilling and Shaping the Cookies
Once the dough is formed, it needs a little time to chill, which makes it much easier to handle. I turn the dough out onto a lightly floured surface. At this point, you can either divide the dough into two or three portions, wrap each portion in plastic wrap, and refrigerate for at least 1 hour, or until firm. Alternatively, I sometimes prefer to shape the cookies before chilling. To do this, I divide the dough and roll each portion into a log about 1.5 inches in diameter. Then, I wrap these logs tightly in plastic wrap and refrigerate them for at least 1-2 hours, or until they are firm enough to slice cleanly. This method makes slicing the cookies into uniform rounds very straightforward later on.
Baking Your Italian Christmas Cookies to Perfection
When you’re ready to bake, preheat your oven to 350°F (175°C). If you chilled the dough in logs, take one log out at a time and slice it into 1/4-inch thick rounds. If you chilled the dough in a mass, you can pinch off small pieces and roll them into balls about 1 inch in diameter, then flatten them slightly. Arrange the cookie dough rounds or flattened balls on baking sheets lined with parchment paper. Leave about 1 inch of space between each cookie, as they will spread slightly during baking.
I bake these Italian Christmas Cookies for 8-10 minutes, or until the edges are lightly golden brown. The centers might still look a little soft, but they will continue to set as they cool. It’s important not to overbake them, as this will result in dry, crum extractbly cookies. Once baked, I let them cool on the baking sheets for a few minutes before carefully transferring them to a wire rack to cool completely. This step is crucial before decorating, as warm cookies will melt the glaze.
Crafting the Perfect Glaze and Decorating
While the cookies are cooling, let’s prepare the simple yet essential glaze. In a medium bowl, I combine the 2 cups of powdered sugar with the 1/2 teaspoon of vanilla extract. Gradually, I add the 3 tablespoons of milk, whisking until the glaze is smooth and has a drizzling consistency. If the glaze is too thick, add a tiny bit more milk, a teaspoon at a time. If it’s too thin, add a little more powdered sugar. The consistency is key for achieving beautiful decorations.
Once the cookies are completely cool, it’s time for the festive part – decorating! I like to dip the top of each cookie into the glaze, allowing the excess to drip back into the bowl. Alternatively, you can use a spoon to drizzle the glaze over the cookies. As soon as the glaze is applied, and while it’s still wet, I generously sprinkle the nonpareil sprinkles over the tops. The vibrant colors of the sprinkles against the white glaze make these Italian Christmas Cookies truly festive and irresistible. Allow the glaze to set completely before stacking or storing the cookies.

Conclusion:
And there you have it – a delightful journey into crafting your very own batch of delicious Italian Christmas Cookies! We’ve covered the traditional method, ensuring a tender crum extractb and a sweet, fragrant finish that’s sure to impress. These cookies are more than just a treat; they are a symbol of warmth, family, and festive cheer. Don’t be afraid to get the whole family involved in the decorating process – it’s where some of the best memories are made.
For serving, these Italian Christmas Cookies are simply divine with a cup of hot cocoa, a steaming mug of coffee, or even a glass of milk. They also make a wonderful addition to any cookie platter, beautifully complementing other holiday favorites.
Feel free to experiment with variations! Consider adding a hint of lemon zest to the dough for a brighter flavor, or perhaps a touch of almond extract. You can also get creative with your icings – colored royal icing, a simple glaze with sprinkles, or even a dusting of powdered sugar can transform these cookies into edible works of art. Most importantly, have fun with it and enjoy the process of baking and sharing these special treats. Happy baking and Merry Christmas!
Frequently Asked Questions:
Can I make these Italian Christmas Cookies ahead of time?
Absolutely! These cookies store wonderfully. Once completely cooled, you can store them in an airtight container at room temperature for up to a week. For longer storage, you can freeze the undecorated cookies for up to 3 months.
What kind of flour should I use for these Italian Christmas Cookies?
All-purpose flour is generally recommended for these cookies. It provides the perfect balance of structure and tenderness. Avoid using self-rising flour, as the leavening agents are already accounted for in the recipe.
My dough is too sticky. What can I do?
If your dough is too sticky to handle, try chilling it in the refrigerator for about 30 minutes. This will firm up the butter and make it easier to roll and cut. You can also lightly dust your work surface and hands with a little extra all-purpose flour, but be careful not to add too much, as this can make the cookies tough.
Authentic Italian Christmas Cookies – Easy Recipe
A classic and easy recipe for delicious, tender Italian Christmas cookies, perfect for festive celebrations.
Ingredients
-
4 large eggs
-
1 cup granulated sugar
-
1/2 cup unsalted butter, softened
-
2 teaspoons vanilla or almond extract
-
3 1/2 cups all-purpose flour
-
4 teaspoons baking powder
-
2 cups powdered sugar
-
1/2 teaspoon vanilla extract
-
3 tablespoons milk
-
Nonpareil sprinkles for decoration
Instructions
-
Step 1
In a large mixing bowl, whisk together the 4 large eggs. Add the 1 cup of granulated sugar and beat with an electric mixer on medium speed for about 2-3 minutes until pale yellow and slightly thickened. Add the 1/2 cup of softened unsalted butter and continue beating until light and fluffy. Stir in the 2 teaspoons of vanilla or almond extract. -
Step 2
In a separate medium bowl, whisk together the 3 1/2 cups of all-purpose flour and 4 teaspoons of baking powder. Gradually add this dry mixture to the wet ingredients, mixing on low speed until just combined. Do not overmix. -
Step 3
Turn the dough out onto a lightly floured surface. Divide the dough into two or three portions, wrap each portion in plastic wrap, and refrigerate for at least 1 hour, or until firm. Alternatively, shape the dough into logs about 1.5 inches in diameter, wrap tightly in plastic wrap, and refrigerate for at least 1-2 hours. -
Step 4
Preheat your oven to 350°F (175°C). If dough was chilled in logs, slice into 1/4-inch thick rounds. If chilled in a mass, pinch off small pieces, roll into 1-inch balls, and flatten slightly. Arrange on baking sheets lined with parchment paper, leaving 1 inch between cookies. -
Step 5
Bake for 8-10 minutes, or until the edges are lightly golden brown. Let cool on baking sheets for a few minutes, then transfer to a wire rack to cool completely. -
Step 6
To make the glaze, combine 2 cups of powdered sugar with 1/2 teaspoon of vanilla extract. Gradually add 3 tablespoons of milk, whisking until smooth and drizzle-able. Adjust consistency with more milk or powdered sugar if needed. -
Step 7
Once cookies are completely cool, dip the top of each cookie into the glaze, or drizzle glaze over them. Immediately sprinkle with nonpareil sprinkles while the glaze is still wet. Allow the glaze to set completely before storing.
Important Information
Nutrition Facts (Per Serving)
It is important to consider this information as approximate and not to use it as definitive health advice.
Allergy Information
Please check ingredients for potential allergens and consult a health professional if in doubt.
Leave a Comment