
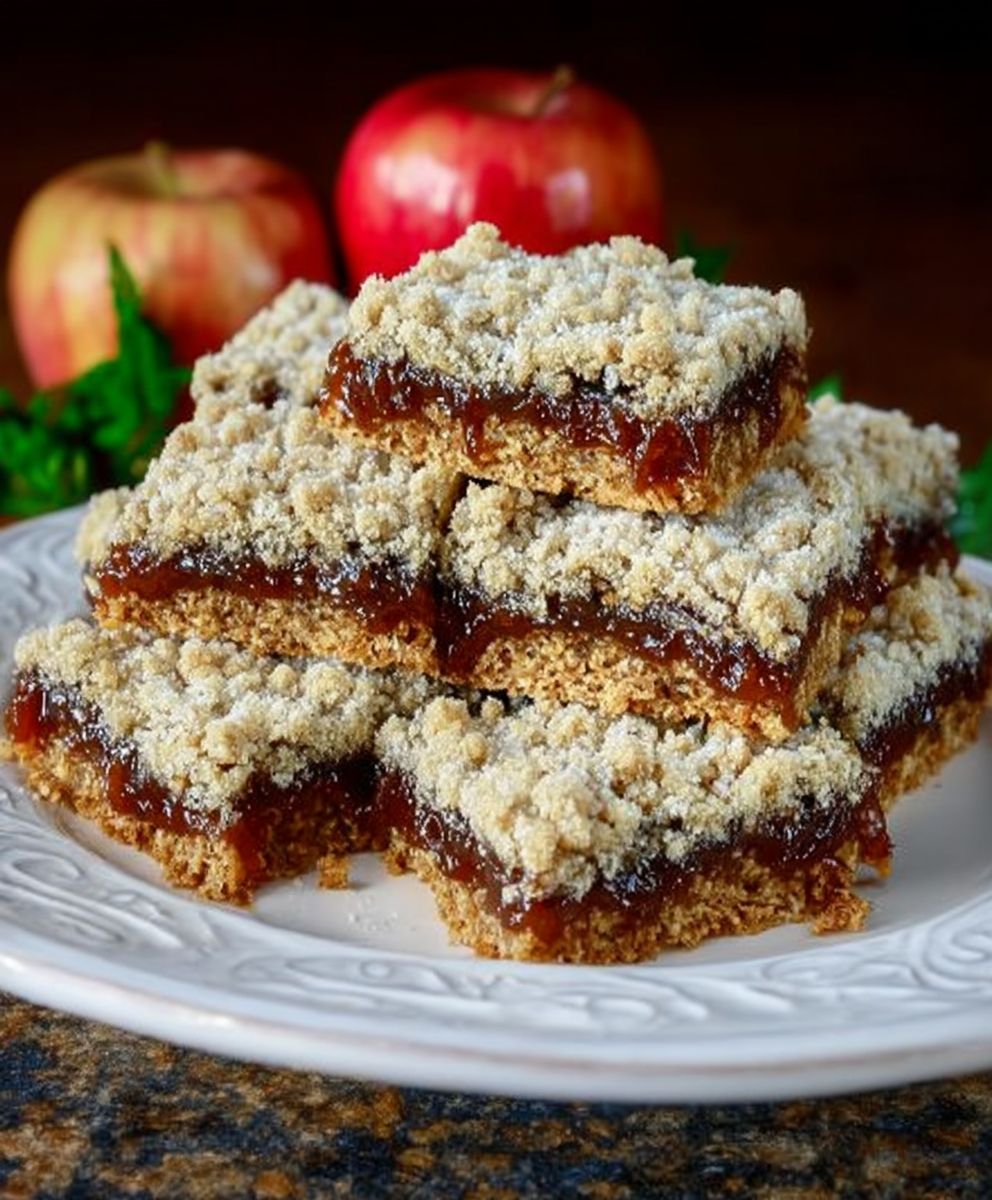
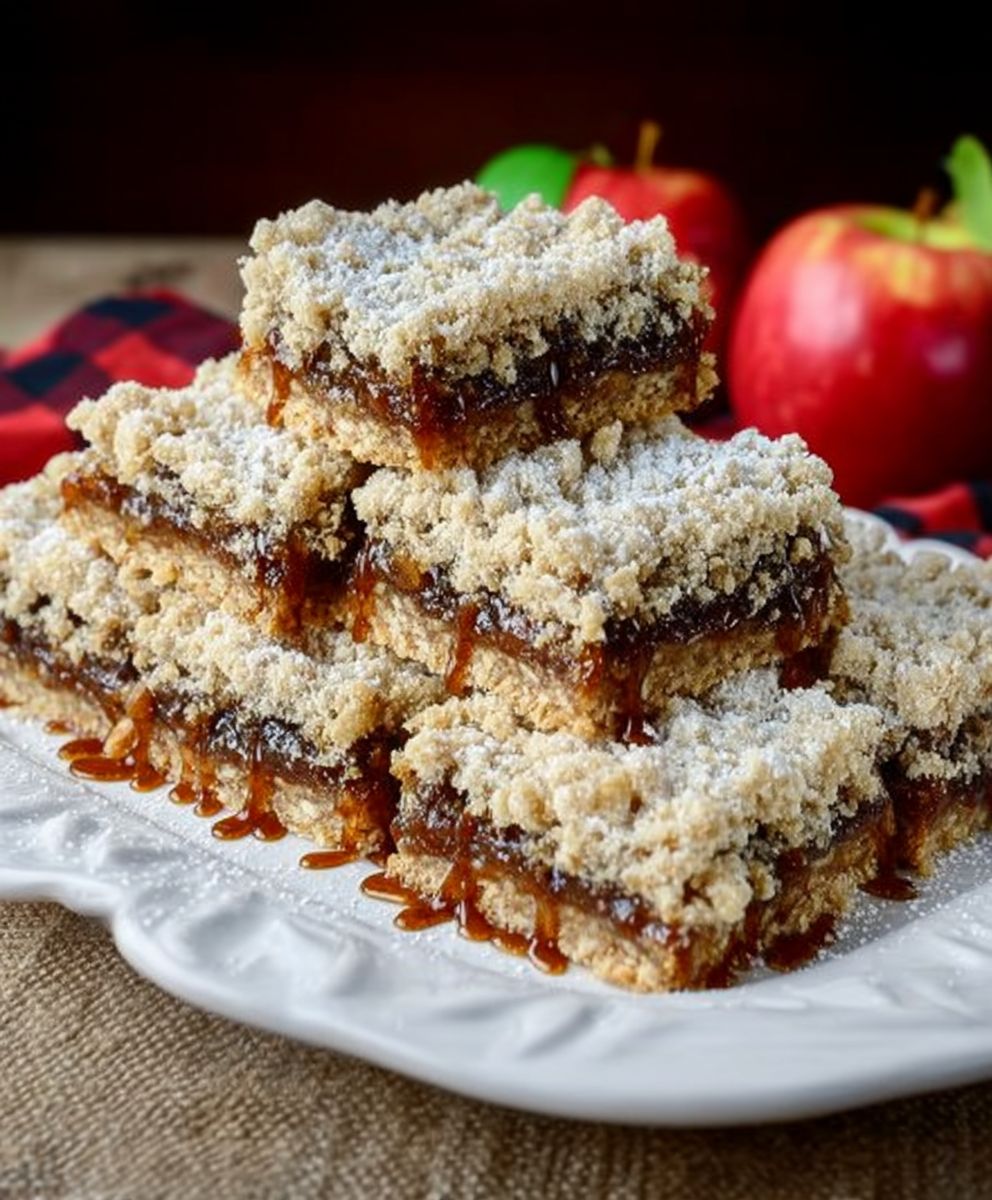
Apple butter bars: Prepare to be transported to a cozy autumn afternoon with every single bite! Imagine the warm, comforting aroma of spiced apples mingling with buttery shortbread. These aren’t just dessert; they’re a hug in bar form, a delightful treat that perfectly captures the essence of fall baking.
Apple butter itself boasts a rich history, originating as a way to preserve the fall harvest before refrigeration. Families would gather for days, stirring huge copper kettles filled with apples, spices, and cider, slowly transforming the mixture into the smooth, concentrated spread we know and love. While we might not be stirring kettles for days, we can still enjoy the fruits (pun intended!) of that tradition with these delectable bars.
What makes apple butter bars so irresistible? It’s the perfect combination of textures and flavors. The buttery, crumbly shortbread crust provides a delightful base for the smooth, spiced apple butter filling. The sweetness is balanced by a hint of cinnamon and nutmeg, creating a symphony of flavors that dance on your palate. Plus, they’re incredibly easy to make, making them perfect for a weeknight treat or a potluck dessert. Get ready to experience a taste of autumn in every square!
Ingredients:
- For the Crust:
- 2 cups all-purpose flour
- 1 cup (2 sticks) cold unsalted butter, cut into cubes
- ½ cup packed light brown sugar
- ¼ teaspoon salt
- 4-6 tablespoons ice water
- For the Apple Butter Filling:
- 1 cup apple butter (store-bought or homemade)
- 2 large eggs
- ½ cup granulated sugar
- 2 tablespoons all-purpose flour
- 1 teaspoon vanilla extract
- ½ teaspoon ground cinnamon
- ¼ teaspoon ground nutmeg
- Pinch of salt
- Optional Streusel Topping:
- ½ cup all-purpose flour
- ¼ cup packed light brown sugar
- ¼ cup cold unsalted butter, cut into cubes
- ¼ teaspoon ground cinnamon
Preparing the Crust:
- In a large bowl, whisk together the flour, brown sugar, and salt. This ensures the brown sugar is evenly distributed, which is key for a consistent crust texture.
- Add the cold, cubed butter to the flour mixture. Using a pastry blender or your fingertips, cut the butter into the flour until the mixture resembles coarse crumbs. The smaller the butter pieces, the flakier the crust will be. Don’t overwork it! You want to see small pieces of butter throughout.
- Gradually add the ice water, one tablespoon at a time, mixing gently after each addition. The amount of water needed will vary depending on the humidity and the flour you’re using. Stop adding water when the dough just comes together and is slightly moist but not sticky. Be careful not to add too much water, or the crust will be tough.
- Form the dough into a disc, wrap it tightly in plastic wrap, and refrigerate for at least 30 minutes. This chilling time is crucial! It allows the gluten to relax, which prevents the crust from shrinking during baking. It also helps the butter to firm up, resulting in a flakier crust. You can even chill it for longer, up to a few hours, if you need to prep ahead.
- Preheat your oven to 350°F (175°C). While the oven is preheating, grease and flour a 9×13 inch baking pan. This will prevent the bars from sticking and make them easy to remove after baking. You can also line the pan with parchment paper, leaving an overhang on the sides, for even easier removal.
- Remove the dough from the refrigerator and divide it in half. On a lightly floured surface, roll out one half of the dough to fit the bottom of the prepared baking pan. Gently transfer the dough to the pan and press it evenly into the bottom. You can use a rolling pin to help even it out, or just use your fingers.
- Bake the crust for 15 minutes, or until it is lightly golden brown. This pre-baking step helps to prevent the crust from becoming soggy when the filling is added. Keep a close eye on it, as oven temperatures can vary.
Making the Apple Butter Filling:
- While the crust is baking, prepare the apple butter filling. In a medium bowl, whisk together the apple butter, eggs, granulated sugar, flour, vanilla extract, cinnamon, nutmeg, and salt until smooth. Make sure there are no lumps of flour remaining. The filling should be thick and creamy.
Preparing the Streusel Topping (Optional):
- If you’re making the streusel topping, combine the flour, brown sugar, and cinnamon in a small bowl. Cut in the cold butter using a pastry blender or your fingertips until the mixture resembles coarse crumbs. The streusel should be crumbly and slightly clumpy.
Assembling and Baking the Bars:
- Remove the pre-baked crust from the oven. Pour the apple butter filling evenly over the crust.
- If using, sprinkle the streusel topping evenly over the apple butter filling.
- Roll out the remaining half of the dough. You can either cut it into strips and create a lattice pattern over the filling, or crumble it over the filling for a more rustic look. If you choose the lattice, gently press the edges of the strips to the bottom crust to seal. If you crumble the dough, try to distribute it evenly.
- Bake for 30-35 minutes, or until the filling is set and the crust and topping (if using) are golden brown. The center of the filling should be set and not jiggly. If the crust starts to brown too quickly, you can tent the pan with aluminum foil to prevent it from burning.
- Let the bars cool completely in the pan before cutting into squares. This is important! If you try to cut them while they’re still warm, the filling will be too soft and the bars will fall apart. Cooling allows the filling to set and the crust to firm up.
- Once cooled, cut into bars and serve. These bars are delicious served warm or at room temperature. They can also be stored in an airtight container at room temperature for up to 3 days, or in the refrigerator for up to a week.
Tips for Success:
- Use cold butter: Cold butter is essential for a flaky crust. The cold butter creates pockets of steam during baking, which results in layers of flaky dough.
- Don’t overwork the dough: Overworking the dough will develop the gluten, resulting in a tough crust. Mix the dough just until it comes together.
- Chill the dough: Chilling the dough allows the gluten to relax and the butter to firm up, which prevents the crust from shrinking during baking and results in a flakier crust.
- Pre-bake the crust: Pre-baking the crust helps to prevent it from becoming soggy when the filling is added.
- Let the bars cool completely: Letting the bars cool completely allows the filling to set and the crust to firm up, making them easier to cut and serve.
- Use high-quality apple butter: The quality of the apple butter will greatly impact the flavor of the bars. Use a high-quality store-bought apple butter or make your own for the best results. Homemade apple butter is incredibly delicious and adds a special touch to these bars.
- Adjust sweetness to taste: If you prefer a less sweet filling, you can reduce the amount of granulated sugar.
- Add nuts: For added texture and flavor, you can add chopped nuts, such as pecans or walnuts, to the streusel topping or sprinkle them over the filling before baking.
- Experiment with spices: Feel free to experiment with different spices in the filling, such as ground ginger, cloves, or allspice.
- Serve with ice cream or whipped cream: These apple butter bars are delicious served with a scoop of vanilla ice cream or a dollop of whipped cream.
Variations:
- Caramel Apple Butter Bars: Drizzle caramel sauce over the baked bars for a decadent treat.
- Apple Butter Cheesecake Bars: Add a layer of cheesecake filling on top of the crust before adding the apple butter filling.
- Gluten-Free Apple Butter Bars: Use a gluten-free flour blend in the crust and streusel topping.
- Vegan Apple Butter Bars: Use a vegan butter substitute in the crust and streusel topping, and replace the eggs in the filling with a flax egg (1 tablespoon ground flaxseed mixed with 3 tablespoons water).
Troubleshooting:
- Crust is too tough: You may have overworked the dough or added too much water. Be careful not to overmix the dough and add water gradually.
- Crust is shrinking during baking: You may not have chilled the dough long enough. Make sure to chill the dough for at least 30 minutes before rolling it out.
- Filling is too runny: You may not have baked the bars long enough. Bake until the filling is set and not jiggly.
- Bars are sticking to the pan: Make sure to grease and flour the pan thoroughly before adding the crust. You can also line the pan with parchment paper for easier removal.
Storage Instructions:
- Store the cooled apple butter bars in an airtight container at room temperature for up to 3 days, or in the refrigerator for up to a week.
- For longer storage, you can freeze the bars. Wrap them individually in plastic wrap and then place them in a freezer-safe bag or container. They can be frozen for up to 2 months. Thaw in the refrigerator before serving.
Conclusion:
And there you have it! These Apple Butter Bars are truly something special, and I genuinely believe they’re a must-try for anyone who loves the cozy flavors of fall. The combination of the buttery, crumbly crust, the sweet and spiced apple butter filling, and that optional (but highly recommended!) streusel topping creates a symphony of textures and tastes that will have you reaching for seconds and maybe even thirds!
But why are these bars so irresistible? It’s more than just the delicious flavor profile. It’s the ease of preparation. This recipe is surprisingly simple, making it perfect for both seasoned bakers and those just starting out. You don’t need any fancy equipment or complicated techniques; just a few basic ingredients and a little bit of love. Plus, the aroma that fills your kitchen while these bars are baking is pure autumnal bliss. It’s like a warm hug in dessert form!
Beyond the sheer deliciousness and ease, these Apple Butter Bars are incredibly versatile. Looking for serving suggestions? They’re fantastic served warm with a scoop of vanilla ice cream or a dollop of whipped cream. A sprinkle of chopped pecans or walnuts adds a delightful crunch. For a truly decadent treat, try drizzling them with caramel sauce. They’re also wonderful served at room temperature, making them perfect for potlucks, bake sales, or afternoon tea.
Want to experiment with variations? Go ahead! Try using different types of apples in your apple butter for a unique flavor twist. Add a pinch of cinnamon or nutmeg to the crust for extra warmth. If you’re feeling adventurous, incorporate a layer of cream cheese filling between the crust and the apple butter. You could even use a gingersnap cookie crust for a spicier base. The possibilities are endless!
These bars are also a fantastic way to use up any leftover apple butter you might have lurking in your pantry. Instead of letting it sit unused, transform it into a crowd-pleasing dessert that everyone will adore. And let’s be honest, who doesn’t love a good apple butter recipe?
Don’t just take my word for it try this recipe yourself! I’m confident that you’ll be delighted with the results. These Apple Butter Bars are more than just a dessert; they’re an experience. They’re a taste of autumn, a celebration of simple pleasures, and a reminder that sometimes, the best things in life are the ones that are made with love.
Once you’ve baked your own batch of these delightful bars, I’d absolutely love to hear about your experience. Did you make any variations? What did your family and friends think? Share your photos and stories in the comments below! I’m always eager to see how you make this recipe your own. Happy baking, and enjoy every delicious bite of your homemade Apple Butter Bars! I hope this recipe becomes a cherished tradition in your home, just as it has in mine.
Apple Butter Bars: The Ultimate Fall Dessert Recipe
Delicious apple butter bars with a flaky crust and optional streusel topping. Perfect for fall baking!
Ingredients
- 2 cups all-purpose flour
- 1 cup (2 sticks) cold unsalted butter, cut into cubes
- ½ cup packed light brown sugar
- ¼ teaspoon salt
- 4-6 tablespoons ice water
- 1 cup apple butter (store-bought or homemade)
- 2 large eggs
- ½ cup granulated sugar
- 2 tablespoons all-purpose flour
- 1 teaspoon vanilla extract
- ½ teaspoon ground cinnamon
- ¼ teaspoon ground nutmeg
- Pinch of salt
- ½ cup all-purpose flour
- ¼ cup packed light brown sugar
- ¼ cup cold unsalted butter, cut into cubes
- ¼ teaspoon ground cinnamon
Instructions
- Prepare the Crust: In a large bowl, whisk together the flour, brown sugar, and salt.
- Add the cold, cubed butter to the flour mixture. Using a pastry blender or your fingertips, cut the butter into the flour until the mixture resembles coarse crumbs.
- Gradually add the ice water, one tablespoon at a time, mixing gently after each addition. Stop adding water when the dough just comes together and is slightly moist but not sticky.
- Form the dough into a disc, wrap it tightly in plastic wrap, and refrigerate for at least 30 minutes.
- Preheat your oven to 350°F (175°C). Grease and flour a 9×13 inch baking pan.
- Remove the dough from the refrigerator and divide it in half. On a lightly floured surface, roll out one half of the dough to fit the bottom of the prepared baking pan. Gently transfer the dough to the pan and press it evenly into the bottom.
- Bake the crust for 15 minutes, or until it is lightly golden brown.
- Make the Apple Butter Filling: While the crust is baking, prepare the apple butter filling. In a medium bowl, whisk together the apple butter, eggs, granulated sugar, flour, vanilla extract, cinnamon, nutmeg, and salt until smooth.
- Prepare the Streusel Topping (Optional): If you’re making the streusel topping, combine the flour, brown sugar, and cinnamon in a small bowl. Cut in the cold butter using a pastry blender or your fingertips until the mixture resembles coarse crumbs.
- Assemble and Bake: Remove the pre-baked crust from the oven. Pour the apple butter filling evenly over the crust.
- If using, sprinkle the streusel topping evenly over the apple butter filling.
- Roll out the remaining half of the dough. You can either cut it into strips and create a lattice pattern over the filling, or crumble it over the filling for a more rustic look.
- Bake for 30-35 minutes, or until the filling is set and the crust and topping (if using) are golden brown.
- Let the bars cool completely in the pan before cutting into squares.
- Once cooled, cut into bars and serve.
Notes
- Use cold butter for a flaky crust.
- Don’t overwork the dough.
- Chill the dough for at least 30 minutes.
- Pre-bake the crust to prevent sogginess.
- Let the bars cool completely before cutting.
- Use high-quality apple butter for the best flavor.
- Adjust sweetness to taste.
- Add nuts to the streusel or filling for added texture.
- Experiment with different spices in the filling.
- Serve with ice cream or whipped cream.

Leave a Comment