
Honey Garlic Chicken Breasts – are you searching for that quintessential dish that effortlessly marries the sweet and the savory, delights every palate, and transforms an ordinary weeknight dinner into something truly special? Look no further. This beloved recipe has earned its place as a go-to for countless home cooks, not just for its incredibly irresistible flavor but also for its remarkable simplicity.
While the specific origins of “Honey Garlic Chicken Breasts” as a distinct dish might be a modern culinary evolution, the magical pairing of honey and garlic itself boasts a rich history, gracing dishes across diverse cultures for centuries. This combination creates a glaze that is deeply flavorful, wonderfully sticky, and beautifully caramelized.
Why This Dish Stands Out:
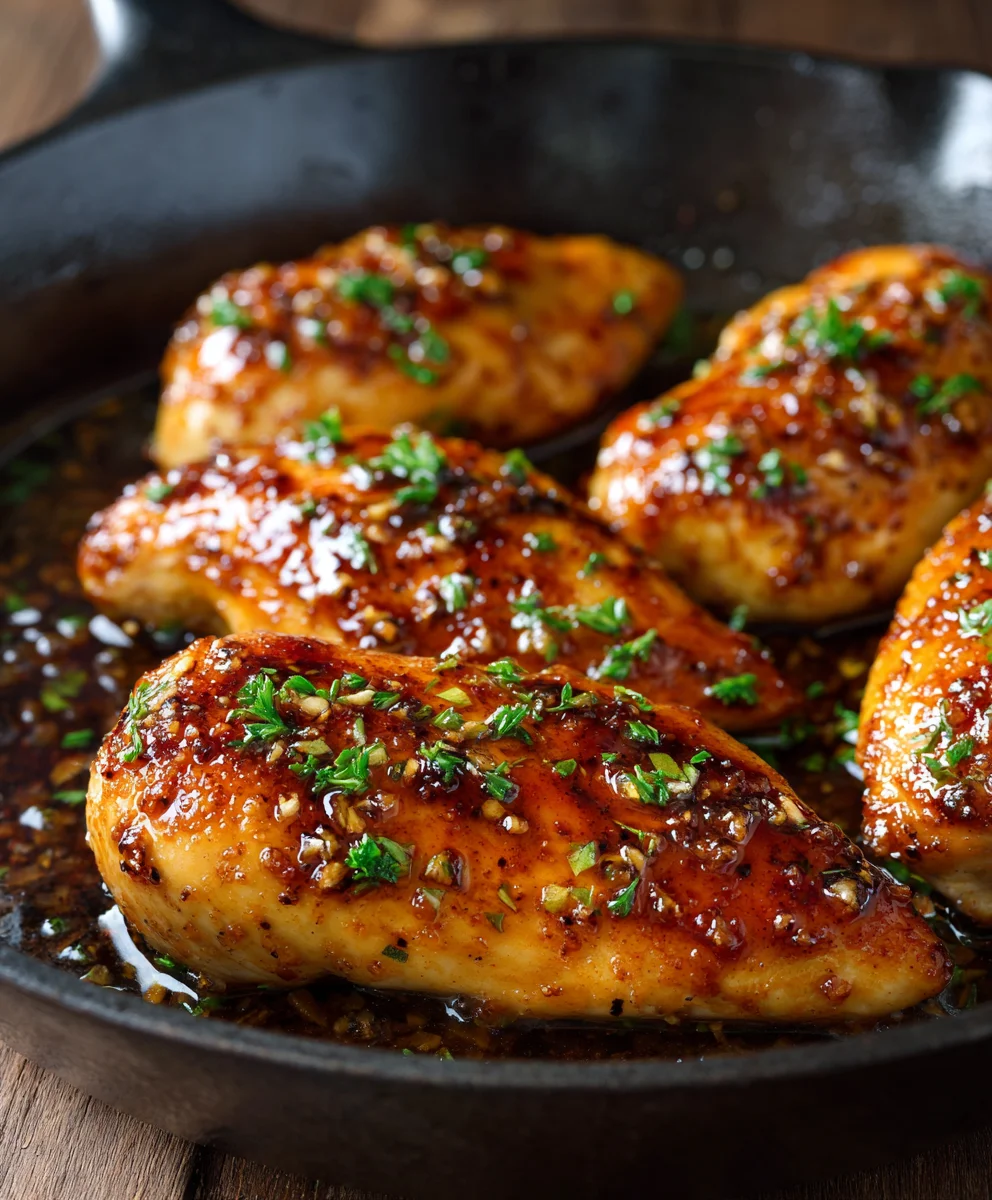
People absolutely adore this dish because it delivers a magnificent depth of flavor with minimal effort. The robust aroma of garlic mellows and sweetens as it cooks, creating a perfect counterpoint to the golden, comforting sweetness of honey, often balanced with a subtle tang. The result is perfectly tender chicken enveloped in a glossy, sticky sauce that is both comforting and exciting. It’s a guaranteed crowd-pleaser, appealing to both sophisticated palates and the pickiest of eaters, making Honey Garlic Chicken Breasts a truly indispensable recipe for busy families and culinary enthusiasts alike. Get ready to impress with this easy yet elegant meal!
Ingredients:
-
For the Honey Garlic Chicken Breasts:
- 4 boneless, skinless chicken breasts (approximately 1.5 to 2 pounds total) – I always recommend choosing organic or free-range if possible, as the quality truly shines through in this simple dish. Thicker breasts may need to be slightly butterflied or pounded for even cooking.
- 1 tablespoon olive oil (or other high-smoke point oil like avocado oil) – This is essential for achieving a beautiful sear on your chicken.
- Salt and freshly ground black pepper, to taste – Don’t be shy here; proper seasoning of the chicken itself is crucial for depth of flavor.
-
For the Irresistible Honey Garlic Sauce:
- 1/2 cup low-sodium soy sauce – Using low-sodium gives you more control over the overall saltiness of the dish. If you only have regular soy sauce, you might want to slightly reduce the amount or add a splash more water.
- 1/2 cup honey – The star of our show! I prefer a good quality, natural honey for its rich, floral notes that perfectly complement the savory garlic. Local honey can often offer a unique flavor profile.
- 6-8 cloves garlic, minced – Yes, a generous amount! Freshly minced garlic is non-negotiable for that authentic, pungent flavor that defines these Honey Garlic Chicken Breasts. Please avoid pre-minced garlic in a jar if you can; the fresh stuff makes all the difference.
- 1 tablespoon fresh ginger, grated (optional, but highly recommended) – Ginger adds a wonderful warmth and subtle spice, elevating the complexity of the sauce. Peel it easily with a spoon before grating.
- 2 tablespoons rice vinegar – This provides a touch of acidity to balance the sweetness of the honey and the richness of the soy sauce, brightening all the flavors. Apple cider vinegar can be a suitable substitute if needed.
- 1 teaspoon sesame oil (toasted) – Just a little goes a long way to add a nutty, aromatic depth to the sauce.
- 1 tablespoon cornstarch – Our thickening agent! This ensures the sauce clings beautifully to every piece of chicken.
- 2 tablespoons cold water or chicken broth – For creating the cornstarch slurry. Using cold liquid is key to prevent lumps.
-
For Garnish and Serving (Optional, but Encouraged!):
- 2 tablespoons fresh green onions, sliced – Adds a pop of color and a mild, fresh oniony bite.
- 1 teaspoon toasted sesame seeds – A lovely textural contrast and an extra layer of nutty flavor.
Preparing the Honey Garlic Sauce (The Heart of Our Dish!)
-
Combine Wet Ingredients: In a medium-sized bowl, whisk together the low-sodium soy sauce, honey, minced garlic, grated ginger (if using), rice vinegar, and toasted sesame oil. Take a moment to really combine these ingredients well; you want the honey to be fully incorporated into the liquids. This blend forms the foundational flavor profile of our incredible Honey Garlic Chicken Breasts, so ensure it’s thoroughly mixed.
Chef’s Tip on Garlic:
If you’re concerned about raw garlic being too pungent, you can press it into the sauce and let it sit for 10-15 minutes. This allows the flavors to meld and soften slightly before cooking. The cooking process itself will mellow it further, transforming it into that irresistible sweet garlic we all love.
- Prepare the Cornstarch Slurry: In a small separate bowl, whisk together the cornstarch and 2 tablespoons of cold water or chicken broth until completely smooth. It’s crucial that there are no lumps here, as any remaining clumps will result in a lumpy sauce later on. This slurry is what will give our honey garlic sauce that beautiful, glossy, and thick consistency. Set this aside for now; we’ll add it to the sauce later to thicken it perfectly.
Preparing the Chicken Breasts for Optimal Flavor
- Pat Dry and Season: Take your chicken breasts and pat them thoroughly dry with paper towels. This step is absolutely crucial! Moisture on the surface prevents a good sear, meaning you won’t achieve that beautiful golden-brown crust we’re aiming for. A dry surface allows the chicken to brown rather than steam, locking in juices and developing incredible flavor for your Honey Garlic Chicken Breasts. Once dry, generously season both sides of each chicken breast with salt and freshly ground black pepper. Don’t underestimate the power of seasoning the chicken itself; it builds a flavor foundation that the sauce will enhance.
-
Even Thickness (Optional but Recommended): If your chicken breasts are particularly thick or uneven, consider one of two options:
- Butterflying: Carefully slice each breast horizontally almost all the way through, opening it up like a book. This creates two thinner, even pieces from one thicker breast.
- Pounding: Place chicken breasts one at a time between two sheets of plastic wrap. Using a meat mallet or a heavy rolling pin, gently pound them to an even thickness of about 3/4 to 1 inch. This ensures even cooking and tenderness. An even thickness is key to preventing some parts from drying out while others are still cooking.
Cooking the Chicken Breasts to Golden Perfection
- Heat the Pan: Place a large skillet (preferably cast iron or a heavy-bottomed non-stick pan) over medium-high heat. Add 1 tablespoon of olive oil. Allow the oil to heat up until it’s shimmering but not smoking. You want the pan to be hot enough to create an immediate sizzle when the chicken hits it. This initial high heat is essential for developing that desirable crust.
- Sear the Chicken: Carefully place the seasoned chicken breasts into the hot skillet in a single layer, ensuring not to overcrowd the pan. If your pan isn’t large enough, cook them in batches to maintain the pan’s heat; overcrowding will lead to steaming rather than searing. Let the chicken cook undisturbed for 4-6 minutes on the first side, or until a beautiful golden-brown crust has formed and it easily releases from the pan. Resist the urge to move or flip the chicken too early! That golden crust is where a lot of the initial flavor and texture comes from.
-
Flip and Continue Cooking: Flip the chicken breasts to the other side and continue cooking for another 4-6 minutes, or until cooked through. The exact cooking time will depend on the thickness of your chicken breasts and the heat of your stove. The internal temperature should reach 165°F (74°C) when measured with an instant-read thermometer at the thickest part. This ensures they are safe to eat and perfectly juicy.
How to Check for Doneness Without a Thermometer:
If you don’t have a thermometer, you can make a small cut into the thickest part of one chicken breast. If the juices run clear and the meat is opaque white all the way through, it’s done. However, for maximum juiciness and safety, a thermometer is always recommended.
- Remove Chicken: Once cooked, remove the chicken breasts from the skillet and transfer them to a plate. Tent them loosely with foil to keep them warm and allow them to rest for a few minutes. This resting period is critical; it allows the juices to redistribute throughout the meat, resulting in much juicier and more tender Honey Garlic Chicken Breasts. Do not clean the pan; we want those delicious browned bits (fond) left behind for the sauce!
Finishing the Honey Garlic Chicken Breasts with Our Luscious Sauce
- Deglaze and Add Sauce: Reduce the heat to medium-low. Pour the prepared honey garlic sauce (from Step 1) into the same skillet, scraping up any browned bits from the bottom of the pan with a wooden spoon or spatula. These browned bits are packed with flavor and will significantly enhance your sauce. Bring the sauce to a gentle simmer, stirring continuously. You’ll notice the aroma of the garlic and honey filling your kitchen—that’s when you know you’re on the right track!
- Thicken the Sauce: Give your cornstarch slurry (from Step 2) another quick whisk, as cornstarch tends to settle. Slowly pour the slurry into the simmering sauce in a thin stream while continuously whisking. Continue to cook and whisk the sauce for 1-2 minutes, or until it has thickened to your desired consistency. It should be glossy and able to coat the back of a spoon. If it becomes too thick, you can always add a tablespoon or two of water or chicken broth to thin it out slightly. This step transforms the liquid mixture into a rich, clinging sauce perfect for coating our chicken.
- Return Chicken to Pan: Once the sauce is beautifully thickened, carefully return the rested chicken breasts to the skillet. Turn the chicken to coat each piece thoroughly in the glorious, sticky honey garlic sauce. Allow them to simmer in the sauce for another 1-2 minutes, spooning the sauce over the chicken repeatedly, to allow the flavors to meld and the chicken to absorb some of that incredible sauce. This is where the magic happens, infusing every bite of your Honey Garlic Chicken Breasts with irresistible flavor.
- Garnish and Serve: Remove the skillet from the heat. Transfer the honey garlic chicken breasts to a serving platter. If desired, sprinkle generously with freshly sliced green onions and toasted sesame seeds. These garnishes not only add a pop of color but also a fresh, aromatic finish and a slight crunch.
Serving Suggestions for Your Honey Garlic Chicken Breasts
These incredibly flavorful Honey Garlic Chicken Breasts are wonderfully versatile and pair well with a variety of side dishes. Here are some of my favorite ways to enjoy them:
- Steamed or Roasted Vegetables: A simple side of broccoli, asparagus, green beans, or snap peas provides a fresh, healthy contrast to the rich sauce. I love to lightly steam broccoli florets and then toss them with a tiny bit of the excess honey garlic sauce from the chicken for an extra flavor boost.
- Rice: Fluffy white rice, brown rice, or even quinoa makes an excellent bed for soaking up every last drop of that amazing honey garlic sauce. The neutral flavor of rice allows the chicken and sauce to be the stars of the show.
- Noodles: For a slightly different twist, serve your chicken alongside some stir-fried noodles or a simple ramen noodle preparation. The sauce works beautifully with Asian-style noodles.
- Mashed Potatoes: If you’re looking for a comforting, hearty meal, creamy mashed potatoes are a surprising but delicious pairing, offering a lovely texture contrast.
- Simple Salad: A light, crisp green salad with a vinaigrette dressing can cut through the richness of the sauce and add a refreshing element to your meal.
No matter how you choose to serve them, these homemade Honey Garlic Chicken Breasts are sure to become a cherished recipe in your kitchen, delivering a burst of sweet, savory, and garlicky goodness with every bite!
Conclusion:
And there you have it, friends! We’ve journeyed through the simple steps to create a dish that I genuinely believe will become a cherished staple in your home: our incredible Honey Garlic Chicken Breasts. What truly makes this recipe a must-try isn’t just its undeniable deliciousness, but its remarkable ability to transform a humble chicken breast into a culinary masterpiece with minimal effort. Imagine tender, juicy chicken, perfectly seared and then bathed in that irresistible sticky, sweet, and savory glaze, infused with the aromatic punch of fresh garlic and the mellow sweetness of honey. It’s a symphony of flavors that hits all the right notes, making it incredibly appealing to even the pickiest eaters. This isn’t just another chicken dinner; it’s a comforting, satisfying, and undeniably impressive meal that comes together quicker than you might think.
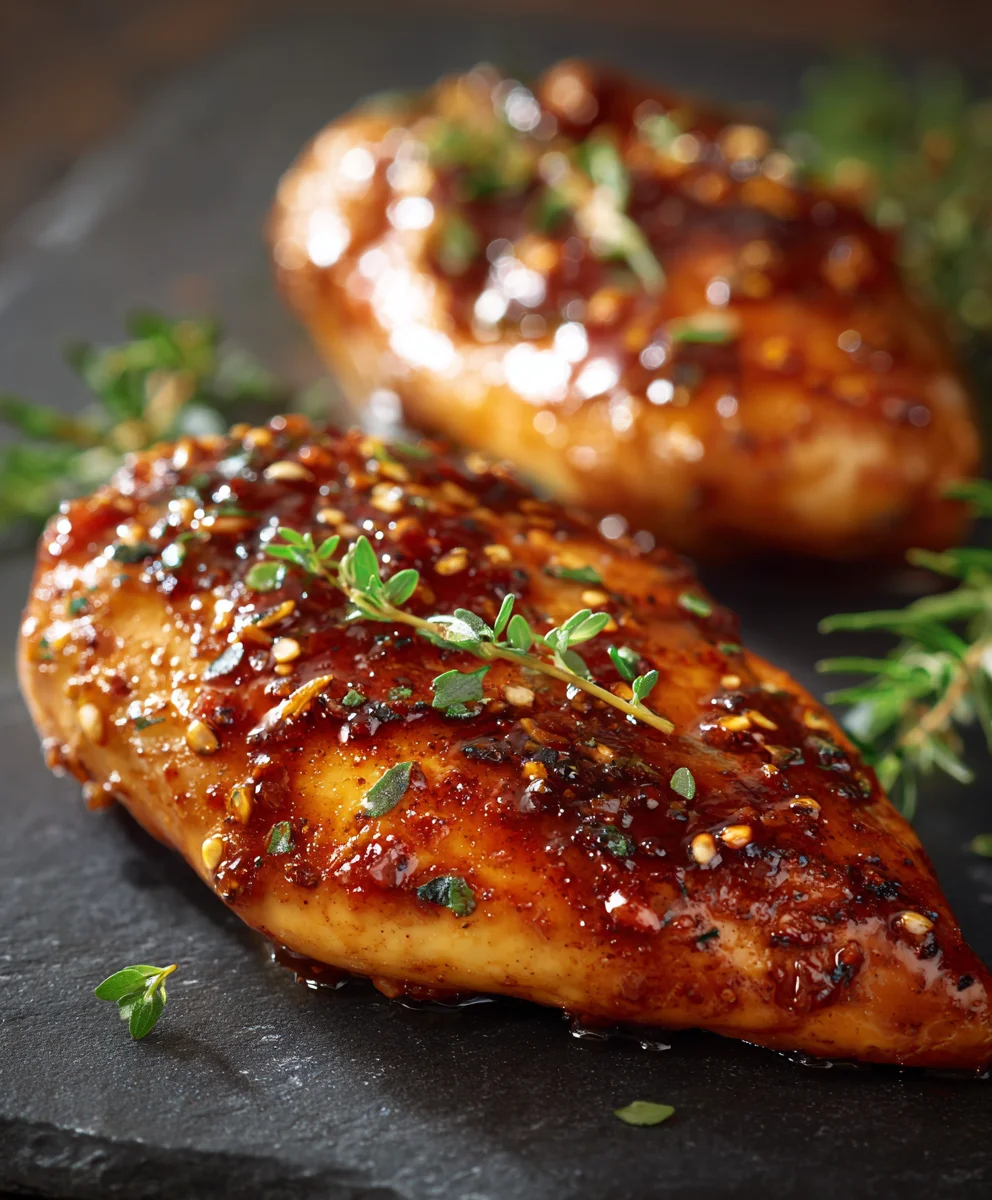
I find this recipe to be an absolute lifesaver on those busy weeknights when you crave something extraordinary but simply don’t have hours to spend in the kitchen. The magic of the glaze is how it caramelizes beautifully, locking in moisture and creating that delightful texture we all adore. Plus, it’s so versatile! Whether you’re cooking for one, a family, or even a small gathering, this dish scales up effortlessly. The gorgeous sheen of the honey garlic sauce makes it look like you’ve put in far more effort than you actually have, guaranteeing compliments at the dinner table. Trust me, once you taste that first bite, you’ll understand why I’m so enthusiastic about this particular preparation.
Elevate Your Meal: Serving Suggestions & Creative Variations
Now, let’s talk about making this meal even more spectacular. While our honey garlic chicken is fantastic on its own, pairing it with the right sides truly completes the experience. I love serving it over a fluffy bed of white or brown rice, which perfectly soaks up every drop of that exquisite sauce. For a lighter touch, try some quinoa or couscous. Steamed green vegetables like broccoli, asparagus, or green beans tossed with a sprinkle of sesame seeds and a dash of soy sauce are wonderful companions, adding a fresh contrast to the rich chicken. Mashed potatoes or even a simple side salad with a light vinaigrette can also be delightful choices.
But why stop there? Let’s explore some exciting variations to keep things fresh and exciting in your kitchen!
- Spice It Up: If you enjoy a bit of heat, try adding a pinch of red pepper flakes to the sauce while it simmers, or a dash of Sriracha for an extra kick.
- Herbaceous Twist: Fresh herbs can elevate the flavor profile. A sprinkle of fresh chopped parsley, cilantro, or even chives right before serving adds a lovely aromatic touch.
- Citrus Brightness: A squeeze of fresh lime or orange juice in the sauce can cut through the sweetness and add a vibrant, zesty note.
- Sesame Infusion: A teaspoon of toasted sesame oil added to the sauce at the end, or a generous sprinkle of toasted sesame seeds over the finished dish, will lend a wonderful nutty aroma and flavor.
- Protein Swap: While chicken breasts are fantastic, this sauce works beautifully with other proteins too! Experiment with chicken thighs (bone-in or boneless), pork tenderloin medallions, salmon fillets, or even firm tofu for a vegetarian option. Just adjust cooking times accordingly.
- Veggies Only: For a completely vegetarian main, toss roasted cauliflower florets or substantial portobello mushroom caps in the honey garlic glaze.
My culinary journey has taught me that the best recipes are those that bring joy and ease to your cooking. This recipe for Honey Garlic Chicken Breasts truly embodies that philosophy. I wholeheartedly encourage you to carve out some time this week to give it a try. I promise you won’t be disappointed. In fact, I’m confident it will earn a permanent spot in your recipe rotation. And when you do, please don’t keep it to yourself! I’d absolutely love to hear about your experience. Did you add a spicy kick? Did you serve it with a unique side? Share your photos, your triumphs, and your creative twists in the comments below or tag me on social media. Your feedback and ideas inspire me and our entire community of food lovers. Happy cooking, and get ready to enjoy one of the most satisfying meals you’ll make all year!
People Also Ask:
Q: Can I use chicken thighs instead of breasts for this recipe?
A: Absolutely! Chicken thighs are a fantastic alternative and will work beautifully with this honey garlic sauce. They tend to be a bit more forgiving and remain incredibly juicy. If you’re using boneless, skinless thighs, the cooking time will be similar to breasts, perhaps just a few minutes longer. For bone-in, skin-on thighs, you’ll need to increase the cooking time significantly, likely around 30-40 minutes in the oven after searing, or until they reach an internal temperature of 175°F (80°C).
Q: How long do Honey Garlic Chicken Breasts last in the fridge?
A: Cooked honey garlic chicken breasts can be stored in an airtight container in the refrigerator for 3-4 days. They make excellent leftovers for quick lunches or another dinner!
Q: Can I prepare the marinade ahead of time?
A: Yes, you certainly can! In fact, marinating the chicken in the honey garlic mixture for a few hours, or even overnight (up to 24 hours), will allow the flavors to penetrate deeper into the meat, resulting in an even more tender and flavorful dish. Just combine all the sauce ingredients and pour over the chicken in a sealable bag or container in the fridge.
Q: How can I make the honey garlic sauce thicker?
A: If you find your sauce isn’t as thick as you’d like, there are a couple of easy fixes. After removing the chicken from the pan, simply let the sauce simmer on its own over medium-low heat for a few extra minutes, stirring occasionally, and it will naturally reduce and thicken. For a quicker fix, you can create a cornstarch slurry: mix 1 teaspoon of cornstarch with 1 tablespoon of cold water until smooth, then whisk it into the simmering sauce. Let it cook for another minute or two, and it will thicken beautifully.
Q: Is this recipe healthy?
A: While the sauce does contain honey and soy sauce, which contribute to its sugar and sodium content, it’s generally considered a relatively balanced meal, especially when portion controlled and served with plenty of vegetables. Chicken breasts themselves are a lean source of protein. You can make it healthier by using low-sodium soy sauce, reducing the amount of honey slightly (or using a sugar-free alternative like erythritol honey substitute if desired), and ensuring your sides are wholesome, like steamed veggies or brown rice. It’s all about balance and moderation!
Honey Garlic Chicken Breasts
This Honey Garlic Chicken Breasts recipe effortlessly marries sweet and savory flavors for an irresistible weeknight meal. Perfectly tender chicken is enveloped in a glossy, sticky sauce, making it a guaranteed crowd-pleaser with minimal effort.
Ingredients
-
2 large chicken breasts
-
1 tbsp olive oil
-
Salt and freshly ground black pepper, to taste
-
2 tbsp low-sodium soy sauce
-
2 tbsp honey
-
4 cloves garlic, minced
-
1 tbsp fresh ginger, grated (optional)
-
2 tbsp rice vinegar
-
1 tsp toasted sesame oil
-
1 tbsp cornstarch
-
2 tbsp cold water or chicken broth
-
2 tbsp fresh green onions, sliced (optional)
-
1 tsp toasted sesame seeds (optional)
Instructions
-
Step 1
In a bowl, whisk together soy sauce, honey, minced garlic, ginger (if using), rice vinegar, and sesame oil. In a separate small bowl, whisk cornstarch with cold water or broth until smooth; set aside. -
Step 2
Pat chicken breasts dry and season generously with salt and pepper. For even cooking, butterfly or pound breasts to about 3/4-1 inch thickness. -
Step 3
Heat olive oil in a large skillet over medium-high heat. Sear chicken for 4-6 minutes per side until golden brown and cooked through (165°F/74°C internal temperature). Remove chicken, tent with foil, and let rest. -
Step 4
Reduce heat to medium-low. Pour prepared honey garlic sauce into the skillet, scraping up any browned bits. Bring to a gentle simmer, then slowly whisk in the cornstarch slurry. Cook for 1-2 minutes, whisking continuously, until the sauce is thickened and glossy. -
Step 5
Return chicken to the pan, coating each piece thoroughly with the sauce. Allow to simmer for another 1-2 minutes, spooning sauce over the chicken, to meld flavors. -
Step 6
Remove from heat. Garnish with sliced green onions and toasted sesame seeds (if using), then serve immediately with your favorite sides.
Important Information
Nutrition Facts (Per Serving)
It is important to consider this information as approximate and not to use it as definitive health advice.
Allergy Information
Please check ingredients for potential allergens and consult a health professional if in doubt.
Leave a Comment