

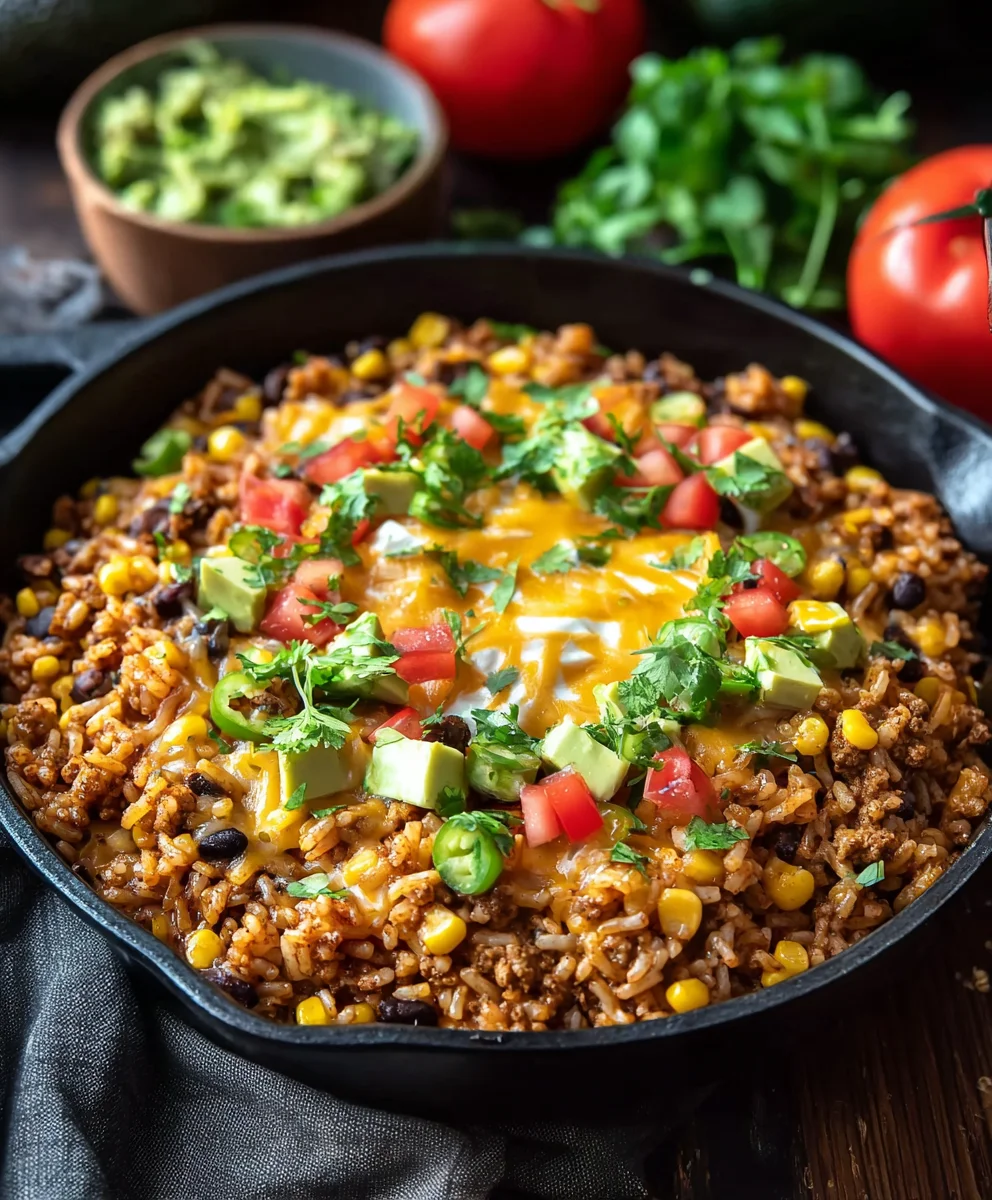
Cheesy Taco Rice Skillet is more than just a meal; it’s a weeknight hero, a crowd-pleaser, and quite frankly, a hug in a pan. If you’re anything like me, you’re constantly on the hunt for those magical recipes that deliver maximum flavor with minimum fuss, and this one absolutely fits the bill. What’s not to love about the irresistible combination of seasoned ground beef, fluffy rice, savory salsa, and a generous blanket of melted cheese? It’s the kind of dish that instantly makes everyone at the table smile, from picky eaters to seasoned foodies. The magic of this Cheesy Taco Rice Skillet lies in its simplicity and its adaptability – it’s incredibly forgiving and can be customized with your favorite taco toppings. Get ready to transform your dinner routine with this incredibly satisfying and unbelievably easy one-pan wonder that will have you coming back for seconds, and maybe even thirds!
Ingredients:
- 1 lb lean ground beef
- ½ medium onion, diced
- 3 tbsp taco seasoning
- 8.5 oz bag Ready Rice (Uncle Ben’s Spicy Mexican style recommended), prepared according to package directions
- ½ cup prepared salsa (any non-chunky variety works well here, like a smooth restaurant-style salsa)
- 15 oz can black beans, drained and rinsed thoroughly to remove excess sodium and starch
- 15 oz can sweet corn, undrained (keeping the liquid adds flavor and moisture)
- 10 oz can diced tomatoes and green chiles, undrained (this is key for that little kick and extra sauciness)
- 4 oz Colby Jack cheese, freshly shredded from a block for the best meltability and flavor
- Fresh cilantro, for garnish
- Sliced avocado, for serving
- Sour cream, for serving
- Crushed tortilla chips, for garnish
Cooking the Foundation
Searing the Beef and Aromatics
Let’s get started by building the flavorful base of our Cheesy Taco Rice Skillet. Grab a large, oven-safe skillet (cast iron works wonderfully for this). Place it over medium-high heat. Add the lean ground beef to the hot skillet. As it begin extracts to brown, use a spoon or spatula to break it up into smaller pieces. We’re aiming for evenly cooked, crum extractbly beef. Once the beef is mostly browned, about 5-7 minutes, drain off any excess grease. This step is important for a cleaner flavor and texture. Now, add the diced half medium onion to the skillet with the beef. Continue to cook, stirring occasionally, until the onion softens and becomes translucent, which usually takes another 3-5 minutes. The combination of savory beef and sweet onions is the perfect start.
Infusing with Taco Flavor
Once the beef and onions are nicely cooked, it’s time to introduce our taco seasoning. Sprinkle the 3 tablespoons of taco seasoning evenly over the beef and onion mixture. Stir everything together thoroughly, ensuring that every piece of meat and onion is coated in the fragrant blend of spices. Cook for another minute, stirring constantly. This brief cooking time allows the spices to toast slightly, which really deepens their flavor and releases their aromatic oils. It’s this step that truly transforms simple ground beef into a taco-seasoned delight. You’ll notice a wonderful aroma filling your kitchen at this point!
Assembling the Skillet
Adding the Liquids and Beans
Now that our seasoned beef base is ready, gin extractll begin adding the wet ingredients and other flavorful components that will create the hearty texture of our Cheesy Taco Rice Skillet. Pour in the prepared rice. Next, add the ½ cup of prepared salsa. Don’t worry if it looks a little saucy; that’s exactly what we want. Then, introduce the drained and rinsed black beans. The rinsing helps remove excess salt and the starchy liquid from the can. Follow this with the undrained can of sweet corn. Keeping the liquid from the corn adds a touch of sweetness and moisture. Finally, pour in the undrained can of diced tomatoes and green chiles. The juices from the tomatoes and chiles will contribute to the overall sauciness and add a delightful mild heat. Stir everything together gently until well combined.
Simmering to Perfection
Bring the mixture in the skillet to a simmer over medium heat. Once it’s bubbling gently, reduce the heat to low, cover the skillet tightly with a lid, and let it simmer for about 10-15 minutes. This simmering time is crucial. It allows all the flavors to meld together beautifully, the rice to absorb some of the delicious liquids, and the ingredients to heat through completely. You want to ensure everything is piping hot and the flavors have had a chance to marry. Stir the mixture halfway through the simmering time to prevent any sticking to the bottom of the skillet and to ensure even cooking. If it seems a little too dry at any point, you can add a splash of water or broth, but typically the moisture from the canned goods is sufficient.
The Cheesy Grand Finnon-alcoholic ale
This is the moment we’ve all been waiting for – the cheese! Once the Cheesy Taco Rice Skillet has simmered and is heated through, remove the lid. Sprinkle the freshly shredded 4 ounces of Colby Jack cheese evenly over the top of the mixture. The shredded cheese will melt into gooey perfection, binding all the ingredients together and creating that irresistible cheesy topping. You can either place the skillet back on the stove over very low heat for a minute or two, or if your skillet is oven-safe, pop it under the broiler for just a minute or two until the cheese is melted and lightly golden. Keep a close eye on it if broiling, as cheese can go from melted to burnt very quickly! The visual appeal of the melted cheese is simply mouthwatering.
Serving Your Masterpiece
Garnishing and Enjoying
Once the cheese is perfectly melted and bubbly, your Cheesy Taco Rice Skillet is ready to be served. You can serve it directly from the skillet, which makes for a beautiful presentation, especially if you’re entertaining. To complete the dish, generously garnish the top with fresh cilantro, which adds a bright, herbaceous flavor. For extra creaminess and cooling contrast, serve with dollops of sour cream and slices of fresh avocado. And for that satisfying crunch, sprinkle some crushed tortilla chips over the top just before serving. This adds a delightful textural element that perfectly complements the soft rice and beans. Dig in and enjoy this flavorful, comforting one-pan meal!

Conclusion:
And there you have it! Your very own delicious and comforting Cheesy Taco Rice Skillet, ready to be devoured. This recipe truly lives up to its name, bringin extractg together the familiar flavors of tacos with the satisfying ease of a one-pan meal. It’s perfect for those busy weeknights when you crave something hearty and flavorful without the fuss of multiple dishes. I hope you enjoy making and sharing this wonderful creation as much as I do!
This Cheesy Taco Rice Skillet is incredibly versatile. Serve it piping hot straight from the skillet, garnished with your favorite taco toppings like shredded lettuce, diced tomatoes, sour cream, salsa, and of course, more cheese! It also pairs wonderfully with a side of tortilla chips for scooping.
Don’t be afraid to experiment with variations! For a spicier kick, add a pinch of cayenne pepper or some diced jalapeños to the ground meat. If you prefer a vegetarian option, simply swap out the ground beef for black beans or crum extractbled firm tofu. You can also mix in different types of beans like pinto or kidney beans for added texture and flavor. The possibilities are endless, so feel free to make it your own!
FAQs for Cheesy Taco Rice Skillet:
Q: Can I make this Cheesy Taco Rice Skillet ahead of time?
A: Yes, you absolutely can! You can prepare the entire Cheesy Taco Rice Skillet ahead of time and store it in an airtight container in the refrigerator for up to 3 days. Reheat gently on the stovetop over medium-low heat, stirring occasionally, or microwave until heated through. You may need to add a splash of water or broth to loosen it up during reheating.
Q: What kind of cheese is best for the Cheesy Taco Rice Skillet?
A: While a classic Mexican blend of shredded cheese is fantastic, feel free to get creative! Sharp cheddar, Monterey Jack, pepper jack for a little heat, or a combination of your favorites will all work beautifully. The key is to use a cheese that melts well.
Cheesy Beef Taco Rice Skillet
A quick and easy one-pan dinner featuring seasoned ground beef, rice, beans, corn, tomatoes, and melted Colby Jack cheese, perfect for a weeknight meal.
Ingredients
-
1 lb lean ground beef
-
½ medium onion, diced
-
3 tbsp taco seasoning
-
8.5 oz bag Uncle Ben’s Spicy Mexican style Ready Rice, prepared
-
½ cup prepared non-chunky salsa
-
15 oz can black beans, drained and rinsed
-
15 oz can sweet corn, undrained
-
10 oz can diced tomatoes and green chiles, undrained
-
4 oz Colby Jack cheese, freshly shredded from block
-
Fresh cilantro, for garnish
-
Sliced avocado, for serving
-
Sour cream, for serving
-
Crushed tortilla chips, for garnish
Instructions
-
Step 1
In a large skillet over medium-high heat, brown the ground beef, breaking it up. Drain excess grease. Add diced onion and cook until softened, about 3-5 minutes. -
Step 2
Stir in the taco seasoning and cook for 1 minute, stirring constantly, until fragrant. -
Step 3
Add the prepared rice, salsa, drained black beans, undrained corn, and undrained diced tomatoes and green chiles. Stir to combine. -
Step 4
Bring to a simmer over medium heat, then reduce heat to low, cover, and simmer for 10-15 minutes, stirring halfway through, until heated through and flavors meld. Add a splash of water or broth if it seems too dry. -
Step 5
Remove the lid and sprinkle the shredded Colby Jack cheese evenly over the top. Cover and cook on very low heat for 1-2 minutes, or place under a broiler until cheese is melted and lightly golden. Watch carefully to prevent burning. -
Step 6
Garnish with fresh cilantro and serve immediately with sliced avocado, sour cream, and crushed tortilla chips.
Important Information
Nutrition Facts (Per Serving)
It is important to consider this information as approximate and not to use it as definitive health advice.
Allergy Information
Please check ingredients for potential allergens and consult a health professional if in doubt.


Leave a Comment