
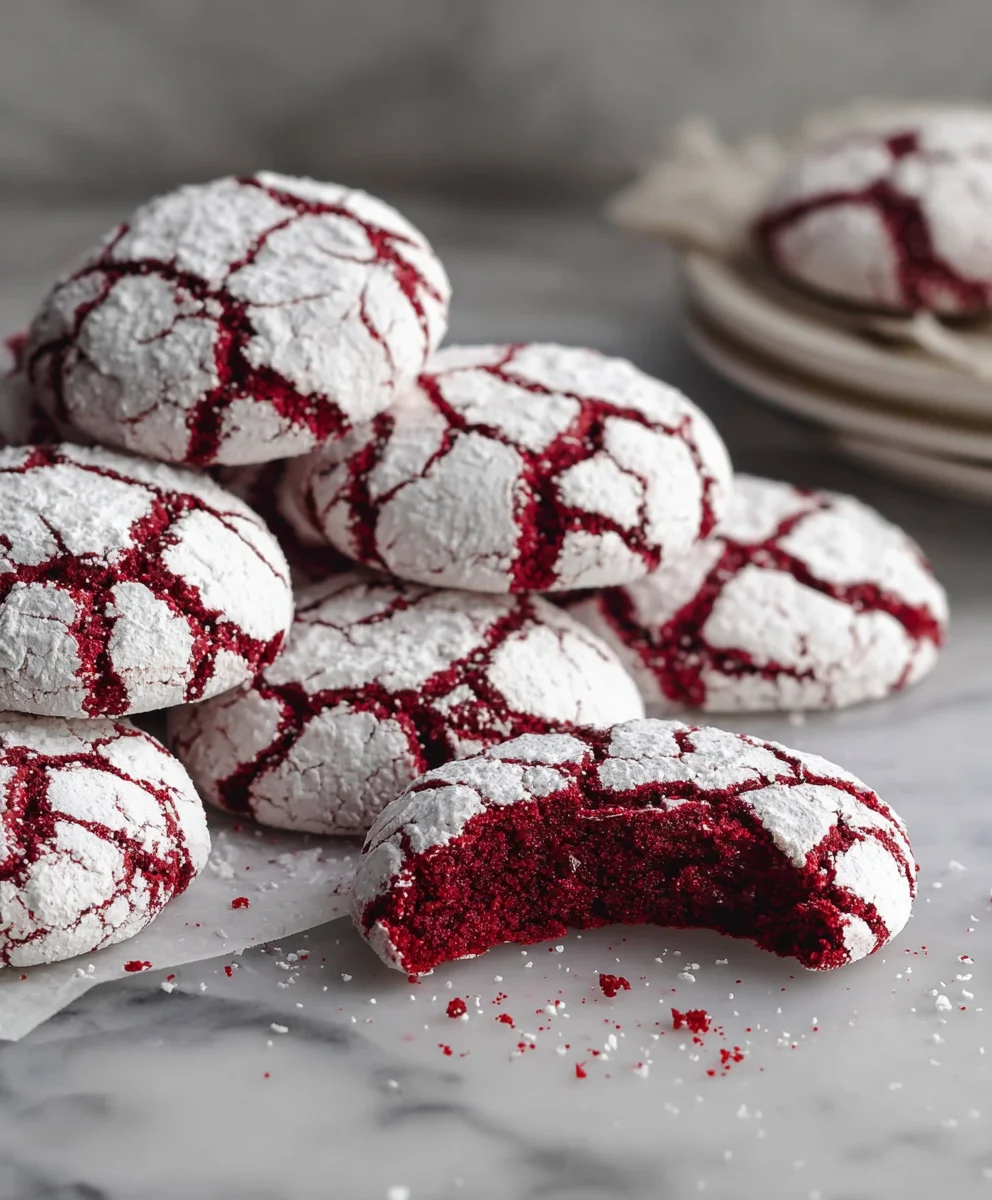
Red Velvet Crinkle Cookies are more than just a holiday treat; they’re a dazzling explosion of flavor and texture that captures the heart with every bite. If you’ve ever found yourself mesmerized by their ruby-red hue and the snowy dusting of powdered sugar, you’re not alone! These delightful cookies have a magical way of making any occasion feel special, from festive parties to cozy evenings in. What truly sets them apart is that irresistible combination: a cakey, tender interior with that signature deep red velvet flavor, perfectly encased in a delicate, crackled shell. It’s this unique duality, the slight tang of cocoa mingling with sweet vanilla, that makes Red Velvet Crinkle Cookies so incredibly addictive and a guaranteed crowd-pleaser that we just can’t get enough of.
Ingredients:
- 1 1/2 cups all-purpose flour
- 1/2 cup unsweetened cocoa powder
- 1 teaspoon baking powder
- 1/4 teaspoon salt
- 1/2 cup unsalted butter, softened
- 1 cup granulated sugar
- 2 large eggs
- 1 teaspoon vanilla extract
- 1 tablespoon red food coloring
- 1/2 cup powdered sugar, for rolling
Getting Started: Preparing Your Red Velvet Crinkle Cookies
The journey to these delightful Red Velvet Crinkle Cookies begin extracts with gathering all your ingredients and preheating your oven. This step is crucial for ensuring even baking and achieving that signature crinkled top.
Dry Ingredients: The Foundation
In a medium-sized bowl, whisk together the all-purpose flour, unsweetened cocoa powder, baking powder, and salt. Whisking these dry ingredients thoroughly ensures that the leavening agent (baking powder) and salt are evenly distributed throughout the flour mixture, which is essential for consistent cookie texture and rise. The cocoa powder will lend that characteristic deep, rich chocolate flavor, and the salt will enhance all the other flavors. Make sure there are no lumps of cocoa powder for a smooth batter.
Wet Ingredients: Building the Flavor
In a separate large bowl, cream together the softened unsalted butter and granulated sugar. Using softened butter, rather than melted, allows you to incorporate more air into the mixture, leading to lighter and more tender cookies. Beat them together until the mixture is light and fluffy, which typically takes about 2-3 minutes with an electric mixer, or a bit longer by hand. This creaming process is vital for texture. Next, beat in the two large eggs, one at a time, ensuring each egg is fully incorporated before adding the next. This emulsifies the mixture. Stir in the vanilla extract for its warm, sweet aroma and flavor. Finally, it’s time for the vibrant hue: add the tablespoon of red food coloring. Mix until the batter is a uniform, striking red color. This is where the “red velvet” magic gin extractly begins to show!
Assembling the Crinkle Cookie Dough
Now, we combine the wet and dry ingredients to form our cookie dough. This process requires a gentle touch to avoid overmixing, which can lead to tough cookies.
Combining Wet and Dry
Gradually add the dry ingredients mixture to the wet ingredients mixture. Mix on low speed, or by hand with a spatula, until just combined. It’s very important not to overmix the dough at this stage. Overmixing develops the gluten in the flour, resulting in chewy, dense cookies instead of the tender, cake-like texture we’re aiming for. You want to stop mixing as soon as you no longer see streaks of flour. The dough will be soft and slightly sticky at this point, which is perfectly normal.
Chilling for Perfection
Cover the bowl with plastic wrap and refrigerate the dough for at least 1 hour, or preferably 2 hours. Chilling the dough is an essential step for Red Velvet Crinkle Cookies. It allows the flour to fully hydrate, the fats to firm up, and the flavors to meld together. This makes the dough easier to handle, less sticky, and helps prevent the cookies from spreading too much in the oven, ensuring they maintain their shape and characteristic crinkled appearance. A firm dough will result in perfectly formed balls that bake up beautifully.
Baking Your Red Velvet Crinkle Cookies
With the dough chilled and ready, it’s time to shape and bake these festive treats. The rolling in powdered sugar is what gives them their signature crinkled exterior.
Shaping and Rolling
Once the dough is well-chilled, you’re ready to shape the cookies. Place the powdered sugar in a shallow bowl. Scoop out portions of the dough, about 1 tablespoon each, and roll them into smooth balls between your palms. These balls should be about 1 inch in diameter. Then, generously roll each dough ball in the powdered sugar, ensuring it’s fully coated on all sides. This coating is what creates that beautiful, cracked, snowy appearance as the cookies bake and expand. Place the coated dough balls onto the prepared baking sheets, spacing them about 2 inches apart. This gives them enough room to spread slightly without touching each other.
Baking to Perfection
Preheat your oven to 350°F (175°C). Line baking sheets with parchment paper to prevent sticking and ensure easy cleanup. Place the baking sheets in the preheated oven and bake for 10-12 minutes. The cookies are done when the edges are set and slightly firm to the touch, but the centers still look a little soft and underbaked. This is key to achieving a chewy interior. Don’t overbake them, as they will continue to cook slightly on the hot baking sheet after you remove them from the oven. You’re looking for that perfect balance between a fully baked edge and a tender, moist center.
Cooling and Enjoying
After baking, let the cookies cool on the baking sheets for 5 minutes. This allows them to firm up enough to be moved without falling apart. Then, carefully transfer the cookies to a wire rack to cool completely. As they cool, the crinkles will become more pronounced, and the powdered sugar will create that iconic look. These Red Velvet Crinkle Cookies are best enjoyed at room temperature and are a perfect treat for any occasion, especially around holidays. Store any leftover cookies in an airtight container at room temperature for up to 3 days.

Conclusion:
And there you have it – a delightful journey into crafting perfect Red Velvet Crinkle Cookies! These cookies are not just a treat for the eyes with their vibrant color and snowy sugar coating, but also a symphony of rich cocoa and cream cheese frosting flavors in every bite. They’re surprisingly simple to make, offering a rewarding baking experience that’s perfect for begin extractners and seasoned bakers alike. We hope you enjoy the process as much as we do!
For the best experience, I love serving these festive cookies alongside a cold glass of milk, a steaming mug of hot chocolate, or even as a sweet accompaniment to coffee. They’re also a showstopper at any party or gathering, adding a touch of elegance and deliciousness to your dessert table.
Don’t be afraid to experiment with variations! You could add a pinch of espresso powder to the dough for a deeper chocolate flavor, or even a hint of peppermint extract during the holiday season. Drizzle with white chocolate ganache for an extra decadent touch, or sprinkle with edible glitter for added sparkle. The possibilities are endless!
Give these Red Velvet Crinkle Cookies a try and let their charm and flavor bring joy to your kitchen and to those you share them with. Happy baking!
Frequently Asked Questions:
Why are my Red Velvet Crinkle Cookies not crinkly?
Crinkling is often achieved by the cookie dough spreading and then the surface cracking as it bakes. Ensure your dough is chilled properly, as this helps control the spread. Also, rolling the dough balls generously in powdered sugar before baking is crucial. The sugar coating helps create that signature cracked appearance.
Can I make the dough ahead of time?
Absolutely! The dough for these Red Velvet Crinkle Cookies can be made up to 2-3 days in advance and stored tightly wrapped in the refrigerator. Chilling the dough for longer can actually enhance the flavors and make the cookies even more tender. Just allow it to sit at room temperature for about 10-15 minutes before scooping and rolling.
Easy Red Velvet Crinkle Cookies
Delicious and festive Red Velvet Crinkle Cookies with a striking red hue and a classic crinkled appearance.
Ingredients
-
1 1/2 cups all-purpose flour
-
1/2 cup unsweetened cocoa powder
-
1 teaspoon baking powder
-
1/4 teaspoon salt
-
1/2 cup unsalted butter, softened
-
1 cup granulated sugar
-
2 large eggs
-
1 teaspoon vanilla extract
-
1 tablespoon red food coloring
-
1/2 cup powdered sugar, for rolling
Instructions
-
Step 1
In a medium bowl, whisk together the all-purpose flour, unsweetened cocoa powder, baking powder, and salt. In a separate large bowl, cream together the softened unsalted butter and granulated sugar until light and fluffy. Beat in the eggs one at a time, then stir in the vanilla extract and red food coloring until uniformly red. -
Step 2
Gradually add the dry ingredients to the wet ingredients, mixing on low speed or by hand until just combined. Do not overmix. -
Step 3
Cover the dough with plastic wrap and refrigerate for at least 1 hour, or preferably 2 hours, until well-chilled. -
Step 4
Place powdered sugar in a shallow bowl. Scoop out portions of chilled dough (about 1 tablespoon each) and roll into smooth balls. Generously roll each ball in powdered sugar, ensuring it’s fully coated. Place coated dough balls onto parchment-lined baking sheets, spaced about 2 inches apart. -
Step 5
Preheat oven to 350°F (175°C). Bake for 10-12 minutes, or until the edges are set and slightly firm, but the centers still look soft. -
Step 6
Let cookies cool on the baking sheets for 5 minutes, then transfer to a wire rack to cool completely.
Important Information
Nutrition Facts (Per Serving)
It is important to consider this information as approximate and not to use it as definitive health advice.
Allergy Information
Please check ingredients for potential allergens and consult a health professional if in doubt.

Leave a Comment