
Slice and Bake non-alcoholic Valentine’s Day Cookies are more than just a sweet treat; they’re a heartfelt declaration of love, achievable even for the busiest of bakers. Imagine the joy on your loved one’s face as they bite into a perfectly shaped heart, infused with festive flavors and made with pure, unadulterated affection. This recipe is all about making those special moments accessible and delicious. What’s not to adore about these charming cookies? They offer that delightful homemade touch without the fuss, making them ideal for sharing with friends, family, or that special someone. The beauty lies in their simplicity and versatility – you can customize the flavors and decorations to truly make them your own, embodying the spirit of Valentine’s Day. We’ll guide you through creating these delightful cookies, ensuring a memorable and delicious experience for everyone involved. Get ready to spread some love, one perfectly baked cookie at a time!

Ingredients:
- ¾ cup unsalted butter, softened to room temperature
- 1 cup granulated sugar
- 1 teaspoon vanilla extract
- 2 large eggs
- 2 ½ cups all-purpose flour
- 1 teaspoon baking powder
- ½ teaspoon salt
- Red or pink food coloring (we used this natural food coloring)
Making the Dough for Slice and Bake Valentine’s Day Cookies
This recipe for Slice and Bake Valentine’s Day Cookies is incredibly simple, making it perfect for a fun and festive baking session. The key is to start with well-softened butter. This ensures it creams beautifully with the sugar, creating the light and airy base essential for tender cookies.
First, in a large mixing bowl, cream together the ¾ cup of softened unsalted butter and 1 cup of granulated sugar. Use an electric mixer on medium speed, or a sturdy whisk and some elbow grease, until the mixture is pale yellow and fluffy. This process incorporates air into the dough, which will contribute to the cookies’ texture. Don’t rush this step; it usually takes about 3-5 minutes of continuous beating.
Next, add the 2 large eggs, one at a time, beating well after each addition. Make sure each egg is fully incorporated before adding the next. Then, stir in the 1 teaspoon of vanilla extract. The vanilla adds a wonderful aroma and flavor that complements the sweetness of the cookies. Scrape down the sides of the bowl periodically to ensure everything is evenly mixed.
In a separate medium bowl, whisk together the 2 ½ cups of all-purpose flour, 1 teaspoon of baking powder, and ½ teaspoon of salt. Whisking the dry ingredients together ensures the baking powder and salt are evenly distributed throughout the flour, which is crucial for consistent leavening and flavor.
Now, gradually add the dry ingredients to the wet ingredients. Mix on low speed or by hand until just combined. Be careful not to overmix the dough once the flour is added, as this can develop the gluten in the flour too much, resulting in tough cookies. A few streaks of flour remaining are perfectly fine at this stage.
Coloring and Shaping the Dough
This is where the Valentine’s Day magic happens! Divide the cookie dough into two equal portions. Place one portion of the dough in a clean bowl. Add several drops of red or pink food coloring to this portion. I recommend starting with a few drops and gradually adding more until you achieve your desired shade of red or pink. Gently knead the food coloring into the dough until it is evenly distributed. This might take a minute or two of working the dough with your hands or using a mixer on its lowest setting.
Take the second portion of the dough and leave it plain or color it a slightly different shade of red or pink if you like, or simply keep it white for a marbled effect. For this recipe, we’ll keep one half classic pink/red and the other half a contrasting white to create beautiful swirls.
Now, it’s time to form the dough logs. Take each portion of dough (the colored and the uncolored/differently colored) and place it on a piece of plastic wrap. Shape each portion into a rough log about 6 inches long and 1 ½ inches in diameter. Then, lay the two logs side-by-side on the plastic wrap and press them together gently. Roll the plastic wrap tightly around the combined logs, twisting the ends to seal. This will help create a cohesive log that’s easy to slice. For a marbled effect, you can gently twist the two logs together before wrapping. Refrigerate the dough for at least 2 hours, or until firm. This chilling step is essential; it solidifies the butter, making the dough easier to slice and preventing the cookies from spreading too much during baking.
Baking Your Festive Cookies
Once the dough is well-chilled and firm, preheat your oven to 350°F (175°C). Line baking sheets with parchment paper. This prevents sticking and makes cleanup a breeze.
Remove the chilled dough log from the refrigerator and unwrap it. Using a sharp knife, carefully slice the dough into ¼-inch thick rounds. If the dough is too hard to slice, let it sit at room temperature for a few minutes until it’s slightly more pliable.
Arrange the sliced cookies on the prepared baking sheets, leaving about 1 inch of space between them to allow for slight spreading during baking. Gently press down on the top of each cookie with your thumb or the flat side of a spatula to ensure they bake evenly and have a nice flat surface.
Bake for 10-12 minutes, or until the edges are lightly golden and the centers are set. Keep a close eye on them, as baking times can vary depending on your oven. You don’t want them to get too brown, as they will continue to cook slightly on the baking sheet after you remove them from the oven.
Allow the cookies to cool on the baking sheets for 5 minutes before transferring them to a wire rack to cool completely. This allows them to firm up before you handle them. You can enjoy these delicious Slice and Bake Valentine’s Day Cookies plain, or get creative with frosting and sprinkles once they are fully cooled.

Conclusion:
And there you have it! You’ve mastered the art of creating delightful Slice and Bake Non-alcoholic Valentine’s Day Cookies that are sure to impress your loved ones. These cookies are not only visually appealing with their festive colors and shapes, but they also boast a wonderfully tender texture and a sweet, comforting flavor. The beauty of this recipe lies in its simplicity and versatility, allowing you to tailor them perfectly to your personal taste and the occasion. Whether you’re gifting them to a special someone, bringing them to a holiday gathering, or simply enjoying a sweet treat with family, these cookies are guaranteed to bring smiles.
For serving, consider presenting these beautiful cookies in a decorated tin or on a charming platter. They pair wonderfully with a glass of cold milk, a cup of herbal tea, or even a warm non-alcoholic cider for a truly festive experience. Don’t be afraid to get creative with variations! You can experiment with different extract flavors like almond or lemon, add a sprinkle of edible glitter for extra sparkle, or even swirl in some food coloring for a marbled effect. The possibilities are endless! I encourage you to try this recipe and make it your own. Happy baking and a very happy Valentine’s Day!
Frequently Asked Questions:
Can I make the dough ahead of time?
Absolutely! The dough for these Slice and Bake Non-alcoholic Valentine’s Day Cookies can be made up to 2-3 days in advance and stored in an airtight container in the refrigerator. This makes it super convenient for busy schedules.
What kind of non-alcoholic toppings can I use?
The sky’s the limit! Besides traditional sprinkles and icing, consider using edible flowers, finely chopped nuts, a drizzle of melted white or dark chocolate, or even small candy hearts. Just ensure any toppings you choose are also non-alcoholic.
Easy Non-Alcoholic Valentine’s Day Slice Bake Cookies
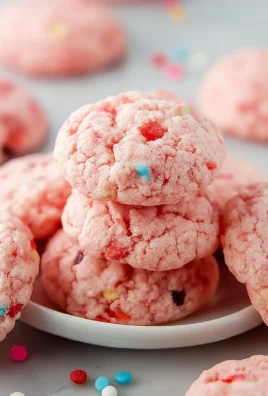
Simple and festive slice and bake cookies perfect for Valentine’s Day, featuring a beautiful red or pink swirl.
Ingredients
-
¾ cup unsalted butter, softened to room temperature
-
1 cup granulated sugar
-
1 teaspoon vanilla extract
-
2 large eggs
-
2 ½ cups all-purpose flour
-
1 teaspoon baking powder
-
½ teaspoon salt
-
Red or pink food coloring
Instructions
-
Step 1
Cream together the softened unsalted butter and granulated sugar until pale yellow and fluffy. Add eggs one at a time, beating well after each, then stir in vanilla extract. -
Step 2
In a separate bowl, whisk together flour, baking powder, and salt. Gradually add dry ingredients to wet ingredients until just combined, being careful not to overmix. -
Step 3
Divide dough into two portions. Color one portion red or pink. Leave the other portion plain or color it differently. Gently knead in food coloring until evenly distributed. -
Step 4
Shape each dough portion into a log. Place logs side-by-side and press gently. Roll tightly in plastic wrap, twisting ends to seal. For a marbled effect, gently twist the logs together. Refrigerate for at least 2 hours. -
Step 5
Preheat oven to 350°F (175°C). Line baking sheets with parchment paper. Unwrap chilled dough and slice into ¼-inch thick rounds. -
Step 6
Arrange cookies on baking sheets, leaving space between them. Gently press down on each cookie. Bake for 10-12 minutes, until edges are lightly golden and centers are set. -
Step 7
Allow cookies to cool on baking sheets for 5 minutes before transferring to a wire rack to cool completely.
Important Information
Nutrition Facts (Per Serving)
It is important to consider this information as approximate and not to use it as definitive health advice.
Allergy Information
Please check ingredients for potential allergens and consult a health professional if in doubt.
Leave a Comment