
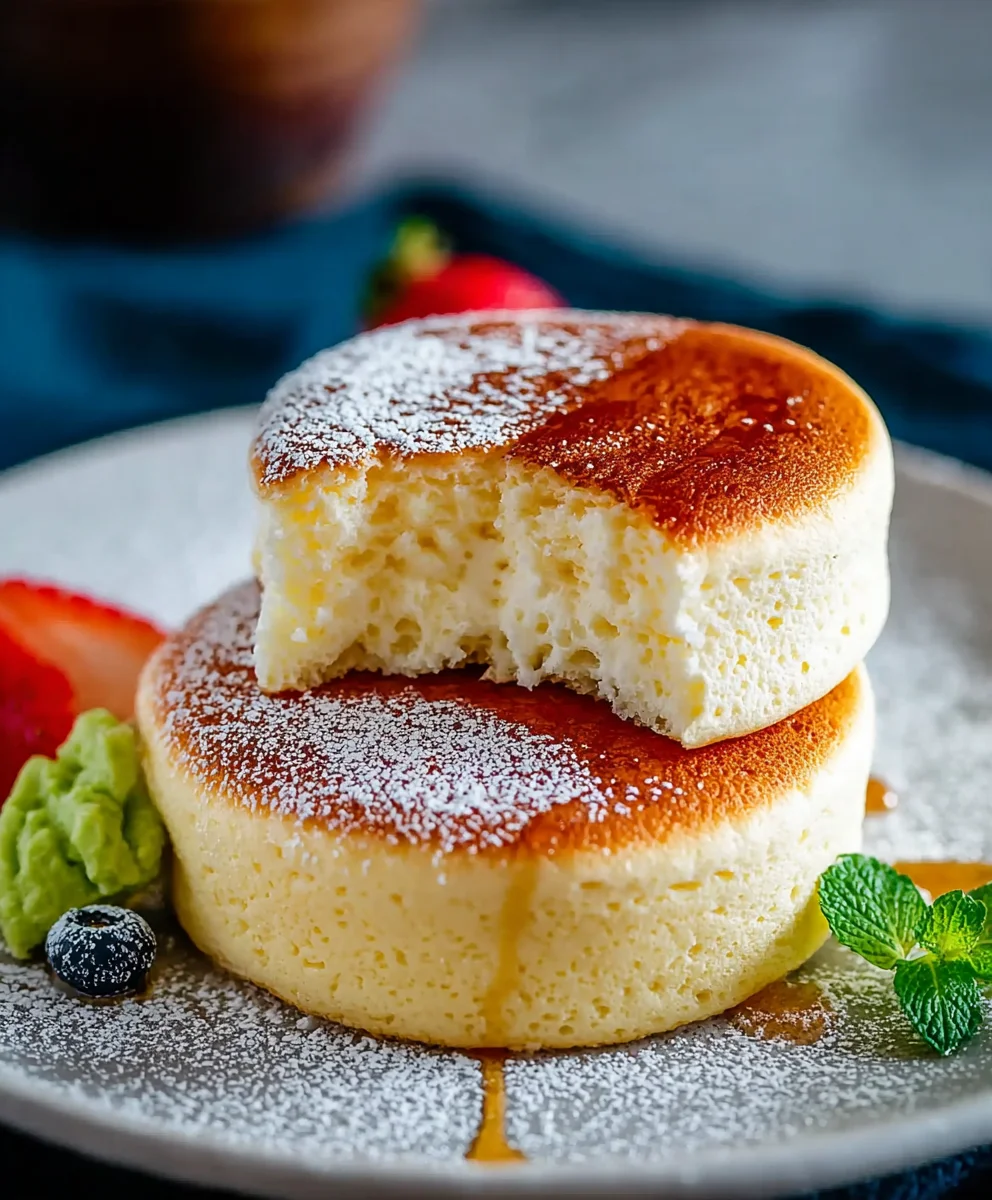
Japanese Souffle Pancakes are more than just a breakfast item; they’re an ethereal cloud of pure joy that has captured hearts and taste buds worldwide. Imagine a breakfast so light, so fluffy, it practically floats off your plate. That’s the magic of these iconic pancakes. People are absolutely captivated by their impossibly delicate texture, a stark contrast to the denser, more traditional pancakes we might be used to. What truly sets these Japanese Souffle Pancakes apart is the science and artistry involved in their creation. It’s the gentle folding of whipped egg whites that creates that signature towering height and airy crumb, a testament to patience and precise technique. They’re often served with a cascade of fresh fruit, a drizzle of maple syrup, or a dollop of whipped cream, transforming them into a visually stunning and utterly delicious experience that is undeniably worth the effort.

Ingredients:
- 4 large eggs, separated (you’ll need both yolks and whites)
- 1/4 cup granulated sugar (divided into two portions)
- 1/2 cup cake flour
- 1/2 teaspoon baking powder
- 1 pinch salt
- 3 tablespoons whole milk
- 1/2 teaspoon vanilla extract
- 4 tablespoons water (for cooking the pancakes)
- Butter (for greasing the pan)
Preparing the Batter
The key to achieving those impossibly fluffy Japanese Souffle Pancakes lies in a light and airy batter. We’ll start by combining our dry ingredients, then our wet ingredients, and finally bringing them together. This meticulous approach ensures a smooth consistency and an even rise.
Step 1: Combine Dry Ingredients
In a medium-sized bowl, whisk together the 1/2 cup of cake flour, 1/2 teaspoon of baking powder, and 1 pinch of salt. Sifting these ingredients is highly recommended. Sifting aerates the flour and helps to prevent any lumps from forming, which is crucial for a delicate pancake texture. Make sure everything is thoroughly combined before moving on. This creates a foundational dry mix that will contribute to the lightness of our souffle pancakes.
Step 2: Prepare the Yolks Mixture
In a separate, larger bowl, whisk together the 4 egg yolks with half of the granulated sugar (about 2 tablespoons). You’ll want to whisk this mixture until it becomes pale yellow and slightly thickened. This process is called ribboning – when you lift the whisk, the mixture should fall back into the bowl in a thick ribbon that slowly dissolves. Next, add the 3 tablespoons of whole milk and the 1/2 teaspoon of vanilla extract to the egg yolk mixture. Whisk gently until everything is just combined. The vanilla extract adds a wonderful aroma and depth of flavor that complements the subtle sweetness of the pancakes.
Step 3: Combine Wet and Dry
Now, gradually add the sifted dry ingredients from Step 1 into the wet yolk mixture from Step 2. Use a whisk or a spatula to gently fold the dry ingredients into the wet. Be careful not to overmix! Overmixing can develop the gluten in the flour, leading to tougher pancakes. We want to mix just until there are no dry streaks of flour visible. A few small lumps are perfectly fine at this stage. The batter should be thick but pourable.
Whipping the Meringue
This is arguably the most important step for achieving that signature souffle height and cloud-like texture. We need to create a stable meringue that will hold its air.
Step 4: Create the Meringue
In a clean, dry bowl (any trace of grease will prevent the egg whites from whipping properly), beat the 4 egg whites using an electric mixer on medium speed. Once they start to become frothy and foamy, gradually add the remaining half of the granulated sugar (about 2 tablespoons), a little at a time, while continuing to beat. Increase the mixer speed to high and continue beating until stiff, glossy peaks form. This means when you lift the beaters, the egg whites stand straight up and hold their shape without collapsing. This stiff meringue is what gives our Japanese Souffle Pancakes their incredible volume.
Step 5: Fold the Meringue into the Batter
This is a delicate process that requires care to preserve the air you’ve whipped into the egg whites. Take about one-third of the stiff meringue and gently fold it into the yolk batter using a spatula. Use a cut-and-fold motion, scooping from the bottom of the bowl and lifting it over the meringue. Once that first third is incorporated, add the remaining meringue in two more additions, folding gently after each. The goal is to combine the two mixtures until just incorporated, with no streaks of white meringue visible. The batter should be light, airy, and voluminous. Don’t worry if it looks slightly lumpy; it’s better to under-mix slightly than to deflate the meringue.
Cooking the Souffle Pancakes
Using a non-stick pan and gentle heat is crucial for these delicate pancakes. We want them to cook through without browning too quickly on the outside.
Step 6: Prepare for Cooking
Heat a large, non-stick skillet or griddle over low heat. Add a knob of butter and let it melt, ensuring it coats the surface of the pan. A very low heat is essential here; if the pan is too hot, the outsides will burn before the insides cook. Now, add about 1 tablespoon of water to the hot pan and quickly cover it with a lid. This creates a steamy environment that helps the pancakes cook evenly and rise beautifully. Prepare your piping bags or spoons for shaping the pancakes.
Step 7: Cook the Pancakes
Carefully spoon or pipe mounds of batter onto the prepared skillet. Aim for a height of about 2-3 inches per pancake. Don’t overcrowd the pan; cook in batches if necessary. Immediately place the lid back on the skillet to trap the steam. Let the pancakes cook for about 5-7 minutes on the first side. You’ll notice they start to puff up significantly. Gently peek underneath to check for a light golden-brown color. Once the first side is cooked, carefully flip each pancake. You can use two spatulas for easier handling, as they can be quite delicate. Add another tablespoon of water to the pan, cover, and cook for another 5-7 minutes on the second side, or until the pancakes are cooked through and golden brown on both sides. You can test for doneness by gently pressing the side; it should spring back slightly. Serve immediately to enjoy their incredible fluffiness.
Conclusion:
And there you have it! You’ve now unlocked the secret to creating those impossibly fluffy and delightful Japanese Souffle Pancakes right in your own kitchen. Remember, patience and a gentle hand are your best friends throughout this process. The reward for your effort is a stack of airy, cloud-like pancakes that are a true delight to behold and even more so to devour. They’re perfect for a leisurely weekend brunch, a special occasion breakfast, or simply when you need a little bit of edible sunshine.
We love serving these Japanese Souffle Pancakes simply dusted with powdered sugar, a drizzle of maple syrup, and a dollop of whipped cream. However, don’t be afraid to experiment! Consider adding fresh berries for a burst of color and tartness, a spoonful of your favorite fruit compote, or even a dusting of matcha powder for a sophisticated twist. For those who love a little extra indulgence, a scoop of vanilla ice cream on the side is never a bad idea!
We truly hope you enjoy making and, more importantly, eating these beautiful Japanese Souffle Pancakes. They’re a testament to simple ingredients transforming into something truly extraordinary. Don’t be discouraged if your first attempt isn’t absolutely perfect; practice makes perfect, and each batch will bring you closer to pancake mastery. Happy cooking!
Frequently Asked Questions:
Why are my Japanese Souffle Pancakes flat?
The most common reason for flat souffle pancakes is overmixing the egg whites or not whipping them to stiff peaks. Ensure you’re folding them in gently to maintain the airiness.
Can I make Japanese Souffle Pancakes without a non-stick pan?
While a good non-stick pan is highly recommended, you can use a well-seasoned cast-iron skillet or a regular pan lightly greased with butter or oil. Just be extra careful when flipping to avoid sticking.
What’s the best way to store leftover batter?
Souffle pancake batter is best used immediately as the whipped egg whites will lose their airiness over time. It’s not recommended to store leftover batter for extended periods.
Fluffy Japanese Souffle Pancakes – Easy Recipe
An easy recipe for creating incredibly fluffy Japanese Souffle Pancakes with a light and airy texture.
Ingredients
-
4 large eggs, separated
-
1/4 cup granulated sugar
-
1/2 cup cake flour
-
1/2 teaspoon baking powder
-
1 pinch salt
-
3 tablespoons whole milk
-
1/2 teaspoon vanilla extract
-
4 tablespoons water (for cooking)
-
Butter (for greasing the pan)
Instructions
-
Step 1
In a medium-sized bowl, whisk together the 1/2 cup of cake flour, 1/2 teaspoon of baking powder, and 1 pinch of salt. Sift these ingredients to prevent lumps and ensure a delicate texture. Thoroughly combine. -
Step 2
In a separate, larger bowl, whisk together the 4 egg yolks with half of the granulated sugar (about 2 tablespoons) until pale yellow and slightly thickened (ribbon stage). Add the 3 tablespoons of whole milk and the 1/2 teaspoon of vanilla extract. Whisk gently until just combined. -
Step 3
Gradually add the sifted dry ingredients into the egg yolk mixture. Gently fold using a whisk or spatula until just combined, being careful not to overmix. A few small lumps are acceptable. -
Step 4
In a clean, dry bowl, beat the 4 egg whites with an electric mixer on medium speed until frothy. Gradually add the remaining half of the granulated sugar while beating. Increase speed to high and beat until stiff, glossy peaks form. -
Step 5
Gently fold about one-third of the stiff meringue into the yolk batter. Add the remaining meringue in two more additions, folding gently after each until just incorporated with no streaks of white meringue visible. The batter should be light and airy. -
Step 6
Heat a large, non-stick skillet or griddle over low heat. Add butter to coat the surface. Add 1 tablespoon of water to the hot pan and quickly cover with a lid to create steam. -
Step 7
Spoon or pipe mounds of batter (about 2-3 inches high) onto the skillet, ensuring not to overcrowd. Immediately cover with the lid and cook for 5-7 minutes. Flip carefully, add another tablespoon of water, cover, and cook for another 5-7 minutes until golden brown and cooked through.
Important Information
Nutrition Facts (Per Serving)
It is important to consider this information as approximate and not to use it as definitive health advice.
Allergy Information
Please check ingredients for potential allergens and consult a health professional if in doubt.


Leave a Comment