
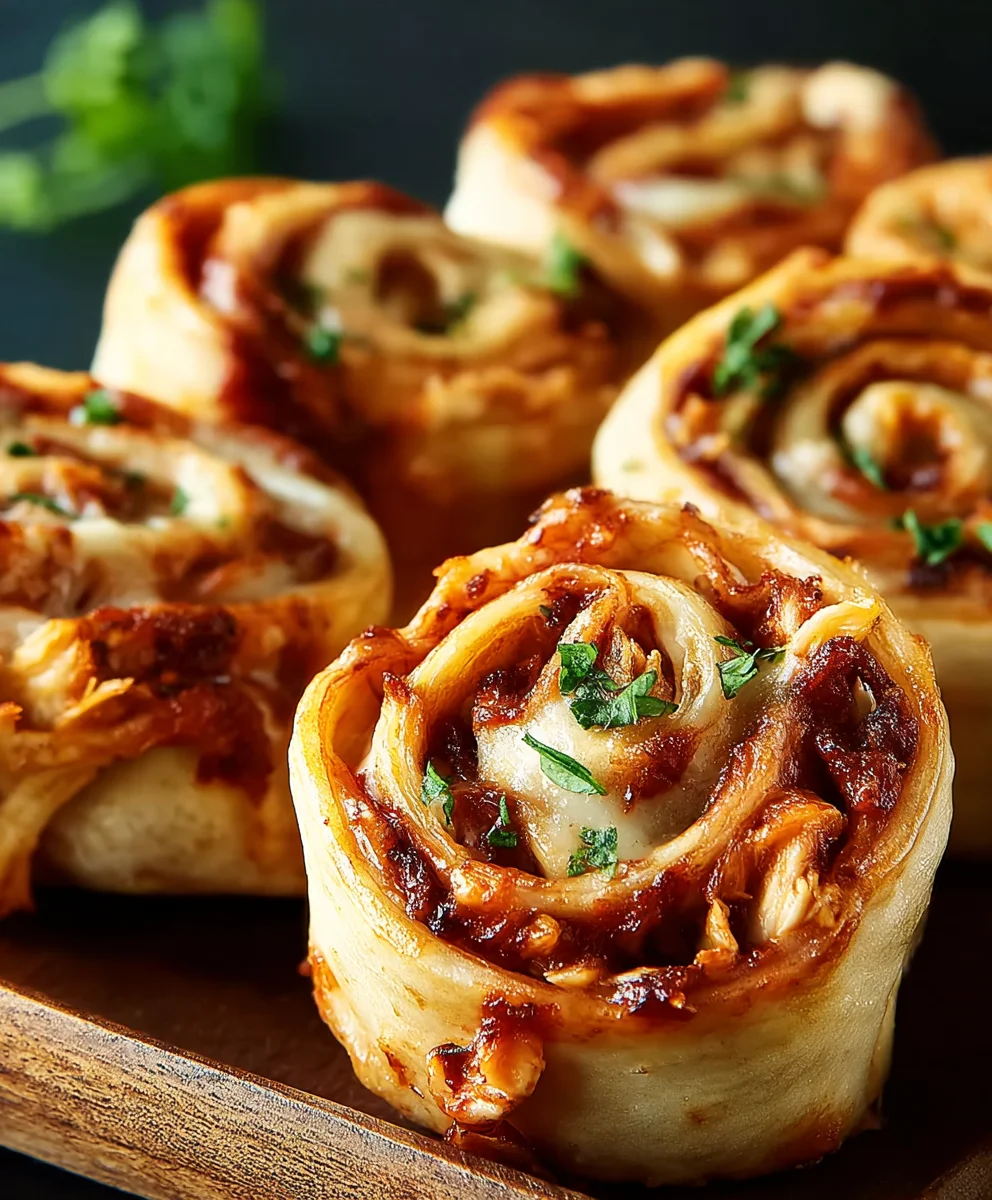
BBQ Chicken Roll-Ups are more than just a meal; they are a portable party in every bite! Who can resist the irresistible combination of tender, smoky BBQ chicken wrapped up in a soft, yielding tortilla? These delightful rolls have earned their place in our recipe repertoire for countless reasons. They are the ultimate crowd-pleaser, perfect for everything from casual weeknight dinners and lively backyard barbecues to school lunches and potluck gatherings. What truly sets these BBQ Chicken Roll-Ups apart is their incredible versatility and how easily they adapt to individual tastes.
Why You’ll Love These BBQ Chicken Roll-Ups:
The beauty of these roll-ups lies in their simplicity and their ability to deliver big flavor without fuss. You can customize the filling with your favorite creamy additions, crunchy vegetables, or extra zest to make them uniquely yours. Imagine the satisfied sighs as everyone devours these delicious, handheld delights, their faces smeared with just the right amount of tangy BBQ sauce. They are designed for maximum enjoyment and minimal mess, making them a win-win for both the cook and the eaters. Get ready to discover your new go-to recipe!

Ingredients:
- 1 refrigerated pizza crust (like Pillsbury’s)
- 2 cups shredded chicken or 12-oz canned chicken, drained and flaked if using canned
- 1/3 cup diced red onion
- 1/2 cup BBQ sauce
- 1 1/2 cups shredded mozzarella cheese, plus additional for topping
- Cooking spray or parchment paper for lining the baking sheet
Preparing the Filling
The first step to creating these delicious BBQ Chicken Roll-Ups is to get your filling ready. This is where the magic happens, combining tender chicken with sweet and smoky BBQ sauce and a bit of zing from the red onion. If you’re using leftover cooked chicken, make sure it’s finely shredded. Rotisserie chicken is a fantastic shortcut here, offering pre-cooked, seasoned meat that’s already tender. If you opt for canned chicken, be sure to drain it thoroughly and then flake it apart with a fork. You want distinct pieces of chicken, not a mushy texture.
In a medium bowl, combine the shredded chicken, diced red onion, and BBQ sauce. Mix everything together until the chicken is evenly coated in the sauce. The red onion adds a delightful crunch and a slight sharpness that balances the sweetness of the BBQ sauce. For a milder onion flavor, you can soak the diced red onion in cold water for about 10 minutes before draining and adding it to the mix. This process mellows its bite without sacrificing its texture. Stir in 1 1/2 cups of the shredded mozzarella cheese into the chicken mixture. This will help bind the filling together once it’s baked, creating a gooey, cheesy interior. Make sure the cheese is well distributed throughout the chicken and onion. Taste the mixture at this point and adjust seasonings if necessary. You might want a little more BBQ sauce if it seems dry, or a pinch of black pepper if you like.
Assembling the Roll-Ups
Now comes the fun part: transforming the pizza crust into glorious roll-ups! Preheat your oven to 375°F (190°C). This temperature is perfect for cooking the pizza crust through without burning it, ensuring a golden-brown finish. While the oven heats up, prepare a baking sheet by lining it with parchment paper or giving it a generous spray with cooking spray. This crucial step prevents the roll-ups from sticking to the pan, making cleanup a breeze and ensuring your creations lift off the sheet perfectly.
Unroll the refrigerated pizza crust onto a lightly floured surface. Gently press it out to form a rectangle, as uniform as possible. You don’t want any thick or thin spots, as this can lead to uneven cooking. Spread the prepared BBQ chicken and cheese mixture evenly over the surface of the pizza crust. Leave about a 1/2-inch border along all the edges. This border is important because it helps to seal the roll-ups and prevent the filling from oozing out too much during baking. Imagine it as a little dam for your delicious filling.
Starting from one of the longer sides, carefully and tightly roll up the pizza crust, just like you would a jelly roll. Try to keep the roll as compact as possible. Once rolled, you should have a long log of dough filled with BBQ chicken and cheese. Now, using a sharp knife, cut this log into individual roll-ups, approximately 1 1/2 to 2 inches thick. You should get about 8-10 roll-ups, depending on how thick you cut them. Place the cut roll-ups cut-side down onto the prepared baking sheet, leaving a little space between each one to allow for expansion.
Baking to Perfection
To give these BBQ Chicken Roll-Ups an extra layer of flavor and a beautiful golden sheen, sprinkle a little extra shredded mozzarella cheese over the top of each roll-up. This is optional, but highly recommended for that irresistible cheesy finish. Press the cheese down gently so it adheres to the dough. Now, it’s time to bake them to golden perfection.
Place the baking sheet into the preheated oven. Bake for 15-20 minutes, or until the pizza crust is puffed up, golden brown, and the cheese is melted and bubbly. The exact baking time can vary depending on your oven and the thickness of your roll-ups, so keep an eye on them during the last few minutes of baking. You’re looking for that beautiful toasted crust and luscious, melted cheese oozing slightly from the sides. If the tops start to brown too quickly before the crust is cooked, you can loosely tent the baking sheet with aluminum foil for the remaining baking time.
Once they are beautifully golden and the filling is hot and bubbly, carefully remove the baking sheet from the oven. Let the BBQ Chicken Roll-Ups cool on the baking sheet for a few minutes before attempting to transfer them. This brief cooling period allows them to set slightly, making them easier to handle and preventing the cheesy filling from escaping. They are best served warm, allowing you to fully appreciate the melty cheese and the rich BBQ chicken flavor. You can serve them as is, or with your favorite dipping sauces like extra BBQ sauce, ranch dressing, or a cool, creamy dip. Enjoy the savory, smoky, and cheesy goodness in every bite!
Conclusion:
And there you have it – delicious and satisfying BBQ Chicken Roll-Ups ready to be devoured! We’ve walked through creating these flavor-packed bites, perfect for any occasion. From quick weeknight dinners to impressive party appetizers, these roll-ups are sure to be a hit. The smoky sweetness of the BBQ sauce combined with tender chicken and creamy cheese, all encased in a delightful tortilla, creates a truly irresistible combination. Don’t be afraid to get creative with your fillings and enjoy the process of making these fantastic BBQ Chicken Roll-Ups!
To elevate your experience, consider serving these warm with a side of coleslaw for a classic pairing, or perhaps some sweet potato fries. For variations, feel free to experiment with different cheeses like pepper jack for a little heat, or add in some finely diced jalapeños for an extra kick. You could also swap out the chicken for shredded pork or even use a vegetarian filling like black beans and corn. The possibilities are endless, so go forth and make these your own!
Frequently Asked Questions:
Can I make BBQ Chicken Roll-Ups ahead of time?
Yes, you absolutely can! You can prepare the filling and store it in an airtight container in the refrigerator for up to 2 days. Assemble and bake the roll-ups closer to serving time for the best texture. If you assemble them ahead of time, they might become a little soggy.
What are some good dipping sauce options?
Beyond the BBQ sauce used inside, a cooling ranch dressing or a tangy blue cheese dip makes for excellent accompaniments. A simple sour cream and chive dip is also a crowd-pleaser.
Easy BBQ Beef Roll-Ups Quick Recipe
Delicious and easy BBQ beef roll-ups made with refrigerated pizza crust, seasoned beef, red onion, and melted mozzarella cheese. A perfect quick meal or appetizer.
Ingredients
-
1 refrigerated pizza crust (like Pillsbury’s)
-
2 cups shredded beef (cooked)
-
1/3 cup diced red onion
-
1/2 cup BBQ sauce
-
1 1/2 cups shredded mozzarella cheese, plus additional for topping
-
Cooking spray or parchment paper for lining the baking sheet
Instructions
-
Step 1
Prepare the filling: In a medium bowl, combine shredded beef, diced red onion, and BBQ sauce. Mix well until the beef is evenly coated. Stir in 1 1/2 cups of shredded mozzarella cheese. Taste and adjust seasoning if needed. -
Step 2
Preheat oven to 375°F (190°C). Prepare a baking sheet by lining it with parchment paper or spraying with cooking spray. -
Step 3
Unroll the pizza crust onto a lightly floured surface and gently press it into a rectangle. Spread the beef and cheese mixture evenly over the crust, leaving a 1/2-inch border. -
Step 4
Starting from a longer side, carefully and tightly roll up the pizza crust like a jelly roll. Cut the log into 1 1/2 to 2-inch thick roll-ups. Place cut-side down onto the prepared baking sheet. -
Step 5
Sprinkle additional mozzarella cheese over the top of each roll-up. Bake for 15-20 minutes, or until golden brown and the cheese is melted and bubbly. -
Step 6
Let cool on the baking sheet for a few minutes before serving warm. Serve as is or with your favorite dipping sauces.
Important Information
Nutrition Facts (Per Serving)
It is important to consider this information as approximate and not to use it as definitive health advice.
Allergy Information
Please check ingredients for potential allergens and consult a health professional if in doubt.

Leave a Comment