
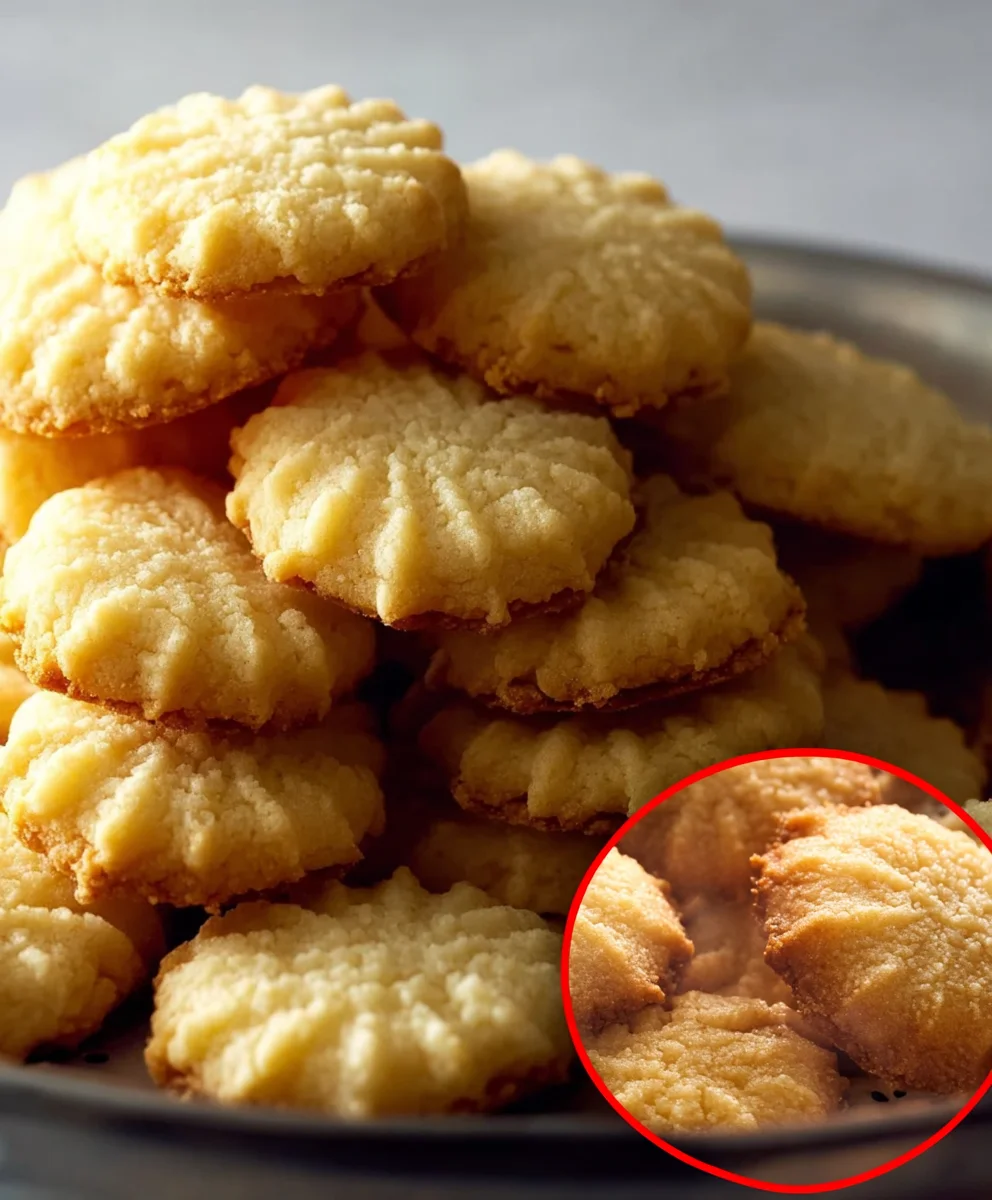
Super Easy Stovetop Butter Cookies Recipe
Get ready to unlock the secret to incredibly delicious, melt-in-your-mouth cookies without ever turning on your oven! We all love a classic butter cookie, right? That perfect balance of rich buttery flavor and a satisfyingly crisp yet tender texture is pure comfort in every bite. But let’s be honest, the thought of preheating the oven, messy baking sheets, and precise baking times can sometimes be a deterrent. Well, fear not, cookie lovers! This Super Easy Stovetop Butter Cookies Recipe is about to become your new go-to. It’s a revelation – a way to achieve that same delightful cookie magic with minimal effort and maximum flavor, all from the convenience of your stovetop. What makes these so special? It’s the ingenious simplicity, the speed at which they come together, and the fact that they deliver an explosion of buttery goodness that will have everyone asking for the recipe.

Ingredients:
- 1 cup unsalted butter, softened
- 1/2 cup granulated sugar
- 1/4 cup powdered sugar (also known as confectioners’ sugar or icing sugar)
- 1 teaspoon vanilla extract
- 2 cups all-purpose flour
- 1/4 teaspoon salt
Preparing the Butter Cookie Dough
The journey to these delightful Super Easy Stovetop Butter Cookies begins with creating a smooth and pliable dough. First, in a large mixing bowl, cream together the softened unsalted butter, granulated sugar, and powdered sugar. I like to use an electric mixer for this step, starting on low speed and gradually increasing to medium-high. You’re aiming for a light and fluffy mixture, which usually takes about 3-5 minutes. This creaming process incorporates air into the butter and sugars, which contributes to the cookies’ tender texture. Next, beat in the vanilla extract until it’s thoroughly combined. The aroma alone is a wonderful preview of the deliciousness to come!
Now, it’s time to incorporate the dry ingredients. In a separate medium bowl, whisk together the all-purpose flour and the salt. Gradually add the dry ingredients to the wet ingredients, mixing on low speed until just combined. Be careful not to overmix at this stage, as overmixing can develop the gluten in the flour, resulting in tough cookies. You want to mix just until you no longer see streaks of dry flour. The dough should be soft but hold its shape.
Shaping and Chilling the Cookies
Once your dough is ready, it’s time to shape it. For these Super Easy Stovetop Butter Cookies, we’re going for a classic round shape. You can either roll the dough into a log and slice it, or use a small cookie scoop to portion out uniform amounts. I find using a cookie scoop helps ensure all your cookies bake evenly. Roll each portion into a ball, and then flatten it slightly with your palm or the bottom of a glass. The goal is to create a disk that’s about 1/4 to 1/2 inch thick.
Now for a crucial step that guarantees perfectly shaped cookies: chilling. Arrange the shaped cookie dough on a round baking tray, making sure there’s a little space between each one as they might spread slightly. The recipe instructions emphasize the importance of refrigerating or freezing them for at least 30 minutes before baking. This step is absolutely vital because it firms up the butter in the dough. When the chilled dough hits the heat, the butter melts more slowly, preventing the cookies from spreading too much and losing their delightful shape. I usually place mine in the freezer for about 30 minutes, as this makes them firm up quicker.
Stovetop Baking Method
For those looking for a unique and energy-efficient cooking method, the stovetop approach is fantastic. Grab a large pan, such as a cast-iron skillet or a heavy-bottomed pot. Add a cup of salt to this pan. Don’t worry, the salt isn’t meant to be eaten; it acts as a heat diffuser, creating a more even cooking environment, much like sand would. Carefully place a steaming rack in the middle of the pan, ensuring it’s stable. Now, preheat your pan on medium heat. You want the pan and the salt to get nice and hot, but not smoking excessively.
Once the pan is preheated and you’ve chilled your cookie dough for at least 30 minutes, it’s time to bake. Carefully place the round baking tray containing the cookie dough directly on top of the steaming rack inside the preheated pan. Ensure the tray is sitting level. Immediately cover the pan with a lid. This lid is essential for trapping the heat and steam, mimicking the oven environment. Cook for about 30 to 35 minutes on medium heat. You’ll want to resist the urge to peek too often, as each time you lift the lid, you release precious heat. The cookies are done when their edges are lightly golden brown and the centers are set. The stovetop method results in a wonderfully soft and chewy cookie.
Oven Baking Alternative
If you prefer the traditional oven method, these Super Easy Stovetop Butter Cookies are just as delightful. Ensure your oven is preheated to 350°F (175°C). While the dough is chilling, you can prepare your baking sheets by lining them with parchment paper or silicone baking mats to prevent sticking. Once your cookies have had their mandatory chilling period of at least 30 minutes in the refrigerator or freezer, arrange them on the prepared baking sheets. Leave about 2 inches between each cookie to allow for a bit of spreading.
Bake in the preheated 350°F oven for about 15 minutes. Keep an eye on them towards the end of the baking time, as ovens can vary. The cookies are typically done when the edges are just beginning to turn golden brown, and the centers look set and slightly puffed. They might still appear a little soft in the middle, but they will firm up as they cool. This method also yields perfectly tender butter cookies.
Cooling and Serving
Regardless of whether you chose the stovetop or oven method, the cooling process is just as important for achieving the perfect texture. Once the cookies are baked, remove the baking tray from the pan (if using the stovetop method) or the oven. Let the cookies cool on the baking tray for a few minutes. This allows them to firm up slightly before you attempt to move them. Then, carefully transfer the cookies to a wire rack to cool completely. Allowing them to cool completely ensures they don’t crumble when you handle them and that their flavor fully develops. Once they are completely cool, serve them and enjoy the simple, buttery goodness! They are perfect with a cup of tea or coffee.
Conclusion:
And there you have it – the most delightful and truly Super Easy Stovetop Butter Cookies Recipe you’ll ever make! We’ve walked through each simple step, from creaming the butter and sugar to achieving that perfect golden-brown finish. These cookies are a testament to the fact that delicious, homemade treats don’t require complicated techniques or a fancy oven. Their buttery richness and tender crumb are guaranteed to be a hit, whether you’re baking for a special occasion or simply indulging in a sweet moment.
These versatile butter cookies are wonderful on their own, perfect with a cup of tea or coffee. For a touch of elegance, try drizzling them with a little melted chocolate or sandwiching two together with a bit of jam. You can also easily customize this recipe! Consider adding a hint of almond extract along with the vanilla for a marzipan-like flavor, or stir in some finely chopped nuts like pecans or walnuts for added texture.
Don’t be afraid to experiment and make this recipe your own! The joy of baking is in creating something special that brings smiles. I encourage you to give this Super Easy Stovetop Butter Cookies Recipe a try and experience the simple pleasure of homemade goodness. Happy baking!
Frequently Asked Questions:
Q1: Can I store these butter cookies for a long time?
Yes, these butter cookies store very well! Once completely cooled, keep them in an airtight container at room temperature for up to a week. Their simple ingredients and lack of perishable additions make them quite shelf-stable.
Q2: My cookies spread too much. What did I do wrong?
Cookie spread can happen for a few reasons. Ensure your butter wasn’t too soft when you started creaming it. It should be softened, but not melted. Also, avoid overmixing the dough once the flour is added. Chilling the dough for 15-20 minutes before baking can also help prevent excessive spreading.
Super Easy Stovetop Butter Cookies-Fast & Delicious
Quick and delicious butter cookies made easily on the stovetop, or in the oven as an alternative. These cookies are tender, chewy, and full of buttery flavor.
Ingredients
-
1 cup unsalted butter, softened
-
1/2 cup granulated sugar
-
1/4 cup powdered sugar
-
1 teaspoon vanilla extract
-
2 cups all-purpose flour
-
1/4 teaspoon salt
-
1 cup salt (for stovetop method)
Instructions
-
Step 1
In a large mixing bowl, cream together softened unsalted butter, granulated sugar, and powdered sugar until light and fluffy. Beat in vanilla extract. -
Step 2
In a separate bowl, whisk together all-purpose flour and salt. Gradually add dry ingredients to wet ingredients, mixing on low speed until just combined. Do not overmix. -
Step 3
Pipe or scoop the dough onto a round baking tray. Roll into balls and flatten slightly to about 1/4 to 1/2 inch thick disks. -
Step 4
Refrigerate or freeze the shaped cookie dough for at least 30 minutes. This step is crucial to prevent cookies from spreading too much. -
Step 5
For stovetop baking: Add 1 cup of salt to a large pan, place a steaming rack in the middle, and preheat on medium heat. Carefully place the round baking tray with cookie dough on top of the rack. Cover with a lid and cook for 30-35 minutes on medium heat until edges are golden brown and centers are set. -
Step 6
For oven baking: Preheat oven to 350°F (175°C). Arrange chilled cookies on parchment-lined baking sheets, leaving 2 inches between each. Bake for about 15 minutes, or until edges are lightly golden brown. -
Step 7
Let the cookies cool on the baking tray for a few minutes, then transfer to a wire rack to cool completely.
Important Information
Nutrition Facts (Per Serving)
It is important to consider this information as approximate and not to use it as definitive health advice.
Allergy Information
Please check ingredients for potential allergens and consult a health professional if in doubt.


Leave a Comment