
Rice Pudding is more than just a dessert; it’s a warm hug in a bowl, a spoonful of pure comfort that transcends generations and cultures. Have you ever craved that quintessential dish that instantly transports you back to simpler times, perhaps to your grandmother’s kitchen or a cozy winter evening? This recipe promises exactly that nostalgic journey, delivering pure bliss with every creamy spoonful. Its origins are ancient, with variations found across virtually every continent, from a comforting staple in Roman kitchens to a festive treat in Scandinavia, and a spiced delicacy in Asia. This humble combination of rice, milk, and sugar has nourished and delighted people for centuries, evolving into countless beloved forms.
What makes this particular dish so universally adored? I believe it’s its incredible versatility and the sheer blissful creaminess it offers. It’s wonderfully adaptable – whether you prefer it subtly sweet with a hint of vanilla, spiced with cinnamon and nutmeg, or enriched with citrus zest and dried fruits, there’s a version for everyone.
Rice Pudding is also surprisingly simple to prepare, transforming basic pantry ingredients into an utterly luxurious treat.
It’s perfect for a satisfying dessert, a comforting breakfast, or even a delightful snack. Today, I’m thrilled to share my go-to recipe for this timeless classic, guaranteed to become a cherished addition to your culinary repertoire.
Ingredients:
- 3 cups cooked, cold leftover white rice: This is the star of our pudding! Using leftover rice, ideally short or medium-grain, provides the perfect texture and absorbs the flavors beautifully. Make sure it’s cold, as this helps prevent it from becoming mushy too quickly during cooking.
- 4 cups whole milk: Whole milk is crucial for achieving that rich, creamy consistency we all adore in a good rice pudding. Its higher fat content contributes significantly to the luxurious mouthfeel, ensuring every spoonful is incredibly smooth and satisfying.
- 1/2 cup granulated sugar: For just the right amount of sweetness. You can always adjust this to your personal preference; if you like it sweeter, feel free to add a tablespoon or two more, or less if you prefer a more subtle sweetness.
- 1 teaspoon pure vanilla extract: A classic flavor enhancer that brightens the entire dish. I always recommend using a good quality pure vanilla extract for the best, most aromatic results.
- 1/2 teaspoon ground nutmeg: This is a non-negotiable for my grandmother’s recipe, as mentioned! It provides a warm, slightly spicy aroma that perfectly complements the creamy sweetness of the pudding. We’ll use some in the cooking process and save a little extra for sprinkling.
- 1/4 teaspoon salt: A small amount of salt is essential to balance the sweetness and bring out all the other flavors, preventing the pudding from tasting flat. Don’t skip this!
- 2 tablespoons unsalted butter: Added at the end, butter enriches the pudding, giving it an extra layer of velvety smoothness and a subtle, delicious richness.
Preparing Your Rice Pudding Base
There’s something incredibly comforting about a classic rice pudding, especially when it’s made with love and a bit of patience. My grandmother always said the secret to a truly great rice pudding isn’t just the ingredients, but the care you put into each step. Let’s get started on creating that creamy, dreamy dessert that will transport you straight back to a cozy kitchen.
-
Combine the Core Ingredients: To begin, I grab a large, heavy-bottomed saucepan. The heavy bottom is key here because it helps distribute heat evenly and significantly reduces the risk of the pudding scorching on the bottom – a common pitfall we want to avoid! Into this saucepan, I gently combine the 3 cups of cooked, cold leftover white rice, 4 cups of whole milk, 1/2 cup of granulated sugar, and 1/4 teaspoon of salt. I give it a good stir with a wooden spoon or a heat-resistant spatula, ensuring all the ingredients are well integrated. The goal here is to evenly disperse the sugar and salt so they dissolve gradually and infuse the milk and rice with flavor from the very beginning. This initial stirring is more than just mixing; it’s about setting the stage for a homogenous, perfectly flavored pudding. Make sure there are no clumps of rice, as this can lead to uneven cooking. If your rice is particularly clumpy, you might gently break it up with your spoon before adding the milk.
I find that starting with cold rice truly makes a difference. If you were to use freshly cooked, hot rice, it might break down too quickly, potentially leading to a gummier texture rather than the distinct, yet tender, grains we’re aiming for. The cold rice has had time to firm up, making it more resilient to the long, slow cooking process. This resilience allows the rice to absorb the creamy milk without becoming mushy, maintaining a pleasant chewiness that is characteristic of a truly satisfying rice pudding.
The Gentle Simmering Process
This is where the magic truly happens, transforming simple ingredients into a rich, creamy indulgence. Patience is your best friend during this stage; rushing it will only lead to a less-than-perfect pudding. Trust me, the aroma that will soon fill your kitchen is worth every moment of waiting!
-
Cook to Creamy Perfection: Now, I place my saucepan over medium heat. The initial goal is to bring the mixture to a gentle simmer. As soon as I see small bubbles forming around the edges and a hint of steam rising, I immediately reduce the heat to the lowest possible setting. This is crucial for preventing the milk from boiling over or, worse, scorching at the bottom of the pan. From this point forward, the process becomes a slow, meditative dance of heating and stirring.
I continue to cook the pudding on this very low heat, stirring frequently. And by frequently, I mean every few minutes, especially as it starts to thicken. My grandmother always advised me to scrape the bottom and sides of the pan with my spatula during each stir. This prevents any milk solids or rice grains from sticking and burning, which can impart an unpleasant flavor to the entire batch. It also ensures even cooking and helps release the starches from the rice, which are essential for creating that wonderfully thick, creamy texture.
The total cooking time for this stage typically ranges from 45 minutes to an hour, sometimes even a bit longer. The exact time will depend on several factors: the type of rice you used, the specific heat output of your stove, and how creamy and thick you prefer your pudding. What you’re looking for is a noticeable transformation: the mixture will thicken considerably, the rice grains will have plumped up, becoming tender and soft, and the liquid will have reduced to a rich, velvety consistency. When I lift my spoon, the pudding should cling to it, leaving a thick coating, rather than running off immediately like thin milk. It should still look a little looser than you might expect for a finished pudding, as it will continue to thicken significantly as it cools.
Throughout this simmering process, I sometimes like to add about 1/4 teaspoon of the ground nutmeg directly into the pot. This allows the nutmeg’s warm, comforting spice to infuse deeply into the pudding as it cooks, creating a more complex and aromatic flavor profile. You’ll notice the kitchen filling with the most inviting aroma as this happens – a true sign of comfort food in the making!
A note on consistency: If, after about an hour, your pudding isn’t as thick as you’d like, you can continue to simmer it gently for an additional 10-15 minutes, stirring constantly. Conversely, if it becomes too thick before the rice is perfectly tender, you can always add a splash or two of extra milk to achieve your desired consistency. Don’t be afraid to taste it during this stage – not only is it part of the fun, but it also helps you gauge the rice’s tenderness and the overall flavor development.
The constant stirring isn’t just about preventing sticking; it’s also about building emulsion. As you stir, you’re encouraging the starches from the rice to release and mingle with the milk, creating a homogenous, rich texture. This mechanical action is key to achieving that signature “creamy” mouthfeel without needing to add extra thickeners like cornstarch or eggs, keeping the focus purely on the harmonious blend of rice and dairy.
My best advice during this long simmer is to be present. Don’t wander too far from the stove. Engage with the process, enjoy the aromas, and observe the subtle changes in texture. This is where a good rice pudding truly distinguishes itself from a mediocre one – in the patient, attentive cooking.
Adding the Finishing Touches and Cooling
Once your rice pudding has reached that perfect, luscious consistency, it’s time to bring it all together with the final flavorings that elevate it from good to absolutely unforgettable. These last steps might seem small, but they make a world of difference in the overall experience.
-
Stir in Vanilla and Butter: Once the rice pudding has achieved its desired creamy thickness and the rice grains are perfectly tender, I remove the saucepan from the heat. This is the ideal moment to stir in the 1 teaspoon of pure vanilla extract and the 2 tablespoons of unsalted butter. Adding the vanilla off the heat is important because high temperatures can diminish its delicate flavor and aroma. We want that bright, warm vanilla note to shine through. The butter, as it melts into the warm pudding, adds an incredible richness and a silky sheen, enhancing the luxurious texture even further. I stir gently until the butter is fully incorporated and the vanilla is evenly distributed, making sure every spoonful will be infused with these wonderful finishing touches.
The residual heat of the pudding is more than enough to melt the butter and gently warm the vanilla, allowing their essences to blend seamlessly with the cooked rice and milk. You’ll immediately notice the pudding taking on a slightly glossy appearance and an even more inviting aroma. This is a moment of pure culinary satisfaction, knowing that you’ve just perfected the core flavor profile of your grandmother’s beloved recipe. The butter not only adds richness but also contributes to the smooth mouthfeel, making the pudding feel utterly decadent on the tongue. It’s a little secret ingredient that takes a good rice pudding to a truly exceptional level.
-
Cool and Thicken: Now comes the hardest part for me: resisting the urge to dig in immediately! While warm rice pudding is absolutely delightful, it’s truly at its best when it has had some time to cool and set. I transfer the pudding to a serving bowl or individual ramekins, depending on how I plan to serve it. Then, I press a piece of plastic wrap directly onto the surface of the pudding. This prevents a skin from forming, which can be less appealing in texture. Allowing it to cool down slowly on the counter for about 30 minutes to an hour lets the flavors meld even further and the pudding to thicken to its ultimate, glorious consistency.
After it has cooled to room temperature, I usually place it in the refrigerator for at least 2-3 hours, or even overnight, for a truly chilled and firm pudding. As it cools, the starches in the rice continue to hydrate and bind with the milk, resulting in that wonderfully thick, scoopable texture. Don’t be alarmed if it seems a little too loose when you first take it off the heat; it will firm up beautifully as it chills. This cooling period is not just about temperature; it’s a crucial step in developing the full body and structure of the pudding, ensuring it holds its shape while remaining perfectly creamy and smooth.
If you plan to serve it warm, a shorter cooling time is sufficient, perhaps just 15-20 minutes after taking it off the heat, allowing it to cool just enough so it’s not scalding but still wonderfully comforting. For a chilled dessert, the refrigerator time is essential. The patience truly pays off with a superior texture and enhanced flavors.
Serving and Enjoying Your Homemade Rice Pudding
The moment of truth! Your kitchen is now filled with the irresistible scent of comfort, and your rice pudding is ready to be enjoyed. There are so many wonderful ways to serve this classic dessert, whether you prefer it warm or cold, plain or dressed up.
-
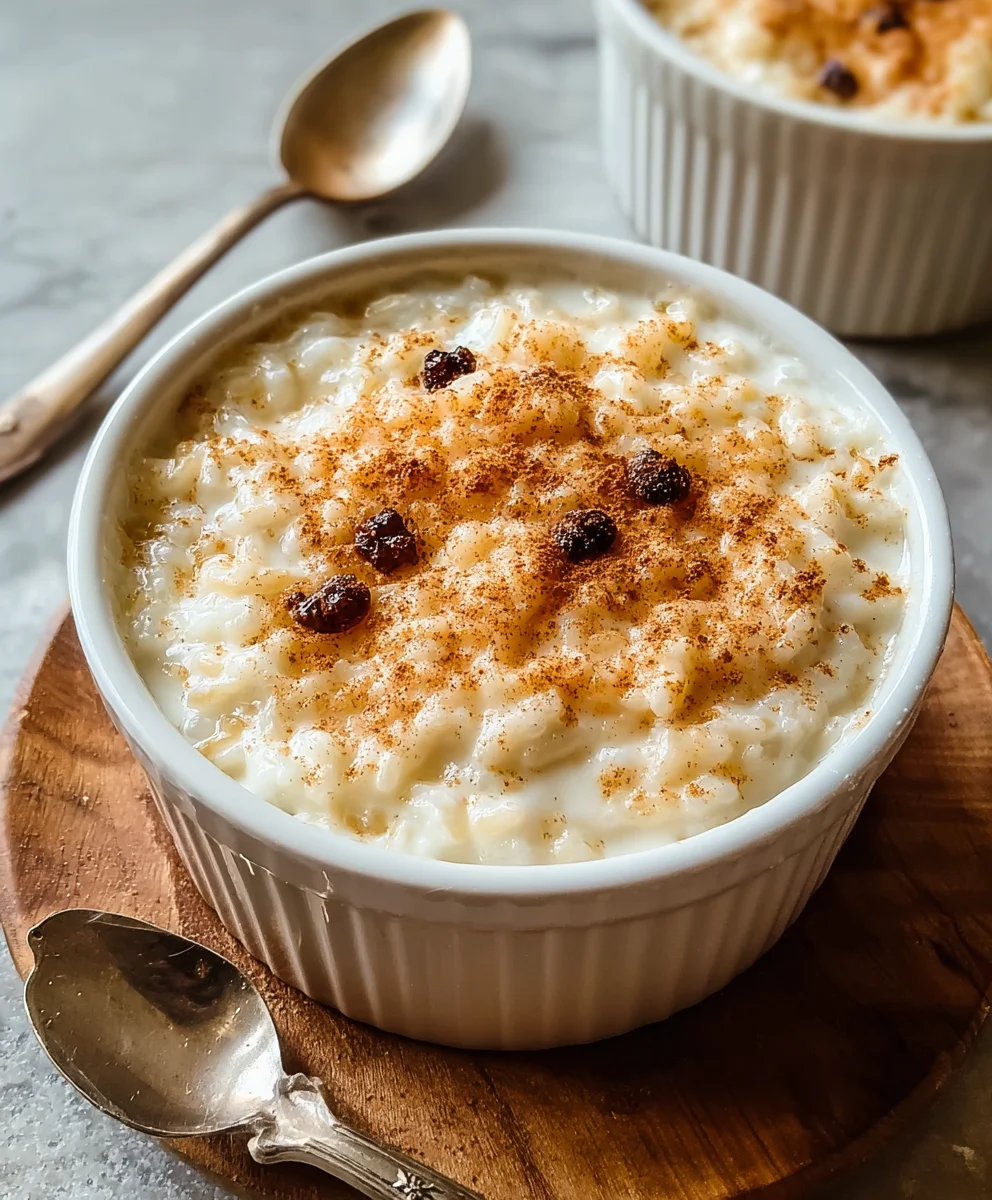
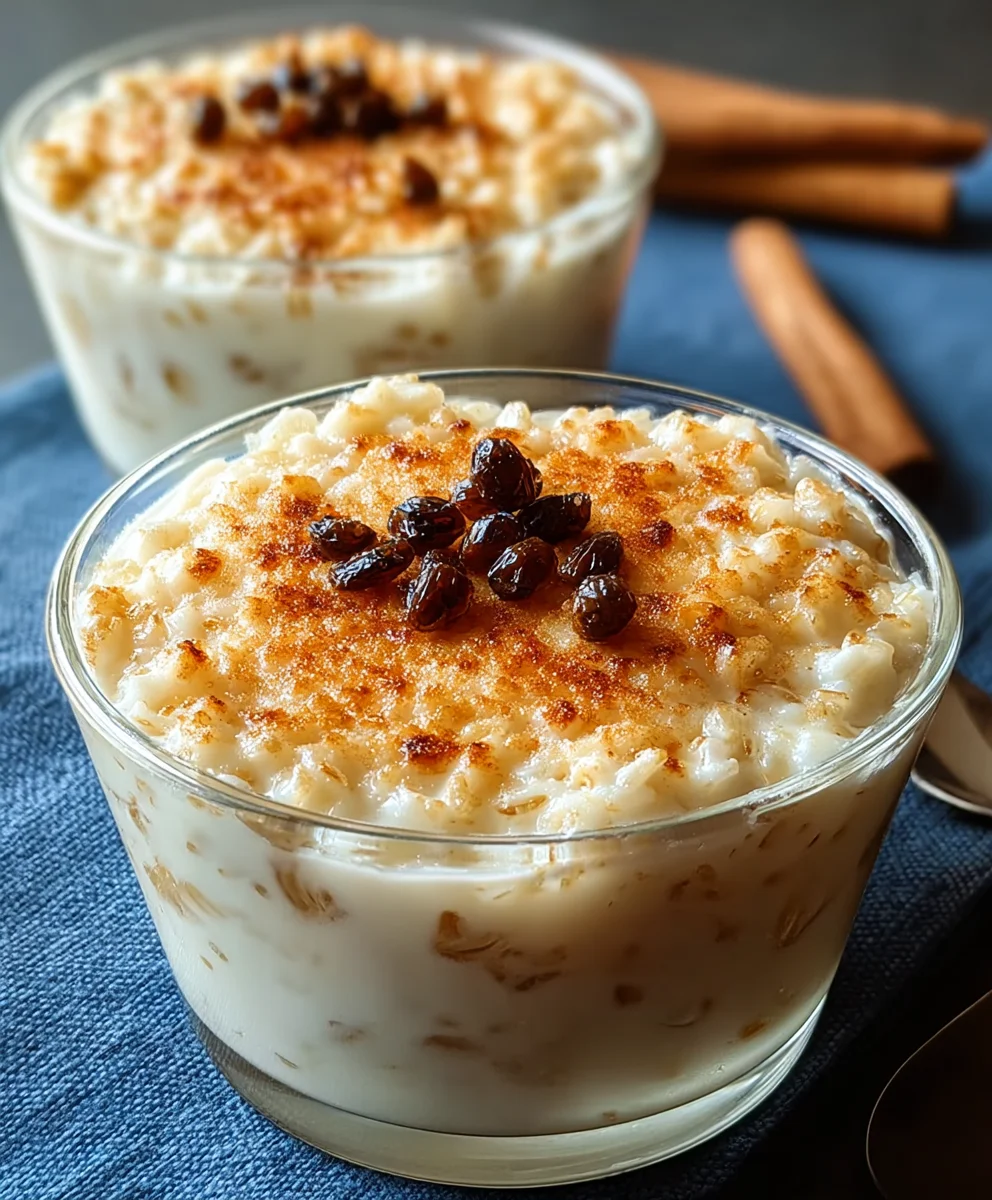
Serve and Garnish: Once your rice pudding has cooled to your desired temperature, it’s ready to be served. I love to scoop generous portions into bowls. For that final, authentic touch that my grandmother always insisted on, I generously sprinkle a little extra ground nutmeg over the top of each serving. This not only adds a beautiful visual appeal with its warm, earthy color but also provides an extra burst of that comforting aroma and flavor with every spoonful. The freshness of the ground nutmeg right before serving truly awakens the senses.
Serving Suggestions and Variations:
- Warm vs. Cold: This pudding is absolutely delicious both warm and chilled. If you’ve refrigerated it and prefer it warm, you can gently reheat individual portions in the microwave for 30-60 seconds, or in a small saucepan over low heat, adding a splash of milk if needed to loosen it up. I personally adore it slightly warm on a chilly evening, but it’s equally refreshing served cold on a warmer day.
- Fruit Toppings: Fresh berries like raspberries, blueberries, or sliced strawberries make a fantastic, vibrant addition. A dollop of fruit compote or a spoonful of good quality jam (cherry or apricot are personal favorites) also complements the creamy base beautifully. Sometimes, I’ll even fold in some golden raisins or dried cranberries during the last 15 minutes of cooking, allowing them to plump up and add little bursts of chewiness and sweetness.
- Sweet Syrups: A drizzle of maple syrup, honey, or even a touch of caramel sauce can elevate the dessert. For a sophisticated twist, a splash of rum or brandy can be stirred in just before serving, but that’s certainly optional and for adult palates.
- Crunchy Elements: Toasted slivered almonds, chopped pecans, or a sprinkle of granola can add a delightful textural contrast. The slight crunch against the smooth pudding is incredibly satisfying.
- Extra Creaminess: A swirl of whipped cream, crème fraîche, or even a dollop of Greek yogurt can make the pudding even more decadent. If you’re feeling extra indulgent, a scoop of vanilla bean ice cream melting over a warm bowl of rice pudding is pure bliss.
- Spice it Up: Besides nutmeg, a pinch of ground cinnamon or even a tiny amount of cardamom can be added to the cooking process for a different aromatic profile. A thin strip of lemon or orange zest simmered with the milk (and then removed before serving) can also add a bright, citrusy note.
Storage: Leftover rice pudding stores wonderfully in an airtight container in the refrigerator for up to 3-4 days. It makes for a fantastic breakfast or a quick dessert whenever a craving strikes. If it thickens too much in the fridge, a quick stir and a splash of milk or cream will bring it back to its luscious consistency.
Making rice pudding from scratch is a labor of love, but the payoff is immense. The creamy texture, the delicate sweetness, and the comforting warmth of nutmeg create a dessert that feels both nostalgic and utterly satisfying. Each time I make this, I feel a connection to my grandmother, and I hope it brings a similar sense of comfort and joy to your home.
Conclusion:
And there you have it, my friends! We’ve reached the sweet finale of our culinary journey together, and I truly hope you’re feeling as inspired as I am to whip up a batch of this incredible Rice Pudding. What makes this recipe an absolute must-try isn’t just its undeniable deliciousness, but also its beautiful simplicity and the profound sense of comfort it brings. Imagine a dish that effortlessly transports you back to childhood, to cozy evenings and shared moments, all while being incredibly straightforward to prepare. That’s precisely what this Rice Pudding offers. It’s an economical dessert that doesn’t skimp on flavor or satisfaction, making it a perfect staple for any home cook looking to add a touch of warmth and indulgence to their repertoire without any fuss. I genuinely believe that once you try it, you’ll understand why it holds such a special place in my heart, and soon, in yours too.
One of the things I adore most about this classic dessert is its incredible versatility. While the core recipe is utterly perfect on its own, it also serves as a wonderful canvas for your own creative touches. Let’s talk about serving suggestions and variations because this is where the fun truly begins! For a classic experience, serve your Rice Pudding warm, fresh from the pot, with a generous dusting of cinnamon or freshly grated nutmeg. A dollop of fruit compote – perhaps cherry, berry, or apricot – adds a lovely tart counterpoint to the creamy sweetness. If you’re a fan of contrasting textures, a sprinkle of toasted slivered almonds, chopped pistachios, or even candied pecans can elevate the dish significantly. Don’t be afraid to experiment with different temperature extremes either; while heavenly warm, a chilled Rice Pudding served straight from the fridge on a hot summer’s day is an unexpected delight, feeling almost like a thick, luxurious custard.
Beyond toppings, consider playing with the flavors infused during cooking. A strip of lemon or orange zest simmered with the rice, then removed before serving, can brighten the entire profile. For an exotic twist, a few crushed cardamom pods or a pinch of saffron can transform it into a more globally inspired treat. If you’re looking for a dairy-free option, replacing cow’s milk with full-fat coconut milk yields a wonderfully rich and aromatic Rice Pudding that’s equally satisfying. You could also stir in dried cranberries, raisins, or chopped dates towards the end of cooking for pockets of chewy sweetness. For the chocolate lovers, a handful of chocolate chips melted into the warm pudding is always a welcome addition. See? The possibilities are endless, and each variation simply adds another layer to this already beloved dessert.
I am so incredibly passionate about this recipe, and I truly hope you take the leap and try making this magnificent Rice Pudding in your own kitchen. It’s more than just a recipe; it’s an invitation to create, to share, and to savor. There’s something uniquely gratifying about preparing a dish that brings so much joy and comfort. Please, don’t keep your culinary adventures to yourself! Once you’ve made it, I’d absolutely love to hear about your experience. Did you stick to the classic? Or did you venture into a bold new variation? What were your favorite toppings? Share your photos, your triumphs, and even your questions in the comments below or tag me on social media. Your feedback and creativity inspire me immensely, and I can’t wait to see how you make this beautiful Rice Pudding recipe your own. Happy cooking, and even happier eating!
People Also Ask:
What kind of rice is best for rice pudding?
For the creamiest and most classic rice pudding, I always recommend using a short-grain rice like Arborio, sushi rice, or even pudding rice (which is specifically milled for this purpose). These varieties release more starch during cooking, resulting in that wonderfully thick, luxurious texture we all love. While long-grain rice can work, it tends to yield a less creamy and more separated consistency.
Can rice pudding be made ahead of time?
Absolutely! Rice pudding is an excellent make-ahead dessert. In fact, many people prefer it chilled, allowing the flavors to meld and the pudding to thicken even further in the refrigerator. Just be sure to cool it completely before covering and storing it. When reheating, you might need to add a splash of milk to loosen it up, as it can thicken quite a bit overnight.
How long does homemade rice pudding last in the fridge?
Properly stored in an airtight container in the refrigerator, homemade rice pudding will typically last for 3 to 5 days. It’s always best enjoyed fresh, but it holds up wonderfully for a few days, making it perfect for meal prepping your dessert or enjoying leftovers.
Can you freeze rice pudding?
While technically possible, I generally don’t recommend freezing rice pudding as it can alter the texture. The rice grains might become a bit mushy or gritty once thawed, and the creamy consistency can sometimes separate. If you do choose to freeze it, ensure it’s in an airtight container, and thaw it slowly in the refrigerator before gently reheating and stirring well, possibly adding a little extra milk or cream.
What are some common toppings for rice pudding?
The beauty of rice pudding lies in its versatility with toppings! Classic choices include a sprinkle of cinnamon or nutmeg, fresh fruit (berries, sliced bananas, peaches), fruit compotes or jams, and a drizzle of honey or maple syrup. For added texture, toasted nuts like almonds, pecans, or walnuts are fantastic. Some people also enjoy a dollop of whipped cream or a swirl of chocolate sauce. Don’t be afraid to get creative!
Indulge in Homemade Creamy Rice Pudding: Easy Recipe!
My grandmother’s Rice Pudding recipe brings back warm memories. This creamy dessert, sprinkled with nutmeg, is the coziest way to transform leftover rice into something magical for a chilly evening or just because.
Ingredients
-
3 cups cooked, cold leftover white rice
-
4 cups whole milk
-
1/2 cup granulated sugar
-
1 teaspoon pure vanilla extract
-
1/2 teaspoon ground nutmeg, plus more for garnish
-
1/4 teaspoon salt
-
2 tablespoons unsalted butter
Instructions
-
Step 1
In a large, heavy-bottomed saucepan, combine 3 cups cooked, cold leftover white rice, 4 cups whole milk, 1/2 cup granulated sugar, and 1/4 teaspoon salt. Stir well to combine, ensuring all ingredients are integrated and any rice clumps are broken up. -
Step 2
Place the saucepan over medium heat and bring the mixture to a gentle simmer. Immediately reduce heat to the lowest setting. Cook for 45-60 minutes, stirring frequently (every few minutes) and scraping the bottom and sides of the pan. The pudding will thicken, and the rice grains will plump and become tender. Stir in 1/4 teaspoon ground nutmeg during this stage. The pudding should cling to a spoon and will continue to thicken as it cools. If it becomes too thick, add a splash of milk; if too thin, simmer gently for longer. -
Step 3
Remove the saucepan from the heat. Stir in 1 teaspoon pure vanilla extract and 2 tablespoons unsalted butter until fully incorporated and the butter has melted, creating a rich and silky texture. -
Step 4
Transfer the pudding to a serving bowl or individual ramekins. Press plastic wrap directly onto the surface to prevent a skin from forming. Allow to cool on the counter for 30-60 minutes, then refrigerate for at least 2-3 hours (or overnight) until thoroughly chilled and firm. The pudding will firm up considerably as it cools. -
Step 5
Scoop into bowls and sprinkle generously with extra ground nutmeg. Serve warm or chilled. For warm serving, gently reheat individual portions in the microwave (30-60 seconds) or on the stovetop with a splash of milk. Top with fresh berries, fruit compote, maple syrup, toasted nuts, or a dollop of whipped cream for added decadence. Store leftovers in an airtight container in the refrigerator for up to 3-4 days; add a splash of milk or cream if it thickens too much when serving from the fridge.
Important Information
Nutrition Facts (Per Serving)
It is important to consider this information as approximate and not to use it as definitive health advice.
Allergy Information
Please check ingredients for potential allergens and consult a health professional if in doubt.


Leave a Comment