
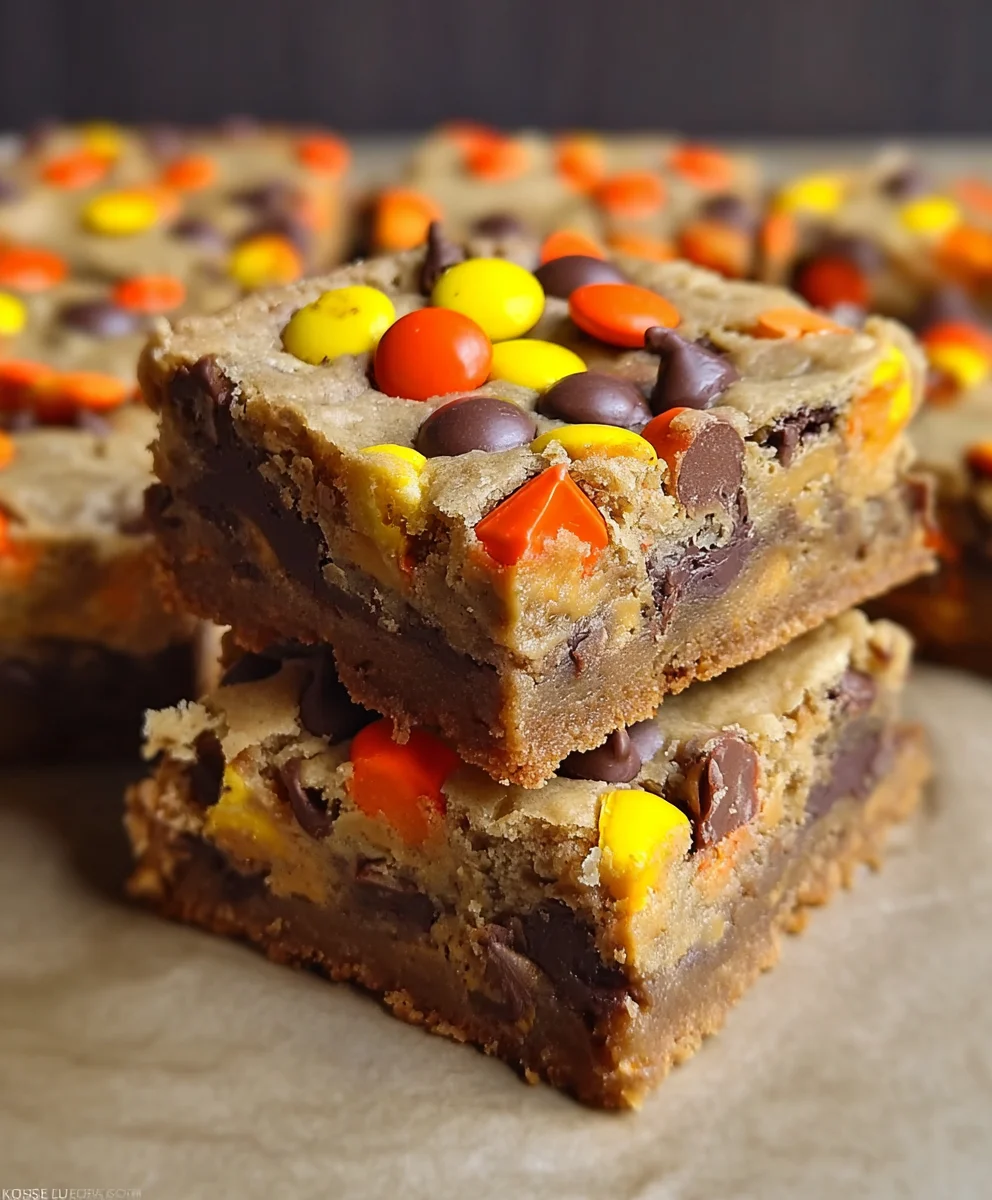
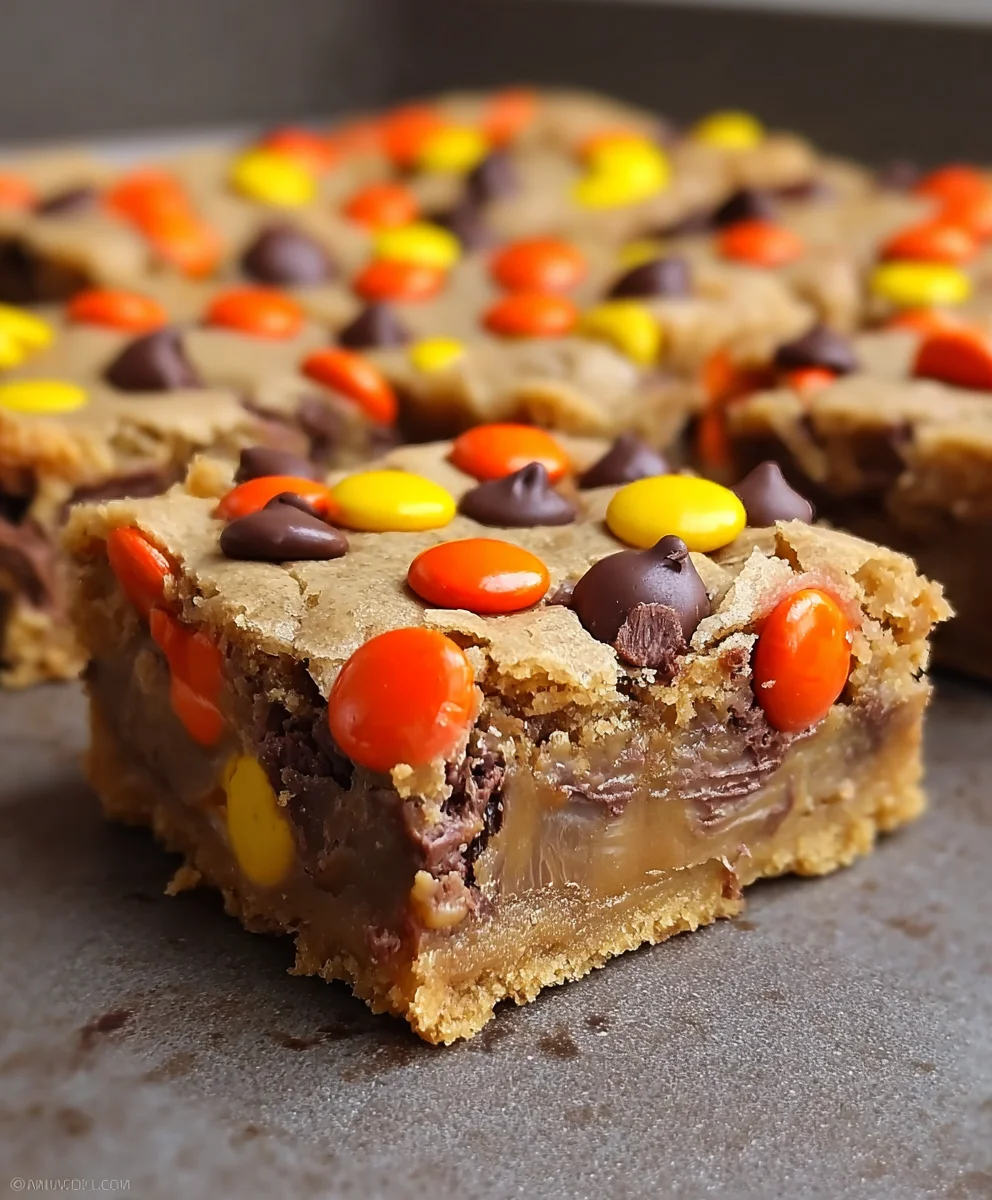
Reeses Pieces Chocolate Chip Cookie Bars – just the name itself conjures up images of gooey, chewy perfection, doesn’t it? Prepare to embark on a truly delightful baking adventure that promises to elevate your dessert game. Imagine sinking your teeth into a thick, soft cookie bar, where the classic comfort of a chocolate chip cookie meets the irresistible, vibrant crunch and peanut butter magic of Reese’s Pieces.
This dessert isn’t just a treat; it’s a celebration of one of America’s most beloved flavor pairings: chocolate and peanut butter. While the original chocolate chip cookie has a storied past, the genius addition of Reese’s candies brings a modern, playful twist that resonates with generations. It taps into that nostalgic joy of childhood candy and transforms it into an elegant yet fun-loving baked good.
Why Everyone Loves These Bars
People adore these bars for a multitude of reasons. The rich, buttery base provides the perfect foundation, generously studded with melted chocolate chips that offer pockets of pure bliss. Then, the vibrant orange, yellow, and brown candy shells of the Reese’s Pieces deliver a satisfying crunch, quickly followed by that unmistakable, creamy peanut butter flavor. They are incredibly convenient to make and serve, making them ideal for potlucks, parties, or simply a satisfying afternoon snack. Each bite is a harmonious blend of sweet, salty, chewy, and crunchy – a true symphony of textures and tastes. Whether you’re a lifelong devotee of the chocolate-peanut butter combination or simply seeking a new dessert sensation, these Reeses Pieces Chocolate Chip Cookie Bars are guaranteed to become a cherished favorite in your baking repertoire.
Ingredients:
-
For the Ultimate Cookie Dough Base:
- 1 cup (2 sticks or 226g) Unsalted Butter, softened to room temperature. It’s incredibly important for your butter to be truly soft, but not melted, for the perfect creamy base for these Reeses Pieces Chocolate Chip Cookie Bars. I usually leave mine out on the counter for at least an hour or two before I plan to bake.
- 1 cup (200g) Granulated Sugar. This helps with the spread and chewiness of your cookie bars.
- 1 cup (220g) Light Brown Sugar, packed. The molasses in the brown sugar contributes significantly to the rich flavor and wonderfully moist, chewy texture we’re aiming for in these delicious bars. Make sure to pack it down firmly when measuring!
- 2 Large Eggs, at room temperature. Room temperature eggs emulsify better with the butter and sugar, creating a more uniform dough.
- 2 teaspoons Pure Vanilla Extract. Don’t skimp on the vanilla! A good quality vanilla extract really enhances the overall flavor profile of your Reeses Pieces Chocolate Chip Cookie Bars.
- 2 ¼ cups (270g) All-Purpose Flour. Precisely measured is key here. I often use a kitchen scale for accuracy, or the spoon-and-level method if using measuring cups, to avoid over-flouring which can lead to dry bars.
- 1 teaspoon Baking Soda. This is your leavening agent, helping the bars rise and achieve that lovely soft interior.
- ½ teaspoon Salt. A crucial ingredient often overlooked! Salt balances the sweetness and brings out all the wonderful flavors in your cookie bars.
-
For the Irresistible Mix-Ins:
- 1 cup (170g) Semi-Sweet Chocolate Chips. Classic and always a winner. You can use milk chocolate or dark chocolate chips too, depending on your preference.
- 1 cup (170g) Peanut Butter Chips. These are absolutely essential for amplifying that fantastic peanut butter flavor, making these Reeses Pieces Chocolate Chip Cookie Bars truly sing.
- 1 ½ cups (about 250g) Reeses Pieces Candies. Ah, the star of the show! These add the iconic color, crunch, and undeniable peanut butter candy magic that defines these bars.
Equipment You’ll Need:
Having the right tools ready makes the baking process so much smoother and more enjoyable. For these amazing Reeses Pieces Chocolate Chip Cookie Bars, here’s what I recommend having on hand:
- 9×13 inch Baking Pan: A sturdy metal or ceramic pan is ideal for even baking. I always lightly grease mine and line it with parchment paper for easy removal.
- Electric Mixer (Stand or Handheld): Essential for creaming butter and sugars until light and fluffy. A stand mixer makes life easier, but a good handheld mixer will certainly get the job done.
- Large Mixing Bowl: For combining your wet ingredients and then incorporating your dry ingredients. You’ll want one that’s big enough to handle all that glorious dough without spills.
- Medium Mixing Bowl: For whisking together your dry ingredients before adding them to the wet.
- Rubber Spatula or Wooden Spoon: Perfect for scraping down the sides of your bowl and for gently folding in your delicious mix-ins.
- Measuring Cups and Spoons: Accuracy is your friend in baking!
- Parchment Paper: My secret weapon for non-stick baking and effortlessly lifting the whole slab of bars out of the pan for neat cutting.
- Wire Cooling Rack: Important for letting your Reeses Pieces Chocolate Chip Cookie Bars cool completely and prevent them from getting soggy on the bottom.
Before You Begin – Essential Prep Work:
A little preparation goes a long way in ensuring a smooth baking experience and perfect results for your Reeses Pieces Chocolate Chip Cookie Bars. Don’t skip these simple steps!
- Preheat Your Oven: Always start by preheating your oven to 350°F (175°C). This ensures that when your dough goes in, it starts baking immediately and evenly, preventing sad, underbaked spots. Give it at least 15-20 minutes to reach the correct temperature and stabilize.
- Prepare Your Baking Pan: Take your 9×13 inch baking pan and lightly grease it with butter or non-stick spray. Then, line it with parchment paper, allowing an overhang on the two longer sides. This parchment “sling” will be your best friend when it comes to lifting the cooled bars out of the pan in one perfect piece, making cutting a breeze. Trust me, this small step makes a huge difference for mess-free Reeses Pieces Chocolate Chip Cookie Bars!
- Measure All Ingredients: Get all your ingredients measured out and ready to go before you even start mixing. This “mise en place” approach prevents you from scrambling mid-recipe and ensures you haven’t forgotten anything crucial. Having everything at room temperature, especially the butter and eggs, is vital for proper emulsification and a smooth dough.
- Whisk Dry Ingredients: In your medium mixing bowl, whisk together the all-purpose flour, baking soda, and salt. Whisking ensures these dry ingredients are thoroughly combined and evenly distributed throughout the dough, which is important for consistent texture in your Reeses Pieces Chocolate Chip Cookie Bars.
Crafting the Ultimate Reeses Pieces Chocolate Chip Cookie Bar Dough:
This is where the magic truly begins! Follow these steps carefully to build a foundation for incredibly chewy and flavorful Reeses Pieces Chocolate Chip Cookie Bars.
- Cream the Butter and Sugars: In your large mixing bowl, using an electric mixer, cream together the softened unsalted butter, granulated sugar, and packed light brown sugar. Start on low speed to combine, then increase to medium-high. You’ll want to beat this mixture for a full 2-3 minutes, or even up to 5 minutes, until it becomes wonderfully light, fluffy, and noticeably pale in color. This process is crucial as it incorporates air into the butter, which will give your Reeses Pieces Chocolate Chip Cookie Bars their delightful lift and tender crumb. Scrape down the sides of the bowl frequently with your rubber spatula to ensure everything is evenly mixed.
- Incorporate the Eggs and Vanilla: With the mixer on medium speed, add the large eggs one at a time. Beat well after each addition, ensuring the egg is fully incorporated into the butter-sugar mixture before adding the next. This creates a stable emulsion. Once both eggs are in, add the pure vanilla extract and beat for another 30 seconds to 1 minute until everything is thoroughly combined and looks smooth and glossy. The mixture might look a little curdled at first when the eggs are added, but keep mixing, and it will come together beautifully.
- Gradually Add Dry Ingredients: Now, it’s time to bring in your pre-whisked dry ingredients. With your mixer on the lowest speed, slowly add the flour mixture to the wet ingredients in two or three additions. Mix only until just combined. The moment you see no streaks of dry flour, stop the mixer. Overmixing at this stage is the enemy of tender Reeses Pieces Chocolate Chip Cookie Bars! Overworking the flour develops too much gluten, which can lead to tough, dry bars. A few visible streaks of flour are perfectly fine at this point, as they will disappear in the next step.
- Fold in the Irresistible Mix-Ins: Remove the bowl from the mixer and grab your sturdy rubber spatula. Gently, yet thoroughly, fold in the semi-sweet chocolate chips, peanut butter chips, and the star of the show, the Reeses Pieces candies. Use a folding motion, bringing the mixture from the bottom of the bowl to the top, until all the delicious additions are evenly distributed throughout the cookie dough. Be careful not to crush the Reeses Pieces too much; we want those vibrant colors and textural pops! This is truly the heart of your “Reeses Pieces Chocolate Chip Cookie Bars” – make sure every bite will be packed with flavor!
Baking Your Reeses Pieces Chocolate Chip Cookie Bars to Perfection:
Now that your incredible dough is ready, it’s time to transform it into golden, chewy bars. Pay attention to baking times and visual cues for the best results!
- Spread the Dough Evenly: Spoon the thick cookie dough into your prepared 9×13 inch baking pan. Using your rubber spatula or the back of a lightly greased spoon, gently press and spread the dough evenly across the bottom of the pan. It will be thick, so take your time to ensure it reaches all corners and has a uniform thickness. This is important for even baking and consistent texture in every single Reeses Pieces Chocolate Chip Cookie Bar. If you like, you can sprinkle a few extra Reeses Pieces or chocolate chips on top for a visually appealing finish – a little trick I often use!
- Bake Until Golden: Place the pan in your preheated 350°F (175°C) oven. Bake for approximately 28-35 minutes. Baking times can vary depending on your oven, so keep a close eye on them. You’re looking for the edges to be set and lightly golden brown, while the center should still look slightly soft and maybe a tiny bit underdone. A toothpick inserted into the center should come out with moist crumbs, not wet batter. Remember, these are bars, and we want them chewy, so slightly underbaking is better than overbaking, which can lead to dry and crumbly Reeses Pieces Chocolate Chip Cookie Bars.
- Cool Completely (This is Crucial!): Once baked, remove the pan from the oven and place it on a wire cooling rack. This step is extremely important for the final texture. Allow the bars to cool in the pan for at least 30-45 minutes, or even longer, until they are firm enough to handle. Cooling allows the bars to continue setting up, prevents them from crumbling when cut, and lets all those amazing flavors meld together. Patience is a virtue here! Resisting the urge to cut into warm bars will be hard, but your perfectly structured Reeses Pieces Chocolate Chip Cookie Bars will thank you for it.
Serving and Storing Your Delicious Reeses Pieces Chocolate Chip Cookie Bars:
You’ve put in all the effort, and now it’s time to enjoy the fruits of your labor! Here’s how to perfectly portion and keep your Reeses Pieces Chocolate Chip Cookie Bars fresh.
- Lift and Cut with Ease: Once the bars are sufficiently cooled, use the parchment paper overhang as handles to gently lift the entire slab of Reeses Pieces Chocolate Chip Cookie Bars out of the baking pan and onto a cutting board. This parchment paper trick makes cleanup a breeze and ensures your bars maintain their shape beautifully. Using a sharp knife, cut the large slab into your desired size and shape. I usually go for 12-16 generous squares or even smaller rectangles, depending on who I’m serving. For cleaner cuts, you can occasionally wipe your knife with a warm, damp cloth between slices.
- Serving Suggestions: These Reeses Pieces Chocolate Chip Cookie Bars are absolutely phenomenal on their own, offering a delightful combination of sweet, salty, and peanut buttery goodness in every bite. However, if you’re feeling extra indulgent, consider serving them slightly warmed with a scoop of vanilla bean ice cream and a drizzle of chocolate or caramel sauce. They also make a fantastic addition to any potluck, bake sale, or simply as a comforting treat with a tall glass of milk or a hot cup of coffee. The vibrant colors of the Reeses Pieces make them an instant crowd-pleaser!
- Storage for Freshness: To keep your Reeses Pieces Chocolate Chip Cookie Bars at their absolute best, store them in an airtight container at room temperature. They will stay wonderfully fresh and chewy for up to 3-4 days. If you want to extend their life, you can also freeze them! Simply wrap individual bars or small batches tightly in plastic wrap, then place them in a freezer-safe bag or container. They’ll keep well in the freezer for up to 2-3 months. When you’re ready to enjoy, just let them thaw at room temperature for an hour or so, or give them a quick zap in the microwave for that freshly baked, gooey center experience.
Conclusion:
If you’ve followed along with me on this culinary adventure, you already know that what we’ve created isn’t just another dessert; it’s an experience. This recipe for
Reeses Pieces Chocolate Chip Cookie Bars is truly a must-try for anyone who appreciates the sublime combination of rich, gooey chocolate and the distinct, irresistible crunch and flavor of peanut butter candies. I’m talking about that perfect harmony of sweet and salty, chewy and slightly crisp edges, all baked into a wonderfully satisfying bar that’s easier to make than individual cookies and delivers maximum impact with minimal fuss.
From the moment these bars start baking, your kitchen will be filled with an aroma that promises pure deliciousness, a scent that’s a nostalgic hug in itself. Imagine the joy of pulling a pan of these golden-brown beauties from the oven, their tops studded with brightly colored Reeses Pieces and glistening chocolate chips, still bubbling slightly. The sheer simplicity of pressing the dough into a pan, rather than scooping individual cookies, makes this recipe a dream for busy bakers or anyone looking for a high-reward, low-effort treat. It’s the kind of dessert that feels special and indulgent, yet it’s incredibly approachable for bakers of all skill levels. Trust me when I say, the chewy interior, the slight crispness at the edges, and the pockets of melted chocolate mingling with the iconic peanut butter candy flavor make these bars an absolute showstopper. They are perfect for bringing to a potluck, delighting your family, or simply treating yourself to something extraordinary on an ordinary Tuesday. They truly are an unparalleled delight that brings smiles to every face, and that’s precisely why I encourage you to add this recipe to your regular baking rotation.
Serving Suggestions & Creative Variations to Explore:
Now that you’ve got a batch of these glorious bars, let’s talk about how to enjoy them to their fullest, and how you can make them uniquely yours. My absolute favorite way to savor these
Reeses Pieces Chocolate Chip Cookie Bars is when they are still slightly warm from the oven. The chocolate chips are molten, and the Reeses Pieces are soft and melty, releasing their peanut buttery goodness into every bite. Pair a warm bar with a generous scoop of vanilla bean ice cream – the contrast of warm and cold, gooey and creamy, is simply divine. A drizzle of extra chocolate fudge sauce or a swirl of peanut butter over the top of the ice cream takes it to another level of decadence. For a more classic pairing, nothing beats a tall, frosty glass of cold milk, providing the perfect counterpoint to the rich sweetness of the bars. They also hold up beautifully at room temperature, making them ideal for packing into lunchboxes, bringing to picnics, or serving at parties where they can sit out for a bit. For a truly elegant presentation, try cutting them into smaller, bite-sized squares and arranging them on a dessert platter with fresh berries or a dusting of confectioners’ sugar.
Unleash Your Inner Baker: Customization Ideas!
But the fun doesn’t stop there! While the original recipe is perfection, these bars are incredibly forgiving and open to customization. Don’t be afraid to experiment with different types of chocolate chips – a mix of milk chocolate and dark chocolate, or even white chocolate, could add another layer of flavor. For a more intense peanut butter experience, you could add a handful of chopped roasted peanuts to the dough, or even swirl a tablespoon or two of creamy peanut butter into the dough just before baking. If you’re feeling adventurous, consider swapping out some of the Reeses Pieces for other candies like M&M’s for a vibrant pop of color, or chopped Snickers bars for an extra layer of caramel and nougat. A sprinkle of sea salt over the top of the bars right after they come out of the oven will also enhance all the flavors, creating that coveted sweet-and-salty balance even further. For a fun seasonal twist, you could incorporate festive sprinkles or different colored candies. The possibilities are truly endless, and each variation offers a chance to make these bars perfectly suited to your taste and occasion.
So, what are you waiting for? It’s time to preheat your oven and get baking! I promise you, these delightful bars are going to become an instant favorite in your household. There’s an immense satisfaction that comes from baking something so universally loved, and these
Reeses Pieces Chocolate Chip Cookie Bars truly fit that bill. I can’t express enough how much I genuinely believe you’ll adore this recipe and the joy it brings. I would absolutely love to hear about your baking experience! Please, don’t hesitate to share your photos, your triumphs, and any creative variations you come up with. Tag me on social media, leave a comment below, or just send me an email to tell me how much you and your loved ones enjoyed this recipe. Happy baking, my friends!
Ultimate Reese’s Pieces Chocolate Chip Cookie Bars!
Indulge in these delightful Reese’s Pieces Chocolate Chip Cookie Bars! This recipe combines the classic comfort of a chocolate chip cookie with the irresistible crunch and peanut butter magic of Reese’s Pieces, creating a chewy, gooey perfection that’s a celebration of chocolate and peanut butter.
Ingredients
-
1 cup (2 sticks / 226g) Unsalted Butter, softened
-
1 cup (200g) Granulated Sugar
-
1 cup (220g) Light Brown Sugar, packed
-
2 Large Eggs, room temperature
-
2 teaspoons Pure Vanilla Extract
-
2 ¼ cups (270g) All-Purpose Flour
-
1 teaspoon Baking Soda
-
½ teaspoon Salt
-
1 cup (170g) Semi-Sweet Chocolate Chips
-
1 cup (170g) Peanut Butter Chips
-
1 ½ cups (about 250g) Reese’s Pieces Candies
Instructions
-
Step 1
Preheat oven to 350°F (175°C). Lightly grease and line a 9×13 inch baking pan with parchment paper, leaving an overhang. -
Step 2
In a medium bowl, whisk together flour, baking soda, and salt. Set aside. -
Step 3
In a large bowl, cream softened butter, granulated sugar, and packed light brown sugar with an electric mixer for 2-5 minutes until light and fluffy. Scrape down sides of the bowl. -
Step 4
Beat in eggs one at a time, ensuring each is incorporated. Stir in vanilla extract until smooth. -
Step 5
Gradually add the whisked dry ingredients to the wet mixture on low speed, mixing only until just combined and no streaks of flour remain. Do not overmix. -
Step 6
Remove bowl from mixer. Gently fold in semi-sweet chocolate chips, peanut butter chips, and Reese’s Pieces until evenly distributed throughout the dough. -
Step 7
Spread the thick cookie dough evenly into the prepared 9×13 inch pan. Bake for approximately 28-35 minutes, until edges are lightly golden brown and the center looks slightly soft. A toothpick inserted should come out with moist crumbs. -
Step 8
Remove from oven and cool completely in the pan on a wire rack for at least 30-45 minutes. Once cooled, use the parchment overhang to lift the slab out and cut into desired bars. Serve and enjoy! -
Step 9
Store leftover bars in an airtight container at room temperature for 3-4 days, or freeze wrapped individually for up to 2-3 months.
Important Information
Nutrition Facts (Per Serving)
It is important to consider this information as approximate and not to use it as definitive health advice.
Allergy Information
Please check ingredients for potential allergens and consult a health professional if in doubt.

Leave a Comment