
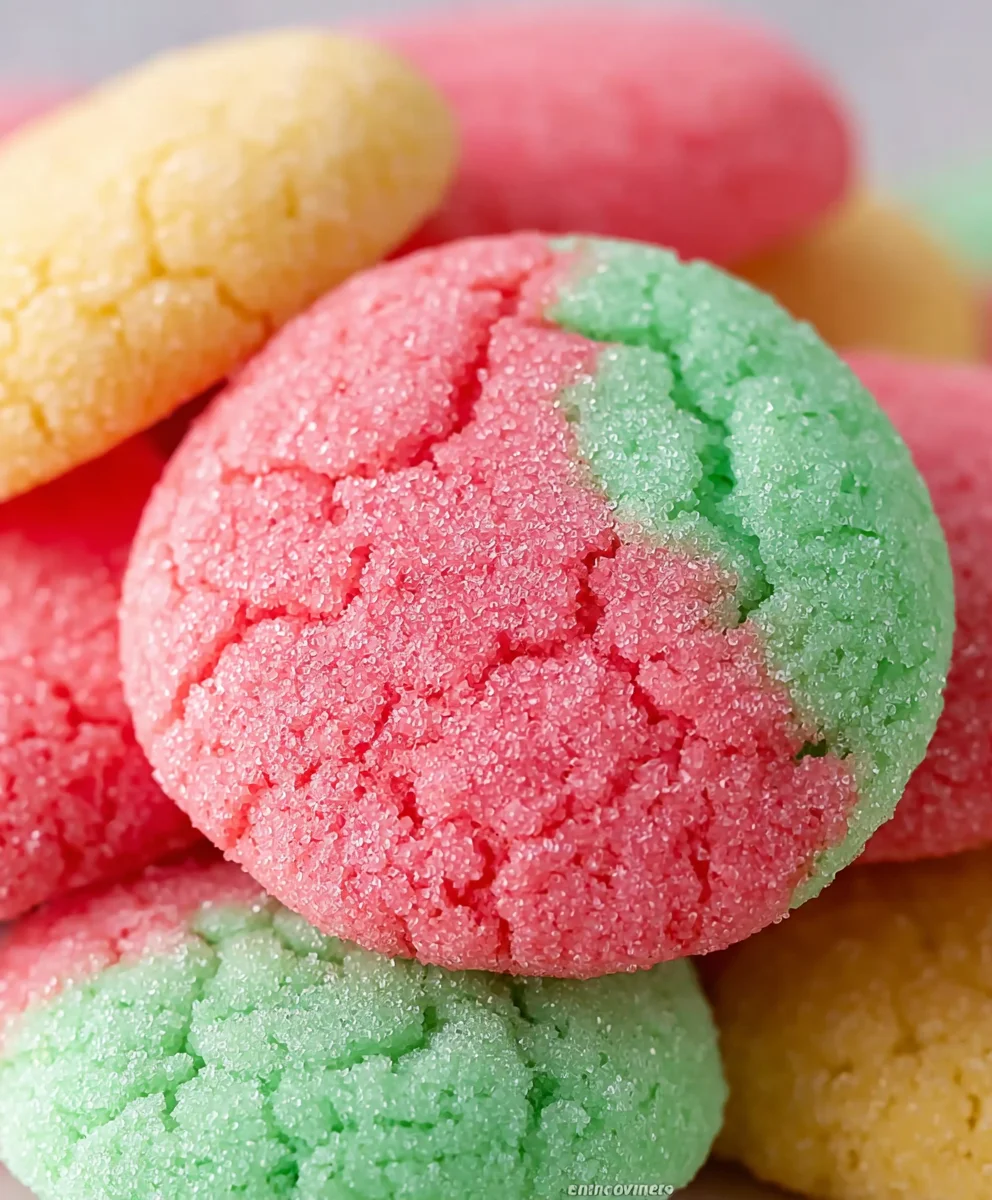
Jello Cookies Soft Chewy are more than just a sweet treat; they are a delightful culinary adventure that promises to brighten any day! Imagine sinking your teeth into a cookie that offers an immediate burst of vibrant color, a playful fruity flavor, and a texture so utterly perfect it’s almost magical. I am absolutely thrilled to share this recipe with you, as it consistently brings smiles and a touch of whimsy to every occasion.
While these delightful morsels might not boast ancient origins, their popularity surged as a wonderfully creative and customizable dessert, becoming a staple at modern potlucks, holiday celebrations, and especially children’s parties. Their unique charm lies in their adaptability, allowing for endless color and flavor combinations, transforming simple ingredients into something truly special. It’s this innovative spirit that has cemented their place as a beloved, fun-to-make treat in countless homes.
Why Everyone Adorably Loves These Cookies
What truly sets these cookies apart and makes them an instant favorite is their absolutely irresistible texture. Forget dry or crumbly; these cookies are designed to be perfectly soft and wonderfully chewy, offering a delightful resistance with every bite. This fantastic mouthfeel, combined with the exciting and distinct fruity notes from the Jello, creates an unforgettable indulgence that appeals to all ages. You’ll discover that people adore them not only for their fantastic taste and stunning visual appeal but also because making them is such a joy. Indeed, it’s their signature Jello Cookies Soft Chewy quality that makes them utterly irresistible and truly memorable.

Ingredients:
- For the Jello Cookies:
- 1 cup (2 sticks) unsalted butter, softened to room temperature
- 1 cup granulated sugar
- 2 large eggs, at room temperature
- 1 teaspoon pure vanilla extract
- 2 ½ cups all-purpose flour
- 2 teaspoons baking powder
- ¼ teaspoon salt
- 1 (3-ounce) package flavored gelatin (Jell-O brand works wonderfully), any flavor – I love cherry or strawberry for vibrant color and taste!
- For Rolling (Optional, but highly recommended for extra sparkle and sweetness):
- ½ cup granulated sugar OR powdered sugar OR an additional ¼ cup of flavored gelatin powder (matching or complementary to your cookie flavor)
Preparing the Jello Cookie Dough
Crafting the perfect dough is the first and most crucial step to achieving those delightful Jello Cookies Soft Chewy. Take your time with each stage, as precision here will directly impact the final texture and flavor.
- Cream the Butter and Sugar: In a large mixing bowl, using an electric mixer (either a stand mixer with a paddle attachment or a hand mixer), combine your softened butter and granulated sugar. Beat on medium-high speed for about 3-5 minutes. You’re looking for a mixture that is light, fluffy, and noticeably pale in color. This creaming process incorporates air into the butter, which is absolutely vital for a tender, soft, and chewy cookie texture. Don’t rush this step; it’s the foundation for truly exceptional Jello Cookies Soft Chewy. I always make sure my butter is genuinely soft, almost spreadable, but not melted, to get the best aeration.
- Incorporate Eggs and Vanilla: Reduce the mixer speed to low. Add the eggs one at a time, beating well after each addition until fully incorporated. After the eggs, stir in the vanilla extract. Once again, make sure your eggs are at room temperature. This helps them emulsify better with the butter mixture, preventing a curdled appearance and ensuring a smooth, cohesive dough. Scrape down the sides of the bowl with a rubber spatula as needed to ensure everything is evenly mixed.
- Whisk Dry Ingredients: In a separate medium-sized bowl, whisk together the all-purpose flour, baking powder, and salt. Whisking these dry ingredients together ensures that the leavening agent (baking powder) and salt are evenly distributed throughout the flour. This prevents pockets of unmixed ingredients and guarantees a consistent rise and flavor in every single cookie.
- Combine Wet and Dry Mixtures: Gradually add the dry ingredients to the wet ingredients, mixing on low speed until just combined. Be careful not to overmix! Overmixing develops the gluten in the flour, which can lead to tough, dense cookies – the exact opposite of the Jello Cookies Soft Chewy we’re aiming for. Stop mixing as soon as you no longer see streaks of dry flour. A few small lumps are perfectly fine and often preferred over an overmixed dough.
- Add the Jell-O Powder: Now for the magic! Gently fold in the entire package of dry flavored gelatin powder into the dough. Mix until the color is evenly distributed throughout. This is where your cookies get their vibrant hue and delightful fruity flavor. The Jell-O also contributes significantly to the unique, slightly tangy taste and that incredibly soft and chewy texture. Ensure the powder is fully incorporated, but again, avoid overmixing. The dough will be soft and vibrant!
-
Chill the Dough (Crucial Step!): Cover the bowl with plastic wrap and refrigerate the dough for at least 1-2 hours, or even up to 24 hours. This chilling step is absolutely non-negotiable for success.
Why Chilling is Essential for Soft Chewy Jello Cookies:
- Prevents Spreading: Cold dough spreads less in the oven, resulting in thicker, chewier cookies rather than flat, crispy ones.
- Deepens Flavor: Chilling allows the flavors (especially from the Jell-O) to meld and intensify.
- Easier to Handle: The dough will be much less sticky and easier to roll into balls.
- Optimizes Texture: It helps the fat in the butter solidify, contributing to that desired Jello Cookies Soft Chewy texture by slowing down the melting process in the oven. Trust me, patience here pays off immensely!
Shaping and Coating Your Jello Cookies
Once your dough is perfectly chilled, it’s time to bring your colorful cookies to life. This stage is all about creating uniform shapes and adding that extra textural and visual appeal with a delicious coating.
- Prepare Your Coating: While the dough is chilling, or just before you start shaping, pour your chosen coating (granulated sugar, powdered sugar, or additional Jell-O powder) into a shallow bowl. If using Jell-O powder for rolling, make sure it’s a fresh, dry package. I often use granulated sugar for a sparkly, slightly crisp exterior, but powdered sugar offers a softer, sweeter finish. A mix of Jell-O powder and granulated sugar can also provide an extra pop of flavor and color!
- Preheat Oven and Prepare Baking Sheets: About 15-20 minutes before you plan to bake, preheat your oven to 350°F (175°C). Line two large baking sheets with parchment paper or silicone baking mats. This prevents sticking and ensures even baking and easy cleanup. Using parchment paper is a personal preference; it makes removing the delicate cookies much simpler.
- Scoop and Roll the Dough: Remove the chilled dough from the refrigerator. Using a small cookie scoop (about 1.5 tablespoons, or a size #40 scoop), portion out the dough. Roll each portion gently between your palms to form a smooth ball. Aim for consistent sizes to ensure all cookies bake evenly.
- Coat the Cookie Dough Balls: Drop each dough ball into your prepared coating. Roll it around until it’s completely covered. Don’t be shy here; a generous coating adds a wonderful crunch and sweetness that perfectly complements the soft interior. Place the coated dough balls about 2 inches apart on your prepared baking sheets. This spacing is important to prevent them from merging as they spread slightly during baking. I usually fit about 12 cookies per standard baking sheet.
Baking Your Soft Chewy Jello Cookies
This is where the magic happens! Baking correctly is the final piece of the puzzle to ensure your cookies come out perfectly Jello Cookies Soft Chewy, with a beautiful crackled top and a tender interior.
- Bake Until Just Set: Place one baking sheet in the preheated oven. Bake for 9-11 minutes. The exact timing can vary depending on your oven, so keep a close eye on them. The cookies are done when the edges are lightly set and just beginning to turn a faint golden brown, but the centers still look soft and slightly underbaked. They might even look a little puffy. Do not overbake! This is the single most important tip for ensuring your Jello Cookies Soft Chewy maintain their signature texture. Overbaking is the quickest way to turn a soft cookie into a hard, crumbly one.
- Cool on Baking Sheet: Once removed from the oven, let the cookies cool on the baking sheet for about 5-10 minutes. They will be very delicate and soft straight out of the oven, so this cooling period on the hot sheet allows them to firm up slightly and continue to cook ever so slightly without drying out. This step contributes significantly to their eventual perfect chewiness.
- Transfer to a Wire Rack: After the initial cooling period on the baking sheet, carefully transfer the cookies to a wire cooling rack to cool completely. Allowing them to cool on a rack ensures air circulation all around the cookie, preventing the bottoms from becoming soggy and helping them achieve that perfect soft and slightly crisp exterior, while maintaining a wonderfully Jello Cookies Soft Chewy interior. Repeat the baking process with the remaining dough, using a cooled baking sheet for each batch if possible.
Tips for Achieving Perfectly Soft Chewy Jello Cookies
Here are some of my go-to tips to ensure every batch of your Jello Cookies Soft Chewy turns out absolutely perfect:
- Use Room Temperature Ingredients: I cannot stress this enough, especially for butter and eggs. Room temperature ingredients emulsify better, creating a smoother dough that bakes more evenly and yields a superior texture. It’s the secret sauce for those truly Jello Cookies Soft Chewy.
- Don’t Overmix the Dough: Once you add the dry ingredients, mix only until just combined. Overmixing develops gluten, leading to tough cookies. We want tender, melt-in-your-mouth cookies, not hockey pucks!
- Embrace the Chill Time: That 1-2 hour (or longer!) chilling period is not just a suggestion; it’s a critical step. It prevents spreading, enhances flavor, and makes the dough much easier to handle. Seriously, don’t skip it if you want truly Jello Cookies Soft Chewy.
- Know Your Oven: Ovens can vary wildly in temperature. Consider using an oven thermometer to ensure your oven is truly at 350°F (175°C). An oven that runs too hot or too cold can significantly impact baking time and cookie texture.
- Do Not Overbake: This is the golden rule for any soft and chewy cookie. When the edges are just set and the centers still look a little soft, pull them out! They will continue to set as they cool on the baking sheet. A minute too long can turn your perfectly Jello Cookies Soft Chewy into something much harder.
- Experiment with Jell-O Flavors: The beauty of these cookies is the endless flavor possibilities! Try lemon for a zesty kick, lime for a tangy twist, grape for a unique flavor, or even tropical punch for a burst of exotic fruitiness. You can even mix and match colors for festive occasions. Imagine red and green for Christmas, or pastel colors for Easter!
- Consider the Coating: While granulated sugar is a classic choice, try powdered sugar for a more delicate, soft sweetness, or even a mix of Jell-O powder and granulated sugar for an extra pop of color and flavor.
- Storage for Optimal Softness: Store your cooled Jello Cookies Soft Chewy in an airtight container at room temperature for up to 3-5 days. If you find them starting to firm up, placing a slice of plain bread in the container with them can help keep them soft by providing moisture.
Troubleshooting Common Jello Cookie Questions
Even with the best recipes, sometimes things don’t go exactly as planned. Here are some common issues and how to fix them to ensure your next batch of Jello Cookies Soft Chewy is perfect:
-
“My cookies spread too much and are flat!”
- Solution: The most common culprit is insufficient chilling time. Make sure your dough is thoroughly chilled for at least 1-2 hours. Also, ensure your butter wasn’t too soft or melted when you started creaming, as this can add excess moisture. Using too much baking powder or an overly hot oven can also contribute to spreading. Try reducing your baking powder slightly or checking your oven temperature with a thermometer.
-
“My cookies are hard, not soft and chewy!”
- Solution: This almost always points to overbaking. Remember, you want to pull them out when the centers still look slightly underdone. They will continue to bake on the hot baking sheet. Another reason could be overmixing the dough, which develops gluten and makes cookies tough. Ensure you’re only mixing until the dry ingredients are just combined.
-
“The Jell-O flavor isn’t strong enough.”
- Solution: Ensure you’re using a full 3-ounce package of Jell-O. For an extra boost of flavor, you can use the Jell-O powder as part of your rolling sugar coating, or even add an extra teaspoon of a complementary extract (e.g., cherry extract with cherry Jell-O).
-
“My cookies aren’t as colorful as I expected.”
- Solution: The vibrancy of the color can depend on the Jell-O flavor chosen (some are naturally more vivid than others) and the brand. You can try a Jell-O flavor known for its strong color, like cherry, strawberry, or lime. Some bakers also add a tiny drop of food coloring (gel preferred) to match the Jell-O color, but I find the Jell-O itself usually provides plenty of pop!
-
“The cookies taste a bit artificial.”
- Solution: While the Jell-O flavor is part of the charm, if you find it too artificial, consider using pure fruit extracts instead of artificial ones. Also, ensuring you use high-quality vanilla extract can help round out the flavors. Sometimes, just a pinch more salt in the dry ingredients can balance the sweetness and artificial notes.
Conclusion:
And there you have it, my friends! We’ve journeyed through the simple, yet utterly delightful, process of creating a batch of cookies that I wholeheartedly believe will become a cherished staple in your baking repertoire. I can’t stress enough how much I adore this recipe, and I know you will too. What truly sets these apart is their incredible texture – a perfect harmony of chewiness and softness that is surprisingly difficult to achieve in a single cookie. The vibrant colors, derived from the Jell-O, make them an instant showstopper, bringing a burst of joy to any plate. They’re not just pretty; the subtle fruity tang from the Jell-O elevates the flavor profile, making each bite a refreshingly sweet experience that stands out from your everyday sugar cookie. It’s a recipe that promises minimal fuss but delivers maximum impact, making it ideal for busy weeknights, last-minute gatherings, or simply when you need a little burst of sunshine in your day. Trust me, once you taste these incredible Jello Cookies Soft Chewy and bursting with fruity flavor, you’ll understand why I’m so enthusiastic. They are a game-changer, offering a playful twist on a classic treat that’s guaranteed to bring smiles.
Elevate Your Cookie Experience: Serving Suggestions & Creative Twists
Now that you’ve mastered the art of baking these beauties, let’s talk about how to truly make them shine or adapt them for any occasion. While they are absolutely perfect straight from the cooling rack with a tall glass of cold milk, don’t hesitate to get creative! For a delightful dessert platter, arrange an assortment of colors – imagine red cherry, green lime, and yellow lemon cookies creating a rainbow effect that’s as pleasing to the eye as it is to the palate. They are fantastic alongside a scoop of vanilla bean ice cream, where the warm, soft cookie slightly melts the ice cream, creating a heavenly mouthful. If you’re hosting a party, consider making miniature versions to serve as adorable bite-sized treats. For an extra touch of decadence, you could drizzle them with a simple powdered sugar glaze, perhaps tinted with a tiny drop of food coloring to match the Jell-O flavor, or even dip half of each cookie in melted white chocolate and sprinkle with festive sprinkles. Thinking about holidays? These cookies are incredibly versatile! Use strawberry or cherry Jell-O for Valentine’s Day, lime and lemon for a bright spring celebration, or orange and grape for a fun Halloween treat. You could even add a dash of citrus zest to the dough for an extra layer of brightness, or fold in some white chocolate chips for a creamy counterpoint to the fruity tang. For gifting, stack a few different colored cookies in a clear cellophane bag tied with a pretty ribbon – they make a thoughtful, homemade present that’s sure to impress with both their looks and taste.
Your Baking Adventure Awaits!
So, what are you waiting for? This is your invitation to step into the kitchen and experience the pure joy of baking something truly special. I promise you, this recipe is incredibly forgiving and yields consistently delicious results every single time. There’s a unique satisfaction in pulling these vibrant, aromatic cookies from the oven, knowing you’ve created something beautiful and delicious with your own hands. Don’t just read about it – try it! Embrace the fun, the simplicity, and the sheer deliciousness that these cookies bring. And once you’ve had your first bite, I would absolutely love to hear all about your experience. Did you try a new Jell-O flavor? Did you add any fun mix-ins? Perhaps you discovered a perfect serving combination? Your insights and creative twists inspire me and our whole community of bakers! Please feel free to share your photos, your triumphs, and even your “oops” moments (we all have them!) in the comments below. Let’s build a delightful collection of variations and success stories together. Happy baking, my friends, and get ready to fall in love with your new favorite cookie!
Soft & Chewy Jello Cookies
Delightful Soft & Chewy Jello Cookies with vibrant color and playful fruity flavor. This easy recipe promises a magical texture that appeals to all ages.
Ingredients
-
1 cup unsalted butter, softened
-
1 cup granulated sugar
-
2 large eggs
-
1 tsp pure vanilla extract
-
2 ½ cups all-purpose flour
-
2 tsp baking powder
-
¼ tsp salt
-
1 (3-ounce) package flavored gelatin (Jell-O)
-
½ cup granulated sugar (for rolling)
Instructions
-
Step 1
In a large bowl, cream softened butter and 1 cup granulated sugar until light and fluffy (3-5 minutes). -
Step 2
Beat in eggs one at a time, then stir in vanilla extract. Scrape down the sides of the bowl as needed. -
Step 3
In a separate medium bowl, whisk together all-purpose flour, baking powder, and salt. -
Step 4
Gradually add the dry ingredients to the wet mixture, mixing on low speed until just combined. Do not overmix. -
Step 5
Gently fold in the entire package of dry flavored gelatin powder until the color is evenly distributed throughout the dough. -
Step 6
Cover the bowl and refrigerate the dough for at least 1-2 hours (or up to 24 hours). -
Step 7
Preheat your oven to 350°F (175°C). Line two large baking sheets with parchment paper. Pour the ½ cup granulated sugar (or chosen coating) into a shallow bowl. -
Step 8
Remove chilled dough from the refrigerator. Scoop about 1.5 tablespoons of dough for each cookie. Roll each portion into a smooth ball. -
Step 9
Drop each dough ball into the prepared coating and roll until completely covered. Place coated balls about 2 inches apart on the prepared baking sheets. -
Step 10
Bake one baking sheet at a time for 9-11 minutes. Cookies are done when edges are lightly set but centers still look soft. Do not overbake. -
Step 11
Let cookies cool on the baking sheet for 5-10 minutes, then carefully transfer them to a wire cooling rack to cool completely. Repeat with remaining dough.
Important Information
Nutrition Facts (Per Serving)
It is important to consider this information as approximate and not to use it as definitive health advice.
Allergy Information
Please check ingredients for potential allergens and consult a health professional if in doubt.

Leave a Comment