
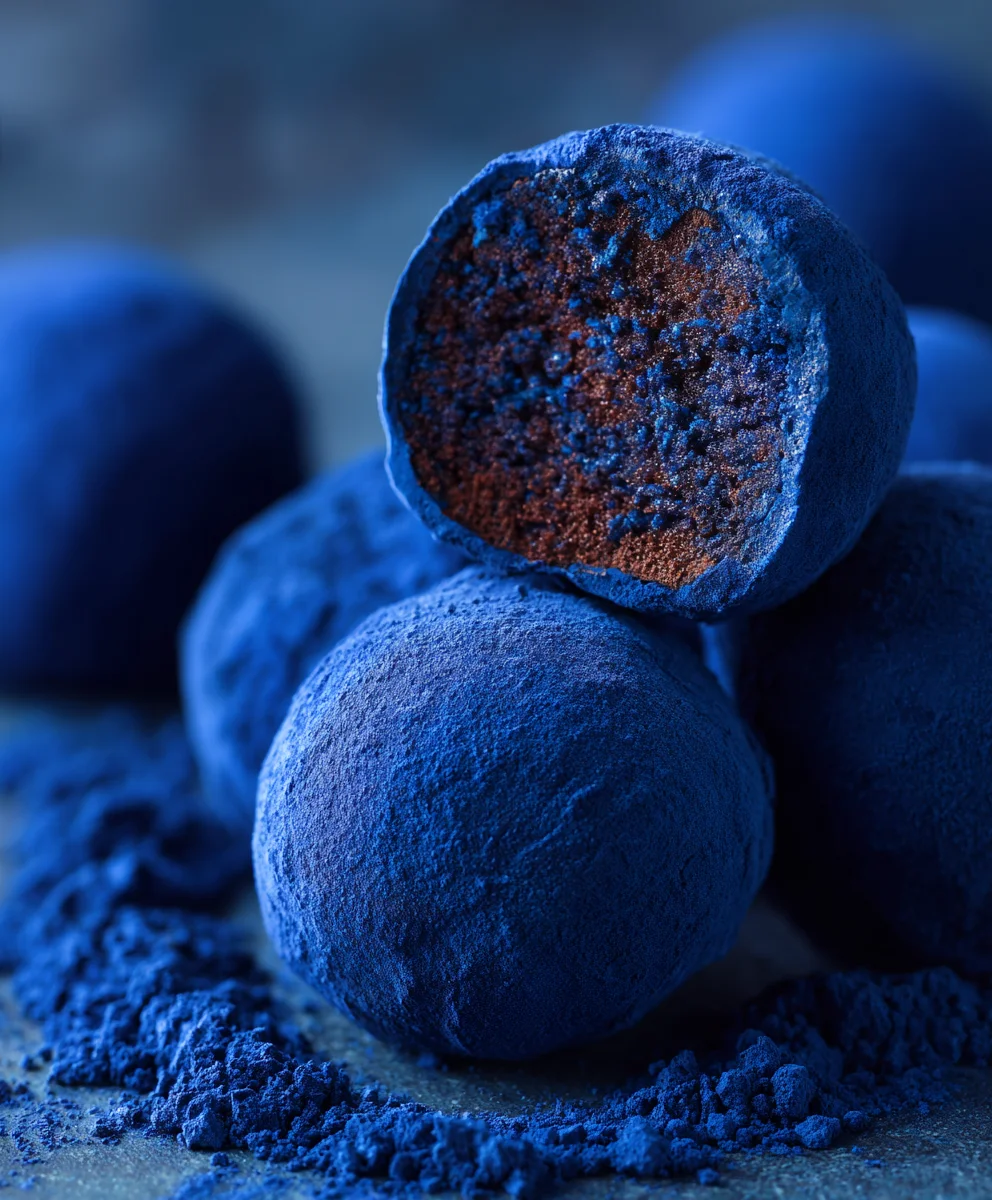
Blue Christmas Truffles are more than just a sweet treat; they are a miniature masterpiece, ready to sprinkle a touch of winter magic and festive wonder into your holiday season. Imagine presenting a plate of these exquisite, vibrant blue confections, each one promising a moment of pure, melt-in-your-mouth bliss. I assure you, their enchanting appearance is only matched by their exquisite flavor. While chocolate truffles have graced tables as luxurious confections since the early 20th century, becoming synonymous with indulgence and gifting, our unique take adds a modern, whimsical twist perfect for contemporary holiday celebrations.
People adore this dish not only for its rich, decadent chocolate interior and impossibly smooth texture but also for the striking visual appeal that makes it an instant showstopper. These are the kind of treats that spark conversations and create lasting memories, whether you’re serving them at a festive gathering or carefully packaging them as heartfelt, homemade gifts. Their convenience, requiring no baking and relatively simple steps, belies their elegant presentation, making them accessible for even novice confectioners. This recipe for Blue Christmas Truffles offers a delightful escape into a world of rich flavor and captivating beauty, promising to elevate your holiday dessert spread to something truly extraordinary.
Ingredients:
- 450g (approx. 16 oz) High-Quality White Chocolate: I always recommend using a good quality bar or callets, not chocolate chips, as chips often contain stabilizers that prevent them from melting smoothly. This is the backbone of our Blue Christmas Truffles, so don’t skimp! Chopping it finely will help it melt more evenly and contribute to a supremely smooth ganache.
- 240ml (approx. 1 cup) Heavy Cream (35% fat or higher): The fat content is crucial here for achieving a rich, velvety ganache that will set beautifully. Lighter creams won’t give you the same luxurious texture and may result in a ganache that is too thin or doesn’t set properly.
- 55g (approx. 4 tbsp) Unsalted Butter: This adds an incredible richness, a beautiful gloss, and a delightful melt-in-your-mouth quality to the truffles. Make sure it’s unsalted so we can control the overall flavor profile without any unexpected salinity.
- 1 teaspoon Pure Vanilla Extract: A classic flavor enhancer that beautifully complements white chocolate, adding warmth and depth to our Blue Christmas Truffles. Ensure it’s pure vanilla for the best aroma and taste.
- ½ – 1 teaspoon Electric Blue Gel Food Coloring: Gel coloring is superior to liquid coloring for achieving a vibrant, deep blue hue without adding too much moisture to the ganache, which can negatively impact its texture. Adjust based on your desired intensity for these striking Blue Christmas Truffles – a little goes a long way!
- Optional Flavor Boosters (choose one or none, or create your own blend!):
- ¼ teaspoon Peppermint Extract: For a refreshing, cool, and undeniably festive twist, reminiscent of winter holidays.
- ¼ teaspoon Almond Extract: Adds a subtle, sophisticated nutty note that pairs wonderfully with white chocolate.
- ¼ teaspoon Orange Zest: For a bright, citrusy counterpoint that cuts through the richness and adds a fresh aroma.
- ¼ teaspoon Cardamom or Cinnamon: For a warm, spiced holiday flavor.
- Assorted Coatings (for a truly festive and varied finish):
- 1 cup Shredded Coconut: You can leave some white for a snowy effect and tint some with a tiny drop of blue food coloring (dilute with a few drops of water first for easier mixing) for a captivating blue snow-like finish.
- ¼ cup Edible Silver Glitter or White Pearl Dust: To give our Blue Christmas Truffles that magical, shimmering, and ethereal winter wonderland look.
- ¼ cup Silver Dragees or Sprinkles: For added texture, sparkle, and a charming decorative touch that catches the light beautifully.
- ½ cup Confectioners’ Sugar (Powdered Sugar): For a delicate, elegant, and softly sweet snowy coating.
- ½ cup Unsweetened Cocoa Powder: For a classic, slightly bitter, and beautifully contrasting truffle coating, which also happens to look incredibly chic against the vibrant blue interior.
- Optional: Crushed Candy Canes: For a delightful peppermint crunch and a quintessential holiday vibe.
- Optional: Finely Chopped Nuts (e.g., pistachios or pecans): For a textural contrast and sophisticated flavor.
- Essential Equipment:
- Heatproof bowl (preferably glass or metal, large enough to contain the chocolate)
- Small saucepan (for heating cream)
- Rubber spatula or whisk (for gentle mixing)
- Small cookie scoop (about 1 tablespoon capacity) or two teaspoons (for portioning)
- Several baking sheets
- Parchment paper or silicone baking mats (to prevent sticking)
- Gloves (optional, but highly recommended for rolling to keep hands clean and minimize heat transfer)
- Shallow bowls or plates (for coating stations)
Preparing the Ganache Base: The Heart of Our Blue Christmas Truffles
- Chop the White Chocolate Finely: Our journey to creating exquisite Blue Christmas Truffles begins with the chocolate. Grab your high-quality white chocolate and, if it’s in a bar form, chop it very finely into small, even pieces. The finer the chop, the more quickly and evenly it will melt when the hot cream is poured over it. Uniformity in size is key here for a smooth, lump-free ganache. Place all the chopped chocolate into a clean, heatproof bowl. I find a glass bowl works wonderfully as it retains heat effectively, aiding in the melting process.
- Gently Heat the Cream and Butter: In a small, heavy-bottomed saucepan, combine your measured heavy cream and unsalted butter. Place the saucepan over medium heat. Gently warm the mixture, stirring occasionally with a spatula or whisk, until the butter is completely melted and small, delicate bubbles just begin to appear around the very edges of the pan. This is a crucial moment: do not let the mixture come to a vigorous boil! We want it hot enough to melt the chocolate effectively without scalding the cream, which can lead to a grainy texture or cause the ganache to separate. As soon as you see those gentle bubbles, it’s ready.
- The “Pour and Wait” Technique: Immediately remove the hot cream and butter mixture from the heat and, with confidence, pour it directly over the finely chopped white chocolate in your heatproof bowl. Now, here’s the hardest part for many (myself included!): resist the urge to stir right away! Let it sit undisturbed for exactly 5 minutes. This dedicated waiting period allows the residual heat from the cream to gently and thoroughly melt the chocolate pieces from the bottom up, ensuring a uniform and beautifully smooth texture when you finally stir it. Patience here truly makes a difference in the final quality of your Blue Christmas Truffles.
- Stir Until Silky Smooth and Glossy: After the 5-minute waiting period, take your rubber spatula or a whisk and gently but continuously start stirring the mixture. Begin stirring from the very center of the bowl, slowly expanding your circles outwards. You’ll observe the chocolate slowly beginning to yield, melt, and gracefully combine with the warm cream. Continue stirring with purpose until the mixture is entirely smooth, beautifully glossy, and perfectly uniform in both color and texture. There should be absolutely no lumps of unmelted chocolate visible. If, by a rare chance, you still encounter a few stubborn tiny lumps, you can employ a very gentle fix: place the bowl over a very lightly simmering pot of water (creating a makeshift double boiler) for a mere minute or two, stirring constantly. Be exceedingly careful not to allow any water or steam to come into contact with the chocolate, as this is a notorious culprit for causing chocolate to seize and become unusable.
- Infuse With Vanilla, Our Signature Blue, and Optional Flavors: Now for the moment we infuse our ganache with its festive identity as Blue Christmas Truffles! Add the pure vanilla extract, your chosen electric blue gel food coloring, and any optional flavor boosters (like peppermint or almond extract) to the smooth, warm ganache. I recommend starting with ½ teaspoon of blue gel coloring and adding just a tiny bit more, drop by drop, if you desire a deeper, more intense blue hue. Stir everything thoroughly and patiently until the color is completely and evenly distributed throughout the ganache. You’ll witness it transform into a truly captivating, uniform blue – a genuinely festive and magical sight that promises wonderful results.
- Chill the Ganache to Perfection: Once beautifully colored and flavored, cover the bowl with plastic wrap. It’s important to press the plastic wrap directly onto the surface of the ganache. This prevents a “skin” from forming on top, which could affect the final texture of your truffles. Place the covered bowl in the refrigerator for at least 3-4 hours, or ideally, for the best and most consistent results, allow it to chill overnight. The ganache absolutely needs to be firm enough to scoop and roll without melting too quickly in your hands. If you’re pressed for time, you can place it in the freezer for about 1-2 hours, but check it frequently to ensure it doesn’t freeze solid, as an overly frozen ganache can become difficult to work with and might impact the final creamy texture. A perfectly chilled ganache will be firm to the touch but still pliable when gently pressed with a spoon or finger. This precise chilling is paramount for easy shaping of your Blue Christmas Truffles.
Shaping Our Festive Truffles
- Prepare Your Efficient Workstation: Before you even think about scooping that gorgeous blue ganache, take a moment to meticulously set up your workstation. Line two or more baking sheets with parchment paper or silicone baking mats – these will be where your freshly rolled truffles rest. Have your chosen assortment of coatings ready in separate shallow dishes or bowls, positioned within easy reach. If you intend to wear gloves (which I highly recommend for a less messy experience and to minimize the heat transfer from your hands, thereby preventing the ganache from melting prematurely), put them on now. A well-organized space makes the rolling process much more enjoyable and efficient for your Blue Christmas Truffles.
- Scoop Uniform Ganache Portions: Remove the perfectly chilled ganache from the refrigerator. Using a small cookie scoop (ideally about 1 tablespoon capacity, but a ½ tablespoon scoop can be used for mini truffles) or two teaspoons if you don’t have a scoop, portion out the ganache. Try your best to make each scoop as uniform in size as possible. Consistency in size not only looks professional but also ensures your truffles cool and set evenly. If the ganache is too hard to scoop, let it sit at room temperature for a few minutes to soften slightly.
- Roll into Elegant Spheres: Gently take each scooped portion and quickly but delicately roll it between the palms of your hands to form a smooth, round ball. Work with purpose and speed, as the natural heat from your hands will inevitably start to melt the ganache. If the ganache begins to feel too soft, sticky, or difficult to handle at any point during this process, do not hesitate! Immediately place the entire tray of partially rolled truffles back into the refrigerator or freezer for 10-15 minutes to firm up again before you continue. While precision here isn’t strictly necessary – as the various coatings will beautifully mask minor imperfections – striving for a nice round shape will always elevate the visual appeal of your Blue Christmas Truffles. Place the perfectly rolled truffles on your prepared baking sheets, leaving a small space between each.
- A Brief Chill Before Decorating: Once all your ganache has been transformed into delightful blue spheres, I highly recommend placing the baking sheets with the un-coated truffles back into the refrigerator for an additional 15-30 minutes. This extra chill time is a small, but significant, investment. It ensures that your truffles are robustly firm and cold, making them considerably easier to handle and coat without becoming overly sticky, losing their exquisite shape, or melting during the decoration phase. This step is particularly beneficial for achieving beautifully coated Blue Christmas Truffles that hold their form.
Decorating for a Winter Wonderland: Making Our Blue Christmas Truffles Sparkle
- Establish Your Diverse Coating Stations: This is truly where your artistic vision comes to life and where your Blue Christmas Truffles will get their unique festive character! Arrange your assorted coatings in separate, clean, and shallow bowls or plates. For instance, dedicate one plate for your vibrant blue-tinted shredded coconut, another for the pristine white coconut, a third for the dazzling edible silver glitter, and so on. Having distinct stations makes the coating process incredibly efficient, prevents cross-contamination of toppings, and allows for a stunning variety of finished truffles. Consider using wider, flatter dishes for easier rolling.
-
Master the Art of Coating Your Truffles: Take a small batch of your chilled truffles from the refrigerator at a time – working with 4-5 truffles simultaneously helps keep the rest cold. Drop one or two truffles into your chosen coating. Gently, yet firmly, roll the truffle around in the coating using your fingers or a fork until it is completely and evenly covered from all angles. For very fine coatings like cocoa powder or confectioners’ sugar, you might gently tap off any excess to achieve a clean finish. For edible glitter or pearl dust, you can either gently roll them very lightly, or for a more precise application, sprinkle the glitter over the truffles while rotating them. For a truly dazzling effect, consider a multi-layered approach: roll them first in a base coating (like coconut), and then gently sprinkle or dab on some edible glitter or silver pearl dust for an extra dimension of sparkle.
Creative Coating Combinations and Tips for Your Blue Christmas Truffles:
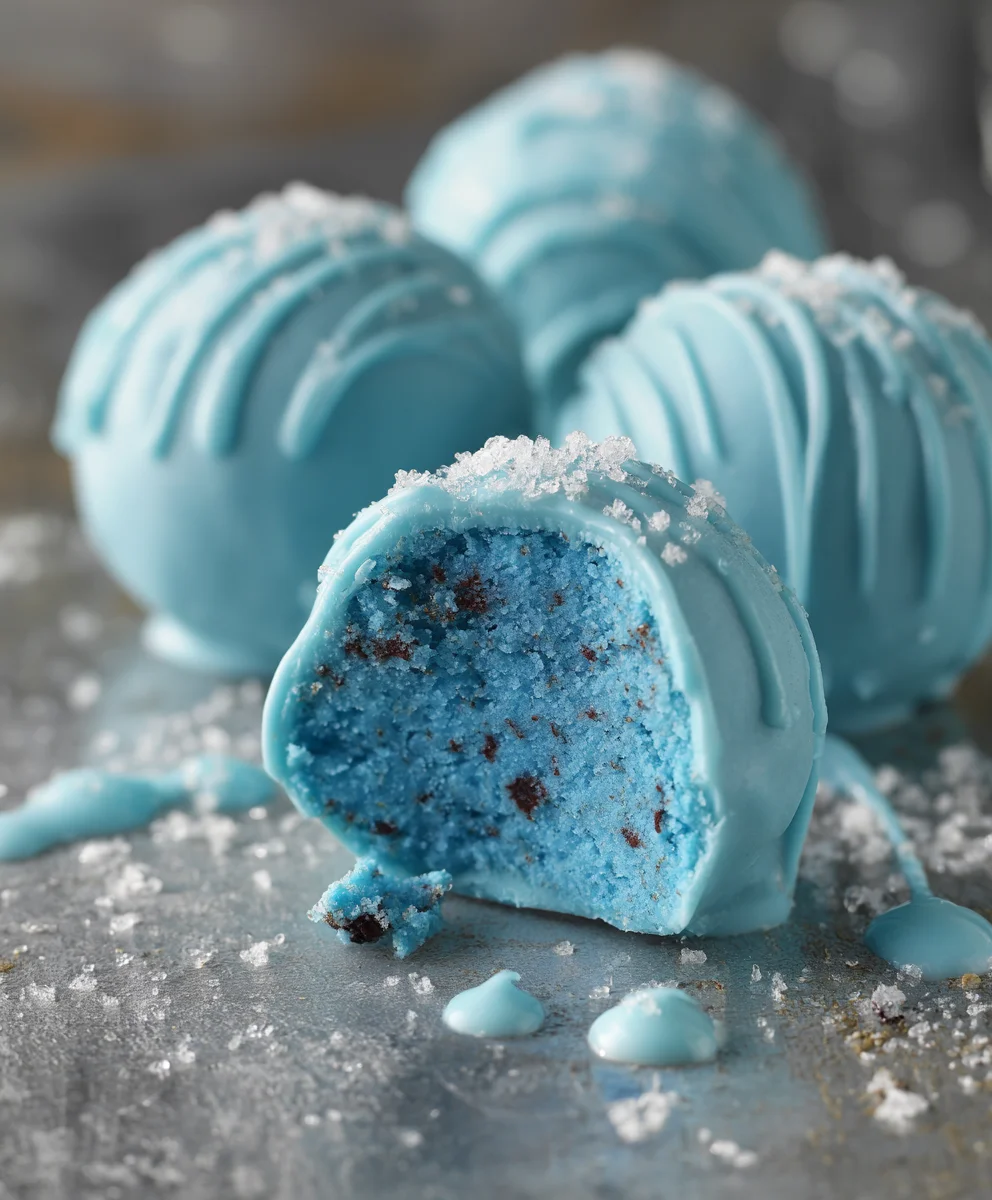
- The Classic Blue Snowball: Roll completely in blue-tinted shredded coconut for a wonderfully soft, snowy exterior that hints at the vibrant interior.
- Winter Frost Elegance: Roll in pristine white shredded coconut, then delicately dust with confectioners’ sugar or edible white pearl dust for a glistening, ethereal effect.
- Starlight Sparkle: First, roll in white coconut for a clean base, then gently press silver dragees onto the surface, or roll lightly in edible silver glitter for a truly celestial shine.
- Midnight Blue Contrast: Roll thoroughly in unsweetened cocoa powder for a sophisticated, slightly bitter shell that provides a dramatic and beautiful contrast against the bright blue interior when bitten into.
- Peppermint Dream: For a refreshing crunch, roll in a mixture of white coconut and finely crushed candy canes. This adds both texture and a delightful minty kick, perfect for the holidays.
- Nutty Indulgence: Roll in finely chopped pistachios or pecans for an earthy, crunchy counterpoint to the creamy ganache.
- Two-Tone Magic: Consider rolling half a truffle in one coating (e.g., white coconut) and the other half in a contrasting coating (e.g., blue coconut) for a striking visual effect.
Feel absolutely free to mix and match these ideas! You could have a truffle rolled in blue coconut, then lightly sprinkled with silver glitter for a frosty, celestial look. The goal is to make each Blue Christmas Truffle unique, visually appealing, and an embodiment of the festive spirit you wish to convey.
- Return to Lined Baking Sheets: As you complete the coating for each magnificent truffle, carefully place it back onto a clean section of your parchment-lined baking sheets. Try to ensure they aren’t touching or overcrowded, especially if you plan to do another quick chill. This careful placement preserves their perfect shapes and delicate coatings.
- The Final Chill for Setting: Once all your beautiful Blue Christmas Truffles are meticulously decorated and arranged on the baking sheets, return them to the refrigerator for at least 30-60 minutes. This final, crucial chill allows the ganache to fully firm up and ensures that all the delightful coatings adhere perfectly, preventing them from flaking off. It’s also vital for them to maintain their stunning shape and immaculate appearance until they are ready to be served or gifted. This step guarantees your truffles are perfectly set and ready for presentation.
Storage and Enjoyment
- Optimal Storage for Your Blue Christmas Truffles: Once your truffles are completely firm and their coatings are set, it’s time to store them properly to maintain their freshness and quality. Carefully transfer the truffles to an airtight container. If you need to store them in multiple layers, always separate each layer with a piece of parchment paper. This vital step prevents them from sticking together, preserves their delicate coatings, and avoids any damage to their beautiful decorative work. Store your Blue Christmas Truffles in the refrigerator for up to 1-2 weeks. While they might last longer, the flavor and texture are at their peak within this timeframe.
- Serving and Savoring Your Creation: For the absolute best flavor and luxurious texture, I highly recommend allowing your Blue Christmas Truffles to come to a gentle room temperature for about 10-15 minutes before serving. This brief period allows the ganache to soften ever so slightly, transforming it into an incredibly creamy, melt-in-your-mouth delight that truly showcases its richness. These homemade Blue Christmas Truffles make absolutely stunning edible gifts. Imagine them meticulously packed in decorative boxes or elegant bags, tied with festive ribbons – a truly thoughtful and impressive gesture. They are a delightful indulgence for holiday parties, a sophisticated dessert after a special dinner, or simply a luxurious treat for yourself during a quiet moment. Each bite offers a creamy, rich white chocolate experience with the subtle hint of your chosen flavor, all beautifully encased in a festive blue package. Prepare to impress your family and friends with these uniquely elegant, visually striking, and utterly delicious Blue Christmas Truffles! Enjoy the entire creative process and, most importantly, savor every exquisite moment of the delicious results!
Conclusion:
And there you have it! We’ve journeyed through the magic of creating a truly special treat, one that promises to be the dazzling centerpiece of any festive spread or the most cherished homemade gift. Reflecting on our time together, I truly hope you feel as excited as I do about this recipe. These aren’t just any confections; they’re an experience waiting to happen, a vibrant splash of color and an explosion of rich flavor that will undoubtedly leave a lasting impression on anyone lucky enough to try them. The sheer simplicity of the method, combined with the utterly luxurious outcome, is what makes this recipe an absolute must-try. You’ll be amazed at how easily you can transform a handful of ingredients into something so elegant and irresistibly delicious. Imagine the gasps of delight when friends and family first lay eyes on these jewel-toned beauties!
What truly sets these Blue Christmas Truffles apart is their unique blend of visual appeal and profound deliciousness. They are a feast for the eyes before they even touch the palate, with their enchanting hue that instantly evokes the serene beauty of a winter evening sky, or perhaps the magical glimmer of fresh snow under moonlight. But beyond their stunning looks, each bite offers a creamy, melt-in-your-mouth texture that is pure bliss, a harmonious balance of sweetness and deep, chocolatey goodness that lingers beautifully. They are remarkably versatile, perfectly suited for a sophisticated after-dinner indulgence with a steaming cup of coffee or a delicate herbal tea. Picture them arranged artfully on a pristine white platter, perhaps nestled amongst sprigs of fresh holly or pine, creating an edible work of art that captures the essence of the season. They also make an incredibly thoughtful and personal gift; imagine the joy of presenting a beautifully boxed assortment of these homemade treasures to loved ones, knowing each one was crafted with care and a sprinkle of festive spirit.
Now, let’s talk about taking these delightful truffles to the next level with some serving suggestions and imaginative variations. While absolutely sublime on their own, served at room temperature to allow their full creamy potential to shine, there are so many ways to customize and present them. For an added layer of texture and a burst of complementary flavor, consider rolling some of your truffles in finely chopped toasted almonds, pistachios, or even candied pecans. A simple dusting of unsweetened cocoa powder creates a classic, sophisticated look and provides a lovely counterpoint to the sweetness. For those who adore a bit of sparkle, edible glitter or shimmering edible sugar crystals can transform them into truly magical, glistening treats. Think about drizzling melted white chocolate over a few for an artistic flourish, or even tinting a small amount of white chocolate with a contrasting food coloring, like silver or gold, for an extra festive touch. Don’t be afraid to experiment with the core flavor either; a tiny drop of peppermint extract can infuse them with a refreshing, wintry zing, while a hint of orange zest or a few drops of orange liqueur can add a bright, citrusy note that beautifully complements the chocolate. For an adult-friendly variation, a dash of your favorite rum, brandy, or even an Irish cream liqueur can elevate the flavor profile to new heights, making them an ideal treat for sophisticated holiday gatherings. You could even create different shapes – perhaps pressing some into small silicone molds for star or snowflake shapes – though the classic round truffle is always a winner. Serve them in mini paper cupcake liners for easy handling and a professional presentation, especially when offering them on a dessert buffet.
I genuinely can’t wait for you to experience the sheer delight of creating these treats in your own kitchen. Baking, for me, is an act of love, and sharing the results is pure joy. So, please, gather your ingredients, put on some festive music, and let the magic happen. These aren’t just a recipe; they’re an invitation to create lasting memories and fill your home with the sweet aroma of holiday cheer. Once you’ve whipped up your batch of these delightful treats, I would absolutely adore hearing all about your experience. Did you find a new favorite topping? Did you manage to surprise someone special with a homemade gift that brought a huge smile to their face? Did your family rave about them at the holiday gathering, perhaps even asking for the secret recipe? Head over to the comments section and share your stories, your triumphs, and even your creative variations. I love seeing photos too, so if you’re sharing on social media, tag us! There’s nothing more rewarding for me than seeing my recipes bring happiness and deliciousness to your homes. So go on, dive in, and let’s spread some delicious, vibrant cheer this season!
Blue Christmas Truffles: Perfect Festive Holiday Dessert
These Unique Blue Christmas Truffles are a vibrant, no-bake holiday treat, perfect for festive gatherings or thoughtful gifts. Featuring a rich, decadent white chocolate ganache with a stunning blue hue and various festive coatings, they are easy to make yet elegantly presented, promising a melt-in-your-mouth bliss.
Ingredients
-
450g High-Quality White Chocolate, finely chopped
-
240ml Heavy Cream (35% fat or higher)
-
55g Unsalted Butter
-
1 tsp Non-alcoholic Vanilla Extract
-
½ – 1 tsp Electric Blue Gel Food Coloring
-
Optional Flavor Boosters (choose one): ¼ tsp Peppermint Extract, ¼ tsp Non-alcoholic Almond Extract, ¼ tsp Orange Zest, or ¼ tsp Cardamom/Cinnamon
-
1 cup Shredded Coconut (plain or blue-tinted)
-
¼ cup Edible Silver Glitter or White Pearl Dust
-
¼ cup Silver Dragees or Sprinkles
-
½ cup Confectioners’ Sugar
-
½ cup Unsweetened Cocoa Powder
-
Optional: Crushed Candy Canes
-
Optional: Finely Chopped Nuts (e.g., pistachios or pecans)
Instructions
-
Step 1
Finely chop white chocolate and place in a heatproof bowl. -
Step 2
Heat heavy cream and unsalted butter in a small saucepan over medium heat until butter melts and small bubbles appear at the edges; do not boil. -
Step 3
Pour hot cream mixture over chopped chocolate. Let sit undisturbed for 5 minutes. Then, starting from the center, gently stir until completely smooth, glossy, and lump-free. -
Step 4
Stir in non-alcoholic vanilla extract, electric blue gel food coloring (start with ½ tsp, add more for desired intensity), and any optional flavor boosters. Mix thoroughly until the color is uniform. -
Step 5
Cover the ganache bowl with plastic wrap, pressing it directly onto the surface. Chill in the refrigerator for at least 3-4 hours, or ideally overnight, until firm enough to scoop and roll. -
Step 6
Prepare your workstation: Line two or more baking sheets with parchment paper. Arrange various coatings (e.g., shredded coconut, glitter, sprinkles, confectioners’ sugar, cocoa powder) in separate shallow dishes. -
Step 7
Remove chilled ganache. Using a small cookie scoop (approx. 1 tablespoon capacity) or two teaspoons, portion the ganache. Quickly but gently roll each portion between your palms to form a smooth, round ball. If the ganache becomes too soft, chill briefly. -
Step 8
Place rolled truffles back into the refrigerator for an additional 15-30 minutes to firm up before coating. -
Step 9
Working with a few truffles at a time, roll them in your chosen coatings until completely covered. Experiment with combinations like blue-tinted coconut, edible silver glitter, silver dragees, confectioners’ sugar, unsweetened cocoa powder, crushed candy canes, or chopped nuts. -
Step 10
Place coated truffles onto the lined baking sheets, ensuring they don’t touch. Return them to the refrigerator for a final chill of at least 30-60 minutes to fully set the ganache and adhere coatings. -
Step 11
Store finished truffles in an airtight container in the refrigerator for up to 1-2 weeks. Separate layers with parchment paper to prevent sticking. For best flavor and luxurious texture, allow truffles to sit at room temperature for 10-15 minutes before serving.
Important Information
Nutrition Facts (Per Serving)
It is important to consider this information as approximate and not to use it as definitive health advice.
Allergy Information
Please check ingredients for potential allergens and consult a health professional if in doubt.
Leave a Comment