
Honey Garlic Chicken Breasts have truly earned their place as a beloved weeknight wonder in kitchens worldwide. What’s not to adore about a dish that promises tender, succulent chicken bathed in a glossy, irresistible sauce that strikes the perfect balance between sweet and savory? I find myself consistently drawn to this recipe, not just for its incredible flavor but for the sheer ease and versatility it offers, making it a staple in my cooking repertoire.
While perhaps not steeped in ancient culinary lore like some traditional dishes, the enduring appeal of the honey and garlic combination is a testament to how simple, wholesome ingredients can create something truly extraordinary. This modern classic has swiftly become a go-to for busy home cooks precisely because it delivers gourmet flavor without the fuss, showcasing a timeless pairing that transcends cultural boundaries and appeals to virtually every palate.
Imagine sinking your teeth into juicy chicken, each bite coated in that sticky, aromatic glaze—it’s pure comfort food perfection.
People adore this dish for so many reasons: the way the natural sweetness of the honey gracefully mellows the piquant sharpness of the garlic, creating a deeply satisfying umami experience; the delightful texture of perfectly cooked chicken that remains wonderfully tender; and its remarkable ability to pair beautifully with almost any side, from fluffy rice to vibrant steamed vegetables. Preparing these Honey Garlic Chicken Breasts is not just cooking; it’s creating a moment of simple joy that transforms an ordinary meal into something truly special and memorable.
Ingredients:
-
For the Honey Garlic Chicken Breasts:
- 4 boneless, skinless chicken breasts (approximately 1.5 to 2 pounds total)
- 1 tablespoon olive oil (or avocado oil)
- ½ teaspoon salt, or to taste
- ¼ teaspoon black pepper, freshly ground, or to taste
- 1 tablespoon unsalted butter
- Optional garnish: Fresh chopped parsley or cilantro, sesame seeds
-
For the Honey Garlic Sauce:
- ½ cup low-sodium chicken broth
- ½ cup honey (local raw honey is always a wonderful choice if you have it!)
- ¼ cup soy sauce (or tamari for a gluten-free option)
- 2 tablespoons apple cider vinegar
- 1 tablespoon cornstarch (or arrowroot powder for thickening)
- 6-8 cloves garlic, minced (and trust me, you want to use fresh garlic here for the best flavor in our Honey Garlic Chicken Breasts!)
- ½ teaspoon grated fresh ginger (or ¼ teaspoon ground ginger)
- ¼ teaspoon red pepper flakes (adjust to your preferred level of spice, or omit if you prefer no heat)
Preparing the Honey Garlic Sauce:
- Whisking the Base: In a medium-sized bowl, let’s start by combining the liquid components for our incredible honey garlic sauce. Pour in the ½ cup of low-sodium chicken broth, followed by ½ cup of glorious honey. I always find using a good quality honey really elevates the flavor of these Honey Garlic Chicken Breasts. Next, add the ¼ cup of soy sauce (or tamari if you’re keeping it gluten-free), and 2 tablespoons of apple cider vinegar. The vinegar adds a lovely tang that balances the sweetness of the honey beautifully. Give these a good whisk until they are thoroughly combined and the honey has dissolved into the other liquids. We want a smooth, cohesive base to build upon.
- Creating the Slurry: Now, in a small separate bowl, we need to prepare our thickening agent. This is a crucial step for achieving that perfectly glossy, clingy sauce. Take 1 tablespoon of cornstarch and add about 2 tablespoons of the liquid mixture you just prepared from the main sauce bowl. Whisk this together with a fork or a small whisk until you have a smooth, lump-free slurry. It’s important to do this separately to prevent lumps when it’s added to the warm sauce later. Set this cornstarch slurry aside for now.
- Infusing the Aromatics: Back to our main sauce bowl. It’s time to introduce the heart of the flavor: the aromatics! Add your 6-8 cloves of minced garlic. I really encourage you to use fresh garlic here; the intensity and pungency are unmatched and truly shine in our Honey Garlic Chicken Breasts. Next, grate in ½ teaspoon of fresh ginger. If fresh isn’t available, ¼ teaspoon of ground ginger will work, but fresh is definitely preferred for that vibrant, zesty kick. Finally, if you enjoy a little warmth, add ¼ teaspoon of red pepper flakes. You can always add more or less depending on your heat preference, or skip it entirely. Give everything another good stir to ensure all these wonderful flavors are well distributed throughout the liquid. This completes the sauce preparation for now; we’ll cook it later.
Preparing the Chicken Breasts:
- Pounding the Chicken: Let’s get our chicken ready! Place each of the 4 boneless, skinless chicken breasts between two sheets of plastic wrap or inside a large freezer bag. Using a meat mallet, a rolling pin, or even the bottom of a heavy skillet, carefully pound each chicken breast to an even thickness of about ¾ to 1 inch. This step is absolutely vital for ensuring even cooking and tenderness. Thicker parts won’t cook as quickly as thinner parts, leading to dry, overcooked sections and potentially undercooked ones. Pounding also helps to tenderize the meat, making your Honey Garlic Chicken Breasts wonderfully juicy.
- Seasoning the Chicken: Once all the chicken breasts are uniformly pounded, remove them from the plastic wrap and pat them thoroughly dry with paper towels. Removing excess moisture is key to achieving a nice sear. Season both sides of each chicken breast generously with ½ teaspoon of salt and ¼ teaspoon of freshly ground black pepper. Don’t be shy here; proper seasoning contributes significantly to the overall flavor of the finished dish.
- Initial Sear: Heat 1 tablespoon of olive oil (or avocado oil) in a large skillet or a non-stick pan over medium-high heat. You want the oil to shimmer but not smoke. Once the pan is hot, carefully place the seasoned chicken breasts into the skillet, ensuring not to overcrowd the pan. You might need to cook them in batches if your skillet isn’t large enough. Sear the chicken for about 3-4 minutes per side, until they are beautifully golden brown. This initial searing step is crucial for developing a rich, flavorful crust and locking in the juices. However, don’t worry about cooking them all the way through at this stage; they will finish cooking in the sauce. Once seared, remove the chicken from the skillet and set it aside on a clean plate.
Cooking the Honey Garlic Chicken Breasts:
- Sautéing Aromatics (if not already in sauce): If your skillet has a lot of browned bits (fond) from searing the chicken, that’s great – it adds flavor! If not, or if you had to clean the pan, add 1 tablespoon of unsalted butter to the same skillet over medium heat. Once the butter is melted and sizzling slightly, add any remaining minced garlic and grated ginger (if you chose to keep some separate from the sauce mixture). Sauté for about 30 seconds to 1 minute, until fragrant, being careful not to burn the garlic. This step isn’t strictly necessary if all your aromatics are already in your sauce, but it really amplifies the fresh garlic and ginger punch.
- Adding the Sauce Base: Now, pour the prepared honey garlic sauce mixture (the one without the cornstarch slurry yet) into the skillet. Bring the sauce to a gentle simmer, scraping up any browned bits from the bottom of the pan with a wooden spoon or spatula. Those browned bits are packed with flavor and will integrate beautifully into our Honey Garlic Chicken Breasts. Let the sauce simmer for about 2-3 minutes, allowing the flavors to meld and the mixture to warm through. You’ll notice the delightful aroma filling your kitchen!
- Thickening the Sauce: Give your cornstarch slurry a quick re-whisk, as cornstarch tends to settle at the bottom. Slowly pour the slurry into the simmering sauce in the skillet, whisking constantly. Continue to whisk gently as the sauce thickens. This process usually takes about 1-2 minutes. The sauce will transform, becoming wonderfully glossy and noticeably thicker, capable of coating the back of a spoon. If it gets too thick, you can always add a tablespoon or two more of chicken broth to thin it slightly to your desired consistency. We’re aiming for a luscious, pourable sauce for our Honey Garlic Chicken Breasts.
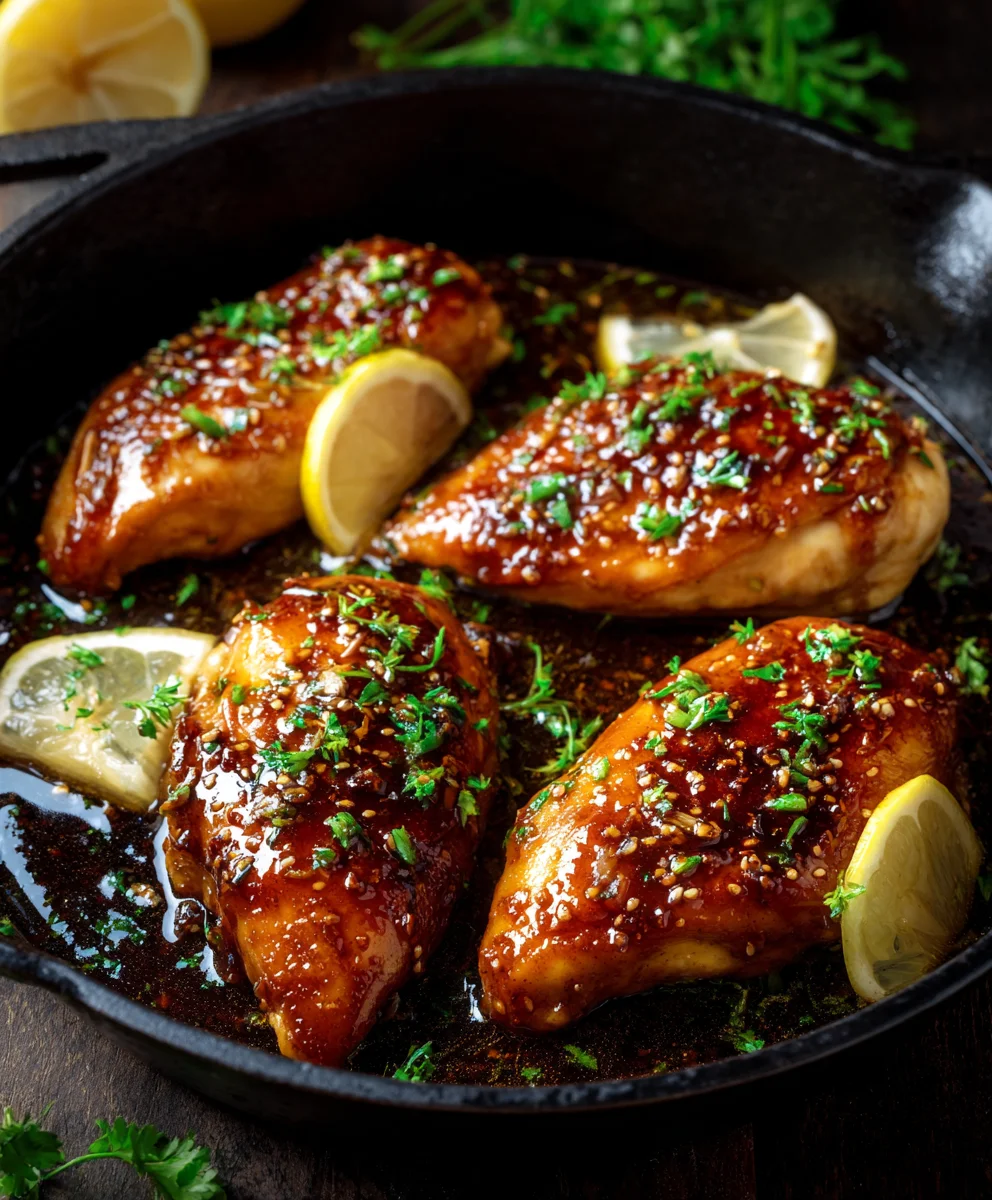
- Finishing the Chicken in the Sauce: Carefully return the seared chicken breasts to the skillet, nestling them into the thickened honey garlic sauce. Reduce the heat to medium-low. Spoon the rich sauce over the chicken breasts to coat them generously. Cover the skillet with a lid and let the chicken simmer gently in the sauce for about 5-8 minutes, or until the chicken is cooked through. The internal temperature of the thickest part of the chicken should reach 165°F (74°C) when checked with an instant-read thermometer. This simmering period allows the chicken to absorb all those incredible honey garlic flavors, making it incredibly tender and juicy.
- Reducing and Glazing: Once the chicken is cooked through, remove the lid. If the sauce isn’t as thick or as reduced as you’d like, you can remove the chicken to a plate and increase the heat slightly, allowing the sauce to simmer uncovered for a few more minutes until it reaches your desired consistency. As it reduces, it will become even more flavorful and sticky, creating that perfect glaze for your Honey Garlic Chicken Breasts.
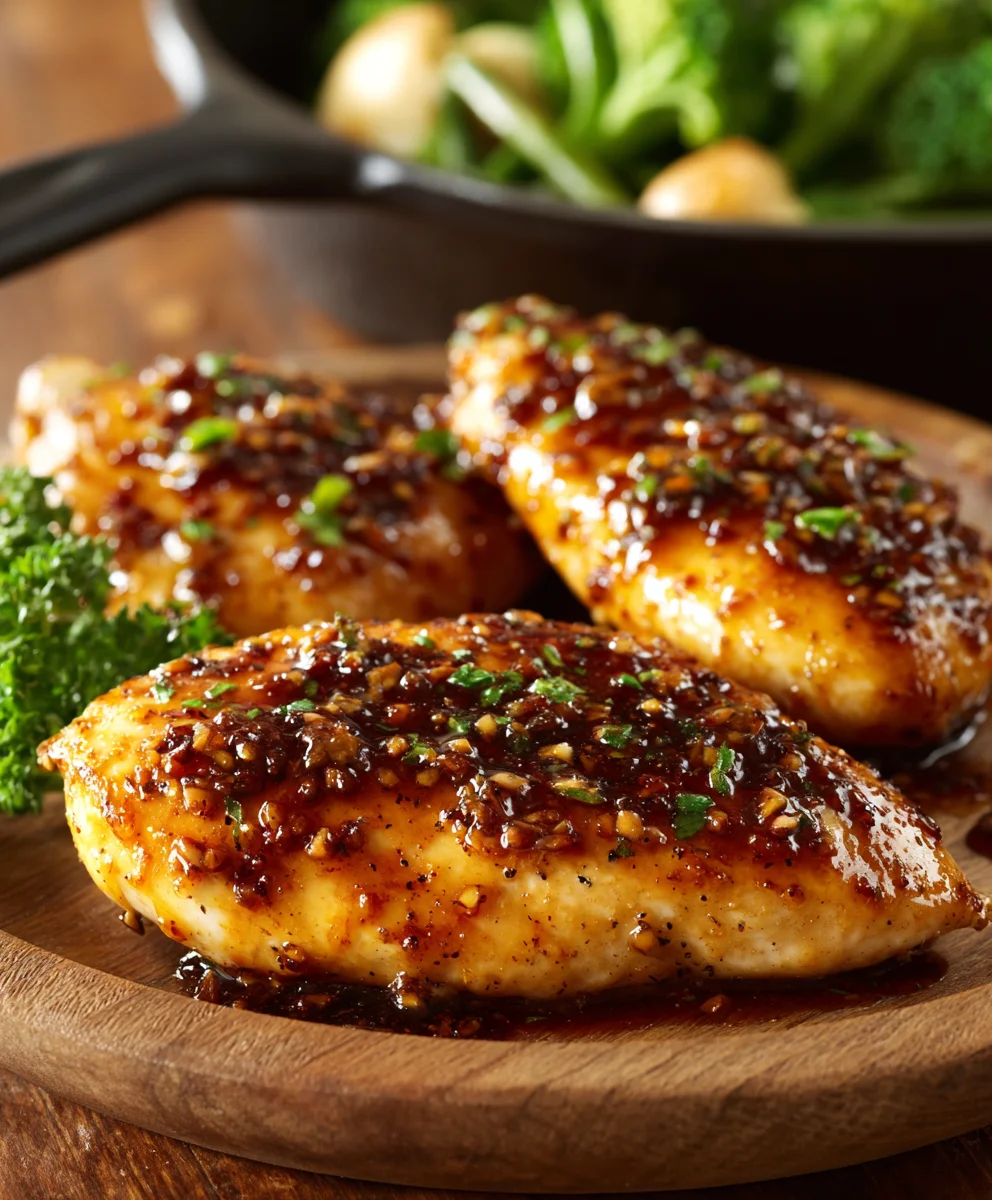
- Rest and Garnish: Carefully remove the Honey Garlic Chicken Breasts from the pan and let them rest on a cutting board for 5 minutes before slicing. Resting allows the juices to redistribute, ensuring every bite is moist and flavorful. Spoon any remaining sauce from the skillet over the sliced or whole chicken breasts. For an extra touch of freshness and visual appeal, garnish with freshly chopped parsley or cilantro and a sprinkle of sesame seeds.
Serving Suggestions and Tips:
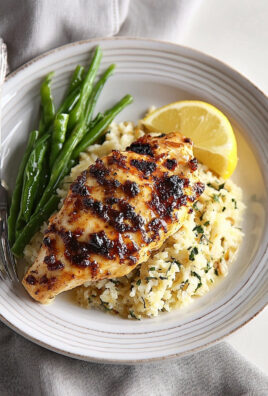
These amazing Honey Garlic Chicken Breasts are incredibly versatile and pair beautifully with a wide array of side dishes. For a complete and satisfying meal, I love serving them alongside fluffy white rice or a fragrant jasmine rice, which does an excellent job of soaking up all that glorious extra sauce. If you’re looking for something a bit lighter or low-carb, consider serving them with quinoa, cauliflower rice, or even a generous helping of mashed potatoes. The creamy texture of mashed potatoes provides a delightful contrast to the sweet and savory chicken.
Vegetables are a must to round out the meal! Steamed broccoli florets, sautéed green beans, or roasted asparagus are fantastic choices. Their slight bitterness or freshness cuts through the richness of the sauce perfectly. For an Asian-inspired twist, try a quick stir-fry of mixed vegetables like bell peppers, snap peas, and carrots. A simple side salad with a light vinaigrette also makes for a refreshing accompaniment.
Tips for Perfect Honey Garlic Chicken Breasts:
- Don’t Skip Pounding: As mentioned before, uniformly pounding the chicken is probably one of the most important steps. It guarantees even cooking, preventing dry spots, and also makes the chicken more tender, allowing it to absorb the sauce better.
- Fresh is Best: While dried spices work in a pinch, using fresh garlic and fresh ginger truly makes a monumental difference in the depth and vibrancy of the honey garlic sauce. The aroma alone is worth the extra effort of mincing and grating.
- Adjust Sweetness/Spice: Feel free to customize the sauce to your liking. If you prefer it sweeter, add a touch more honey. For a spicier kick, increase the red pepper flakes or even add a dash of sriracha. A squeeze of lime juice at the end can also brighten up the flavors beautifully.
- Make it a Meal Prep Star: Honey Garlic Chicken Breasts are fantastic for meal prepping! Cook a larger batch, and portion them out with your favorite sides for quick and easy lunches or dinners throughout the week. They reheat wonderfully. Store in an airtight container in the refrigerator for up to 3-4 days.
- Pan Gravy Perfection: Don’t leave any of that delicious sauce behind in the pan! If you have extra sauce, it’s perfect drizzled over rice, vegetables, or even a fried egg the next morning. It’s truly a sauce you won’t want to waste.
- Consider Thighs: While this recipe focuses on chicken breasts, boneless, skinless chicken thighs work equally well, or even better for some, as they tend to be more forgiving and stay incredibly juicy. Adjust cooking time slightly if using thighs, as they might take a few minutes longer to cook through.
- Achieving the Ultimate Glaze: For an extra thick and sticky glaze, after the chicken is cooked and removed, let the sauce reduce on medium-high heat for an additional 2-3 minutes, stirring frequently, until it’s very syrupy. Then, toss the cooked chicken back in to coat. This creates a deeply caramelized finish.
I hope you absolutely adore making and eating these Honey Garlic Chicken Breasts as much as I do. They are a weeknight favorite in my home for a reason – simple to make, packed with flavor, and incredibly satisfying!
Ingredients:
-
For the Honey Garlic Chicken Breasts:
- 4 boneless, skinless chicken breasts (approximately 1.5 to 2 pounds total)
- 1 tablespoon olive oil (or avocado oil)
- ½ teaspoon salt, or to taste
- ¼ teaspoon black pepper, freshly ground, or to taste
- 1 tablespoon unsalted butter
- Optional garnish: Fresh chopped parsley or cilantro, sesame seeds
-
For the Honey Garlic Sauce:
- ½ cup low-sodium chicken broth
- ½ cup honey (local raw honey is always a wonderful choice if you have it!)
- ¼ cup soy sauce (or tamari for a gluten-free option)
- 2 tablespoons apple cider vinegar
- 1 tablespoon cornstarch (or arrowroot powder for thickening)
- 6-8 cloves garlic, minced (and trust me, you want to use fresh garlic here for the best flavor in our Honey Garlic Chicken Breasts!)
- ½ teaspoon grated fresh ginger (or ¼ teaspoon ground ginger)
- ¼ teaspoon red pepper flakes (adjust to your preferred level of spice, or omit if you prefer no heat)
Preparing the Honey Garlic Sauce:
- Whisking the Base: In a medium-sized bowl, let’s start by combining the liquid components for our incredible honey garlic sauce. Pour in the ½ cup of low-sodium chicken broth, followed by ½ cup of glorious honey. I always find using a good quality honey really elevates the flavor of these Honey Garlic Chicken Breasts. Next, add the ¼ cup of soy sauce (or tamari if you’re keeping it gluten-free), and 2 tablespoons of apple cider vinegar. The vinegar adds a lovely tang that balances the sweetness of the honey beautifully. Give these a good whisk until they are thoroughly combined and the honey has dissolved into the other liquids. We want a smooth, cohesive base to build upon. This ensures that every component is perfectly integrated before we introduce the other elements, laying down a strong foundation for the deep, complex flavors that will soon emerge. The consistency at this stage should be quite fluid, almost like a light syrup, preparing for the later addition of aromatics and thickeners.
- Creating the Slurry: Now, in a small separate bowl, we need to prepare our thickening agent. This is a crucial step for achieving that perfectly glossy, clingy sauce. Take 1 tablespoon of cornstarch and add about 2 tablespoons of the liquid mixture you just prepared from the main sauce bowl. Whisk this together with a fork or a small whisk until you have a smooth, lump-free slurry. It’s important to do this separately to prevent lumps when it’s added to the warm sauce later. A well-made slurry is the secret to a smooth, evenly thickened sauce, avoiding any undesirable clumping that can sometimes occur when cornstarch is added directly to hot liquids. Set this cornstarch slurry aside for now, as its time to shine will come later in the cooking process, after the flavors have had a chance to meld.
- Infusing the Aromatics: Back to our main sauce bowl. It’s time to introduce the heart of the flavor: the aromatics! Add your 6-8 cloves of minced garlic. I really encourage you to use fresh garlic here; the intensity and pungency are unmatched and truly shine in our Honey Garlic Chicken Breasts. Next, grate in ½ teaspoon of fresh ginger. If fresh isn’t available, ¼ teaspoon of ground ginger will work, but fresh is definitely preferred for that vibrant, zesty kick that permeates the entire dish. Finally, if you enjoy a little warmth, add ¼ teaspoon of red pepper flakes. You can always add more or less depending on your heat preference, or skip it entirely if you prefer a milder flavor profile. Give everything another good stir to ensure all these wonderful flavors are well distributed throughout the liquid. This completes the sauce preparation for now; we’ll cook it later, allowing these potent aromatics to fully release their essence into the simmering liquid.
Preparing the Chicken Breasts:
- Pounding the Chicken: Let’s get our chicken ready! Place each of the 4 boneless, skinless chicken breasts between two sheets of plastic wrap or inside a large freezer bag. Using a meat mallet, a rolling pin, or even the bottom of a heavy skillet, carefully pound each chicken breast to an even thickness of about ¾ to 1 inch. This step is absolutely vital for ensuring even cooking and tenderness. Thicker parts won’t cook as quickly as thinner parts, leading to dry, overcooked sections and potentially undercooked ones. Pounding also helps to tenderize the meat, breaking down some of the muscle fibers, which results in a wonderfully juicy and tender bite in your finished Honey Garlic Chicken Breasts. This uniformity is a game-changer for a restaurant-quality result.
- Seasoning the Chicken: Once all the chicken breasts are uniformly pounded, remove them from the plastic wrap and pat them thoroughly dry with paper towels. Removing excess moisture is key to achieving a nice sear and that desirable golden-brown crust. Season both sides of each chicken breast generously with ½ teaspoon of salt and ¼ teaspoon of freshly ground black pepper. Don’t be shy here; proper seasoning contributes significantly to the overall flavor of the finished dish, ensuring that the chicken itself is flavorful even before it’s bathed in the delicious honey garlic sauce. A well-seasoned piece of chicken is the foundation of any great meal.
- Initial Sear: Heat 1 tablespoon of olive oil (or avocado oil) in a large skillet or a non-stick pan over medium-high heat. You want the oil to shimmer but not smoke, indicating it’s perfectly hot. Once the pan is hot, carefully place the seasoned chicken breasts into the skillet, ensuring not to overcrowd the pan. You might need to cook them in batches if your skillet isn’t large enough to give each piece adequate space, as overcrowding can steam the chicken instead of searing it. Sear the chicken for about 3-4 minutes per side, until they are beautifully golden brown and have developed a tantalizing crust. This initial searing step is crucial for developing a rich, flavorful crust and locking in the juices, creating a layer of concentrated flavor that enhances the entire Honey Garlic Chicken Breasts experience. However, don’t worry about cooking them all the way through at this stage; they will finish cooking in the sauce, absorbing its flavors. Once seared, remove the chicken from the skillet and set it aside on a clean plate to await its return to the pan for the final cooking stage.
Cooking the Honey Garlic Chicken Breasts:
- Sautéing Aromatics (if not already in sauce): If your skillet has a lot of browned bits (fond) from searing the chicken, that’s great – those are flavor powerhouses! If not, or if you had to clean the pan, add 1 tablespoon of unsalted butter to the same skillet over medium heat. Once the butter is melted and sizzling slightly, add any remaining minced garlic and grated ginger (if you chose to keep some separate from the main sauce mixture for a fresher punch). Sauté for about 30 seconds to 1 minute, until fragrant, being careful not to burn the garlic, which can quickly turn bitter. This step isn’t strictly necessary if all your aromatics are already in your sauce, but it truly amplifies the fresh garlic and ginger punch, creating another layer of aromatic goodness that will infuse into our Honey Garlic Chicken Breasts.
- Adding the Sauce Base: Now, pour the prepared honey garlic sauce mixture (the one without the cornstarch slurry yet) into the skillet. Bring the sauce to a gentle simmer, making sure to scrape up any browned bits from the bottom of the pan with a wooden spoon or spatula. Those browned bits are packed with flavor, known as fond, and will integrate beautifully into our Honey Garlic Chicken Breasts, enriching the overall taste profile. Let the sauce simmer for about 2-3 minutes, allowing the flavors to meld and the mixture to warm through. As it simmers, the various components—honey, soy, vinegar, garlic, and ginger—will begin to harmonise, deepening into a more complex and enticing flavor profile. You’ll notice the delightful aroma filling your kitchen, signaling that something delicious is on its way.
- Thickening the Sauce: Give your cornstarch slurry a quick re-whisk, as cornstarch tends to settle at the bottom. Slowly pour the slurry into the simmering sauce in the skillet, whisking constantly. Continue to whisk gently as the sauce thickens. This process usually takes about 1-2 minutes. The sauce will transform, becoming wonderfully glossy and noticeably thicker, capable of coating the back of a spoon with a beautiful sheen. If it gets too thick, you can always add a tablespoon or two more of chicken broth to thin it slightly to your desired consistency. We’re aiming for a luscious, pourable sauce that clings perfectly to the chicken, creating that signature glaze for our Honey Garlic Chicken Breasts. This thickening step is where the sauce truly comes alive, developing its characteristic texture.
- Finishing the Chicken in the Sauce: Carefully return the seared chicken breasts to the skillet, nestling them into the thickened honey garlic sauce. Reduce the heat to medium-low. Spoon the rich sauce over the chicken breasts to coat them generously, ensuring every inch is bathed in flavor. Cover the skillet with a lid and let the chicken simmer gently in the sauce for about 5-8 minutes, or until the chicken is cooked through. The internal temperature of the thickest part of the chicken should reach 165°F (74°C) when checked with an instant-read thermometer. This simmering period allows the chicken to absorb all those incredible honey garlic flavors, making it incredibly tender and juicy, completing the cooking process while infusing maximum taste into every fiber of the meat.
- Reducing and Glazing: Once the chicken is cooked through, remove the lid. If the sauce isn’t as thick or as reduced as you’d like, you can carefully remove the chicken to a plate and increase the heat slightly, allowing the sauce to simmer uncovered for a few more minutes until it reaches your desired consistency. As it reduces, it will become even more flavorful and sticky, concentrating the sugars and aromatics, creating that perfect, irresistible glaze for your Honey Garlic Chicken Breasts. This final reduction ensures a restaurant-quality finish that makes the dish truly special.
- Rest and Garnish: Carefully remove the Honey Garlic Chicken Breasts from the pan and let them rest on a cutting board for 5 minutes before slicing. Resting allows the juices to redistribute throughout the meat, ensuring every bite is moist and flavorful rather than dry. This is a critical step for tender chicken. Spoon any remaining sauce from the skillet over the sliced or whole chicken breasts, making sure none of that deliciousness goes to waste. For an extra touch of freshness, vibrant color, and visual appeal, garnish generously with freshly chopped parsley or cilantro and a sprinkle of sesame seeds. These garnishes add a lovely textural contrast and an aromatic flourish that completes the dish.
Serving Suggestions and Tips:
These amazing Honey Garlic Chicken Breasts are incredibly versatile and pair beautifully with a wide array of side dishes. For a complete and satisfying meal, I love serving them alongside fluffy white rice or a fragrant jasmine rice, which does an excellent job of soaking up all that glorious extra sauce. The subtle starchiness of the rice provides a perfect canvas for the rich and savory sauce, allowing you to savor every last drop. If you’re looking for something a bit lighter or low-carb, consider serving them with quinoa, cauliflower rice, or even a generous helping of creamy mashed potatoes. The smooth, comforting texture of mashed potatoes provides a delightful contrast to the sweet and savory chicken, making for a truly harmonious plate.
Vegetables are a must to round out the meal and add a burst of freshness! Steamed broccoli florets, sautéed green beans, or roasted asparagus are fantastic choices. Their slight bitterness or vibrant freshness cuts through the richness of the sauce perfectly, providing balance and essential nutrients. For an Asian-inspired twist, try a quick stir-fry of mixed vegetables like colorful bell peppers, crisp snap peas, and sweet carrots, which can be tossed directly in some of the leftover sauce. A simple side salad with a light vinaigrette also makes for a refreshing accompaniment, offering a bright and tangy counterpoint to the savory chicken.
Tips for Perfect Honey Garlic Chicken Breasts:
- Don’t Skip Pounding: As mentioned before, uniformly pounding the chicken is probably one of the most important steps. It guarantees even cooking, preventing dry spots and ensuring consistent doneness across all pieces. Moreover, it tenderizes the meat, making the chicken incredibly succulent and allowing it to absorb the sauce’s flavors more effectively. This small effort yields significant results for your Honey Garlic Chicken Breasts.
- Fresh is Best: While dried spices work in a pinch, using fresh garlic and freshly grated ginger truly makes a monumental difference in the depth, vibrancy, and complexity of the honey garlic sauce. The pungent, aromatic notes of fresh ingredients permeate the entire dish, creating a much more sophisticated and appealing flavor profile that simply can’t be replicated with dried alternatives. The aroma alone is worth the extra effort of mincing and grating.
- Adjust Sweetness/Spice: Feel free to customize the sauce to your liking. If you prefer it sweeter, add a touch more honey, perhaps a tablespoon at a time until it meets your taste preference. For a spicier kick, increase the red pepper flakes or even add a dash of sriracha or your favorite chili garlic sauce. Conversely, if you’re not a fan of heat, simply omit the red pepper flakes. A squeeze of fresh lime juice or a splash of rice vinegar at the end can also brighten up the flavors beautifully, adding a zesty finish.
- Make it a Meal Prep Star: Honey Garlic Chicken Breasts are fantastic for meal prepping! Cook a larger batch, and portion them out with your favorite sides like rice and steamed veggies for quick and easy lunches or dinners throughout the week. They reheat wonderfully in the microwave or on the stovetop, making busy weekdays much simpler. Store them in an airtight container in the refrigerator for up to 3-4 days to maintain freshness and flavor.
- Pan Gravy Perfection: Don’t leave any of that delicious sauce behind in the pan! If you have extra sauce, it’s perfect drizzled over rice, vegetables, or even a fried egg the next morning for a unique breakfast experience. It’s truly a sauce you won’t want to waste, as it concentrates all the wonderful flavors of the dish into a rich, luscious condiment.
- Consider Thighs: While this recipe focuses on chicken breasts, boneless, skinless chicken thighs work equally well, or even better for some, as they tend to be more forgiving and stay incredibly juicy due to their higher fat content. If using thighs, adjust the cooking time slightly, as they might take a few minutes longer to cook through, usually around 8-10 minutes simmering in the sauce. The result will be equally delicious, if not more tender for some palates.
- Achieving the Ultimate Glaze: For an extra thick and sticky glaze, after the chicken is cooked and removed, let the sauce reduce on medium-high heat for an additional 2-3 minutes, stirring frequently, until it’s very syrupy and coats the back of a spoon heavily. Then, toss the cooked chicken back in to coat thoroughly. This creates a deeply caramelized, intensely flavored finish that truly elevates the presentation and taste of your Honey Garlic Chicken Breasts.
I hope you absolutely adore making and eating these Honey Garlic Chicken Breasts as much as I do. They are a weeknight favorite in my home for a reason – simple to make, packed with flavor, and incredibly satisfying! Enjoy every mouth-watering bite!
Conclusion:
I truly believe that if you’re looking for a recipe that effortlessly delivers on flavor, simplicity, and sheer satisfaction, then you absolutely must add this one to your culinary repertoire. We’ve journeyed through the steps of creating a dish that transcends the ordinary, transforming humble chicken breasts into something truly remarkable. The magic lies in the perfect marriage of sweet honey and pungent garlic, creating a glaze that is both incredibly aromatic and deeply flavorful. It’s not just a meal; it’s an experience – one that promises tender, juicy chicken enveloped in a sticky, savory-sweet sauce that tantalizes the taste buds with every single bite. This recipe isn’t just easy; it’s foolproof, designed to ensure success whether you’re a seasoned chef or just starting your cooking adventure. The sheer elegance of its flavor profile, combined with the minimal effort required, makes it an undeniable winner in any kitchen. I can confidently say this will become a new go-to for busy weeknights or even casual entertaining, impressing everyone at the table without any fuss. The incredible balance of sweetness and savory depth, coupled with the perfectly cooked, succulent chicken, makes it an unforgettable dish that will have your family asking for it again and again.
Now that you’ve mastered the art of creating these incredible Honey Garlic Chicken Breasts, let’s talk about how to elevate your meal even further or put your own spin on it. For a truly balanced and comforting dinner, I love serving these juicy chicken breasts alongside a fluffy bed of jasmine rice or quinoa, which beautifully soaks up every last drop of that delectable sauce. If you’re looking for something a bit heartier, creamy mashed potatoes or roasted sweet potatoes are fantastic companions, offering a wonderful textural contrast. Don’t forget your greens! Steamed broccoli, roasted asparagus, or a fresh, crisp garden salad with a light vinaigrette will add a vibrant touch and ensure a complete meal. Sometimes, I even like to toss in some steamed green beans directly into the pan with the sauce for the last couple of minutes, letting them get a light coating of that amazing glaze.
Feeling adventurous? This recipe is incredibly adaptable! You could easily toss in some chopped bell peppers, sliced onions, or even some snap peas into the pan during the last few minutes of cooking, allowing them to gently soften and absorb some of that amazing honey garlic glaze. If you prefer a little heat, a pinch of red pepper flakes added to the sauce would introduce a welcome kick. For those who enjoy a tangier note, a squeeze of fresh lime or lemon juice right before serving can brighten up the entire dish and add another layer of complexity. And while chicken breasts are wonderful, feel free to experiment with boneless, skinless chicken thighs for an even juicier result, or even chicken tenderloins for a quicker cooking time, making it perfect for those super busy evenings. This recipe is also brilliant for meal prepping; simply cook a larger batch, portion it out, and enjoy delicious, homemade meals throughout the week. Imagine having such a flavorful and satisfying lunch ready to go without any extra effort! The versatility truly knows no bounds, allowing you to tailor it perfectly to your family’s preferences or what you have on hand in your pantry. You could even shred any leftovers and use them in wraps or sandwiches for a tasty next-day meal.
So, what are you waiting for? I wholeheartedly encourage you to roll up your sleeves, gather your ingredients, and give this truly exceptional recipe a try this week. You’re not just cooking; you’re creating a memorable meal that will delight your senses and those of your loved ones. There’s a profound satisfaction that comes from bringing such a delicious dish to life in your own kitchen, and I promise you, the aroma alone will have everyone eagerly anticipating dinner. Once you’ve experienced the ease and incredible flavor of these Honey Garlic Chicken Breasts, I’m confident they’ll earn a permanent spot on your weekly menu rotation. But don’t keep this culinary triumph to yourself! I would absolutely love to hear all about your experience. Did you add any unique twists? What did you serve it with? Please, share your photos, your thoughts, and your personal variations in the comments below. Your feedback and creativity inspire me and our entire community of home cooks, helping us all discover new ways to enjoy our favorite dishes. Let’s celebrate delicious food together, one amazing recipe at a time! Happy cooking, and I can’t wait to hear from you!
Honey Garlic Chicken Breasts: Easy & Flavorful Dinner!
Tender, succulent chicken bathed in a glossy, irresistible sauce that strikes the perfect balance between sweet and savory. A go-to for busy home cooks, delivering gourmet flavor without the fuss, making it a staple in any cooking repertoire.
Ingredients
-
2 large boneless, skinless chicken breasts
-
1/2 tablespoon olive oil
-
1/4 teaspoon salt
-
1/8 teaspoon black pepper
-
1/2 tablespoon unsalted butter
-
1/4 cup low-sodium chicken broth
-
2 tablespoons honey
-
2 tablespoons soy sauce
-
1 tablespoon apple cider vinegar
-
1/2 tablespoon cornstarch
-
4 cloves garlic, minced
-
1/4 teaspoon grated fresh ginger
-
1/8 teaspoon red pepper flakes
-
Optional garnish: Fresh chopped parsley or cilantro, sesame seeds
Instructions
-
Step 1
In a bowl, whisk together the 1/4 cup chicken broth, 2 tablespoons honey, 2 tablespoons soy sauce, 1 tablespoon apple cider vinegar, 4 cloves minced garlic, 1/4 teaspoon grated fresh ginger, and 1/8 teaspoon red pepper flakes. In a separate small bowl, combine 1/2 tablespoon cornstarch with 2 tablespoons of the sauce mixture to create a lump-free slurry; set aside. -
Step 2
Place each chicken breast between plastic wrap and pound to an even 3/4 to 1-inch thickness. Pat dry with paper towels and season both sides with 1/4 teaspoon salt and 1/8 teaspoon black pepper. -
Step 3
Heat 1/2 tablespoon olive oil in a large skillet over medium-high heat until shimmering. Carefully place seasoned chicken breasts into the skillet and sear for 3-4 minutes per side until golden brown. Remove chicken from skillet and set aside on a clean plate. -
Step 4
If desired, add 1/2 tablespoon unsalted butter to the skillet and sauté any additional minced garlic or grated ginger for 30 seconds. Pour the main honey garlic sauce mixture (without the slurry) into the skillet. Bring to a gentle simmer, scraping up any browned bits from the bottom of the pan. Let simmer for 2-3 minutes. -
Step 5
Re-whisk the cornstarch slurry and slowly pour it into the simmering sauce, whisking constantly until the sauce thickens and becomes glossy (about 1-2 minutes). Return the seared chicken breasts to the skillet, nestling them into the sauce. Spoon sauce over the chicken, cover, and simmer on medium-low heat for 5-8 minutes, or until the internal temperature of the chicken reaches 165°F (74°C). -
Step 6
Remove chicken from the pan and let rest on a cutting board for 5 minutes before slicing. Spoon any remaining sauce over the sliced or whole chicken breasts. Garnish with fresh chopped parsley or cilantro and sesame seeds, if desired, and serve immediately.
Important Information
Nutrition Facts (Per Serving)
It is important to consider this information as approximate and not to use it as definitive health advice.
Allergy Information
Please check ingredients for potential allergens and consult a health professional if in doubt.

Leave a Comment