
Healthy No Bake Oreos are about to become your new favorite guilt-free indulgence, redefining what you thought was possible for a quick, delicious dessert. I am absolutely thrilled to share a recipe that perfectly captures the essence of that beloved, iconic cookie we all grew up with, but with a wonderfully wholesome twist. We all cherish the classic Oreo, a snack staple that has graced kitchen tables and lunchboxes since 1912, bringing simple, sweet joy to generations. But what if you could savor that unmistakable chocolatey crunch and rich, creamy filling without the traditional baking process, and with ingredients you can feel good about? This innovative recipe delivers precisely that – a nostalgic taste experience reimagined for today’s health-conscious palate.
People utterly adore this dish not just for its incredible, familiar taste and delightful texture, which beautifully mimic the original, but also for its remarkable ease and convenience. There’s no oven required, making it an ideal solution for hot days, busy schedules, or when a sudden craving strikes. Imagine whipping up a batch of these delectable treats in minutes, satisfying your sweet tooth without compromising your wellness goals. Prepare yourself to fall head over heels for these irresistible Healthy No Bake Oreos; they truly offer the best of both worlds – pure enjoyment and mindful eating combined into one perfect bite.
Ingredients:
Creating these delightful Healthy No Bake Oreos is surprisingly simple, relying on wholesome ingredients that come together to mimic that iconic flavor and texture we all adore. I’ve carefully selected components that not only taste fantastic but also offer nutritional benefits, making this treat something you can feel genuinely good about enjoying.
For the Cookie Base:
- 1 ½ cups (approximately 250g) Medjool Dates, pitted and firmly packed. These are truly the star of our cookie base, providing natural sweetness and the perfect sticky binder. Ensure they are soft and plump; if yours feel a bit dry, a quick soak in warm water for 10 minutes (then drained well) can work wonders.
- 1 ½ cups (about 130g) Rolled Oats. I opt for certified gluten-free rolled oats to make these accessible to more people, but any standard rolled oats will do. They add a lovely chewiness and fiber to our cookie.
- ½ cup (about 50g) Unsweetened Cacao Powder. This is where we get that rich, deep chocolatey flavor and the signature dark color. Cacao is also packed with antioxidants!
- 1 teaspoon Pure Vanilla Extract. Vanilla is essential for rounding out the flavors and adding a hint of warmth to our chocolate cookie.
- ¼ teaspoon Fine Sea Salt. Don’t skip the salt! It’s crucial for balancing the sweetness and intensifying the chocolate flavor, making every bite more dynamic.
- 2 tablespoons Water or Plant-Based Milk (optional, as needed). This is only if your mixture is too dry to come together. Start with just one tablespoon if you need it.
For the Creamy Vanilla Filling:
- 1 cup (about 140g) Raw Cashews, soaked for at least 4 hours, or preferably overnight, then thoroughly drained and rinsed. Soaking is a non-negotiable step for achieving that incredibly smooth, silky texture in our filling. Trust me, it makes all the difference!
- ¼ cup (about 60ml) Maple Syrup or Agave Nectar. This provides the perfect amount of sweetness to our filling without being overpowering.
- ¼ cup (about 60ml) Full-Fat Coconut Milk (from a can), chilled, just the thick cream part. Chilling the can helps separate the cream from the water. This adds richness and helps the filling set beautifully.
- 2 tablespoons Melted Coconut Oil. This is key for helping the filling firm up and hold its shape in the refrigerator, giving it that classic solid cream consistency.
- 1 ½ teaspoons Pure Vanilla Extract. Just like with the cookie, vanilla is vital here for that classic, sweet cream flavor that pairs so perfectly with the chocolate.
- ⅛ teaspoon Fine Sea Salt. A tiny pinch again to enhance the vanilla and balance the sweetness, preventing the filling from tasting flat.
Preparing the Cookie Base:
-
Soak and Pit the Dates: First things first, ensure your Medjool dates are lovely and soft. If they feel a bit firm, I usually place them in a bowl and cover them with warm water for about 10-15 minutes. Once softened, drain them completely and carefully remove all the pits. This step is crucial for achieving a smooth cookie base and protecting your food processor blades!
-
Process the Oats: In the bowl of a high-speed food processor fitted with the S-blade, add the 1 ½ cups of rolled oats. Pulse for about 30 seconds to a minute, until they break down into a coarse flour consistency. We don’t want a super fine flour, but rather something resembling a fine meal, which will give our cookies a lovely texture without being gritty. Transfer the processed oats to a separate medium-sized bowl for now.
-
Create the Date Paste: Now, add the pitted, softened dates to the food processor. Process them on high until they form a sticky, uniform paste. This might take a couple of minutes, and you may need to stop and scrape down the sides of the bowl a few times to ensure everything is evenly incorporated. You’re looking for a smooth, cohesive ball of date paste.
-
Combine Wet and Dry Ingredients: Add the processed oats back into the food processor with the date paste. Then, add the ½ cup of unsweetened cacao powder, the 1 teaspoon of pure vanilla extract, and the ¼ teaspoon of fine sea salt. Secure the lid.
-
Blend to Form Dough: Process the mixture on high. It might seem crumbly at first, but keep processing. The dates will help bind everything together. Continue blending until a sticky, dark chocolate dough forms and starts to clump around the blade. This can take anywhere from 1 to 3 minutes, depending on your food processor. My tip here: If the mixture seems too dry and isn’t coming together after a couple of minutes, add 1 tablespoon of water or plant-based milk at a time, processing after each addition, until the dough reaches the right consistency – sticky enough to hold together when pressed, but not overly wet.
-
Form the Cookies: Once your dough is ready, transfer it to a large piece of parchment paper. I find it easiest to place another piece of parchment paper on top and then use a rolling pin to roll out the dough evenly to about ¼-inch thickness. Alternatively, you can take small portions of the dough (about 1 tablespoon each) and roll them into balls, then flatten them gently between your palms. For that classic Oreo shape, I love using a 1 ½-inch or 2-inch round cookie cutter to cut out uniform circles. Reroll any scraps and cut more cookies until all the dough is used. This method ensures all your cookies are the same size, which makes for easier assembly of your Healthy No Bake Oreos.
-
Chill the Cookie Bases: Carefully transfer your cut cookie bases onto a baking sheet lined with parchment paper. Place them in the freezer for at least 30 minutes while you prepare the filling. This step is crucial for allowing them to firm up, making them easier to handle and preventing them from crumbling during assembly.
Crafting the Creamy Filling:
The filling is what truly transforms these into legitimate Healthy No Bake Oreos. It’s wonderfully rich and vanilla-scented, perfectly complementing the deep chocolate cookie base.
-
Prepare the Cashews: If you haven’t already, ensure your raw cashews have been soaked for at least 4 hours (or overnight for best results). Drain them thoroughly and rinse them under cold water. This removes any phytic acid and ensures they blend into an incredibly smooth, creamy consistency without any grittiness.
-
Combine Filling Ingredients: In a high-speed blender (a food processor can work, but a blender yields a smoother result for this), add the drained cashews, ¼ cup of maple syrup (or agave), ¼ cup of chilled full-fat coconut milk cream, 2 tablespoons of melted coconut oil, 1 ½ teaspoons of pure vanilla extract, and the ⅛ teaspoon of fine sea salt.
-
Blend Until Silky Smooth: Blend on high speed, scraping down the sides as needed, until the mixture is incredibly smooth and creamy. This can take 2-4 minutes. You want absolutely no cashew lumps remaining. Patience is key here! The smoother the blend, the better the final texture of your filling. The mixture will be thick but pourable, or at least spoonable.
-
Test and Adjust Sweetness: Give the filling a quick taste. If you prefer it a little sweeter, add another tablespoon of maple syrup and blend again. I find the suggested amount to be just right, offering a lovely balance with the chocolate cookie, but taste is personal!
-
Chill the Filling: Transfer the creamy filling to a small bowl. Cover it and place it in the refrigerator for at least 30 minutes. This chilling period allows the coconut oil to start firming up, which will make the filling much easier to pipe or spread onto the cookies and helps it set into that perfect firm-yet-creamy texture we desire for our Healthy No Bake Oreos.
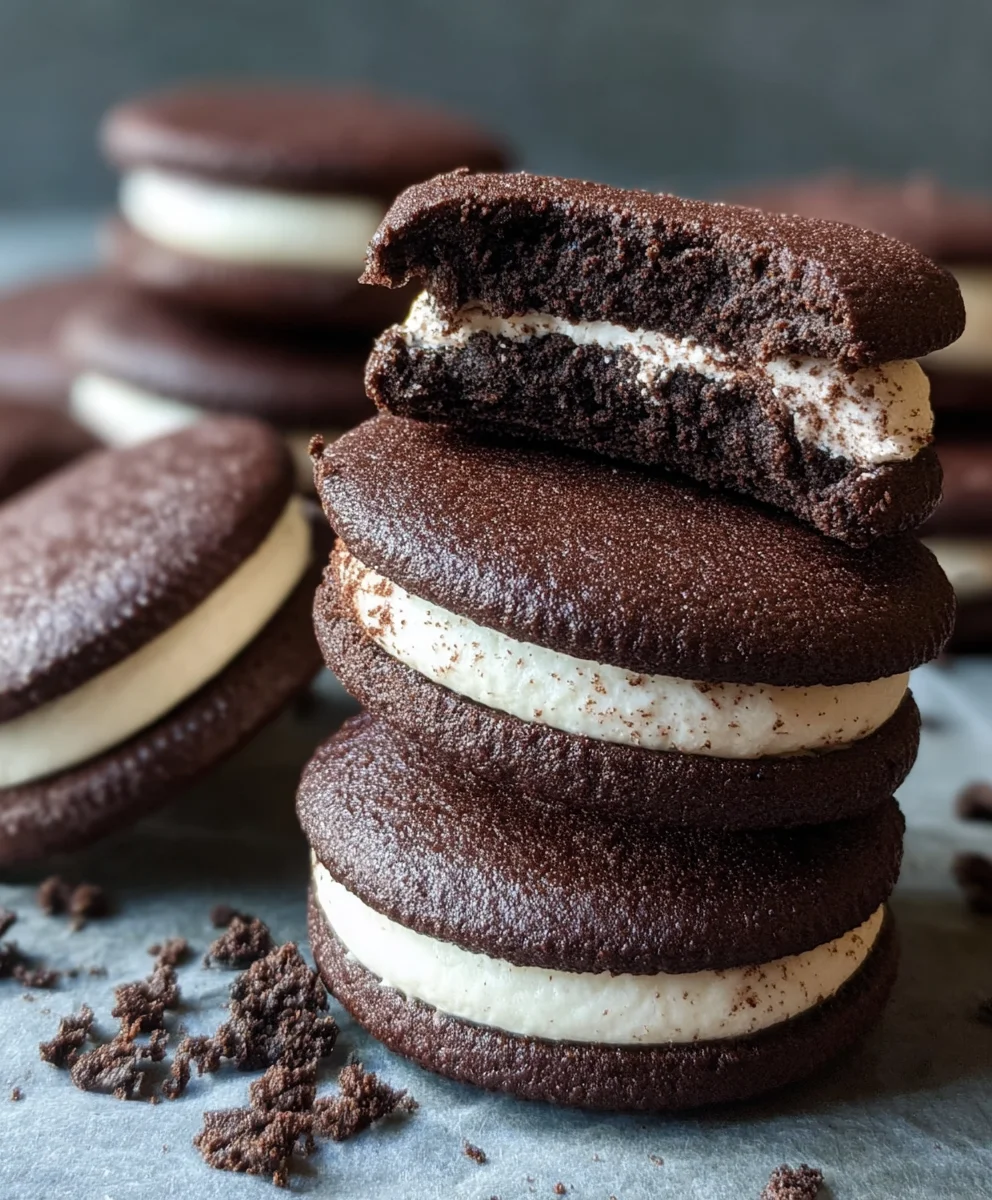
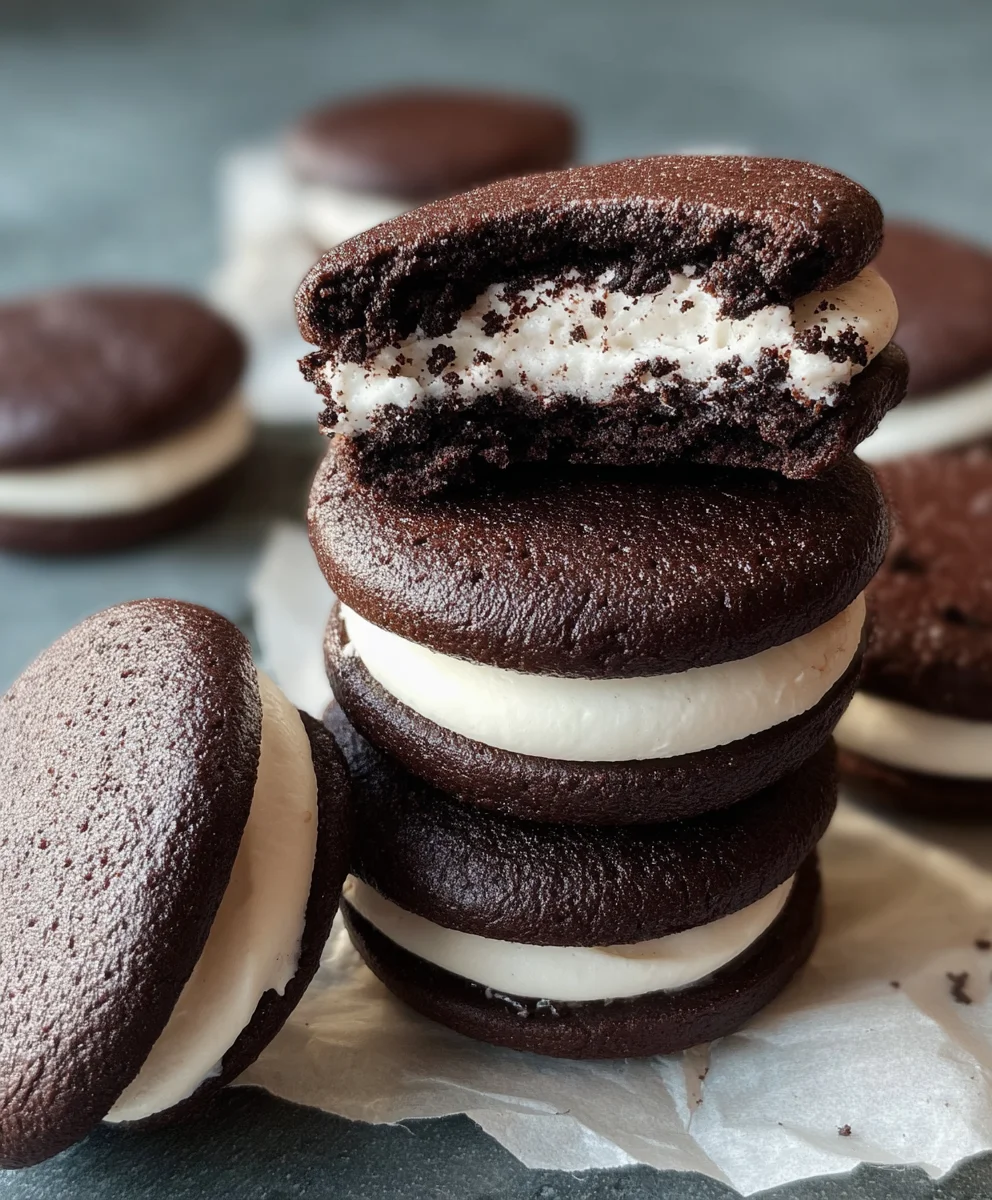
Assembling Your Healthy No Bake Oreos:
Now for the truly satisfying part – bringing everything together! This is where your delicious ingredients transform into the recognizable treat we’re aiming for.
-
Gather Your Components: Take your chilled cookie bases out of the freezer and your chilled creamy filling out of the refrigerator. If the filling has become too firm to work with easily, let it sit at room temperature for 5-10 minutes to soften slightly. If it’s too soft, place it back in the fridge for a bit longer. Aim for a consistency that’s spreadable but still holds its shape.
-
Pipe or Spread the Filling: You have a couple of options here. For a professional, uniform look, transfer the creamy filling to a piping bag fitted with a round tip. Pipe a generous dollop (about 1 to 1 ½ tablespoons) of filling onto the flat side of half of your cookie bases. If you don’t have a piping bag, no worries! Simply use a small spoon or a butter knife to spread a similar amount of filling evenly onto the flat side of half of the cookie bases. I find using a small offset spatula works beautifully for this too, allowing for precision and an even layer of that luscious vanilla cream.
-
Create the Sandwich: Take another plain cookie base and gently place it on top of the filling, pressing down lightly until the filling spreads almost to the edges. Be careful not to press too hard, or you risk cracking your delicate cookie base. You want just enough pressure to secure the sandwich and slightly flatten the filling. The goal is a neat, evenly filled sandwich that looks just like the classic we’re replicating. Repeat this process until all your cookies are assembled into glorious Healthy No Bake Oreos.
-
Final Chill for Setting: Once all your cookies are assembled, arrange them back on the parchment-lined baking sheet. Place them back into the refrigerator for at least 1 hour, or preferably the freezer for 30 minutes, to allow the filling to fully firm up and for all the flavors to meld beautifully. This step is essential for them to hold their shape and achieve that perfect creamy center that contrasts so wonderfully with the chewy cookie. They are absolutely worth the wait!
Storage and Serving Suggestions:
Once your beautiful Healthy No Bake Oreos are fully chilled and set, they are ready to be enjoyed! These treats are incredibly versatile and delightful straight from the fridge or freezer.
- Storage: Store your finished cookies in an airtight container in the refrigerator for up to 1 week. If you want them to last longer, they freeze beautifully! Place them in an airtight container or a freezer-safe bag, separated by parchment paper, and they will keep well for up to 1 month. When you’re ready to enjoy a frozen one, simply let it sit at room temperature for 5-10 minutes, or enjoy it straight from the freezer for a firmer, ice cream-like bite!
- Serving: I love serving these as a sophisticated snack with an afternoon cup of coffee or a cold glass of plant-based milk. They are also a fantastic make-ahead dessert for parties or potlucks. Imagine the delight on people’s faces when they realize these delicious cookies are not only “Oreos” but also a healthier, no-bake version!
- Presentation: For an extra touch, you could dust them lightly with a tiny bit of extra cacao powder before serving, or even a sprinkle of flaky sea salt on top of the chocolate cookie to truly enhance the flavor profile. These little details can elevate an already amazing treat.
Why These Healthy No Bake Oreos Are a Game-Changer:
I genuinely believe these Healthy No Bake Oreos aren’t just a recipe; they’re a revelation. They address so many common desires for healthier dessert options without compromising on taste or the nostalgic joy of a beloved classic. Here’s why I think they stand out:
First and foremost, the nutritional profile is vastly superior to their traditional counterparts. By swapping refined sugars and flours for whole, nutrient-dense ingredients like Medjool dates and rolled oats, we’re introducing fiber, essential minerals, and antioxidants into our treat. Dates provide natural sweetness along with potassium and magnesium, while oats offer sustained energy and digestive benefits. Cacao powder, a star in its own right, is rich in iron and antioxidants, giving us that deep chocolate flavor with added health perks. The cashew-based filling provides healthy fats from the cashews and coconut oil, contributing to satiety and creamy indulgence.
The “no-bake” aspect is another huge win. For anyone who dreads turning on the oven or is short on time, this recipe is a lifesaver. It eliminates the complexities of baking, such as precise oven temperatures and baking times, making it virtually foolproof. It’s perfect for warmer months when you want a delicious treat without heating up your kitchen. The simplicity of using a food processor for the cookies and a blender for the filling means less fuss and more enjoyment. You simply process, shape, and chill – it’s that easy!
Furthermore, these Healthy No Bake Oreos cater to various dietary preferences and restrictions. They are naturally vegan, as they contain no dairy or animal products. For those avoiding gluten, using certified gluten-free rolled oats makes them a perfectly delicious and safe option. This inclusivity means you can share them with a wider audience, knowing you’re offering a treat that almost everyone can enjoy without worry.
But beyond the health benefits and ease, let’s talk about the taste and texture. This is where these no-bake wonders truly shine. The cookie base is wonderfully chewy and rich, with a deep, intense chocolate flavor that’s perfectly balanced by a hint of vanilla and a pinch of salt. It’s dense and satisfying, reminiscent of a brownie, yet with that distinct dark chocolate cookie essence. The creamy filling, on the other hand, is luxuriously smooth, sweet, and bursting with vanilla. It has a delightful texture that melts in your mouth, providing a beautiful contrast to the chewy cookie. When combined, these elements create a harmonious bite that truly captures the spirit of an Oreo, but with an elevated, more wholesome feel.
I’ve found that these cookies don’t just satisfy a craving; they provide a moment of genuine pleasure and contentment. They prove that you don’t have to sacrifice flavor or indulgence when choosing a healthier path. They’re proof that you can have your “Oreos” and feel good about them too. I hope you enjoy making and savoring these as much as I do!
Conclusion:
If you’ve followed along with us today, you’ll know that we’ve just uncovered the secret to creating truly magical moments in your kitchen without ever needing to preheat an oven. This recipe isn’t just another sweet treat; it’s a testament to how effortlessly delicious and surprisingly wholesome indulgence can be. I genuinely believe that these aren’t merely cookies; they’re little bites of pure joy, designed to make your life a little sweeter and a lot simpler. From the very first moment you start gathering your ingredients to that blissful final bite, you’ll appreciate the sheer convenience and delightful outcome of this process. It’s perfect for those busy weeknights when you crave something special but lack the time for extensive baking, or for those scorching summer days when turning on the oven feels like an absolute crime against comfort. The beauty of this particular dessert lies not just in its speed and ease, but in its ability to deliver a familiar, comforting flavor profile in a refreshingly new and guilt-free way.
So, why is this recipe an absolute must-try? For starters, it’s incredibly forgiving. Whether you’re a seasoned chef or someone who considers burning toast a culinary achievement, you simply cannot go wrong here. The minimal ingredients and straightforward steps mean that anyone, and I mean anyone, can whip up a batch of these delectable treats. Furthermore, by focusing on the “healthy” aspect, we’ve found clever ways to reduce some of the typical sugar and fat content found in traditional desserts, without ever compromising on that iconic Oreo taste we all adore. You get all the fun, all the flavor, and all the satisfying crunch and creaminess, but with a lighter feel that leaves you feeling good about your choice. It’s truly the best of both worlds – a treat that satisfies your sweet tooth while still aligning with a more mindful approach to eating. This balance is precisely what makes these Healthy No Bake Oreos a phenomenal choice for everyday enjoyment or special occasions.
But the journey doesn’t end with the basic recipe. Oh no, my friend, that’s just the beginning of your creative adventure! These no-bake wonders are incredibly versatile, practically begging for your personal touch. For serving suggestions, imagine them alongside a steaming mug of coffee on a chilly morning, providing the perfect counterpoint to the bitterness. Or perhaps stacked high on a platter for your next gathering, where they’re guaranteed to be the first to disappear. They also make fantastic additions to packed lunches, a delightful surprise for kids and adults alike, or a quick pick-me-up during an afternoon slump. Consider crushing a few and sprinkling them over a scoop of vanilla bean ice cream for an instant upgrade, or crumbling them as a base for a no-bake cheesecake. The possibilities are genuinely endless, limited only by your imagination!
Endless Variations to Spark Your Culinary Creativity:
- Flavor Infusions: Want to elevate the classic? Try adding a few drops of peppermint extract to the filling for a refreshing mint-chocolate experience, or a hint of orange zest for a bright, citrusy twist. Almond extract can also add a sophisticated, nutty undertone that’s simply divine.
- Texture Play: Boost the crunch factor by folding in finely chopped nuts like pecans, walnuts, or almonds into the cookie base. For a tropical vibe, toasted shredded coconut works wonders. Mini chocolate chips or white chocolate chips can also be incorporated for extra bursts of sweetness.
- Dipping & Drizzling: Take them up a notch by dipping half of each completed cookie into melted dark chocolate, white chocolate, or even a luscious caramel sauce. A simple drizzle across the top can also add an elegant finish, perfect for impressing guests.
- Seasonal Swaps: Adapt these treats for any time of year! During autumn, introduce a pinch of pumpkin spice or cinnamon. For the festive holiday season, a touch of peppermint extract and some crushed candy canes on top would be absolutely magical.
- Cookie Base Alternatives: While Oreos are iconic, don’t shy away from experimenting with other cookie types. Graham crackers, digestive biscuits, or even gluten-free chocolate cookies can serve as excellent substitutes, allowing you to tailor the recipe to dietary needs or personal preference.
I cannot stress enough how much I encourage you to roll up your sleeves, gather your ingredients, and give this recipe a try. You’re not just making a dessert; you’re crafting an experience. An experience of simplicity, health-conscious deliciousness, and pure unadulterated joy. Once you’ve tasted the magic of these Healthy No Bake Oreos, I have a feeling they’ll quickly become a cherished staple in your home. And when you do make them – and I truly hope you do – please, please, please share your experience with me! What variations did you try? What did your family think? Did they disappear as quickly as mine do? Tag us on social media or leave a comment below. Your culinary adventures inspire us all. Let’s spread the joy of easy, delicious, and healthier treats together!
FAQs: People Also Ask About No-Bake Oreo Treats
How long do Healthy No Bake Oreos last and how should I store them?
These delightful treats can typically last for up to 5-7 days when stored correctly. To keep them fresh, place them in an airtight container in the refrigerator. This helps maintain their shape, texture, and prevents them from drying out or becoming too soft. If left at room temperature, they might become a bit too soft, especially if your kitchen is warm.
Can I make Healthy No Bake Oreos gluten-free or vegan?
Absolutely! Making them gluten-free is quite simple: just ensure you use gluten-free sandwich cookies (many brands now offer great alternatives to traditional Oreos) and verify that all other ingredients are certified gluten-free. For a vegan version, use plant-based sandwich cookies, a vegan butter alternative, and ensure your “cream cheese” or “milk” component in the filling is also plant-based. There are many fantastic vegan cream cheese brands and non-dairy milks available that work perfectly.
What are some healthier substitutions for the filling in no-bake Oreos?
To keep the “healthy” aspect prominent, consider these substitutions for the filling: Instead of traditional cream cheese and powdered sugar, you could use a combination of Greek yogurt (drained to remove excess whey for thickness) mixed with a natural sweetener like maple syrup or agave, and a touch of vanilla extract. Another option is using blended cashews (soaked overnight) to create a rich, creamy base with less sugar. Some people also use a combination of mashed avocado and cocoa powder for a surprisingly decadent and nutritious chocolatey filling, though this will alter the flavor profile more significantly.
Can I freeze these no-bake treats for longer storage?
Yes, you can absolutely freeze Healthy No Bake Oreos! This is a fantastic way to prepare them ahead of time or to have a stash of treats ready whenever a craving strikes. Place the prepared cookies in a single layer on a baking sheet lined with parchment paper and freeze for about 1-2 hours until firm. Once firm, transfer them to an airtight freezer-safe container or a freezer bag. They can be stored in the freezer for up to 1-2 months. When you’re ready to enjoy, simply remove them from the freezer and let them thaw at room temperature for 10-15 minutes, or pop them in the fridge for about 30 minutes, until they reach your desired consistency.
Are these no-bake Oreos suitable for children?
Yes, they are wonderfully suitable for children! The no-bake aspect means no hot ovens, making them a safe and fun recipe for kids to help prepare (with adult supervision for any melting steps). The familiar Oreo flavor is almost universally loved by children, and the “healthy” modifications mean you can feel better about offering them as a treat. They are also a great option for school lunchboxes or as an after-school snack. Just be mindful of any specific dietary restrictions or allergies your child or their friends might have.
What kind of Oreos are best for this specific Healthy No Bake Oreos recipe?
For this recipe, I recommend using the standard, classic Oreo cookies as your base, or a similar chocolate sandwich cookie that you prefer. While “Double Stuf” or flavored Oreos (like mint or peanut butter) can work if you want to experiment with different flavor profiles, the classic ones provide a consistent base for the “healthy” modifications in the filling to truly shine. If you’re going for a gluten-free or vegan version, make sure to select the appropriate alternative sandwich cookies that maintain that iconic chocolatey crunch.
Healthy No Bake Oreos
Guilt-free Healthy No Bake Oreos that capture the essence of the classic cookie with a wholesome twist. Easy to make without an oven, these treats are packed with nutritious ingredients, perfect for a quick and mindful sweet indulgence.
Ingredients
-
1 ½ cups (250g) Medjool Dates, pitted, firmly packed
-
1 ½ cups (130g) Rolled Oats
-
½ cup (50g) Unsweetened Cacao Powder
-
1 teaspoon Pure Vanilla Extract
-
¼ teaspoon Fine Sea Salt
-
2 tablespoons Water or Plant-Based Milk (optional, as needed)
-
1 cup (140g) Raw Cashews, soaked 4+ hours, drained & rinsed
-
¼ cup (60ml) Maple Syrup or Agave Nectar
-
¼ cup (60ml) Full-Fat Coconut Milk (thick cream part, chilled)
-
2 tablespoons Melted Coconut Oil
-
1 ½ teaspoons Pure Vanilla Extract
-
⅛ teaspoon Fine Sea Salt
Instructions
-
Step 1
If dates are firm, soak in warm water for 10-15 minutes, then drain and pit. Process rolled oats in a food processor until a coarse flour forms; set aside in a bowl. -
Step 2
Add pitted dates to the food processor and process until a sticky paste. Return processed oats to the food processor with the date paste. Add cacao powder, 1 tsp vanilla extract, and ¼ tsp sea salt. Process until a sticky, dark chocolate dough forms, adding 1 tbsp water/plant-based milk at a time if the mixture is too dry. -
Step 3
Transfer dough to parchment paper, cover with another sheet, and roll evenly to ¼-inch thickness. Use a 1 ½-inch or 2-inch round cookie cutter to cut out circles. Place cookie bases on a parchment-lined baking sheet and freeze for at least 30 minutes. -
Step 4
Ensure raw cashews have been soaked for at least 4 hours, then thoroughly drain and rinse. In a high-speed blender, combine drained cashews, ¼ cup maple syrup, ¼ cup chilled full-fat coconut milk cream, 2 tbsp melted coconut oil, 1 ½ tsp vanilla extract, and ⅛ tsp sea salt. Blend on high until the mixture is incredibly smooth and creamy (2-4 minutes), scraping down sides as needed. Taste and adjust sweetness if desired. -
Step 5
Transfer the creamy filling to a small bowl. Cover and chill in the refrigerator for at least 30 minutes to allow the coconut oil to firm up, making it easier to work with. -
Step 6
Retrieve chilled cookie bases and filling. Pipe or spread 1 to 1 ½ tablespoons of filling onto the flat side of half the cookie bases. Gently place another plain cookie base on top of the filling, pressing lightly until the filling spreads almost to the edges. -
Step 7
Arrange all assembled cookies back on the parchment-lined baking sheet. Place in the refrigerator for at least 1 hour (or freezer for 30 minutes) to allow the filling to fully firm up and flavors to meld. Store in an airtight container in the refrigerator for up to 1 week, or freeze for up to 1 month.
Important Information
Nutrition Facts (Per Serving)
It is important to consider this information as approximate and not to use it as definitive health advice.
Allergy Information
Please check ingredients for potential allergens and consult a health professional if in doubt.


Leave a Comment