
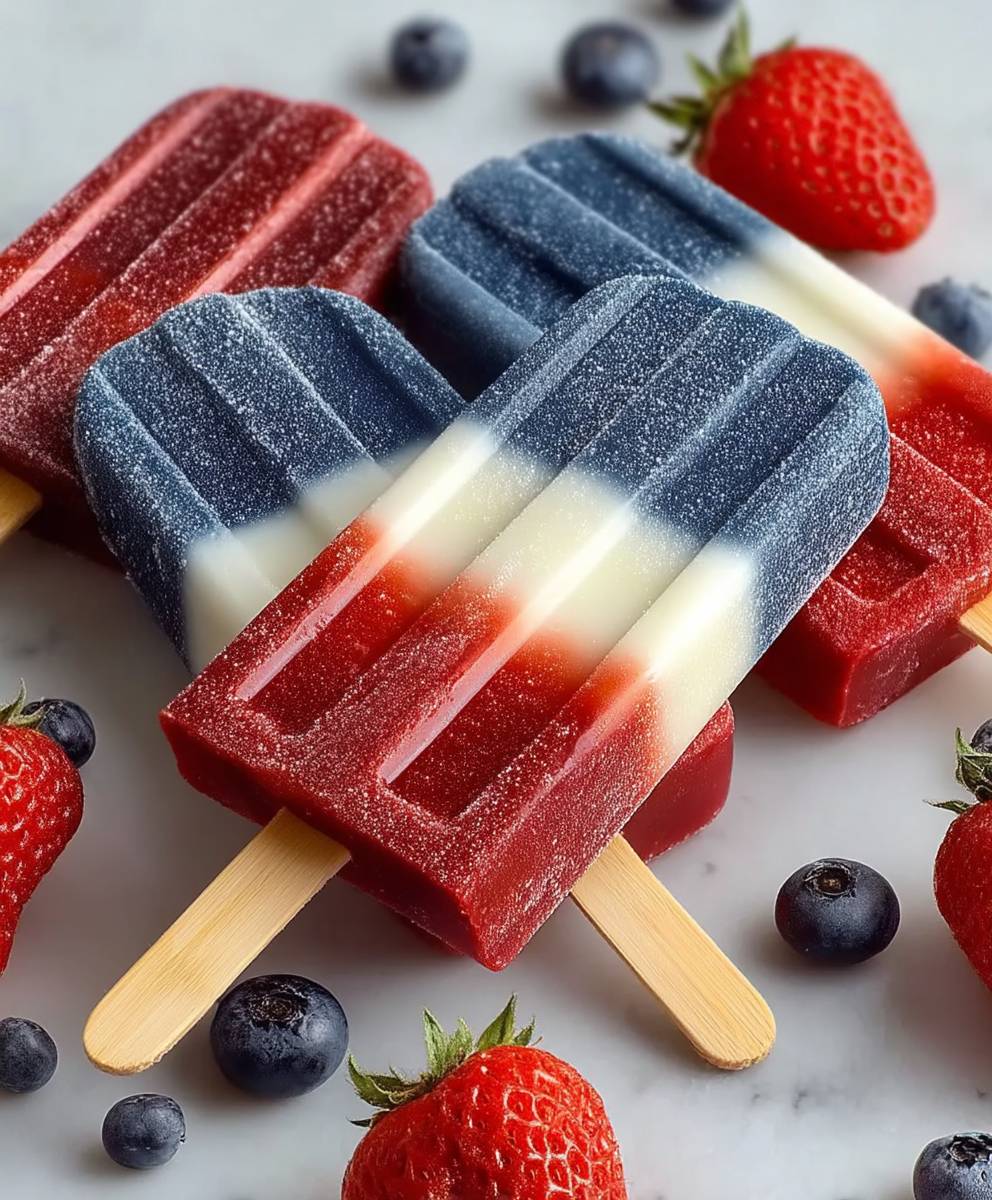
Firecracker Popsicles: Get ready to ignite your taste buds with a burst of patriotic flavor! These aren’t just any popsicles; they’re a vibrant tribute to summer celebrations, especially the 4th of July. Imagine layers of sweet cherry, tangy lemon, and cool blue raspberry swirling together in a frozen treat that’s as visually stunning as it is delicious.
While the exact origins of layered popsicles are debated, the “firecracker” theme has become synonymous with American Independence Day. The red, white, and blue colors mirror the American flag, making them a festive and fun way to celebrate. But these Firecracker Popsicles are more than just a pretty face.
People adore these popsicles for several reasons. First, the combination of fruity flavors is incredibly refreshing on a hot summer day. The sweet cherry, tart lemon, and slightly mysterious blue raspberry create a symphony of tastes that dance on your tongue. Second, the layered effect adds a delightful textural element. Each layer melts at a slightly different rate, providing a unique and enjoyable experience. Finally, they’re incredibly easy to make! With just a few simple ingredients and a little patience, you can create a batch of these patriotic treats that will impress your friends and family. So, ditch the store-bought popsicles and let’s make some homemade magic!

Ingredients:
- For the Blue Layer (Coconut-Pineapple):
- 1 (13.5 ounce) can full-fat coconut milk, refrigerated overnight
- 1 cup frozen pineapple chunks
- 1/4 cup blue spirulina powder (or natural blue food coloring)
- 2 tablespoons maple syrup (or agave nectar, to taste)
- 1 tablespoon lime juice
- For the White Layer (Greek Yogurt):
- 1 cup plain Greek yogurt (full-fat or low-fat)
- 1/4 cup honey (or maple syrup, to taste)
- 1 teaspoon vanilla extract
- For the Red Layer (Strawberry-Raspberry):
- 1 cup frozen strawberries
- 1 cup frozen raspberries
- 1/4 cup water (or more, as needed)
- 2 tablespoons maple syrup (or agave nectar, to taste)
- 1 tablespoon lemon juice
- Equipment:
- Popsicle molds (6-8 capacity)
- Blender or food processor
- Measuring cups and spoons
- Small bowls or containers for each layer
Preparing the Blue Layer (Coconut-Pineapple)
Okay, let’s start with the blue layer. This one is my favorite because it’s so refreshing and the coconut milk gives it a creamy texture. The key here is to have your coconut milk refrigerated overnight. This allows the thick cream to separate from the watery liquid, and we only want the thick cream for this layer.
- Scoop out the Coconut Cream: Carefully open the can of refrigerated coconut milk. You’ll notice a thick layer of cream at the top. Using a spoon, scoop out only the thick coconut cream, leaving the watery liquid behind. You should aim for about 3/4 cup to 1 cup of thick cream. Place the cream in your blender or food processor.
- Add the Pineapple: Add the frozen pineapple chunks to the blender. The frozen pineapple will help thicken the mixture and give it a lovely tropical flavor.
- Add the Blue Spirulina (or Food Coloring): Now for the fun part the blue color! Add the blue spirulina powder (or your natural blue food coloring) to the blender. Start with 1/4 cup of spirulina powder. If you’re using food coloring, add it drop by drop until you achieve your desired shade of blue. Remember, a little goes a long way!
- Sweeten and Add Lime Juice: Add the maple syrup (or agave nectar) to sweeten the mixture. Start with 2 tablespoons and taste. Add more if you prefer a sweeter popsicle. Finally, add the lime juice. The lime juice will brighten the flavors and add a touch of tanginess.
- Blend Until Smooth: Blend all the ingredients together until completely smooth and creamy. You may need to scrape down the sides of the blender a few times to ensure everything is well combined.
- Taste and Adjust: Give the mixture a taste and adjust the sweetness or tanginess as needed. If it’s not sweet enough, add more maple syrup. If it needs more tang, add a squeeze more lime juice.
Preparing the White Layer (Greek Yogurt)
Next up, the white layer! This layer is super simple and adds a nice creamy contrast to the other two layers. The Greek yogurt provides a good source of protein, making these popsicles a slightly healthier treat.
- Combine Ingredients: In a small bowl, combine the Greek yogurt, honey (or maple syrup), and vanilla extract.
- Mix Well: Stir the ingredients together until they are well combined and smooth. Make sure there are no lumps of yogurt remaining.
- Taste and Adjust: Give the mixture a taste and adjust the sweetness as needed. Add more honey or maple syrup if you prefer a sweeter popsicle.
Preparing the Red Layer (Strawberry-Raspberry)
Now, let’s make the red layer! This layer is packed with antioxidants from the strawberries and raspberries, and it’s bursting with fruity flavor. Using frozen berries is key here because they help thicken the mixture and create a nice, icy texture.
- Combine Ingredients: In your blender or food processor, combine the frozen strawberries, frozen raspberries, and water.
- Blend Until Smooth: Blend the ingredients together until smooth. You may need to add a little more water if the mixture is too thick to blend properly. Add water one tablespoon at a time until you reach a smooth consistency.
- Sweeten and Add Lemon Juice: Add the maple syrup (or agave nectar) to sweeten the mixture. Start with 2 tablespoons and taste. Add more if you prefer a sweeter popsicle. Then, add the lemon juice. The lemon juice will enhance the flavors of the berries and add a touch of brightness.
- Taste and Adjust: Give the mixture a taste and adjust the sweetness or tanginess as needed. If it’s not sweet enough, add more maple syrup. If it needs more tang, add a squeeze more lemon juice.
Assembling the Firecracker Popsicles
Alright, we’ve got all three layers ready to go! Now comes the fun part assembling the popsicles. This is where you can get creative and decide how you want to layer the colors. I like to do a classic red, white, and blue pattern, but feel free to experiment!
- Start with the Red Layer: Pour the red strawberry-raspberry mixture into the popsicle molds, filling each mold about 1/3 of the way full.
- Freeze for 1-2 Hours: Place the popsicle molds in the freezer and let them freeze for 1-2 hours, or until the red layer is partially frozen. This is important because it will prevent the colors from bleeding together when you add the next layer. You want it solid enough to support the next layer, but not completely frozen solid.
- Add the White Layer: Once the red layer is partially frozen, carefully pour the white Greek yogurt mixture into the popsicle molds, filling each mold another 1/3 of the way full.
- Freeze for Another 1-2 Hours: Return the popsicle molds to the freezer and let them freeze for another 1-2 hours, or until the white layer is partially frozen. Again, you want it solid enough to support the blue layer.
- Add the Blue Layer: Finally, carefully pour the blue coconut-pineapple mixture into the popsicle molds, filling each mold to the top.
- Insert Popsicle Sticks: Insert the popsicle sticks into the center of each mold. Make sure the sticks are securely in place.
- Freeze Completely: Return the popsicle molds to the freezer and let them freeze completely, for at least 4-6 hours, or preferably overnight. This will ensure that the popsicles are solid and easy to remove from the molds.
Removing the Popsicles from the Molds
Okay, the moment we’ve all been waiting for! It’s time to enjoy our Firecracker Popsicles. Here’s the best way to remove them from the molds without breaking them.
- Run Under Warm Water: Run the popsicle molds under warm water for about 20-30 seconds. This will help loosen the popsicles from the molds. Be careful not to run the water for too long, or the popsicles will start to melt.
- Gently Pull: Gently pull on the popsicle sticks to remove the popsicles from the molds. If they are still stuck, run the molds under warm water for a few more seconds and try again.
- Enjoy! Once you’ve removed the popsicles from the molds, they’re ready to eat! Enjoy your refreshing and patriotic Firecracker Popsicles!
Tips and Variations:
- For a smoother texture: If you prefer a smoother texture, you can strain the red and blue layers through a fine-mesh sieve after blending to remove any seeds or pulp.
- Add some sparkle: For an extra festive touch, you can sprinkle edible glitter on the popsicles before freezing them completely.
- Use different fruits: Feel free to experiment with different fruits in the red and blue layers. For example, you could use blueberries instead of blue spirulina for the blue layer, or cherries instead of strawberries for the red layer.
- Make them vegan: This recipe is already naturally vegan if you use maple syrup or agave nectar instead of honey in the white layer.
- Adjust sweetness to your liking: Everyone has different preferences when it comes to sweetness
Conclusion:
So, there you have it! These Firecracker Popsicles are more than just a frozen treat; they’re a burst of summer fun, a nostalgic nod to childhood, and a guaranteed crowd-pleaser. I truly believe this recipe is a must-try because it’s incredibly easy, customizable to your preferences, and delivers a flavor explosion that will leave you wanting more. Forget those store-bought popsicles loaded with artificial flavors and colors these homemade delights are packed with fresh fruit and vibrant flavors that you can feel good about serving to your family and friends.
Why You Absolutely Need to Make These Firecracker Popsicles:
Seriously, what’s not to love? The layered red, white, and blue colors are visually stunning, making them perfect for patriotic holidays like the Fourth of July or Memorial Day. But honestly, they’re delicious any time of year! The combination of sweet and tangy flavors is incredibly refreshing, especially on a hot summer day. And the best part? You control the ingredients! You can use your favorite fruits, adjust the sweetness to your liking, and even add a little kick with a pinch of cayenne pepper for a truly “firecracker” experience. Plus, making them is a fun activity to do with kids they’ll love helping to layer the colors and patiently (or not so patiently!) waiting for them to freeze.
Serving Suggestions and Variations:
While these Firecracker Popsicles are amazing on their own, there are plenty of ways to customize them and take them to the next level. For a creamier texture, try adding a dollop of Greek yogurt or coconut cream to the white layer. If you’re feeling adventurous, you could even swirl in a little bit of blue spirulina powder for a more intense blue color. For adults, a splash of vodka or rum in the red or blue layer would add a fun and festive twist. You can also experiment with different fruits raspberries, strawberries, and watermelon would all work beautifully in the red layer, while blueberries and blackberries are perfect for the blue. Get creative and have fun with it!
Consider dipping the finished popsicles in melted white chocolate and then sprinkling them with red, white, and blue sprinkles for an extra touch of sweetness and visual appeal. Or, for a healthier option, try dipping them in unsweetened shredded coconut. You could even serve them alongside a scoop of vanilla ice cream or a slice of angel food cake for a truly decadent dessert. The possibilities are endless!
I’m so excited for you to try this recipe and experience the joy of homemade Firecracker Popsicles. I know you’ll love them as much as I do! So, gather your ingredients, grab your popsicle molds, and get ready to create some delicious and refreshing treats. Don’t be afraid to experiment with different flavors and variations to make them your own. And most importantly, have fun!
Once you’ve made your own batch of these delightful Firecracker Popsicles, I’d love to hear about your experience! Share your photos and comments on social media using [Your Hashtag] or tag me [Your Social Media Handle]. I can’t wait to see your creations and hear what you think. Happy popsicle-making!
Firecracker Popsicles: A Refreshing Summer Treat
Festive Firecracker Popsicles with layers of coconut-pineapple blue, Greek yogurt white, and strawberry-raspberry red for a delicious and patriotic treat.
Ingredients
- 1 (13.5 ounce) can full-fat coconut milk, refrigerated overnight
- 1 cup frozen pineapple chunks
- 1/4 cup blue spirulina powder (or natural blue food coloring)
- 2 tablespoons maple syrup (or agave nectar, to taste)
- 1 tablespoon lime juice
- 1 cup plain Greek yogurt (full-fat or low-fat)
- 1/4 cup honey (or maple syrup, to taste)
- 1 teaspoon vanilla extract
- 1 cup frozen strawberries
- 1 cup frozen raspberries
- 1/4 cup water (or more, as needed)
- 2 tablespoons maple syrup (or agave nectar, to taste)
- 1 tablespoon lemon juice
Instructions
- Carefully open the can of refrigerated coconut milk. Scoop out only the thick coconut cream, leaving the watery liquid behind (about 3/4 cup to 1 cup). Place the cream in your blender or food processor.
- Add the frozen pineapple chunks to the blender.
- Add the blue spirulina powder (or your natural blue food coloring) to the blender. Start with 1/4 cup of spirulina powder. If you’re using food coloring, add it drop by drop until you achieve your desired shade of blue.
- Add the maple syrup (or agave nectar) to sweeten the mixture. Start with 2 tablespoons and taste. Add more if you prefer a sweeter popsicle. Finally, add the lime juice.
- Blend all the ingredients together until completely smooth and creamy. You may need to scrape down the sides of the blender a few times to ensure everything is well combined.
- Give the mixture a taste and adjust the sweetness or tanginess as needed.
- In a small bowl, combine the Greek yogurt, honey (or maple syrup), and vanilla extract.
- Stir the ingredients together until they are well combined and smooth. Make sure there are no lumps of yogurt remaining.
- Give the mixture a taste and adjust the sweetness as needed. Add more honey or maple syrup if you prefer a sweeter popsicle.
- In your blender or food processor, combine the frozen strawberries, frozen raspberries, and water.
- Blend the ingredients together until smooth. You may need to add a little more water if the mixture is too thick to blend properly. Add water one tablespoon at a time until you reach a smooth consistency.
- Add the maple syrup (or agave nectar) to sweeten the mixture. Start with 2 tablespoons and taste. Add more if you prefer a sweeter popsicle. Then, add the lemon juice.
- Give the mixture a taste and adjust the sweetness or tanginess as needed.
- Pour the red strawberry-raspberry mixture into the popsicle molds, filling each mold about 1/3 of the way full.
- Place the popsicle molds in the freezer and let them freeze for 1-2 hours, or until the red layer is partially frozen.
- Once the red layer is partially frozen, carefully pour the white Greek yogurt mixture into the popsicle molds, filling each mold another 1/3 of the way full.
- Return the popsicle molds to the freezer and let them freeze for another 1-2 hours, or until the white layer is partially frozen.
- Finally, carefully pour the blue coconut-pineapple mixture into the popsicle molds, filling each mold to the top.
- Insert the popsicle sticks into the center of each mold. Make sure the sticks are securely in place.
- Return the popsicle molds to the freezer and let them freeze completely, for at least 4-6 hours, or preferably overnight.
- Run the popsicle molds under warm water for about 20-30 seconds.
- Gently pull on the popsicle sticks to remove the popsicles from the molds. If they are still stuck, run the molds under warm water for a few more seconds and try again.
- Enjoy!
Notes
- For a smoother texture: Strain the red and blue layers through a fine-mesh sieve after blending to remove any seeds or pulp.
- Add some sparkle: Sprinkle edible glitter on the popsicles before freezing them completely.
- Use different fruits: Experiment with different fruits in the red and blue layers.
- Make them vegan: Use maple syrup or agave nectar instead of honey in the white layer.
- Adjust sweetness to your liking: Everyone has different preferences when it comes to sweetness.
Leave a Comment