
Cupid’s Trash Can Cookies, a whimsical name for a truly delightful treat! Have you ever craved a cookie that’s bursting with flavor and texture, a delightful mishmash of sweet and salty, crunchy and chewy? Then look no further! These cookies are not just a dessert; they’re an experience, a celebration of all things delicious crammed into one irresistible bite.
While the name might not conjure images of romance, these cookies are perfect for sharing with loved ones, especially around Valentine’s Day. Think of them as a playful, unconventional expression of affection. The “trash can” element refers to the delightful assortment of ingredients thrown into the mix pretzels, chocolate chips, toffee bits, and more! It’s a testament to the idea that sometimes, the most unexpected combinations create the most wonderful results.
People adore Cupid’s Trash Can Cookies because they offer a symphony of flavors and textures that tantalize the taste buds. The salty pretzels perfectly complement the sweet chocolate and toffee, while the varying textures keep each bite interesting. They’re also incredibly easy to make, making them a perfect choice for a quick and satisfying treat. Plus, who can resist a cookie that’s packed with so much goodness? Get ready to bake up a batch of these addictive cookies you won’t be disappointed!

Ingredients:
- 1 cup (2 sticks) unsalted butter, softened
- 1 cup granulated sugar
- 1 cup packed light brown sugar
- 2 large eggs
- 1 teaspoon vanilla extract
- 3 cups all-purpose flour
- 1 teaspoon baking soda
- 1 teaspoon salt
- 1 cup semi-sweet chocolate chips
- 1 cup milk chocolate chips
- 1 cup white chocolate chips
- 1 cup crushed pretzels (about 2 cups whole pretzels before crushing)
- 1 cup Valentine’s Day M&M’s (or any festive candy-coated chocolate)
- 1 cup chopped pecans or walnuts (optional, but adds a nice crunch)
- 1/2 cup shredded coconut (optional, for added texture and flavor)
Preparing the Dough:
- Cream the Butter and Sugars: In a large bowl (or the bowl of your stand mixer), cream together the softened butter, granulated sugar, and brown sugar until light and fluffy. This usually takes about 3-5 minutes. Make sure to scrape down the sides of the bowl occasionally to ensure everything is evenly mixed. The mixture should be pale and airy, which is key for a good cookie texture.
- Incorporate the Eggs and Vanilla: Beat in the eggs one at a time, mixing well after each addition. Then, stir in the vanilla extract. The vanilla enhances all the other flavors, so don’t skip it!
- Combine Dry Ingredients: In a separate medium bowl, whisk together the all-purpose flour, baking soda, and salt. Whisking ensures that the baking soda and salt are evenly distributed throughout the flour, which is important for proper leavening and flavor.
- Gradually Add Dry Ingredients to Wet Ingredients: Gradually add the dry ingredients to the wet ingredients, mixing on low speed until just combined. Be careful not to overmix! Overmixing develops the gluten in the flour, which can result in tough cookies. Mix until the flour is almost completely incorporated, but a few streaks of flour are still visible.
- Add the “Trash”: Now comes the fun part! Gently fold in the chocolate chips (semi-sweet, milk chocolate, and white chocolate), crushed pretzels, Valentine’s Day M&M’s, chopped pecans or walnuts (if using), and shredded coconut (if using). Make sure everything is evenly distributed throughout the dough. I like to use a large spatula for this to avoid overmixing.
- Chill the Dough (Important!): Cover the bowl with plastic wrap and chill the dough in the refrigerator for at least 30 minutes, or even better, for 1-2 hours. Chilling the dough allows the gluten to relax, which results in a chewier cookie. It also prevents the cookies from spreading too much during baking. If you’re short on time, 30 minutes will do, but the longer the better!
Baking the Cookies:
- Preheat the Oven: Preheat your oven to 375°F (190°C). Make sure your oven rack is in the center position.
- Prepare Baking Sheets: Line baking sheets with parchment paper or silicone baking mats. This prevents the cookies from sticking and makes cleanup a breeze.
- Scoop the Dough: Use a cookie scoop or a spoon to drop rounded tablespoons of dough onto the prepared baking sheets, leaving about 2 inches between each cookie. These cookies spread a bit, so don’t overcrowd the baking sheet. I usually bake about 6-8 cookies per sheet.
- Bake the Cookies: Bake for 9-11 minutes, or until the edges are golden brown and the centers are still slightly soft. The baking time may vary depending on your oven, so keep a close eye on them. Don’t overbake, or they’ll be dry.
- Cool the Cookies: Remove the baking sheets from the oven and let the cookies cool on the baking sheets for a few minutes before transferring them to a wire rack to cool completely. This allows them to firm up a bit and prevents them from breaking.
Tips and Variations:
- Adjust the Sweetness: If you prefer a less sweet cookie, you can reduce the amount of sugar slightly.
- Substitute Ingredients: Feel free to substitute other types of chocolate chips, candies, or nuts based on your preferences. Butterscotch chips, peanut butter chips, or even dried cranberries would be delicious additions.
- Add Spices: For a warmer flavor, try adding a pinch of cinnamon or nutmeg to the dough.
- Make Them Gluten-Free: You can easily make these cookies gluten-free by using a gluten-free all-purpose flour blend.
- Storage: Store the cooled cookies in an airtight container at room temperature for up to 3-4 days.
- Freezing: You can freeze the cookie dough for up to 2 months. Scoop the dough into balls and place them on a baking sheet lined with parchment paper. Freeze until solid, then transfer them to a freezer bag. When ready to bake, bake from frozen, adding a few extra minutes to the baking time. You can also freeze the baked cookies for up to 2 months.
Troubleshooting:
- Cookies Spreading Too Much: If your cookies are spreading too much, make sure your oven is at the correct temperature and that you haven’t overcreamed the butter and sugar. Also, chilling the dough is crucial for preventing excessive spreading.
- Cookies Too Dry: If your cookies are too dry, you may be overbaking them. Reduce the baking time slightly and make sure you’re not using too much flour.
- Cookies Too Cakey: If your cookies are too cakey, you may have overmixed the dough. Be careful not to overmix when adding the dry ingredients.
Enjoy!
These “Trash Can” cookies are a fun and delicious way to use up leftover ingredients and create a unique and satisfying treat. They’re perfect for parties, potlucks, or just a sweet snack. Don’t be afraid to get creative and customize them to your liking!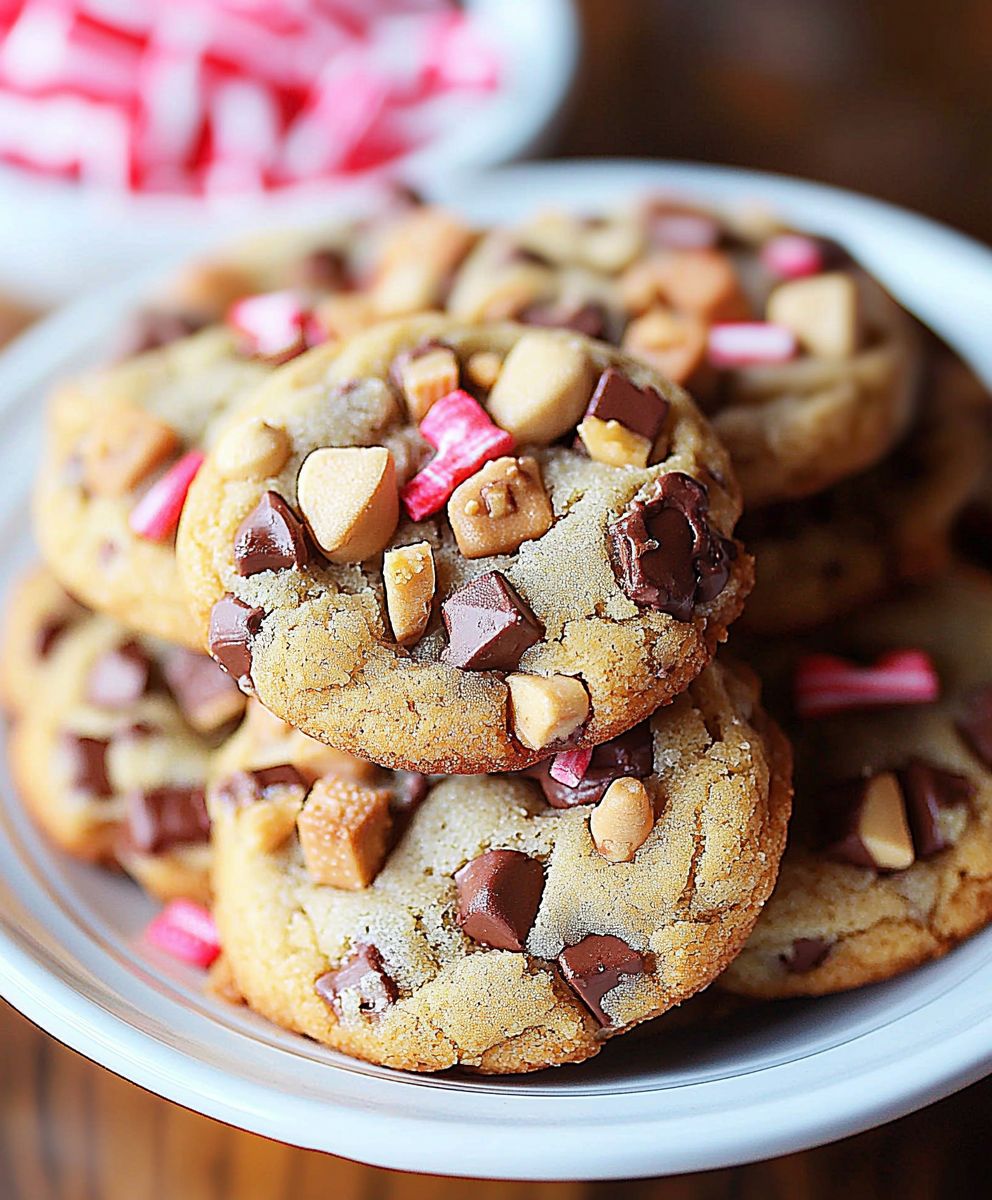
Conclusion:
So, there you have it! These Cupid’s Trash Can Cookies are truly a must-try for anyone looking to add a little fun and a whole lot of deliciousness to their Valentine’s Day (or any day, really!). They’re incredibly easy to make, endlessly customizable, and guaranteed to be a crowd-pleaser. The beauty of this recipe lies in its forgiving nature don’t be afraid to experiment with your favorite candies and treats. It’s all about creating a cookie that reflects your personal taste and brings a smile to your face. I know what you might be thinking: “Trash Can Cookies? Really?” But trust me on this one. The name is just a playful nod to the fact that you’re essentially throwing in all sorts of goodies into one glorious cookie dough. The result is a symphony of textures and flavors that will have you reaching for seconds (and thirds!). Think of these cookies as a blank canvas for your culinary creativity. Not a fan of pretzels? Swap them out for potato chips for a salty-sweet kick. Prefer dark chocolate over milk chocolate? Go for it! The possibilities are truly endless. Serving Suggestions and Variations: For a truly decadent experience, try serving these cookies warm with a scoop of vanilla ice cream. The contrast between the warm, gooey cookie and the cold, creamy ice cream is simply divine. You could also drizzle them with melted chocolate or caramel sauce for an extra touch of indulgence. Here are a few other variations to get your creative juices flowing: * Peanut Butter Lover’s Dream: Add peanut butter chips, Reese’s Pieces, and a swirl of peanut butter to the dough. * Mint Chocolate Madness: Incorporate Andes mints, mint chocolate chips, and a few drops of peppermint extract. * S’mores Delight: Mix in mini marshmallows, graham cracker crumbs, and chocolate chunks. * Birthday Cake Bonanza: Add sprinkles, white chocolate chips, and a touch of vanilla extract for a festive birthday treat. * Vegan Trash Can Cookies: Use vegan butter, chocolate chips, and your favorite vegan candies to create a plant-based version of this classic. These cookies are also perfect for gifting. Package them in a cute tin or box and share them with your loved ones. They’re sure to appreciate the homemade touch and the delicious flavors. I’m confident that once you try this recipe, it will become a staple in your baking repertoire. It’s the perfect way to use up leftover candies, satisfy your sweet tooth, and impress your friends and family. So, what are you waiting for? Gather your ingredients, preheat your oven, and get ready to create some seriously amazing Cupid’s Trash Can Cookies. I can’t wait to hear about your creations! Please, don’t hesitate to share your photos and experiences in the comments below. Let me know what variations you tried and how they turned out. I’m always looking for new and exciting ways to elevate this already fantastic recipe. Happy baking, and happy Valentine’s Day (or any day you choose to bake these!). I hope you enjoy making and eating these as much as I do! Print
Cupids Trash Can Cookies: A Deliciously Fun Recipe
- Total Time: 60 minutes
- Yield: 24–36 cookies 1x
Description
Loaded cookies with chocolate chips, pretzels, M&M’s, and nuts for a sweet and salty treat!
Ingredients
- 1 cup (2 sticks) unsalted butter, softened
- 1 cup granulated sugar
- 1 cup packed light brown sugar
- 2 large eggs
- 1 teaspoon vanilla extract
- 3 cups all-purpose flour
- 1 teaspoon baking soda
- 1 teaspoon salt
- 1 cup semi-sweet chocolate chips
- 1 cup milk chocolate chips
- 1 cup white chocolate chips
- 1 cup crushed pretzels (about 2 cups whole pretzels before crushing)
- 1 cup Valentine’s Day M&M’s (or any festive candy-coated chocolate)
- 1 cup chopped pecans or walnuts (optional, but adds a nice crunch)
- 1/2 cup shredded coconut (optional, for added texture and flavor)
Instructions
- Cream the Butter and Sugars: In a large bowl (or the bowl of your stand mixer), cream together the softened butter, granulated sugar, and brown sugar until light and fluffy. This usually takes about 3-5 minutes. Make sure to scrape down the sides of the bowl occasionally to ensure everything is evenly mixed. The mixture should be pale and airy.
- Incorporate the Eggs and Vanilla: Beat in the eggs one at a time, mixing well after each addition. Then, stir in the vanilla extract.
- Combine Dry Ingredients: In a separate medium bowl, whisk together the all-purpose flour, baking soda, and salt.
- Gradually Add Dry Ingredients to Wet Ingredients: Gradually add the dry ingredients to the wet ingredients, mixing on low speed until just combined. Be careful not to overmix! Mix until the flour is almost completely incorporated, but a few streaks of flour are still visible.
- Add the “Trash”: Gently fold in the chocolate chips (semi-sweet, milk chocolate, and white chocolate), crushed pretzels, Valentine’s Day M&M’s, chopped pecans or walnuts (if using), and shredded coconut (if using). Make sure everything is evenly distributed throughout the dough.
- Chill the Dough (Important!): Cover the bowl with plastic wrap and chill the dough in the refrigerator for at least 30 minutes, or even better, for 1-2 hours.
- Preheat the Oven: Preheat your oven to 375°F (190°C). Make sure your oven rack is in the center position.
- Prepare Baking Sheets: Line baking sheets with parchment paper or silicone baking mats.
- Scoop the Dough: Use a cookie scoop or a spoon to drop rounded tablespoons of dough onto the prepared baking sheets, leaving about 2 inches between each cookie.
- Bake the Cookies: Bake for 9-11 minutes, or until the edges are golden brown and the centers are still slightly soft. The baking time may vary depending on your oven, so keep a close eye on them. Don’t overbake, or they’ll be dry.
- Cool the Cookies: Remove the baking sheets from the oven and let the cookies cool on the baking sheets for a few minutes before transferring them to a wire rack to cool completely.
Notes
- Adjust the Sweetness: If you prefer a less sweet cookie, you can reduce the amount of sugar slightly.
- Substitute Ingredients: Feel free to substitute other types of chocolate chips, candies, or nuts based on your preferences. Butterscotch chips, peanut butter chips, or even dried cranberries would be delicious additions.
- Add Spices: For a warmer flavor, try adding a pinch of cinnamon or nutmeg to the dough.
- Make Them Gluten-Free: You can easily make these cookies gluten-free by using a gluten-free all-purpose flour blend.
- Storage: Store the cooled cookies in an airtight container at room temperature for up to 3-4 days.
- Freezing: You can freeze the cookie dough for up to 2 months. Scoop the dough into balls and place them on a baking sheet lined with parchment paper. Freeze until solid, then transfer them to a freezer bag. When ready to bake, bake from frozen, adding a few extra minutes to the baking time. You can also freeze the baked cookies for up to 2 months.
- Cookies Spreading Too Much: If your cookies are spreading too much, make sure your oven is at the correct temperature and that you haven’t overcreamed the butter and sugar. Also, chilling the dough is crucial for preventing excessive spreading.
- Cookies Too Dry: If your cookies are too dry, you may be overbaking them. Reduce the baking time slightly and make sure you’re not using too much flour.
- Cookies Too Cakey: If your cookies are too cakey, you may have overmixed the dough. Be careful not to overmix when adding the dry ingredients.
- Prep Time: 20 minutes
- Cook Time: 9-11 minutes

Leave a Comment