
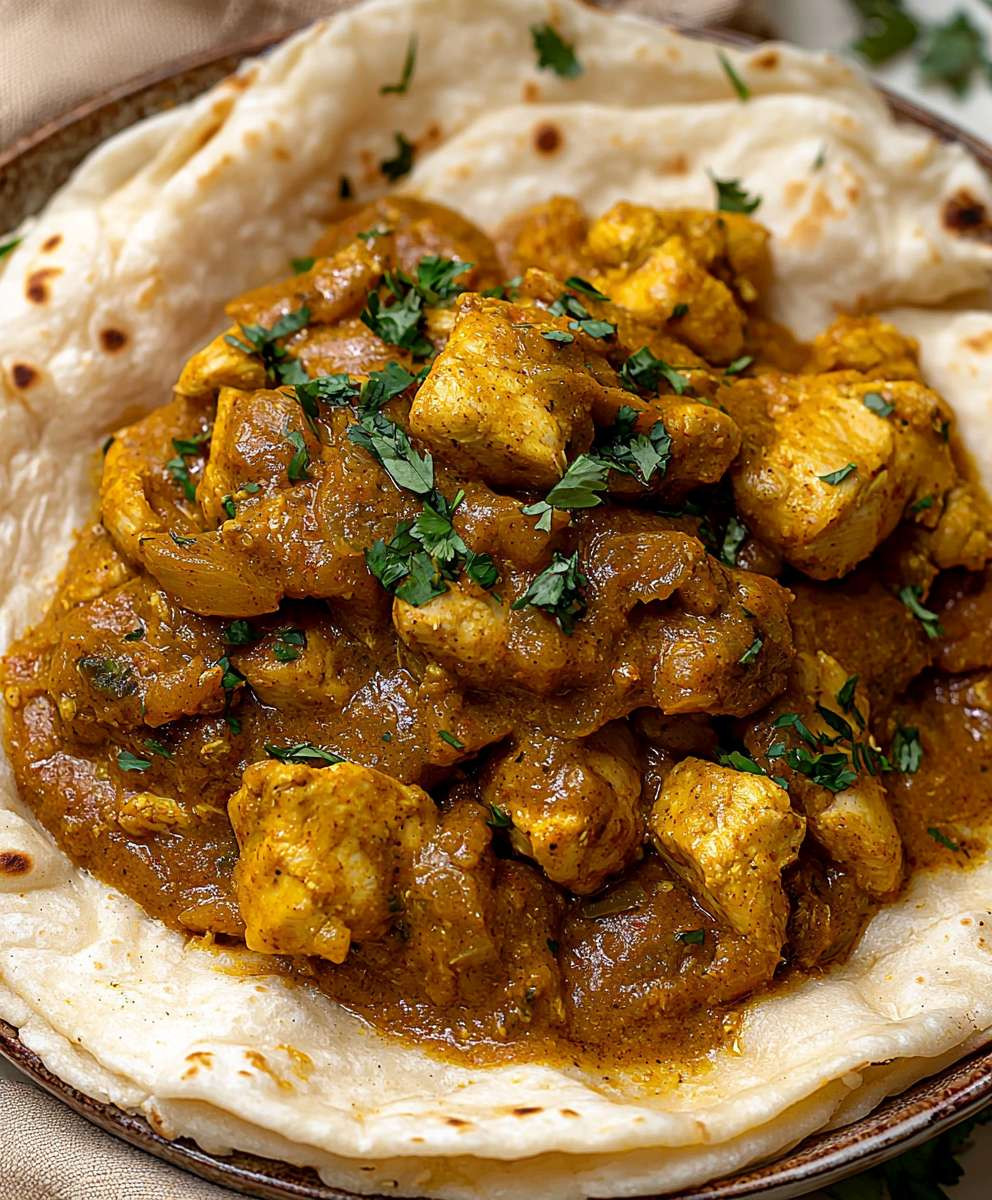
Curry Chicken Roti: Prepare to embark on a culinary journey to the vibrant streets of the Caribbean with this incredibly flavorful and satisfying dish! Imagine tender, juicy pieces of chicken simmered in a rich, aromatic curry sauce, all lovingly enveloped in a soft, pliable roti. It’s a complete meal in one delightful package, and trust me, once you try it, you’ll be hooked.
Curry Chicken Roti is more than just a meal; it’s a cultural icon, deeply rooted in the history of the Caribbean. Brought over by indentured servants from India, the concept of curry was adapted and transformed using local ingredients and flavors, resulting in the unique and beloved dish we know today. Each island boasts its own variation, but the essence remains the same: a celebration of spice, flavor, and community.
What makes Curry Chicken Roti so irresistible? It’s the perfect marriage of textures and tastes. The tender chicken, infused with the warmth of curry spices like turmeric, cumin, and coriander, melts in your mouth. The roti, acting as both plate and utensil, soaks up all that delicious sauce, creating a symphony of flavors with every bite. It’s also incredibly convenient a portable and satisfying meal that’s perfect for lunch, dinner, or even a picnic. So, are you ready to experience the magic of Curry Chicken Roti? Let’s get cooking!
Ingredients:
- For the Curry Chicken:
- 2 lbs boneless, skinless chicken thighs, cut into 1-inch pieces
- 1 large onion, finely chopped
- 4 cloves garlic, minced
- 2 inch piece of ginger, grated
- 2-3 Scotch bonnet peppers, seeded and finely chopped (adjust to your spice preference)
- 2 tbsp curry powder (Trinidadian or Madras curry powder recommended)
- 1 tbsp ground cumin
- 1 tsp ground coriander
- 1/2 tsp turmeric powder
- 1/4 tsp cayenne pepper (optional, for extra heat)
- 2 tbsp vegetable oil
- 1 (14.5 oz) can diced tomatoes, undrained
- 1 (13.5 oz) can coconut milk
- 1 cup chicken broth
- 2 medium potatoes, peeled and cubed
- 1 cup chopped cilantro, for garnish
- Salt and black pepper to taste
- For the Roti (Dhalpuri):
- 3 cups all-purpose flour, plus more for dusting
- 1 tsp baking powder
- 1/2 tsp salt
- 2 tbsp vegetable oil
- 1 1/4 cups warm water, or as needed
- 1 cup yellow split peas (dhal), soaked overnight
- 2 cloves garlic, minced
- 1/2 tsp ground cumin
- 1/4 tsp turmeric powder
- 1/4 tsp salt
- 2 tbsp vegetable oil, for cooking roti
Preparing the Dhal Filling:
- Cook the Dhal: Drain the soaked yellow split peas and place them in a pot. Cover with fresh water and bring to a boil. Reduce heat and simmer until the peas are very soft and easily mashed, about 45-60 minutes. Add more water if needed to prevent sticking.
- Mash the Dhal: Once the dhal is cooked, drain any excess water. Use a potato masher or a fork to thoroughly mash the dhal until it forms a smooth paste.
- Sauté the Aromatics: In a small pan, heat 1 tablespoon of vegetable oil over medium heat. Add the minced garlic and sauté for about 30 seconds, until fragrant. Be careful not to burn the garlic.
- Combine and Season: Add the sautéed garlic, ground cumin, turmeric powder, and salt to the mashed dhal. Mix well to combine all the ingredients. Taste and adjust seasoning as needed. The dhal filling should be flavorful and slightly salty.
- Cool the Filling: Allow the dhal filling to cool completely before using it to fill the roti dough. This will make it easier to handle and prevent the dough from becoming soggy.
Making the Roti Dough:
- Combine Dry Ingredients: In a large bowl, whisk together the all-purpose flour, baking powder, and salt. This ensures that the baking powder is evenly distributed throughout the flour, which will help the roti to be light and fluffy.
- Add Oil: Add the 2 tablespoons of vegetable oil to the dry ingredients. Use your fingertips to rub the oil into the flour until the mixture resembles coarse breadcrumbs. This step is crucial for creating a tender and flaky roti.
- Gradually Add Water: Slowly add the warm water to the flour mixture, mixing with your hands until a dough forms. Start with 1 cup of water and add more, a tablespoon at a time, until the dough comes together. The dough should be soft and pliable, but not sticky.
- Knead the Dough: Turn the dough out onto a lightly floured surface and knead for 8-10 minutes, until it is smooth and elastic. Kneading develops the gluten in the flour, which gives the roti its structure and chewiness.
- Rest the Dough: Place the dough back in the bowl, cover it with a damp cloth or plastic wrap, and let it rest for at least 30 minutes, or up to 1 hour. Resting allows the gluten to relax, making the dough easier to roll out.
Assembling and Cooking the Roti:
- Divide the Dough: After the dough has rested, divide it into 8-10 equal portions. Roll each portion into a smooth ball.
- Flatten and Fill: On a lightly floured surface, flatten one dough ball into a small disc, about 4 inches in diameter. Place about 2-3 tablespoons of the cooled dhal filling in the center of the disc.
- Seal the Filling: Gently bring the edges of the dough up and around the filling, pinching them together to seal the filling inside. Make sure the seal is tight to prevent the filling from leaking out during cooking.
- Roll Out the Roti: Lightly flour the surface again. Gently roll out the filled dough ball into a thin circle, about 8-10 inches in diameter. Be careful not to press too hard, as this can cause the filling to burst through the dough. If the filling starts to peek through, gently pinch the dough together to seal it.
- Cook the Roti: Heat a large, flat griddle or tawa over medium heat. Once the griddle is hot, carefully place the roti on the griddle. Cook for 2-3 minutes per side, or until golden brown spots appear.
- Brush with Oil: Brush the roti with a little vegetable oil on both sides while it is cooking. This will help it to become golden brown and crispy.
- “Clap” the Roti (Optional): This step is optional but traditional. After cooking the roti, hold it with tongs and gently clap it between your hands or use a clean kitchen towel to “clap” it. This helps to separate the layers of the roti and make it more fluffy.
- Keep Warm: Place the cooked roti in a clean kitchen towel or a roti warmer to keep it warm while you cook the remaining roti.
Preparing the Curry Chicken:
- Marinate the Chicken: In a large bowl, combine the chicken pieces with 1 tablespoon of curry powder, ground cumin, ground coriander, turmeric powder, cayenne pepper (if using), salt, and black pepper. Mix well to ensure that the chicken is evenly coated with the spices. Let the chicken marinate for at least 30 minutes, or up to 2 hours in the refrigerator. The longer the chicken marinates, the more flavorful it will be.
- Sauté the Aromatics: Heat the vegetable oil in a large pot or Dutch oven over medium heat. Add the chopped onion and sauté for 5-7 minutes, until softened and translucent. Add the minced garlic and grated ginger and sauté for another minute, until fragrant. Be careful not to burn the garlic or ginger.
- Add the Scotch Bonnet Pepper: Add the chopped Scotch bonnet pepper to the pot and sauté for about 30 seconds. Remember that Scotch bonnet peppers are very spicy, so adjust the amount to your spice preference. If you are sensitive to heat, you can omit the Scotch bonnet pepper altogether.
- Bloom the Curry Powder: Add the remaining 1 tablespoon of curry powder to the pot and cook for 1-2 minutes, stirring constantly. This step helps to “bloom” the curry powder, which intensifies its flavor.
- Add the Chicken: Add the marinated chicken to the pot and cook for 5-7 minutes, stirring occasionally, until the chicken is browned on all sides.
- Add Tomatoes and Coconut Milk: Add the diced tomatoes (with their juice) and coconut milk to the pot. Stir well to combine all the ingredients.
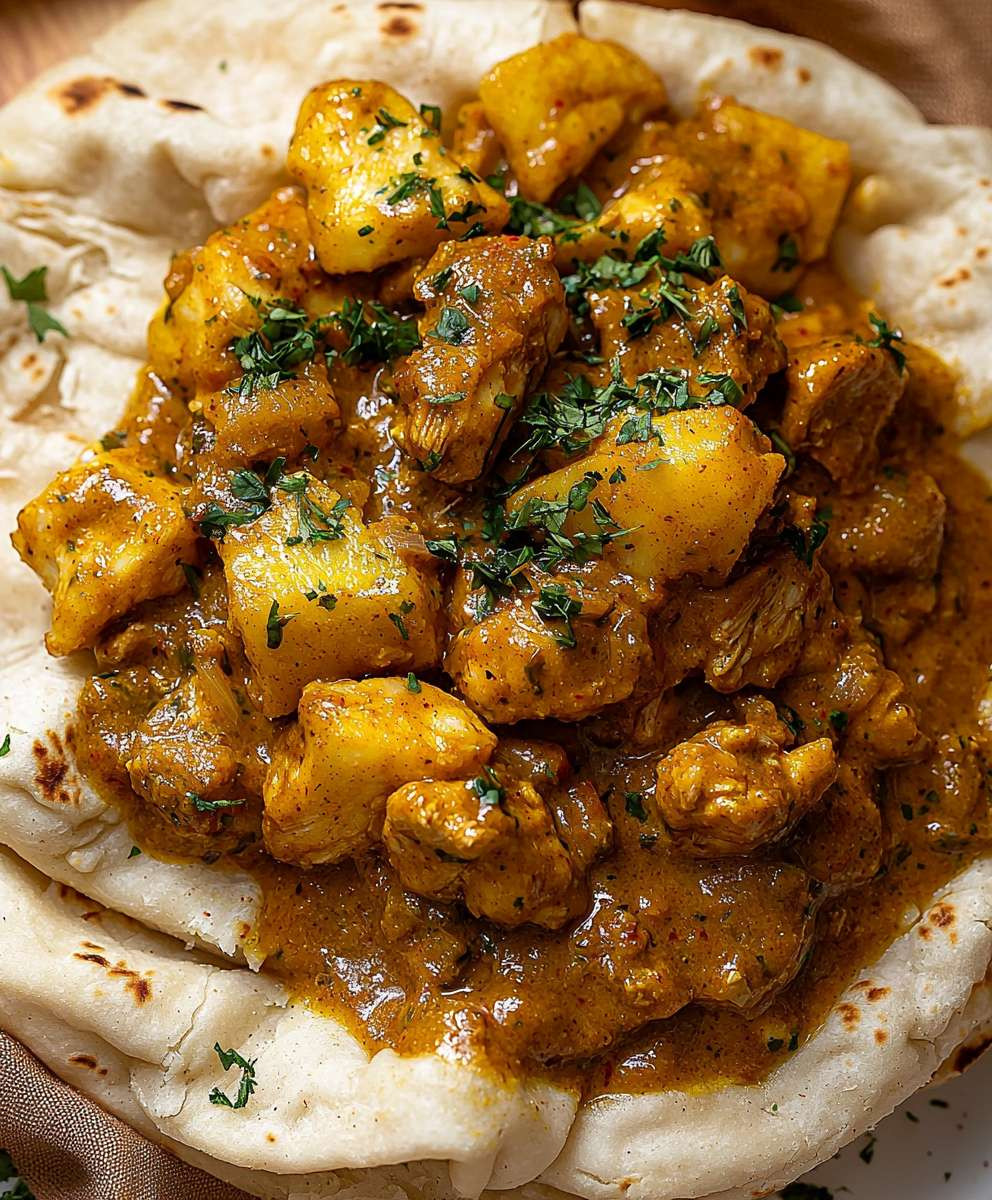
- Add Chicken Broth and Potatoes: Add the chicken broth and cubed potatoes to the pot. Bring the mixture to a boil, then reduce heat to low, cover, and simmer for 30-40 minutes, or until the chicken is cooked through and the potatoes are tender.
- Simmer and Thicken: Remove the lid and continue to simmer the curry for another 10-15 minutes, or until the sauce has thickened to your desired consistency. Stir occasionally to prevent sticking. If the sauce is too thick, you can add a little more chicken broth or water.
- Season to Taste: Taste the curry and adjust seasoning as needed. Add more salt, pepper, or curry powder to your preference.
- Garnish and Serve: Garnish the curry chicken with chopped cilantro. Serve hot with the freshly made roti.
Serving:
To serve, place a generous portion of the curry chicken in the center of a roti. Fold the roti around the curry chicken to create a wrap. Enjoy immediately!
Conclusion:
This Curry Chicken Roti isn’t just a meal; it’s an experience, a journey of flavors that will transport you straight to the Caribbean! I truly believe this recipe is a must-try because it perfectly balances the warmth of the curry spices with the comforting softness of the roti. It’s a dish that’s both satisfying and exciting, and I’m confident it will become a new favorite in your household. Why is this Curry Chicken Roti a must-try? Because it’s more than just a recipe; it’s a celebration of culture and flavor. The tender chicken, infused with aromatic spices, nestled within the pliable roti, creates a symphony of textures and tastes that is simply irresistible. It’s also surprisingly easy to make, even for beginner cooks. I’ve broken down each step to ensure success, and the result is a dish that tastes like it took hours to prepare. Plus, it’s a fantastic way to introduce your family and friends to new and exciting cuisines. But the best part? This recipe is incredibly versatile! While I’ve shared my go-to method, feel free to experiment and make it your own.Serving Suggestions and Variations:
* Spice Level: Adjust the amount of Scotch bonnet pepper (or your preferred chili) to control the heat. If you’re sensitive to spice, start with a small amount and add more to taste. For a milder version, you can omit the pepper altogether. * Vegetarian Option: Easily adapt this recipe by substituting the chicken with chickpeas, potatoes, or a mix of your favorite vegetables. Just ensure the vegetables are cooked until tender before adding them to the curry. * Sides: While the Curry Chicken Roti is a complete meal on its own, it pairs beautifully with a side of mango chutney, a refreshing cucumber salad, or a dollop of plain yogurt to cool down the spice. * Roti Variations: Feel free to use store-bought roti to save time, or try making different types of roti, such as dhalpuri roti or paratha, for a unique twist. * Leftovers: This Curry Chicken Roti is even better the next day! The flavors meld together beautifully overnight. Store any leftovers in an airtight container in the refrigerator for up to 3 days. I’m so excited for you to try this recipe and experience the magic of Curry Chicken Roti for yourself. It’s a dish that’s perfect for a weeknight dinner, a weekend gathering, or any occasion that calls for a flavorful and satisfying meal. Don’t be intimidated by the ingredients or the process. I promise, it’s easier than it looks! Just follow the instructions carefully, and you’ll be rewarded with a delicious and authentic Curry Chicken Roti that will impress your family and friends. I truly believe that cooking is an act of love, and sharing a meal with loved ones is one of life’s greatest pleasures. This Curry Chicken Roti is a dish that’s meant to be shared and enjoyed, so gather your family and friends, get into the kitchen, and create some culinary magic together. And most importantly, I want to hear about your experience! Did you try the recipe? What did you think? Did you make any variations? Share your photos and stories with me in the comments below. I can’t wait to see your creations and hear about your culinary adventures. Happy cooking! I hope you enjoy this Curry Chicken Roti as much as I do! Print
Curry Chicken Roti: The Ultimate Guide to Making It at Home
- Total Time: 3 hours 40 minutes
- Yield: 8–10 rotis 1x
Description
Flavorful Trinidadian curry chicken simmered in coconut milk, served with soft Dhalpuri roti filled with spiced yellow split peas.
Ingredients
- 2 lbs boneless, skinless chicken thighs, cut into 1-inch pieces
- 1 large onion, finely chopped
- 4 cloves garlic, minced
- 2 inch piece of ginger, grated
- 2–3 Scotch bonnet peppers, seeded and finely chopped (adjust to your spice preference)
- 2 tbsp curry powder (Trinidadian or Madras curry powder recommended)
- 1 tbsp ground cumin
- 1 tsp ground coriander
- 1/2 tsp turmeric powder
- 1/4 tsp cayenne pepper (optional, for extra heat)
- 2 tbsp vegetable oil
- 1 (14.5 oz) can diced tomatoes, undrained
- 1 (13.5 oz) can coconut milk
- 1 cup chicken broth
- 2 medium potatoes, peeled and cubed
- 1 cup chopped cilantro, for garnish
- Salt and black pepper to taste
- 3 cups all-purpose flour, plus more for dusting
- 1 tsp baking powder
- 1/2 tsp salt
- 2 tbsp vegetable oil
- 1 1/4 cups warm water, or as needed
- 1 cup yellow split peas (dhal), soaked overnight
- 2 cloves garlic, minced
- 1/2 tsp ground cumin
- 1/4 tsp turmeric powder
- 1/4 tsp salt
- 2 tbsp vegetable oil, for cooking roti
Instructions
- Drain the soaked yellow split peas and place them in a pot. Cover with fresh water and bring to a boil. Reduce heat and simmer until the peas are very soft and easily mashed, about 45-60 minutes. Add more water if needed to prevent sticking.
- Once the dhal is cooked, drain any excess water. Use a potato masher or a fork to thoroughly mash the dhal until it forms a smooth paste.
- In a small pan, heat 1 tablespoon of vegetable oil over medium heat. Add the minced garlic and sauté for about 30 seconds, until fragrant. Be careful not to burn the garlic.
- Add the sautéed garlic, ground cumin, turmeric powder, and salt to the mashed dhal. Mix well to combine all the ingredients. Taste and adjust seasoning as needed. The dhal filling should be flavorful and slightly salty.
- Allow the dhal filling to cool completely before using it to fill the roti dough. This will make it easier to handle and prevent the dough from becoming soggy.
- In a large bowl, whisk together the all-purpose flour, baking powder, and salt. This ensures that the baking powder is evenly distributed throughout the flour, which will help the roti to be light and fluffy.
- Add the 2 tablespoons of vegetable oil to the dry ingredients. Use your fingertips to rub the oil into the flour until the mixture resembles coarse breadcrumbs. This step is crucial for creating a tender and flaky roti.
- Slowly add the warm water to the flour mixture, mixing with your hands until a dough forms. Start with 1 cup of water and add more, a tablespoon at a time, until the dough comes together. The dough should be soft and pliable, but not sticky.
- Turn the dough out onto a lightly floured surface and knead for 8-10 minutes, until it is smooth and elastic. Kneading develops the gluten in the flour, which gives the roti its structure and chewiness.
- Place the dough back in the bowl, cover it with a damp cloth or plastic wrap, and let it rest for at least 30 minutes, or up to 1 hour. Resting allows the gluten to relax, making the dough easier to roll out.
- After the dough has rested, divide it into 8-10 equal portions. Roll each portion into a smooth ball.
- On a lightly floured surface, flatten one dough ball into a small disc, about 4 inches in diameter. Place about 2-3 tablespoons of the cooled dhal filling in the center of the disc.
- Gently bring the edges of the dough up and around the filling, pinching them together to seal the filling inside. Make sure the seal is tight to prevent the filling from leaking out during cooking.
- Lightly flour the surface again. Gently roll out the filled dough ball into a thin circle, about 8-10 inches in diameter. Be careful not to press too hard, as this can cause the filling to burst through the dough. If the filling starts to peek through, gently pinch the dough together to seal it.
- Heat a large, flat griddle or tawa over medium heat. Once the griddle is hot, carefully place the roti on the griddle. Cook for 2-3 minutes per side, or until golden brown spots appear.
- Brush the roti with a little vegetable oil on both sides while it is cooking. This will help it to become golden brown and crispy.
- “Clap” the Roti (Optional): After cooking the roti, hold it with tongs and gently clap it between your hands or use a clean kitchen towel to “clap” it. This helps to separate the layers of the roti and make it more fluffy.
- Place the cooked roti in a clean kitchen towel or a roti warmer to keep it warm while you cook the remaining roti.
- In a large bowl, combine the chicken pieces with 1 tablespoon of curry powder, ground cumin, ground coriander, turmeric powder, cayenne pepper (if using), salt, and black pepper. Mix well to ensure that the chicken is evenly coated with the spices. Let the chicken marinate for at least 30 minutes, or up to 2 hours in the refrigerator. The longer the chicken marinates, the more flavorful it will be.
- Heat the vegetable oil in a large pot or Dutch oven over medium heat. Add the chopped onion and sauté for 5-7 minutes, until softened and translucent. Add the minced garlic and grated ginger and sauté for another minute, until fragrant. Be careful not to burn the garlic or ginger.
- Add the chopped Scotch bonnet pepper to the pot and sauté for about 30 seconds. Remember that Scotch bonnet peppers are very spicy, so adjust the amount to your spice preference. If you are sensitive to heat, you can omit the Scotch bonnet pepper altogether.
- Add the remaining 1 tablespoon of curry powder to the pot and cook for 1-2 minutes, stirring constantly. This step helps to “bloom” the curry powder, which intensifies its flavor.
- Add the marinated chicken to the pot and cook for 5-7 minutes, stirring occasionally, until the chicken is browned on all sides.
- Add the diced tomatoes (with their juice) and coconut milk to the pot. Stir well to combine all the ingredients.
- Add the chicken broth and cubed potatoes to the pot. Bring the mixture to a boil, then reduce heat to low, cover, and simmer for 30-40 minutes, or until the chicken is cooked through and the potatoes are tender.
- Remove the lid and continue to simmer the curry for another 10-15 minutes, or until the sauce has thickened to your desired consistency. Stir occasionally to prevent sticking. If the sauce is too thick, you can add a little more chicken broth or water.
- Taste the curry and adjust seasoning as needed. Add more salt, pepper, or curry powder to your preference.
- Garnish the curry chicken with chopped cilantro. Serve hot with the freshly made roti.
Notes
- Spice Level: Scotch bonnet peppers are very hot. Adjust the amount to your preference, or omit them entirely for a milder curry.
- Prep Time: 1 hour
- Cook Time: 72 minutes


Leave a Comment