

Persimmon jam, especially made from the sweet, sun-ripened Fuyu variety, has a unique flavor that’s hard to replicate. It’s naturally sweet with hints of honey and spice, and this simple recipe lets that shine through. Making jam can seem daunting, but with just three ingredients and a little patience, you can have a gorgeous, homemade preserve that tastes like sunshine in a jar. This jam is particularly wonderful because it requires no pectin, relying on the natural thickening properties of the persimmons and the sugar. Ingredients: 1.5 cups Persimmon Puree 3/4 cup Sugar 3 tbsp Lemon Juice Making the Persimmon Puree Before you can even think about cooking the jam, you need your persimmon puree. The best persimmons to use for this are the Fuyu variety, which are the ones that look like little tomatoes and can be eaten when firm. Hachiya persimmons are the astringent kind that need to be very soft and jelly-like before eating, and while they can also be pureed, Fuyu are easier to work with for a jam that you can potentially even spread before it’s fully set. To make the puree, you’ll want to peel your ripe Fuyu persimmons. Cut them into quarters and remove the core if there is one, though Fuyu usually don’t have much of a seed core. You can then chop them into smaller pieces. You can either steam these pieces until they are very soft, or you can roast them in a single layer on a baking sheet at around 350°F (175°C) until they break down. Roast
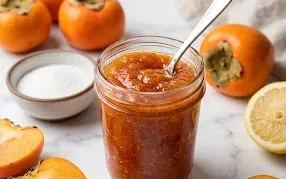
3 Ingredient Persimmon Jam Recipe
Persimmon jam, especially made from the sweet, sun-ripened Fuyu variety, has a unique flavor that’s hard to replicate. It’s naturally sweet with hints of honey and spice, and this simple recipe lets that shine through. Making jam can seem daunting, but with just three ingredients and a little patience, you can have a gorgeous, homemade preserve that tastes like sunshine in a jar. This jam is particularly wonderful because it requires no pectin, relying on the natural thickening properties of the persimmons and the sugar.
Ingredients:
- 1.5 cups Persimmon Puree
- 3/4 cup Sugar
- 3 tbsp Lemon Juice
Making the Persimmon Puree
Before you can even think about cooking the jam, you need your persimmon puree. The best persimmons to use for this are the Fuyu variety, which are the ones that look like little tomatoes and can be eaten when firm. Hachiya persimmons are the astringent kind that need to be very soft and jelly-like before eating, and while they can also be pureed, Fuyu are easier to work with for a jam that you can potentially even spread before it’s fully set. To make the puree, you’ll want to peel your ripe Fuyu persimmons. Cut them into quarters and remove the core if there is one, though Fuyu usually don’t have much of a seed core. You can then chop them into smaller pieces. You can either steam these pieces until they are very soft, or you can roast them in a single layer on a baking sheet at around 350°F (175°C) until they break down. Roasting often brings out a deeper, caramelized flavor which is lovely in jam. Once softened, mash them with a fork or potato masher, or better yet, pulse them in a food processor or blender until you have a smooth puree. Measure out 1.5 cups of this puree. If you end up with a little extra, don’t worry, you can always just eat it plain or use it in smoothies. Make sure there are no large lumps; a smoother puree will result in a smoother jam.
Cooking the Jam
The Initial Mix
In a medium, heavy-bottomed saucepan, combine the 1.5 cups of persimmon puree, the 3/4 cup of sugar, and the 3 tablespoons of lemon juice. The sugar is essential not only for sweetness but also for preservation and for helping the jam to gel. Lemon juice is crucial here; it adds brightness to the flavor profile, balancing the sweetness of the persimmons and sugar. It also provides the acidity that helps the sugar break down and work with the natural pectins in the fruit to thicken the jam. Stir everything together well until the sugar is mostly dissolved and the mixture looks uniform. A heavy-bottomed pot is key here because it distributes heat more evenly, reducing the risk of scorching, which can happen quickly with jam.
Heating and Simmering
Place the saucepan over medium heat. Stir constantly as the mixture begins to heat up. You don’t want the sugar to burn on the bottom of the pan. As the mixture heats, you’ll notice it starts to thin out and then begin to simmer. Once it reaches a gentle boil, reduce the heat to medium-low. You want the jam to maintain a steady, gentle simmer, not a rolling boil that could lead to splattering and a loss of liquid too quickly. Continue to stir frequently, scraping the bottom and sides of the pot to prevent sticking and burning. This simmering process is where the magic happens, concentrating the flavors and thickening the jam. This stage can take anywhere from 30 minutes to an hour, depending on the moisture content of your persimmons and the heat of your stove. Pay attention to the consistency.
Testing for Set
This is probably the most important step for achieving the right jam texture. You’re looking for the jam to thicken enough that it will hold its shape. There are a couple of ways to test this. The most reliable is the “cold plate test.” Before you start cooking, place a few small ceramic plates in your freezer. When you think the jam might be ready, carefully spoon a small amount onto one of the cold plates. Let it sit for about 30 seconds to a minute, then gently push it with your finger. If the surface wrinkles and the jam holds its shape without running back together immediately, it’s ready. If it’s still very runny, continue simmering and test again in 5-10 minute intervals. Another indicator is the “sheeting” test. Dip a spoon into the jam and lift it. If the jam drips off in thick, syrupy drops that eventually form a sheet on the surface of the jam in the pot, it’s likely ready. Be careful not to overcook, as it can become too thick or even burn.
Cooling and Storage
Once your jam has reached its desired consistency, remove the saucepan from the heat. Let the jam cool slightly in the pot for about 10-15 minutes. During this time, it will continue to thicken as it cools. Ladle the hot jam into clean, sterilized jars. Sterilizing your jars and lids is important for proper preservation. You can do this by boiling them in water for at least 10 minutes. Leave about 1/2 inch of headspace at the top of each jar. Wipe the rims clean with a damp cloth to ensure a good seal. Place the lids on the jars and screw on the bands until fingertip tight.
Setting Up
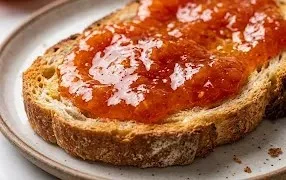
At this point, you have a few options for storing your jam. For immediate enjoyment and short-term storage (up to a few weeks), you can simply let the jars cool completely on the counter, then store them in the refrigerator. If you want to store the jam for longer periods (up to a year or more), you’ll need to process the jars in a boiling water bath. This involves placing the filled and lidded jars in a large pot of boiling water, ensuring the water covers the jars by at least an inch, and processing them for about 10 minutes. After processing, carefully remove the jars and let them cool undisturbed on a towel-lined surface. You should hear the lids “ping” as they seal. Check the seals after 24 hours; if any lids haven’t sealed, store those jars in the refrigerator. This beautiful, homemade persimmon jam is perfect on toast, scones, or even as a glaze for roasted meats. Enjoy the sweet, subtle flavor of the season!
Conclusion:
This 3 ingredient persimmon jam is a testament to how simple ingredients can create something truly special. The natural sweetness of the Fuyu persimmons combined with the bright zing of lemon juice and sugar results in a preserve that is both comforting and sophisticated. It’s a fantastic way to enjoy persimmons when they are in season and a wonderful homemade gift for friends and family. Once your jam has cooled, spoon it into clean jars. It’s perfect spread on toast, scones, or even swirled into yogurt or oatmeal. You can also use it as a glaze for beef or chicken.
Frequently Asked Questions
What kind of persimmons should I use?
Fuyu persimmons are highly recommended for this recipe. They are non-astringent and can be eaten when firm, making them easier to peel and puree. Hachiya persimmons are very astringent and must be completely soft and jelly-like before they are palatable, which can make them more challenging for jam making.
How long does this jam last?
When stored properly in sterilized jars in the refrigerator, this persimmon jam should last for about 3-4 weeks. For longer storage, you can consider water bath canning the jam, which would extend its shelf life significantly.
Can I reduce the sugar?
While sugar acts as a preservative and helps with the setting of the jam, you can try reducing it slightly. However, be aware that this might affect the shelf life and texture of the jam. You might not achieve as thick a consistency without the full amount of sugar.
3 Ingredient Persimmon Jam
A simple and delicious persimmon jam made with just three ingredients. Perfect for spreading on toast or as a sweet topping.
Ingredients
-
1.5 cups Persimmon Puree
-
3/4 cup Sugar
-
3 tbsp Lemon Juice
-
1/2 teaspoon Ground Cinnamon
-
1/4 teaspoon Ground Nutmeg
-
Pinch of Salt
Instructions
-
Step 1
Combine persimmon puree, sugar, and lemon juice in a medium saucepan. -
Step 2
Add cinnamon, nutmeg, and salt to the mixture. -
Step 3
Stir well to combine all ingredients. -
Step 4
Cook over medium heat, stirring frequently, until the mixture thickens to jam consistency, about 20-30 minutes. It should coat the back of a spoon. -
Step 5
Remove from heat and let cool slightly. -
Step 6
Pour into clean jars and store in the refrigerator.
Important Information
Nutrition Facts (Per Serving)
It is important to consider this information as approximate and not to use it as definitive health advice.
Allergy Information
Please check ingredients for potential allergens and consult a health professional if in doubt.


Leave a Comment