
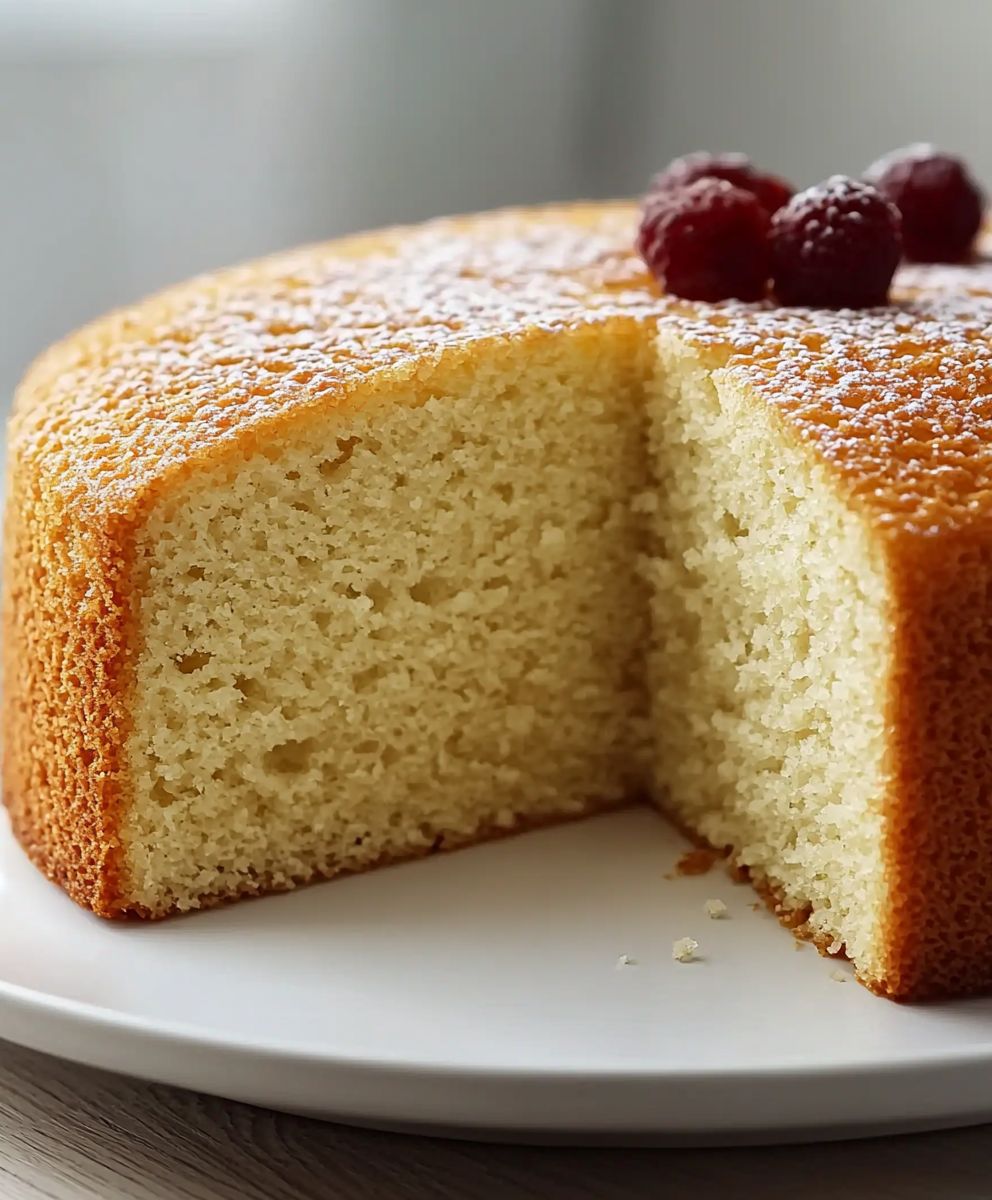
Vanilla cake: just the name conjures up images of birthday celebrations, afternoon tea, and pure, unadulterated comfort. But have you ever stopped to consider why this seemingly simple dessert holds such a special place in our hearts and on our tables? I have, and I’m excited to share my take on this classic treat with you!
The history of vanilla cake is as rich and nuanced as the flavor itself. While the exact origins are debated, the use of vanilla in baking dates back centuries, with the Totonac people of Mexico being among the first to cultivate the vanilla orchid. Over time, vanilla made its way across the globe, becoming a prized ingredient in European and American kitchens. The simplicity of a vanilla cake belies its versatility; it serves as the perfect blank canvas for frostings, fillings, and decorations of all kinds.
What is it about vanilla cake that makes it so universally loved? Perhaps it’s the delicate, sweet flavor that isn’t overpowering, making it a crowd-pleaser for all ages. Or maybe it’s the soft, tender crumb that melts in your mouth with each bite. For me, it’s the nostalgia the memories of childhood birthdays and family gatherings centered around this delightful dessert. Whatever the reason, vanilla cake is a timeless classic that continues to bring joy to people around the world. So, let’s get baking!
Ingredients:
- 2 1/2 cups all-purpose flour
- 1 tablespoon baking powder
- 1/2 teaspoon baking soda
- 1/2 teaspoon salt
- 1 cup (2 sticks) unsalted butter, softened
- 1 3/4 cups granulated sugar
- 2 large eggs
- 2 large egg whites
- 1 tablespoon vanilla extract
- 1 1/4 cups buttermilk
Preparing the Cake Batter
Alright, let’s get started with the heart of our vanilla cake the batter! This is where the magic happens, and following these steps carefully will ensure a light, fluffy, and perfectly vanilla-flavored cake.
- Preheat your oven and prepare your cake pans: First things first, preheat your oven to 350°F (175°C). While the oven is heating up, grease and flour two 9-inch round cake pans. You can also use baking spray with flour already in it for extra insurance against sticking. I like to cut out parchment paper circles for the bottom of the pans as well it makes removing the cakes a breeze!
- Whisk together the dry ingredients: In a large bowl, whisk together the flour, baking powder, baking soda, and salt. Whisking is important because it evenly distributes the leavening agents (baking powder and baking soda) throughout the flour, which will help the cake rise properly. Make sure there are no lumps of baking powder or baking soda remaining.
- Cream together the butter and sugar: In a separate large bowl (or the bowl of your stand mixer), cream together the softened butter and granulated sugar until light and fluffy. This usually takes about 3-5 minutes on medium speed. The mixture should become noticeably lighter in color and almost doubled in volume. This step is crucial because it incorporates air into the batter, which contributes to the cake’s light and airy texture. Don’t rush this step!
- Add the eggs and egg whites: Add the eggs one at a time, beating well after each addition. Then, add the egg whites one at a time, beating well after each addition. Be sure to scrape down the sides of the bowl after each addition to ensure everything is evenly incorporated. The egg whites add extra moisture and structure to the cake, resulting in a more tender crumb.
- Add the vanilla extract: Stir in the vanilla extract. I always use pure vanilla extract for the best flavor, but you can use imitation vanilla extract if that’s what you have on hand.
- Alternate adding the dry ingredients and buttermilk: Gradually add the dry ingredients to the wet ingredients, alternating with the buttermilk, beginning and ending with the dry ingredients. Add the dry ingredients in three additions and the buttermilk in two additions. So, add about one-third of the dry ingredients and mix until just combined. Then, add half of the buttermilk and mix until just combined. Repeat with another third of the dry ingredients, the remaining buttermilk, and then the final third of the dry ingredients. Be careful not to overmix the batter at this stage. Overmixing can develop the gluten in the flour, resulting in a tough cake. Mix until just combined, meaning you don’t see any streaks of flour or buttermilk remaining.
- Divide the batter evenly between the prepared cake pans: Pour the batter evenly into the prepared cake pans. I like to use a kitchen scale to ensure that each pan has the same amount of batter. This will help the cakes bake evenly.
Baking Process
Now that our batter is ready, it’s time to bake these beauties! Proper baking is key to achieving that golden-brown, perfectly risen cake we’re after.
- Bake the cakes: Bake in the preheated oven for 30-35 minutes, or until a wooden skewer inserted into the center comes out clean. The cakes should be golden brown on top and spring back lightly when touched.
- Cool the cakes in the pans: Let the cakes cool in the pans for 10-15 minutes before inverting them onto a wire rack to cool completely. This prevents the cakes from sticking to the pans and allows them to cool evenly.
- Wrap the cooled cakes (optional): Once the cakes are completely cool, wrap them tightly in plastic wrap and refrigerate for at least 30 minutes (or even overnight). This makes them easier to frost and prevents them from crumbling.
Preparing the Vanilla Buttercream Frosting
No vanilla cake is complete without a luscious vanilla buttercream frosting! This recipe is simple, yet yields a smooth, creamy, and perfectly sweet frosting that complements the cake beautifully.
- 1 cup (2 sticks) unsalted butter, softened
- 3-4 cups powdered sugar
- 1/4 cup milk or heavy cream
- 2 teaspoons vanilla extract
- Cream the butter: In a large bowl (or the bowl of your stand mixer), cream the softened butter until smooth and creamy. This usually takes about 2-3 minutes on medium speed.
- Gradually add the powdered sugar: Gradually add the powdered sugar, one cup at a time, beating well after each addition. Start on low speed to prevent the powdered sugar from flying everywhere.
- Add the milk or heavy cream and vanilla extract: Add the milk or heavy cream and vanilla extract, and beat until light and fluffy. If the frosting is too thick, add a little more milk or heavy cream. If it’s too thin, add a little more powdered sugar.
- Beat until smooth and creamy: Continue to beat the frosting for several minutes until it is light, fluffy, and smooth. This will help to incorporate air into the frosting, making it even more delicious.
Assembling and Frosting the Cake
The final step! Now we get to put it all together and create a beautiful, delicious vanilla cake.
- Level the cakes (optional): If the cakes are not perfectly level, use a serrated knife to trim the tops so they are flat. This will make it easier to frost the cake evenly.
- Place the first cake layer on a serving plate or cake stand: Place one cake layer on a serving plate or cake stand.
- Frost the first layer: Spread a generous layer of vanilla buttercream frosting evenly over the top of the first cake layer.
- Place the second cake layer on top: Carefully place the second cake layer on top of the frosting.
- Frost the entire cake: Frost the entire cake with the remaining vanilla buttercream frosting. You can use a spatula or a piping bag to create a smooth or textured finish.
- Decorate the cake (optional): Decorate the cake with sprinkles, fresh fruit, or any other toppings you like.
- Chill the cake (optional): Chill the cake in the refrigerator for at least 30 minutes before serving. This will help the frosting to set and make the cake easier to slice.

Conclusion:
This isn’t just another cake recipe; it’s an invitation to experience the pure, unadulterated joy of a truly exceptional vanilla cake. From its incredibly moist crumb to its delicate, yet pronounced vanilla flavor, this cake is guaranteed to become a staple in your baking repertoire. It’s the kind of cake that evokes memories of childhood birthdays and comforting family gatherings, a classic reimagined for the modern baker.
But what truly sets this recipe apart is its versatility. While it’s divine on its own, a simple dusting of powdered sugar is all it needs to shine, it also serves as the perfect blank canvas for your culinary creativity. Imagine layering it with fresh berries and whipped cream for a summery treat, or frosting it with a rich chocolate ganache for a more decadent indulgence. For a truly special occasion, consider transforming it into a stunning layer cake with a luscious vanilla buttercream frosting, perhaps even adding a hint of lemon zest to the buttercream for a bright, citrusy counterpoint to the vanilla.
And the serving suggestions are endless! Serve it warm with a scoop of vanilla ice cream for a comforting dessert on a chilly evening, or slice it thinly and enjoy it with a cup of coffee or tea in the afternoon. You could even toast slices of the cake and use them as the base for a delightful French toast casserole. The possibilities are truly limited only by your imagination.
Beyond the variations, the real magic lies in the simplicity of the recipe itself. We’ve carefully crafted each step to ensure that even novice bakers can achieve perfect results. The clear instructions and readily available ingredients make this cake accessible to everyone, regardless of their baking experience. We’ve taken the guesswork out of baking, so you can focus on enjoying the process and savoring the delicious outcome.
We’ve poured our heart and soul into perfecting this vanilla cake recipe, and we’re confident that you’ll love it as much as we do. It’s more than just a cake; it’s an experience, a celebration of flavor, and a testament to the power of simple ingredients.
So, what are you waiting for? Preheat your oven, gather your ingredients, and prepare to embark on a baking adventure. We promise you won’t be disappointed. This cake is not only delicious but also creates a wonderful aroma throughout your home, making it a truly sensory experience.
We’re incredibly excited for you to try this recipe and discover the magic of this exceptional vanilla cake for yourself. Once you’ve baked it, we’d absolutely love to hear about your experience! Share your photos, your variations, and your stories with us. Let us know what you thought of the recipe, what you changed, and how you served it. Your feedback is invaluable, and it helps us continue to improve and refine our recipes. You can find us on social media using #BestVanillaCakeEver or leave a comment on our website. We can’t wait to see your creations and hear your thoughts! Happy baking!
Vanilla Cake: The Ultimate Guide to Baking Perfection
Classic vanilla cake with a light and fluffy crumb, topped with a smooth and creamy vanilla buttercream frosting.
Ingredients
- 2 1/2 cups all-purpose flour
- 1 tablespoon baking powder
- 1/2 teaspoon baking soda
- 1/2 teaspoon salt
- 1 cup (2 sticks) unsalted butter, softened
- 1 3/4 cups granulated sugar
- 2 large eggs
- 2 large egg whites
- 1 tablespoon vanilla extract
- 1 1/4 cups buttermilk
- 1 cup (2 sticks) unsalted butter, softened
- 3-4 cups powdered sugar
- 1/4 cup milk or heavy cream
- 2 teaspoons vanilla extract
Instructions
- Preheat oven to 350°F (175°C). Grease and flour two 9-inch round cake pans. Consider using parchment paper circles for the bottom.
- In a large bowl, whisk together flour, baking powder, baking soda, and salt.
- In a separate large bowl (or stand mixer bowl), cream softened butter and granulated sugar until light and fluffy (3-5 minutes on medium speed).
- Add eggs one at a time, beating well after each addition. Then add egg whites one at a time, beating well after each addition. Scrape down the sides of the bowl after each addition.
- Stir in vanilla extract.
- Gradually add dry ingredients to wet ingredients, alternating with buttermilk, beginning and ending with dry ingredients. Add dry ingredients in three additions and buttermilk in two additions, mixing until just combined after each addition. Be careful not to overmix.
- Pour batter evenly into prepared cake pans.
- Bake in preheated oven for 30-35 minutes, or until a wooden skewer inserted into the center comes out clean.
- Let cakes cool in pans for 10-15 minutes before inverting onto a wire rack to cool completely.
- Once cooled, wrap tightly in plastic wrap and refrigerate for at least 30 minutes (or overnight).
- In a large bowl (or stand mixer bowl), cream softened butter until smooth and creamy (2-3 minutes on medium speed).
- Gradually add powdered sugar, one cup at a time, beating well after each addition. Start on low speed.
- Add milk or heavy cream and vanilla extract, and beat until light and fluffy. Adjust milk/cream or powdered sugar to reach desired consistency.
- Continue to beat the frosting for several minutes until it is light, fluffy, and smooth.
- Trim tops of cakes with a serrated knife if they are not level.
- Place one cake layer on a serving plate or cake stand.
- Spread a generous layer of vanilla buttercream frosting evenly over the top of the first cake layer.
- Carefully place the second cake layer on top of the frosting.
- Frost the entire cake with the remaining vanilla buttercream frosting.
- Decorate with sprinkles, fresh fruit, or other toppings.
- Chill the cake in the refrigerator for at least 30 minutes before serving.
Notes
- Use softened butter for both the cake and frosting for best results.
- Don’t overmix the cake batter, as this can result in a tough cake.
- For the best vanilla flavor, use pure vanilla extract.
- Chilling the cakes before frosting makes them easier to handle and prevents crumbling.
- Adjust the amount of powdered sugar and milk/cream in the frosting to achieve your desired consistency.
Leave a Comment