
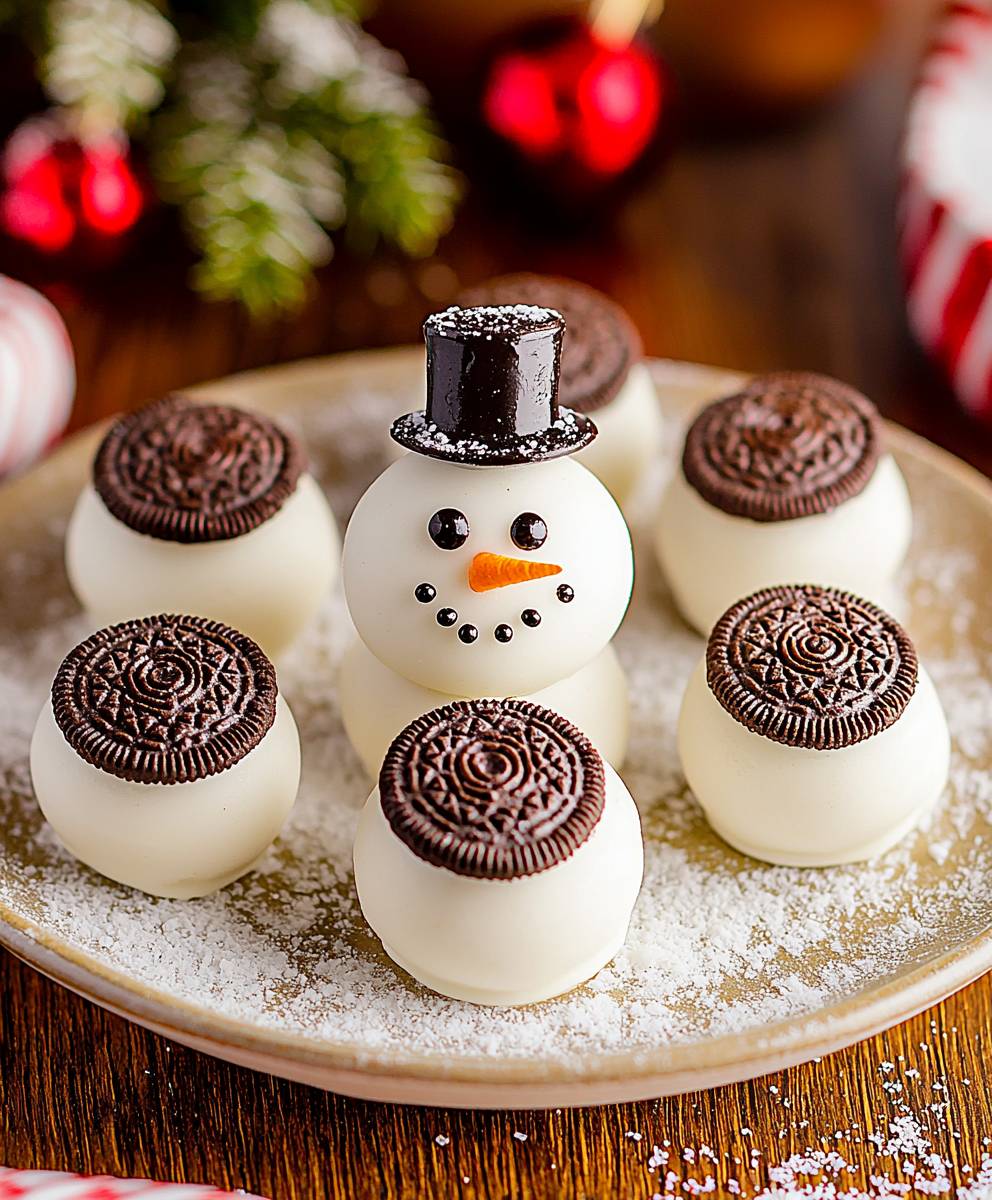
Snowman Oreo Balls: Prepare to be enchanted! Imagine biting into a creamy, melt-in-your-mouth treat that’s as adorable as it is delicious. These aren’t just any dessert; they’re miniature edible snowmen, perfect for bringing a touch of winter wonderland to your holiday gatherings.
While the exact origins of Oreo balls are shrouded in a delightful mystery, their popularity exploded in the early 2000s, quickly becoming a staple at potlucks and holiday parties. The beauty of this recipe lies in its simplicity and the sheer joy it brings. Who can resist a perfectly round ball of Oreo goodness, especially when transformed into a charming snowman?
People adore Snowman Oreo Balls for so many reasons. The combination of the crunchy Oreo cookies and the smooth cream cheese creates a textural symphony in your mouth. Plus, they’re incredibly easy to make, requiring no baking at all! This makes them a fantastic option for getting kids involved in the kitchen. Their festive appearance and delectable taste make them a guaranteed crowd-pleaser, ensuring smiles all around. So, gather your ingredients, and let’s create some edible winter magic!
Ingredients:
- 1 package (14.3 ounces) Oreo cookies, finely crushed
- 1 package (8 ounces) cream cheese, softened
- 16 ounces white chocolate melting wafers
- Orange candy melts or orange sprinkles for the nose
- Mini chocolate chips for the eyes and buttons
- Pretzel sticks, broken in half, for the arms
- Optional: Black decorating gel for the mouth
- Optional: Shredded coconut for coating
Making the Oreo Balls
- First, we need to crush those Oreos! You can use a food processor for this, which is super quick and easy. Just toss the whole package of Oreos in (yes, the filling too!) and pulse until they’re finely crushed. If you don’t have a food processor, no worries! You can put the Oreos in a large zip-top bag and crush them with a rolling pin. Just make sure to get them as fine as possible. We want a nice, even texture for our balls.
- Now, in a large bowl, combine the crushed Oreos and the softened cream cheese. Make sure your cream cheese is really soft! This will make it much easier to mix everything together. I usually leave mine out on the counter for about an hour before I start.
- Using a hand mixer or a sturdy spoon, mix the Oreo crumbs and cream cheese until they are completely combined. You should have a thick, dough-like mixture. Don’t overmix, but make sure there are no streaks of cream cheese visible.
- Once the mixture is well combined, it’s time to form the balls! I like to use a small cookie scoop to make sure all the balls are the same size. This also helps them look more uniform when they’re finished. If you don’t have a cookie scoop, you can use a tablespoon.
- Roll the mixture into balls about 1 inch in diameter. Place the balls on a baking sheet lined with parchment paper or wax paper. This will prevent them from sticking.
- Once all the balls are rolled, place the baking sheet in the freezer for at least 30 minutes. This is a crucial step! Freezing the balls helps them firm up, which makes them much easier to dip in the melted chocolate. If you skip this step, the balls might fall apart when you try to dip them.
Melting the White Chocolate
- While the Oreo balls are freezing, it’s time to melt the white chocolate. There are a couple of ways you can do this. My preferred method is using a double boiler. If you don’t have a double boiler, you can create one by placing a heat-safe bowl over a saucepan of simmering water. Make sure the bottom of the bowl doesn’t touch the water.
- Place the white chocolate melting wafers in the bowl of the double boiler. Stir occasionally until the chocolate is completely melted and smooth. Be careful not to overheat the chocolate, as it can seize up and become grainy.
- If you prefer to use the microwave, you can melt the white chocolate in 30-second intervals, stirring in between each interval. Again, be careful not to overheat the chocolate. Stop microwaving when there are still a few unmelted pieces and stir until they melt completely.
- Once the white chocolate is melted, you’ll want to keep it warm while you’re dipping the Oreo balls. You can do this by leaving it in the double boiler or by placing it in a bowl over a warm water bath.
Dipping and Decorating the Snowman Oreo Balls
- Now for the fun part! Remove the Oreo balls from the freezer. Working one at a time, dip each ball into the melted white chocolate. Make sure the ball is completely covered in chocolate.
- Use a fork or dipping tools to lift the ball out of the chocolate. Gently tap the fork on the edge of the bowl to remove any excess chocolate.
- Place the dipped ball back on the parchment-lined baking sheet.
- Immediately, before the white chocolate sets, add the decorations. This is where you can get creative!
- For the nose, use orange candy melts or orange sprinkles. If using candy melts, melt a small amount and use a toothpick to dab a tiny bit onto the ball where you want the nose to be. Then, attach a small piece of the melted candy. If using sprinkles, just gently press an orange sprinkle into the wet chocolate.
- For the eyes and buttons, use mini chocolate chips. Gently press them into the wet chocolate.
- For the arms, insert two broken pretzel sticks into the sides of the ball. Again, do this while the chocolate is still wet so they stick properly.
- If you want to add a mouth, use black decorating gel. Pipe a small, curved line onto the ball below the nose.
- Optional: If you want to coat the snowman in shredded coconut, sprinkle it over the wet white chocolate immediately after dipping.
- Repeat steps 1-8 for all the Oreo balls.
- Once all the snowmen are decorated, place the baking sheet back in the refrigerator for about 15-20 minutes to allow the white chocolate to set completely.
Tips and Variations
- Don’t skip the freezing step! It’s essential for keeping the Oreo balls from falling apart during dipping.
- If your white chocolate starts to thicken, you can add a teaspoon of vegetable oil or shortening to thin it out.
- If you don’t like white chocolate, you can use milk chocolate or dark chocolate instead.
- For a festive touch, you can add a sprinkle of edible glitter to the snowmen.
- You can also use different types of sprinkles for the nose and buttons.
- If you’re making these for a party, you can prepare the Oreo balls ahead of time and store them in the refrigerator until you’re ready to dip them.
- To make these even more fun, you can set up a decorating station and let your kids or guests decorate their own snowmen.
- Storage: Store the finished Snowman Oreo Balls in an airtight container in the refrigerator for up to a week.
- Troubleshooting: If your white chocolate is seizing up, try adding a small amount of vegetable oil or shortening. If your Oreo balls are falling apart, make sure you’re freezing them long enough.
- Make it easier: Use store-bought candy eyes instead of mini chocolate chips. This will save you some time and effort.
- Flavor variations: Add a drop of peppermint extract to the melted white chocolate for a minty flavor.
Conclusion:
So, there you have it! These Snowman Oreo Balls are more than just a cute treat; they’re a delightful explosion of creamy, chocolatey goodness that’s guaranteed to bring smiles to faces of all ages. Seriously, what’s not to love? They’re incredibly easy to make, require minimal ingredients, and are absolutely perfect for holiday parties, bake sales, or even just a fun afternoon activity with the kids. I truly believe this recipe is a must-try this winter season.
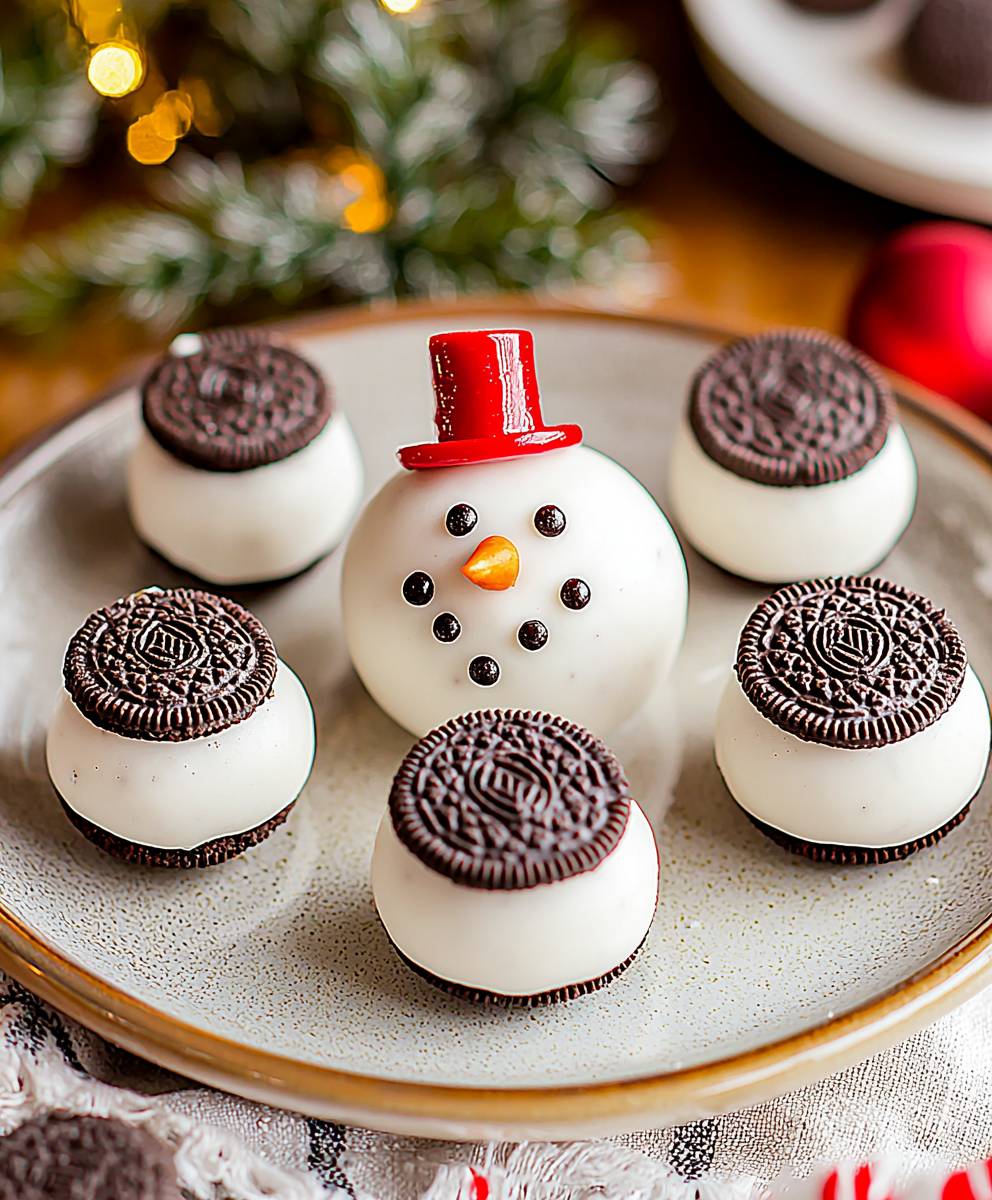
But the best part? The possibilities are endless! Feel free to get creative with your decorations. Instead of the classic orange sprinkle nose, try using a tiny piece of candy corn or even a mini chocolate chip. For the hats, consider using different colored melting chocolate or adding a sprinkle of edible glitter for extra sparkle. If you’re feeling adventurous, you could even dip the finished snowmen in white chocolate and then roll them in shredded coconut for a snowy effect.
Serving suggestions? Oh, I have plenty! These Snowman Oreo Balls are fantastic on their own, of course. But they also pair beautifully with a warm cup of hot chocolate or a glass of cold milk. You could even arrange them on a festive platter alongside other holiday treats like cookies, brownies, and fudge. For a more elegant presentation, try placing each snowman on a small square of parchment paper or in a mini cupcake liner. And if you’re giving them as gifts, package them in a cute little box or bag with a ribbon and a tag. They’re guaranteed to be a hit!
And speaking of variations, don’t be afraid to experiment with different types of Oreos! Golden Oreos would create a lovely vanilla-flavored snowman, while mint Oreos would add a refreshing twist. You could even use double-stuffed Oreos for an extra creamy center. The key is to have fun and let your creativity shine. Remember, there are no rules when it comes to making these adorable treats.
I’m so confident that you’ll love this recipe that I’m practically begging you to try it! Seriously, gather your ingredients, put on some festive music, and get ready to have some fun in the kitchen. I promise you won’t be disappointed. And once you’ve made your own batch of Snowman Oreo Balls, I’d absolutely love to hear about your experience. Did you make any variations? Did you have any funny decorating mishaps? Did the kids enjoy helping out?
Please, share your photos and stories with me! You can tag me on social media using [Your Social Media Handle] or leave a comment below. I’m always so inspired by the creativity and enthusiasm of my readers, and I can’t wait to see what you come up with. So go ahead, give this Snowman Oreo Balls recipe a try and spread some holiday cheer! Happy baking!
Print
Snowman Oreo Balls: A Festive & Delicious Holiday Treat
- Total Time: 60 minutes
- Yield: 30 Oreo balls 1x
Description
Festive Snowman Oreo Balls are easy, no-bake holiday treats. Crushed Oreos, cream cheese, and white chocolate create adorable snowmen perfect for parties.
Ingredients
- 1 package (14.3 ounces) Oreo cookies, finely crushed
- 1 package (8 ounces) cream cheese, softened
- 16 ounces white chocolate melting wafers
- Orange candy melts or orange sprinkles for the nose
- Mini chocolate chips for the eyes and buttons
- Pretzel sticks, broken in half, for the arms
- Optional: Black decorating gel for the mouth
- Optional: Shredded coconut for coating
Instructions
- Crush the Oreo cookies. Use a food processor or place in a zip-top bag and crush with a rolling pin until finely crushed.
- In a large bowl, combine the crushed Oreos and softened cream cheese.
- Mix until completely combined, forming a thick, dough-like mixture.
- Use a small cookie scoop or tablespoon to roll the mixture into 1-inch balls.
- Place the balls on a baking sheet lined with parchment paper or wax paper.
- Freeze for at least 30 minutes.
- Melt the white chocolate using a double boiler or in the microwave in 30-second intervals, stirring in between.
- Keep the melted chocolate warm while dipping.
- Remove the Oreo balls from the freezer.
- Dip each ball into the melted white chocolate, ensuring it’s completely covered.
- Lift the ball out of the chocolate and tap off any excess.
- Place the dipped ball back on the parchment-lined baking sheet.
- Immediately add the decorations before the white chocolate sets.
- Add orange candy melts or orange sprinkles for the nose.
- Add mini chocolate chips for the eyes and buttons.
- Insert two broken pretzel sticks into the sides of the ball for the arms.
- Add a mouth using black decorating gel (optional).
- Sprinkle with shredded coconut (optional).
- Repeat steps for all Oreo balls.
- Refrigerate for 15-20 minutes to allow the white chocolate to set completely.
Notes
- Don’t skip the freezing step!
- If white chocolate thickens, add a teaspoon of vegetable oil or shortening.
- Use milk chocolate or dark chocolate instead of white chocolate.
- Add a sprinkle of edible glitter.
- Use different types of sprinkles for the nose and buttons.
- Prepare the Oreo balls ahead of time and store them in the refrigerator.
- Set up a decorating station and let your kids or guests decorate their own snowmen.
- Storage: Store the finished Snowman Oreo Balls in an airtight container in the refrigerator for up to a week.
- Troubleshooting: If your white chocolate is seizing up, try adding a small amount of vegetable oil or shortening. If your Oreo balls are falling apart, make sure you’re freezing them long enough.
- Make it easier: Use store-bought candy eyes instead of mini chocolate chips. This will save you some time and effort.
- Flavor variations: Add a drop of peppermint extract to the melted white chocolate for a minty flavor.
- Prep Time: 20 minutes
- Cook Time: 10 minutes


Leave a Comment