
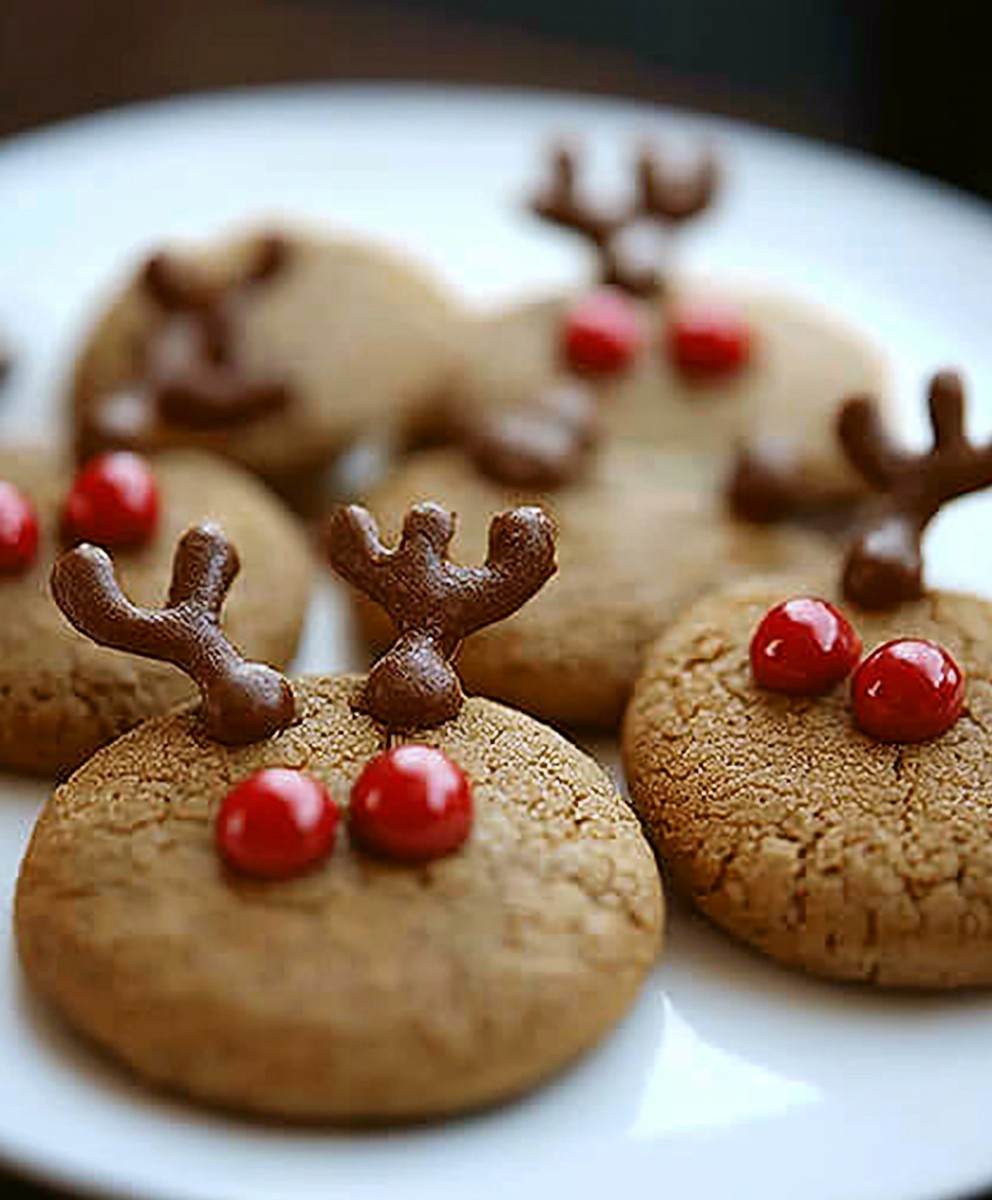
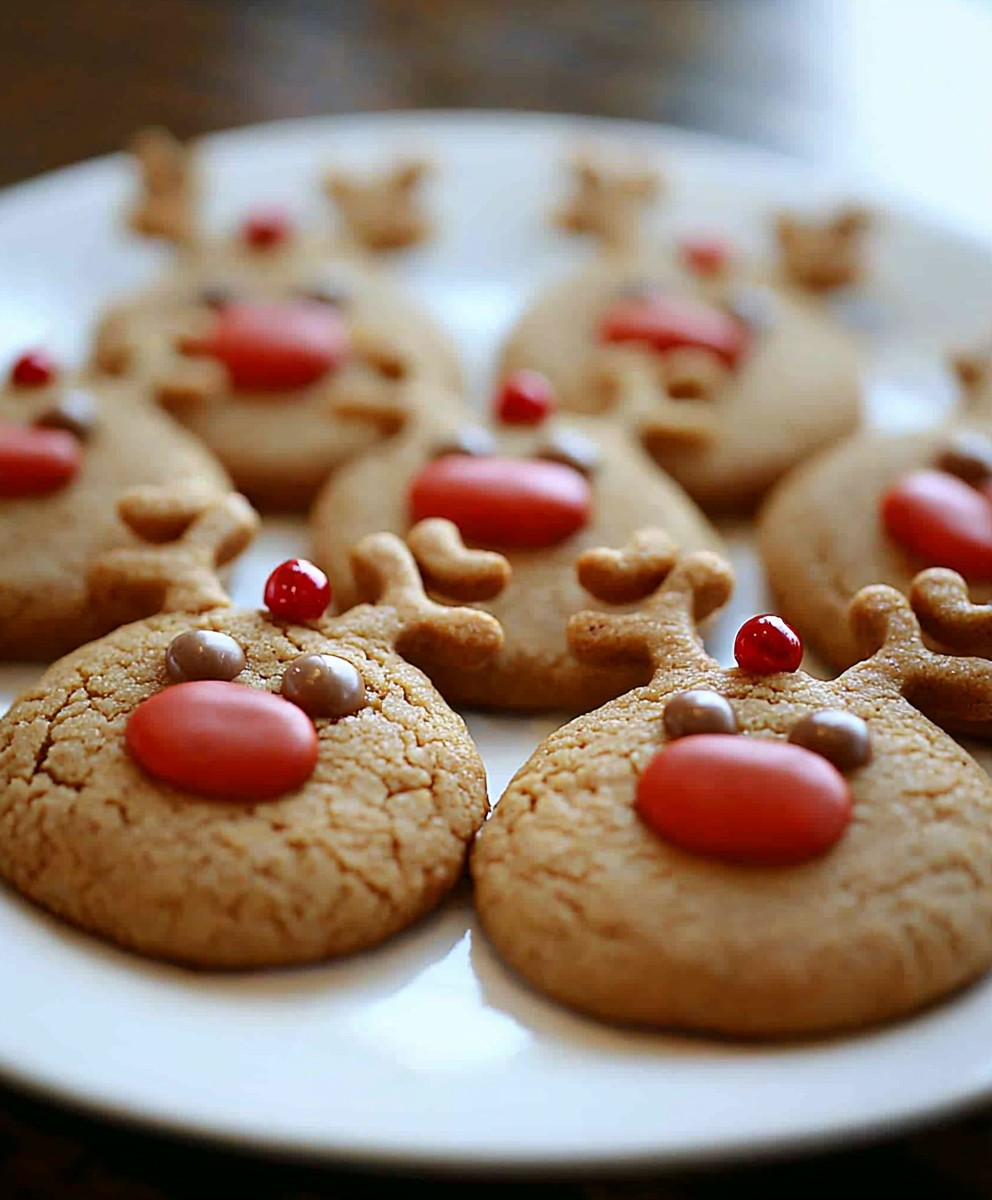
Peanut Butter Reindeer Cookies: Get ready to spread some holiday cheer with these adorable and utterly delicious treats! Imagine the delight on faces young and old as they bite into a soft, chewy cookie shaped like everyone’s favorite Christmas helper. These aren’t just any cookies; they’re a festive experience wrapped in peanut butter goodness.
While the exact origins of reindeer-shaped cookies are shrouded in the mists of holiday baking history, the tradition of making cookies for Christmas dates back centuries. Different cultures have their own unique takes, but the common thread is the joy of sharing sweet treats during the festive season. These Peanut Butter Reindeer Cookies are a modern twist on that tradition, combining the classic comfort of peanut butter with the whimsical charm of reindeer.
What makes these cookies so irresistible? It’s the perfect combination of flavors and textures. The creamy, nutty flavor of peanut butter blends beautifully with the sweetness of sugar, creating a melt-in-your-mouth sensation. The soft, chewy texture is simply divine, and the adorable reindeer design adds a touch of fun to every bite. Plus, they’re surprisingly easy to make, making them a perfect activity for families to enjoy together during the holidays. So, gather your ingredients and let’s get baking! You’ll be amazed at how quickly these festive cookies disappear.
Ingredients:
- 1 cup (2 sticks) unsalted butter, softened
- 1 cup creamy peanut butter
- 1 cup granulated sugar
- 1 cup packed brown sugar
- 2 large eggs
- 1 teaspoon vanilla extract
- 2 1/2 cups all-purpose flour
- 1 teaspoon baking soda
- 1/2 teaspoon baking powder
- 1/4 teaspoon salt
- Pretzel twists (for antlers)
- Candy eyes
- Red M&Ms or red candies (for noses)
- Chocolate frosting or melted chocolate (for attaching decorations)
Preparing the Peanut Butter Cookie Dough
Okay, let’s get started! First things first, we need to make our delicious peanut butter cookie dough. This is the foundation of our adorable reindeer cookies, so let’s make sure we get it just right.
- Cream Together the Butter and Peanut Butter: In a large bowl (or the bowl of your stand mixer), cream together the softened butter and peanut butter until they are light and fluffy. This usually takes about 2-3 minutes. Make sure your butter is truly softened not melted! Softened butter will incorporate air, giving your cookies a lighter texture.
- Add the Sugars: Gradually add the granulated sugar and brown sugar to the butter and peanut butter mixture. Beat until everything is well combined and the mixture is smooth. The brown sugar adds a lovely depth of flavor and helps keep the cookies soft.
- Incorporate the Eggs and Vanilla: Beat in the eggs one at a time, making sure each egg is fully incorporated before adding the next. Then, stir in the vanilla extract. The vanilla enhances all the other flavors, so don’t skip it!
- Combine the Dry Ingredients: In a separate medium bowl, whisk together the flour, baking soda, baking powder, and salt. Whisking ensures that the baking soda and baking powder are evenly distributed throughout the flour, which is crucial for proper leavening.
- Gradually Add Dry Ingredients to Wet Ingredients: Gradually add the dry ingredients to the wet ingredients, mixing on low speed until just combined. Be careful not to overmix the dough! Overmixing can develop the gluten in the flour, resulting in tough cookies. Mix until the flour is just incorporated, and then stop.
- Chill the Dough: Wrap the dough in plastic wrap and chill it in the refrigerator for at least 30 minutes. This is a crucial step! Chilling the dough prevents the cookies from spreading too much during baking and also allows the flavors to meld together. You can chill it for longer, even overnight, if you prefer.
Baking the Cookies
Now that our dough is chilled, it’s time to bake these beauties! Get ready for some delicious aromas to fill your kitchen.
- Preheat the Oven: Preheat your oven to 375°F (190°C). Line baking sheets with parchment paper or silicone baking mats. Parchment paper prevents the cookies from sticking and makes cleanup a breeze.
- Roll and Cut Out the Cookies: On a lightly floured surface, roll out the chilled dough to about 1/4 inch thickness. Use a round cookie cutter (or any shape you like!) to cut out the cookies. I prefer round for easy reindeer assembly, but feel free to get creative!
- Place Cookies on Baking Sheets: Place the cut-out cookies onto the prepared baking sheets, leaving about 1-2 inches between each cookie. This allows for even baking and prevents the cookies from sticking together as they spread.
- Bake the Cookies: Bake for 8-10 minutes, or until the edges are lightly golden brown. Keep a close eye on them, as baking times can vary depending on your oven. You want them to be cooked through but still soft in the center.
- Cool the Cookies: Remove the baking sheets from the oven and let the cookies cool on the baking sheets for a few minutes before transferring them to a wire rack to cool completely. This prevents them from breaking while they are still warm and soft.
Decorating the Reindeer Cookies
This is the fun part! Let your creativity shine as we transform these peanut butter cookies into adorable reindeer.
- Prepare the Decorations: Gather your pretzel twists, candy eyes, red M&Ms (or other red candies), and chocolate frosting or melted chocolate. Make sure everything is within easy reach so you can decorate efficiently.
- Attach the Antlers: Break the pretzel twists in half to create the antlers. Gently press two pretzel halves into the top of each cookie to resemble antlers. You can use a dab of frosting or melted chocolate to secure them if needed.
- Add the Eyes: Use a small amount of chocolate frosting or melted chocolate to attach the candy eyes to each cookie. Position them towards the center of the cookie, leaving room for the nose.
- Attach the Nose: Use a small amount of chocolate frosting or melted chocolate to attach a red M&M (or other red candy) to the center of each cookie to create the reindeer’s nose. Rudolph would be proud!
- Let the Frosting Set: Allow the frosting or melted chocolate to set completely before serving or storing the cookies. This will prevent the decorations from sliding off.
Tips and Tricks for Perfect Reindeer Cookies
Here are a few extra tips to ensure your reindeer cookies are a smashing success!
- Don’t Overbake: Overbaked cookies will be dry and crumbly. Bake them until the edges are lightly golden brown, and the centers are still slightly soft. They will continue to firm up as they cool.
- Use Quality Ingredients: Using high-quality ingredients, especially butter and peanut butter, will make a noticeable difference in the flavor and texture of your cookies.
- Get Creative with Decorations: Feel free to experiment with different types of candies and decorations. You can use different colored M&Ms for the noses, add sprinkles, or even pipe on some extra frosting for a more festive look.
- Make Ahead: The cookie dough can be made ahead of time and stored in the refrigerator for up to 3 days. You can also bake the cookies ahead of time and store them in an airtight container at room temperature for up to 5 days. Decorate them just before serving.
- Freezing: Baked and decorated cookies can be frozen for up to 2 months. Thaw them completely at room temperature before serving. You can also freeze the unbaked cookie dough. Wrap it tightly in plastic wrap and store it in the freezer for up to 3 months. Thaw it in the refrigerator overnight before rolling and baking.
- Peanut Butter Alternatives: If you have peanut allergies, you can substitute the peanut butter with sunflower seed butter (sunbutter) or another nut butter alternative. Just be aware that the flavor and texture of the cookies may be slightly different.
- Troubleshooting: If your cookies are spreading too much, try chilling the dough for a longer period of time. You can also add a tablespoon or two of flour to the dough. If your cookies are too dry, try adding a tablespoon of milk or water to the dough.
Storing Your Delicious Creations
Once your cookies are decorated and the frosting has set, store them in an airtight container at room temperature. They’ll stay fresh and delicious for up to 5 days (if they last that long!). You can also freeze them for longer storage, as mentioned above.
Enjoy!
I hope you enjoy making and eating these adorable Peanut Butter Reindeer Cookies! They’re perfect for holiday parties, cookie exchanges, or just a fun afternoon of baking with family and friends. Happy baking!
Conclusion:
So, there you have it! These Peanut Butter Reindeer Cookies are more than just a festive treat; they’re a guaranteed crowd-pleaser that’s surprisingly simple to make. From the creamy peanut butter base to the adorable reindeer decorations, every element of this recipe is designed to bring joy to your holiday baking. I truly believe this is a must-try recipe this season, and here’s why:
First, the taste is simply irresistible. The combination of peanut butter and chocolate is a classic for a reason, and these cookies perfectly balance the sweet and salty flavors. The soft, chewy texture is incredibly satisfying, making them the perfect treat to enjoy with a warm cup of cocoa or coffee. Second, they’re incredibly fun to make! Getting creative with the reindeer decorations is a fantastic activity for kids and adults alike. It’s a wonderful way to spend quality time together during the holidays, creating memories that will last a lifetime. And third, they’re incredibly versatile. You can easily adapt the recipe to suit your preferences and dietary needs.
Serving Suggestions and Variations:
While these cookies are delicious on their own, there are plenty of ways to elevate them even further. Consider serving them with a scoop of vanilla ice cream for a decadent dessert. Or, pair them with a glass of cold milk for a classic holiday treat. For a festive touch, arrange them on a decorative platter and sprinkle them with edible glitter. They also make fantastic gifts! Package them in cellophane bags tied with ribbon for a thoughtful and homemade present.
If you’re looking to experiment with variations, the possibilities are endless. Try using different types of chocolate for the antlers and eyes, such as white chocolate or dark chocolate. You could also add a sprinkle of chopped nuts or mini chocolate chips to the dough for extra texture and flavor. For a healthier option, substitute the butter with coconut oil and use natural peanut butter. You can even add a touch of cinnamon or nutmeg to the dough for a warm, spicy flavor.
Another fun variation is to make these into “Rudolph” cookies by using a red M&M for the nose. Or, if you’re feeling adventurous, try dipping the entire cookie in melted chocolate and then decorating it with reindeer features. Get creative and have fun with it! The most important thing is to enjoy the process and create cookies that you and your loved ones will adore.
I’m confident that these Peanut Butter Reindeer Cookies will become a new holiday tradition in your home. They’re easy to make, delicious to eat, and guaranteed to bring a smile to everyone’s face. So, what are you waiting for? Gather your ingredients, preheat your oven, and get ready to bake some holiday magic! I can’t wait to hear about your baking adventures. Please, try out this recipe and share your photos and experiences in the comments below. Let me know what variations you tried and how they turned out. Happy baking, and happy holidays!
Print
Peanut Butter Reindeer Cookies: A Festive Holiday Recipe
- Total Time: 60 minutes
- Yield: 24 cookies 1x
Description
Festive peanut butter cookies shaped like reindeer with pretzel antlers, candy eyes, and M&M noses. A fun holiday baking project!
Ingredients
- 1 cup (2 sticks) unsalted butter, softened
- 1 cup creamy peanut butter
- 1 cup granulated sugar
- 1 cup packed brown sugar
- 2 large eggs
- 1 teaspoon vanilla extract
- 2 1/2 cups all-purpose flour
- 1 teaspoon baking soda
- 1/2 teaspoon baking powder
- 1/4 teaspoon salt
- Pretzel twists (for antlers)
- Candy eyes
- Red M&Ms or red candies (for noses)
- Chocolate frosting or melted chocolate (for attaching decorations)
Instructions
- Cream Together Butter and Peanut Butter: In a large bowl, cream together the softened butter and peanut butter until light and fluffy (2-3 minutes).
- Add Sugars: Gradually add granulated sugar and brown sugar. Beat until well combined and smooth.
- Incorporate Eggs and Vanilla: Beat in eggs one at a time, then stir in vanilla extract.
- Combine Dry Ingredients: In a separate bowl, whisk together flour, baking soda, baking powder, and salt.
- Gradually Add Dry to Wet: Gradually add dry ingredients to wet ingredients, mixing on low speed until just combined. Do not overmix.
- Chill Dough: Wrap dough in plastic wrap and chill in the refrigerator for at least 30 minutes (or longer, even overnight).
- Preheat Oven: Preheat oven to 375°F (190°C). Line baking sheets with parchment paper.
- Roll and Cut Out: On a lightly floured surface, roll out dough to 1/4 inch thickness. Use a round cookie cutter to cut out cookies.
- Place on Baking Sheets: Place cookies on baking sheets, leaving 1-2 inches between each.
- Bake: Bake for 8-10 minutes, or until edges are lightly golden brown.
- Cool: Let cookies cool on baking sheets for a few minutes before transferring to a wire rack to cool completely.
- Prepare Decorations: Gather pretzel twists, candy eyes, red M&Ms, and chocolate frosting.
- Attach Antlers: Break pretzel twists in half. Press two pretzel halves into the top of each cookie. Use frosting to secure if needed.
- Add Eyes: Use frosting to attach candy eyes to each cookie.
- Attach Nose: Use frosting to attach a red M&M to the center of each cookie.
- Let Frosting Set: Allow the frosting to set completely before serving.
Notes
- Don’t overbake the cookies.
- Use quality ingredients for the best flavor.
- Get creative with decorations!
- Cookie dough can be made ahead and stored in the refrigerator for up to 3 days.
- Baked cookies can be stored in an airtight container at room temperature for up to 5 days.
- Baked and decorated cookies can be frozen for up to 2 months.
- Peanut butter can be substituted with sunflower seed butter or another nut butter alternative.
- If cookies are spreading too much, chill the dough for a longer period of time.
- If cookies are too dry, try adding a tablespoon of milk or water to the dough.
- Store decorated cookies in an airtight container at room temperature for up to 5 days.
- Prep Time: 30 minutes
- Cook Time: 8-10 minutes

Leave a Comment