
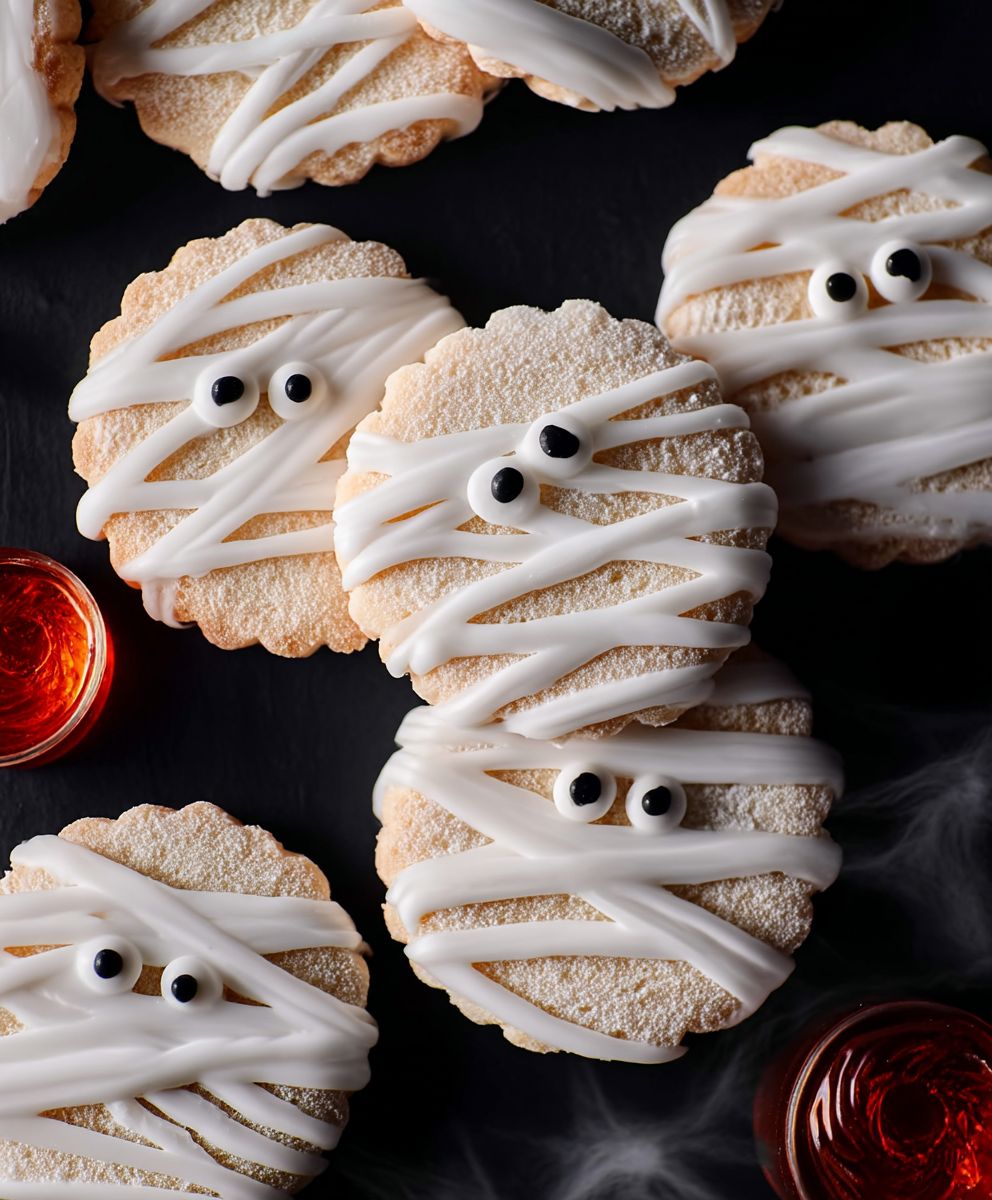
Mummy Sugar Cookies, aren’t they just the cutest, spookiest treat you’ve ever seen? Imagine sinking your teeth into a buttery, melt-in-your-mouth sugar cookie, adorned with delicate bandages of sweet icing. These aren’t just cookies; they’re edible works of art that bring a touch of playful fright to any Halloween gathering.
While sugar cookies themselves have a long and delicious history, tracing back to 7th-century Persia, the “mummy” twist is a relatively modern invention, born from our collective love of all things spooky and sweet during the Halloween season. It’s a fun and creative way to dress up a classic treat, transforming it into something truly special.
What makes these Mummy Sugar Cookies so irresistible? It’s the perfect combination of textures and flavors. The crisp yet tender cookie base provides a satisfying bite, while the smooth, sugary icing adds a touch of sweetness that perfectly complements the buttery flavor. Plus, they’re incredibly fun to make, especially with kids! Get ready to unleash your inner artist and create a batch of these adorable, edible mummies that are guaranteed to be a hit with everyone.
Ingredients:
- 1 cup (2 sticks) unsalted butter, softened
- 1 ½ cups granulated sugar
- 2 large eggs
- 1 teaspoon vanilla extract
- 3 cups all-purpose flour
- 1 teaspoon baking powder
- ½ teaspoon salt
Icing Ingredients:
- 4 cups powdered sugar
- 5-7 tablespoons milk (or water)
- 1 teaspoon vanilla extract
- Black food coloring (gel or liquid)
- White chocolate chips (for melting)
Instructions:
Preparing the Cookie Dough:
- Cream the Butter and Sugar: In a large bowl, or the bowl of your stand mixer, cream together the softened butter and granulated sugar until light and fluffy. This usually takes about 3-5 minutes. Make sure to scrape down the sides of the bowl occasionally to ensure everything is evenly mixed. This step is crucial for creating a tender cookie.
- Add Eggs and Vanilla: Beat in the eggs one at a time, mixing well after each addition. Then, stir in the vanilla extract. The vanilla adds a lovely warmth to the cookies, so don’t skip it!
- Combine Dry Ingredients: In a separate medium bowl, whisk together the all-purpose flour, baking powder, and salt. Whisking ensures the baking powder and salt are evenly distributed throughout the flour, which helps the cookies rise properly and have a consistent flavor.
- Gradually Add Dry Ingredients to Wet Ingredients: Gradually add the dry ingredients to the wet ingredients, mixing on low speed until just combined. Be careful not to overmix the dough, as this can result in tough cookies. Overmixing develops the gluten in the flour, leading to a less tender texture. Stop mixing as soon as the flour is incorporated.
- Chill the Dough: Divide the dough in half, flatten each half into a disc, and wrap each disc tightly in plastic wrap. Refrigerate for at least 2 hours, or preferably overnight. Chilling the dough is essential because it allows the gluten to relax, preventing the cookies from spreading too much during baking. It also makes the dough easier to roll out.
Rolling, Cutting, and Baking the Cookies:
- Preheat Oven and Prepare Baking Sheets: Preheat your oven to 350°F (175°C). Line baking sheets with parchment paper or silicone baking mats. Parchment paper prevents the cookies from sticking and makes cleanup a breeze.
- Roll Out the Dough: On a lightly floured surface, roll out one disc of chilled dough to about ¼ inch thickness. Keep the other disc of dough refrigerated while you work with the first one.
- Cut Out the Cookies: Use a mummy cookie cutter (or any Halloween-themed cookie cutter you like!) to cut out the cookies. If you don’t have a mummy cutter, you can use a rectangle or oval and shape it slightly with a knife after cutting.
- Place Cookies on Baking Sheets: Carefully transfer the cut-out cookies to the prepared baking sheets, leaving about 1 inch of space between each cookie.
- Bake the Cookies: Bake for 8-10 minutes, or until the edges are lightly golden brown. Keep a close eye on them, as baking times can vary depending on your oven. You want the cookies to be baked through but still soft.
- Cool the Cookies: Let the cookies cool on the baking sheets for a few minutes before transferring them to a wire rack to cool completely. Make sure the cookies are completely cool before you start decorating them.
Preparing the Icing:
- Make the White Icing: In a large bowl, whisk together the powdered sugar, vanilla extract, and milk (or water) until smooth. Start with 5 tablespoons of milk and add more, one tablespoon at a time, until you reach a consistency that is thick enough to pipe but still flows easily. You want the icing to be smooth and easy to work with.
- Make the Black Icing: Divide a small portion of the white icing into a separate bowl. Add black food coloring, a little at a time, until you reach the desired shade of black. Be careful not to add too much liquid, as this can thin out the icing too much.
- Melt the White Chocolate: Melt the white chocolate chips in a microwave-safe bowl in 30-second intervals, stirring in between, until smooth. Be careful not to overheat the chocolate, as it can seize up.
Decorating the Mummy Cookies:
- Base Layer of White Icing: Using a piping bag or a spoon, cover each cookie with a thin layer of white icing. This will act as a base for the mummy bandages. Let the base layer of icing set slightly before proceeding to the next step. This will prevent the bandages from sinking into the base layer.
- Pipe the Mummy Bandages: Fill a piping bag fitted with a small round tip (or use a ziplock bag with a tiny corner snipped off) with the white icing. Pipe horizontal lines across each cookie to create the mummy bandage effect. Don’t worry about making them perfectly straight or even; the slightly messy look adds to the mummy’s charm. Vary the thickness and spacing of the lines for a more realistic effect.
- Add the Eyes: Before the white icing sets completely, use a toothpick or a small piping bag to add two small dots of black icing for the eyes. You can also use candy eyes if you prefer. Place the eyes close together to give the mummy a slightly spooky look.
- Drizzle with Melted White Chocolate: Drizzle the melted white chocolate over the bandages to create a more textured and aged look. This step is optional, but it adds a nice touch to the cookies.
- Let the Icing Set: Allow the icing to set completely before serving or storing the cookies. This usually takes about 1-2 hours.
Tips and Tricks:
- Softened Butter is Key: Make sure your butter is properly softened before creaming it with the sugar. It should be soft enough to easily press your finger into, but not melted.
- Don’t Overmix the Dough: Overmixing the dough will result in tough cookies. Mix until just combined.
- Chill the Dough: Chilling the dough is essential for preventing the cookies from spreading too much during baking.
- Use Parchment Paper: Parchment paper prevents the cookies from sticking and makes cleanup a breeze.
- Cool Completely Before Decorating: Make sure the cookies are completely cool before you start decorating them. Otherwise, the icing will melt.
- Adjust Icing Consistency: Adjust the consistency of the icing by adding more milk or powdered sugar as needed.
- Get Creative with Decorations: Feel free to get creative with your decorations! You can use different colors of icing, sprinkles, or other candies to customize your mummy cookies.
Storage Instructions:
Store the decorated cookies in an airtight container at room temperature for up to 3-5 days.

Conclusion:
And there you have it! These adorable mummy sugar cookies are more than just a treat; they’re a fun, festive, and utterly delicious way to celebrate Halloween (or any spooky occasion, really!). I truly believe this recipe is a must-try for several reasons. First, the cookies themselves are perfectly balanced sweet, buttery, and with just the right amount of vanilla. They’re not overly sweet, which makes them ideal for pairing with the rich, decadent royal icing. Second, the decorating process is incredibly therapeutic and a fantastic activity to do with kids. It’s all about letting your creativity flow and embracing the imperfections after all, no two mummies are ever exactly alike! Finally, and perhaps most importantly, these cookies are guaranteed to bring a smile to everyone’s face. Their whimsical design and delightful flavor make them an instant crowd-pleaser.
But the fun doesn’t stop there! Feel free to experiment with different variations to make these mummy sugar cookies your own. For a richer flavor, try adding a teaspoon of almond extract to the cookie dough. If you’re not a fan of royal icing, you can easily substitute it with melted chocolate or even a simple glaze made from powdered sugar and milk. Get creative with the “bandages” too! Use different colors of icing, add sprinkles, or even incorporate edible glitter for a touch of sparkle.
Serving suggestions? Oh, the possibilities are endless! These cookies are perfect for Halloween parties, school bake sales, or simply as a special treat for your loved ones. Package them individually in cellophane bags tied with festive ribbons for adorable party favors. Arrange them on a platter alongside other Halloween-themed goodies like candy corn, chocolate pumpkins, and spooky cupcakes for a truly impressive dessert spread. You could even use them as edible decorations for a Halloween-themed cake or gingerbread house.
And if you’re feeling particularly adventurous, why not try making mini mummy sugar cookies? Simply use a smaller cookie cutter and adjust the baking time accordingly. These bite-sized treats are perfect for little hands and make a great addition to lunchboxes or snack packs.
I’ve poured my heart into perfecting this recipe, and I’m confident that you’ll love it as much as I do. The key to success is to have fun and not be afraid to experiment. Don’t worry if your mummies aren’t perfect that’s part of their charm! The most important thing is to enjoy the process and create memories with your loved ones.
So, what are you waiting for? Gather your ingredients, preheat your oven, and get ready to bake some seriously spooky and delicious mummy sugar cookies! I can’t wait to see your creations. Please, please, please give this recipe a try.
And most importantly, I’d absolutely love to hear about your experience. Did you try any variations? Did you encounter any challenges? What did your family and friends think? Share your photos and stories in the comments below. Your feedback is invaluable, and it helps me continue to improve my recipes and create content that you’ll love. Happy baking, and happy Halloween! I hope you enjoy making these mummy sugar cookies as much as I enjoyed sharing the recipe with you. Let me know how they turn out!
Mummy Sugar Cookies: Spooky & Delicious Recipe!
Spooky and delicious mummy cookies perfect for Halloween! These sugar cookies are decorated with white icing bandages, black eyes, and a drizzle of white chocolate for a fun and festive treat.
Ingredients
- 1 cup (2 sticks) unsalted butter, softened
- 1 ½ cups granulated sugar
- 2 large eggs
- 1 teaspoon vanilla extract
- 3 cups all-purpose flour
- 1 teaspoon baking powder
- ½ teaspoon salt
- 4 cups powdered sugar
- 5-7 tablespoons milk (or water)
- 1 teaspoon vanilla extract
- Black food coloring (gel or liquid)
- White chocolate chips (for melting)
Instructions
- In a large bowl, or the bowl of your stand mixer, cream together the softened butter and granulated sugar until light and fluffy (3-5 minutes). Scrape down the sides of the bowl occasionally.
- Beat in the eggs one at a time, mixing well after each addition. Stir in the vanilla extract.
- In a separate medium bowl, whisk together the all-purpose flour, baking powder, and salt.
- Gradually add the dry ingredients to the wet ingredients, mixing on low speed until just combined. Be careful not to overmix.
- Divide the dough in half, flatten each half into a disc, and wrap each disc tightly in plastic wrap. Refrigerate for at least 2 hours, or preferably overnight.
- Preheat your oven to 350°F (175°C). Line baking sheets with parchment paper or silicone baking mats.
- On a lightly floured surface, roll out one disc of chilled dough to about ¼ inch thickness. Keep the other disc of dough refrigerated.
- Use a mummy cookie cutter (or any Halloween-themed cookie cutter) to cut out the cookies.
- Carefully transfer the cut-out cookies to the prepared baking sheets, leaving about 1 inch of space between each cookie.
- Bake for 8-10 minutes, or until the edges are lightly golden brown.
- Let the cookies cool on the baking sheets for a few minutes before transferring them to a wire rack to cool completely.
- In a large bowl, whisk together the powdered sugar, vanilla extract, and milk (or water) until smooth. Start with 5 tablespoons of milk and add more, one tablespoon at a time, until you reach a consistency that is thick enough to pipe but still flows easily.
- Divide a small portion of the white icing into a separate bowl. Add black food coloring, a little at a time, until you reach the desired shade of black.
- Melt the white chocolate chips in a microwave-safe bowl in 30-second intervals, stirring in between, until smooth.
- Using a piping bag or a spoon, cover each cookie with a thin layer of white icing. Let the base layer of icing set slightly.
- Fill a piping bag fitted with a small round tip (or use a ziplock bag with a tiny corner snipped off) with the white icing. Pipe horizontal lines across each cookie to create the mummy bandage effect.
- Before the white icing sets completely, use a toothpick or a small piping bag to add two small dots of black icing for the eyes. You can also use candy eyes if you prefer.
- Drizzle the melted white chocolate over the bandages to create a more textured and aged look. This step is optional, but it adds a nice touch to the cookies.
- Allow the icing to set completely before serving or storing the cookies. This usually takes about 1-2 hours.
Notes
- Softened butter is key.
- Don’t overmix the dough.
- Chilling the dough is essential.
- Use parchment paper.
- Cool completely before decorating.
- Adjust icing consistency as needed.
- Get creative with decorations!


Leave a Comment