
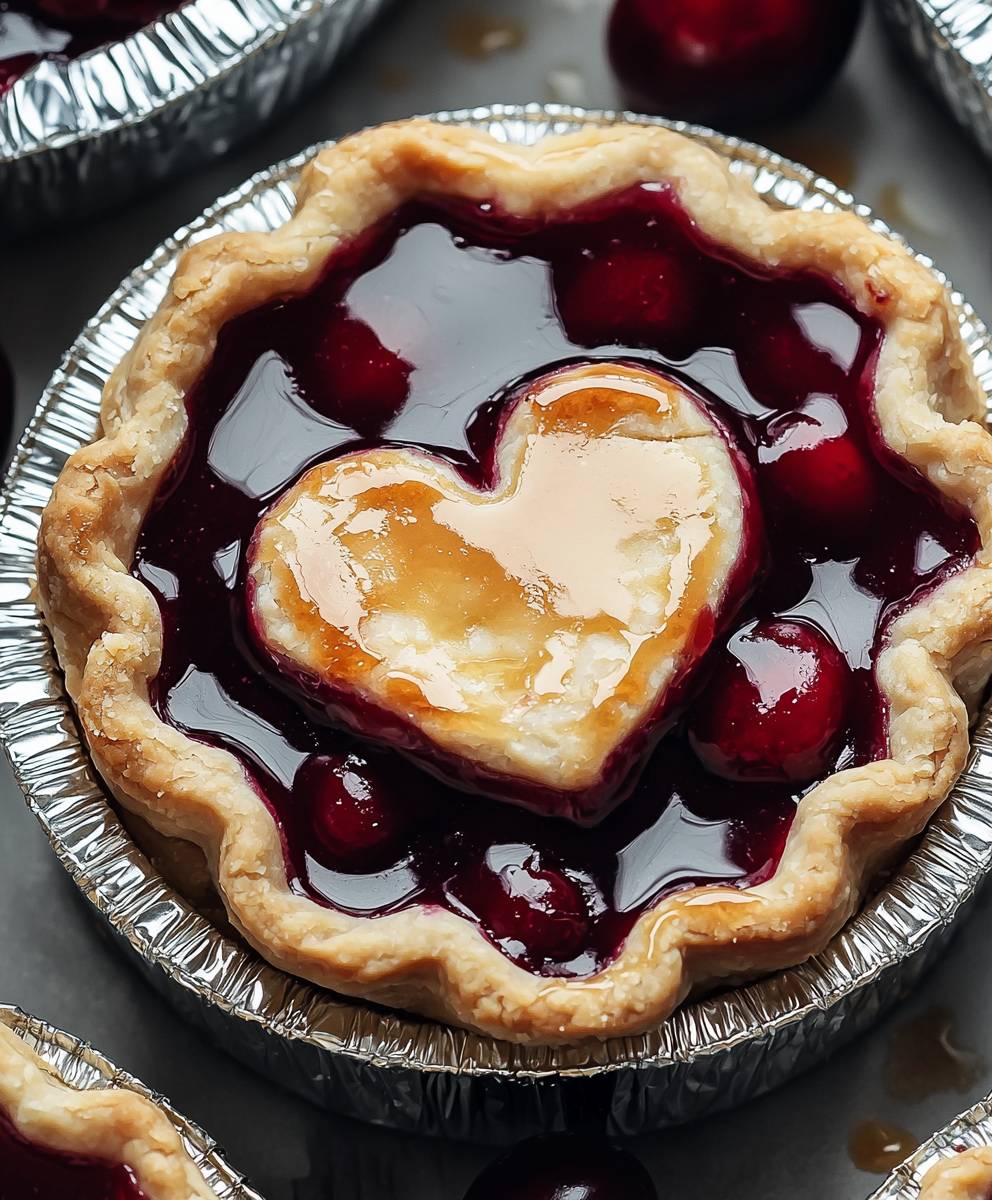
Mini Cherry Pie, those two words alone conjure up images of warm, flaky crusts and sweet, tart cherries bursting with flavor! Is there anything more comforting and delightful than a perfectly portioned pie, all to yourself? I think not! This recipe isn’t just about baking; it’s about creating little pockets of happiness, perfect for a cozy night in or a delightful treat to share (if you’re feeling generous, that is!).
Cherry pie, in its various forms, has a rich history, dating back to the early days of American baking. It’s a symbol of home, hearth, and good old-fashioned comfort. While the traditional full-sized pie is a classic, these mini cherry pies offer a modern twist, providing all the deliciousness in a convenient and adorable package.
People adore cherry pie for its delightful combination of textures and tastes. The buttery, flaky crust provides a satisfying crunch, while the sweet and slightly tart cherry filling offers a burst of fruity goodness. Plus, these mini versions are incredibly easy to handle and enjoy, making them perfect for parties, picnics, or simply a sweet craving. Get ready to experience the joy of baking and savor every delicious bite!
Ingredients:
- For the Crust:
- 2 ½ cups all-purpose flour, plus more for dusting
- 1 teaspoon salt
- 1 cup (2 sticks) unsalted butter, very cold and cut into ½-inch cubes
- ½ cup vegetable shortening, very cold
- 6-8 tablespoons ice water
- For the Cherry Filling:
- 6 cups fresh or frozen (thawed) pitted cherries
- ¾ cup granulated sugar
- ¼ cup cornstarch
- ¼ teaspoon almond extract
- 1 tablespoon lemon juice
- 2 tablespoons unsalted butter, cut into small pieces
- For the Egg Wash (Optional):
- 1 large egg, beaten
- 1 tablespoon milk or water
- For Sprinkling (Optional):
- Turbinado sugar or granulated sugar
Making the Pie Crust:
- Combine Dry Ingredients: In a large bowl, whisk together the flour and salt. This ensures the salt is evenly distributed throughout the dough, which is crucial for flavor.
- Cut in the Fat: Add the cold butter and shortening to the flour mixture. Using a pastry blender or your fingertips (work quickly to keep the butter cold!), cut the fat into the flour until the mixture resembles coarse crumbs. You should still see small pieces of butter and shortening these are what create flaky layers. The size of the pieces is key; aim for pea-sized or slightly larger.
- Add Ice Water: Gradually add the ice water, one tablespoon at a time, mixing gently after each addition. Be careful not to overmix! The dough should just come together and form a shaggy ball. The amount of water needed can vary depending on the humidity and the flour you’re using. Start with 6 tablespoons and add more if needed, but avoid adding too much, as this can make the crust tough.
- Divide and Chill: Divide the dough in half, flatten each half into a disc, wrap tightly in plastic wrap, and refrigerate for at least 2 hours, or preferably overnight. This chilling time is essential! It allows the gluten to relax, which prevents the crust from shrinking during baking, and it also allows the butter to firm up, which contributes to flakiness.
Preparing the Cherry Filling:
- Combine Filling Ingredients: In a large saucepan, combine the cherries, sugar, cornstarch, almond extract, and lemon juice. Stir well to ensure the cornstarch is evenly distributed. Cornstarch is our thickening agent, so we want to avoid any clumps.
- Cook the Filling: Cook the mixture over medium heat, stirring constantly, until the cherries release their juices and the mixture thickens. This usually takes about 5-7 minutes. The filling should be thick enough to coat the back of a spoon.
- Add Butter: Remove the saucepan from the heat and stir in the butter until it’s melted and incorporated. The butter adds richness and a lovely sheen to the filling.
- Cool the Filling: Let the filling cool completely before using it to fill the mini pies. This prevents the crust from becoming soggy. You can speed up the cooling process by spreading the filling out on a baking sheet.
Assembling and Baking the Mini Cherry Pies:
- Preheat Oven and Prepare Muffin Tin: Preheat your oven to 375°F (190°C). Lightly grease a 24-cup mini muffin tin. Alternatively, you can use cupcake liners, but the pies might not brown as evenly on the sides.
- Roll Out the Dough: On a lightly floured surface, roll out one disc of dough to about 1/8-inch thickness. Use a 3-inch round cookie cutter or a knife to cut out circles of dough. You’ll need 24 circles for the bottoms of the pies.
- Line the Muffin Tin: Gently press each circle of dough into the prepared mini muffin tin cups. Make sure the dough is snug against the bottom and sides of each cup.
- Fill the Pies: Spoon the cooled cherry filling into each pie crust, filling them almost to the top. Don’t overfill, or the filling will bubble over during baking.
- Prepare the Pie Tops (Optional): Roll out the second disc of dough and cut out 24 more circles. You can use the same 3-inch cutter, or you can get creative with different shapes or lattice designs. If you’re using circles, cut a few slits in each one to allow steam to escape during baking.
- Add the Pie Tops (Optional): Place the pie tops over the filling, pressing the edges gently to seal. If you’re not using pie tops, you can skip this step.
- Egg Wash (Optional): In a small bowl, whisk together the egg and milk or water. Brush the tops of the pies with the egg wash. This will give them a beautiful golden-brown color.
- Sprinkle with Sugar (Optional): Sprinkle the tops of the pies with turbinado sugar or granulated sugar for added sweetness and sparkle.
- Bake: Bake for 20-25 minutes, or until the crust is golden brown and the filling is bubbly. Keep an eye on them, as baking times can vary depending on your oven.
- Cool: Let the mini pies cool in the muffin tin for a few minutes before transferring them to a wire rack to cool completely. This will prevent them from sticking to the tin.
Tips for Success:
- Keep Everything Cold: The key to a flaky pie crust is to keep the butter and shortening as cold as possible. This prevents the fat from melting into the flour, which would result in a tough crust.
- Don’t Overmix the Dough: Overmixing develops the gluten in the flour, which can make the crust tough. Mix the dough just until it comes together.
- Chill the Dough: Chilling the dough allows the gluten to relax and the butter to firm up, which contributes to flakiness.
- Use Fresh or Frozen Cherries: You can use either fresh or frozen cherries for this recipe. If using frozen cherries, be sure to thaw them completely and drain off any excess liquid.
- Adjust Sweetness to Taste: The amount of sugar in the filling can be adjusted to your liking. If your cherries are very sweet, you may want to reduce the amount of sugar.
- Get Creative with the Topping: Feel free to get creative with the pie tops. You can use different shapes, lattice designs, or even a crumble topping.
- Make Ahead: The pie crust can be made ahead of time and stored in the refrigerator for up to 2 days or in the freezer for up to 2 months. The cherry filling can also be made ahead of time and stored in the refrigerator for up to 3 days.
Serving Suggestions:
- Serve the mini cherry pies warm or at room temperature.
- Top with a scoop of vanilla ice cream or whipped cream.
- Dust with powdered sugar.
- Serve with a cup of coffee or tea.
Storage Instructions:
- Store leftover mini cherry pies in an airtight container at room temperature for up to 2 days or in the refrigerator for up to 4 days.
- To reheat, warm in a preheated oven at 350°F (175°C) for 5-10 minutes.

Conclusion:
And there you have it! These Mini Cherry Pies are truly a must-try, and I’m not just saying that because I created the recipe. The combination of the buttery, flaky crust and the sweet-tart cherry filling is simply irresistible. They’re the perfect size for a single serving, making them ideal for portion control (if you can resist having more than one!) or for packing in lunchboxes. Plus, they’re so much easier to make than a full-sized pie, making them a fantastic option for beginner bakers or anyone short on time.
But the best part? The sheer joy these little pies bring. They’re a guaranteed crowd-pleaser, whether you’re serving them at a summer barbecue, a holiday gathering, or just a cozy night in. The bright red cherries peeking through the golden crust are visually appealing, and the aroma that fills your kitchen while they bake is simply divine. Trust me, your family and friends will be begging you to make them again and again.
Now, let’s talk serving suggestions and variations. While these Mini Cherry Pies are delicious on their own, a scoop of vanilla ice cream or a dollop of whipped cream takes them to the next level. For a touch of elegance, dust them with powdered sugar before serving. If you’re feeling adventurous, try adding a sprinkle of almond extract to the cherry filling for a subtle nutty flavor. You could also experiment with different crusts a graham cracker crust would add a lovely textural contrast, or a chocolate crust would create a decadent treat.
Another fun variation is to add a crumble topping instead of a traditional pie crust top. Simply combine flour, butter, sugar, and a pinch of salt, then crumble it over the cherry filling before baking. This adds a delightful crunch that complements the soft filling perfectly. For a festive touch during the holidays, you can cut out small stars or hearts from the pie crust and arrange them on top of the filling before baking.
Don’t be afraid to get creative and personalize these Mini Cherry Pies to your liking. The possibilities are endless! The key is to have fun and enjoy the process. Baking should be a relaxing and rewarding experience, and these mini pies are the perfect way to unwind and create something delicious.
I truly believe that everyone should have this recipe in their repertoire. It’s a classic for a reason, and these mini versions make it even more accessible and enjoyable. So, what are you waiting for? Gather your ingredients, preheat your oven, and get ready to bake some magic.
I’m so excited for you to try this recipe and experience the joy of homemade Mini Cherry Pies. Once you’ve made them, I’d love to hear about your experience! Did you make any variations? What did your family and friends think? Share your photos and stories in the comments below. I can’t wait to see your creations! Happy baking!
Mini Cherry Pie: The Perfect Bite-Sized Dessert Recipe
Easy mini cherry pies with flaky homemade crust and sweet cherry filling. Perfect for parties or a sweet treat!
Ingredients
- 2 ½ cups all-purpose flour, plus more for dusting
- 1 teaspoon salt
- 1 cup (2 sticks) unsalted butter, very cold and cut into ½-inch cubes
- ½ cup vegetable shortening, very cold
- 6-8 tablespoons ice water
- 6 cups fresh or frozen (thawed) pitted cherries
- ¾ cup granulated sugar
- ¼ cup cornstarch
- ¼ teaspoon almond extract
- 1 tablespoon lemon juice
- 2 tablespoons unsalted butter, cut into small pieces
- 1 large egg, beaten
- 1 tablespoon milk or water
- Turbinado sugar or granulated sugar
Instructions
- In a large bowl, whisk together the flour and salt.
- Add the cold butter and shortening to the flour mixture. Using a pastry blender or your fingertips (work quickly to keep the butter cold!), cut the fat into the flour until the mixture resembles coarse crumbs. You should still see small pieces of butter and shortening these are what create flaky layers.
- Gradually add the ice water, one tablespoon at a time, mixing gently after each addition. Be careful not to overmix! The dough should just come together and form a shaggy ball.
- Divide the dough in half, flatten each half into a disc, wrap tightly in plastic wrap, and refrigerate for at least 2 hours, or preferably overnight.
- In a large saucepan, combine the cherries, sugar, cornstarch, almond extract, and lemon juice. Stir well to ensure the cornstarch is evenly distributed.
- Cook the mixture over medium heat, stirring constantly, until the cherries release their juices and the mixture thickens. This usually takes about 5-7 minutes.
- Remove the saucepan from the heat and stir in the butter until it’s melted and incorporated.
- Let the filling cool completely before using it to fill the mini pies.
- Preheat your oven to 375°F (190°C). Lightly grease a 24-cup mini muffin tin.
- On a lightly floured surface, roll out one disc of dough to about 1/8-inch thickness. Use a 3-inch round cookie cutter or a knife to cut out circles of dough. You’ll need 24 circles for the bottoms of the pies.
- Gently press each circle of dough into the prepared mini muffin tin cups.
- Spoon the cooled cherry filling into each pie crust, filling them almost to the top.
- Roll out the second disc of dough and cut out 24 more circles. Cut a few slits in each one to allow steam to escape during baking.
- Place the pie tops over the filling, pressing the edges gently to seal.
- In a small bowl, whisk together the egg and milk or water. Brush the tops of the pies with the egg wash.
- Sprinkle the tops of the pies with turbinado sugar or granulated sugar.
- Bake for 20-25 minutes, or until the crust is golden brown and the filling is bubbly.
- Let the mini pies cool in the muffin tin for a few minutes before transferring them to a wire rack to cool completely.
Notes
- Keep Everything Cold: The key to a flaky pie crust is to keep the butter and shortening as cold as possible.
- Don’t Overmix the Dough: Overmixing develops the gluten in the flour, which can make the crust tough.
- Chill the Dough: Chilling the dough allows the gluten to relax and the butter to firm up, which contributes to flakiness.
- Use Fresh or Frozen Cherries: You can use either fresh or frozen cherries for this recipe. If using frozen cherries, be sure to thaw them completely and drain off any excess liquid.
- Adjust Sweetness to Taste: The amount of sugar in the filling can be adjusted to your liking.
- Get Creative with the Topping: Feel free to get creative with the pie tops.
- Make Ahead: The pie crust can be made ahead of time and stored in the refrigerator for up to 2 days or in the freezer for up to 2 months. The cherry filling can also be made ahead of time and stored in the refrigerator for up to 3 days.
- Serving Suggestions: Serve the mini cherry pies warm or at room temperature. Top with a scoop of vanilla ice cream or whipped cream. Dust with powdered sugar. Serve with a cup of coffee or tea.
- Storage Instructions: Store leftover mini cherry pies in an airtight container at room temperature for up to 2 days or in the refrigerator for up to 4 days. To reheat, warm in a preheated oven at 350°F (175°C) for 5-10 minutes.
Leave a Comment