
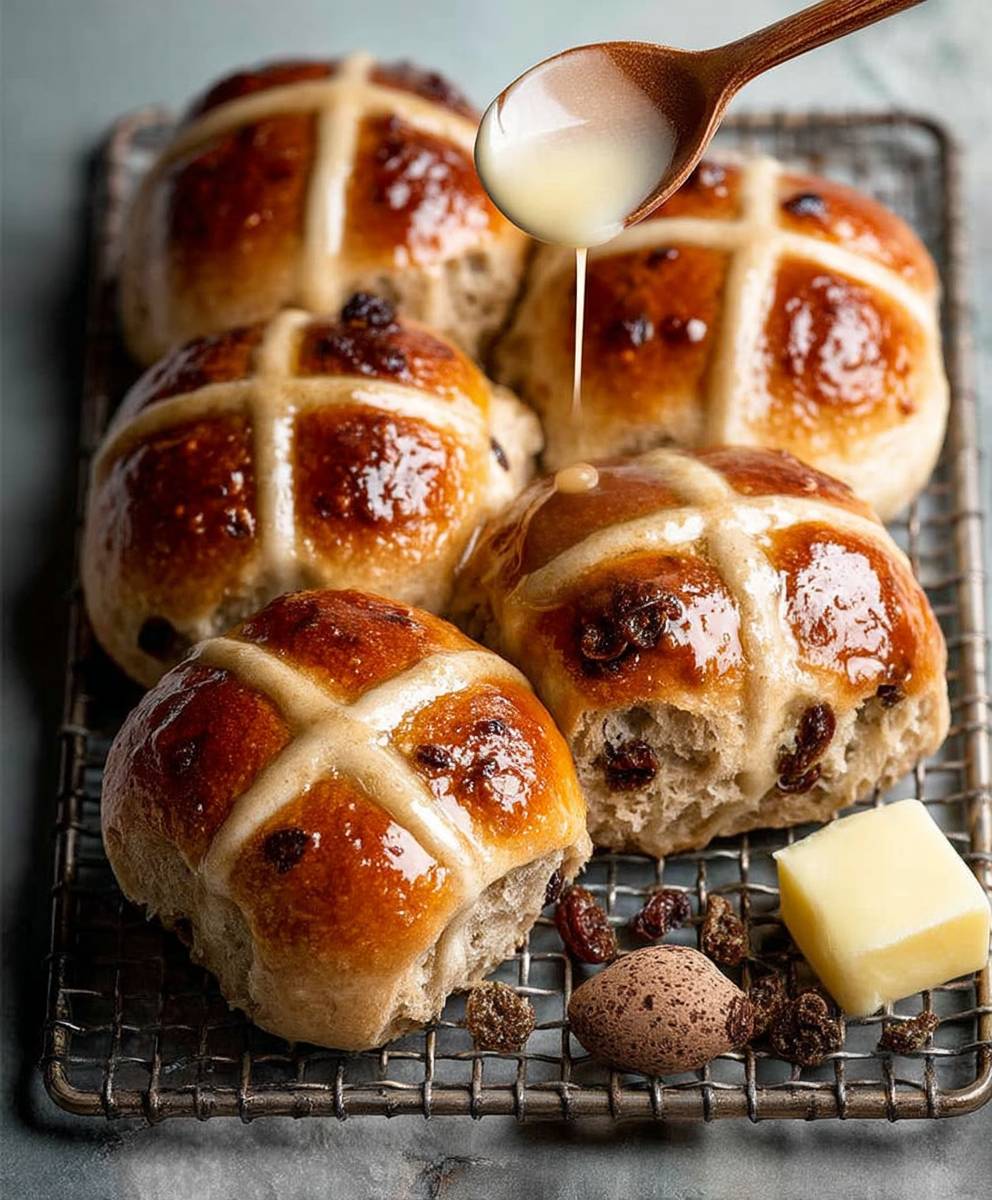
Hot Cross Buns, those delightfully spiced and subtly sweet treats, are more than just a delicious pastry; they’re a symbol of Easter and springtime renewal. Imagine biting into a warm, fragrant bun, the soft dough yielding to the gentle spice of cinnamon and nutmeg, dotted with juicy currants and topped with that iconic cross. Is your mouth watering yet? Mine certainly is!
The history of Hot Cross Buns is as rich and complex as their flavor. While often associated with Christian traditions, some believe their origins trace back to pre-Christian times, with similar buns being baked to honor the pagan goddess Eostre, whose name is linked to Easter. The cross itself, now representing the crucifixion of Jesus, may have initially symbolized the four quarters of the moon. Regardless of their precise beginnings, these buns have been enjoyed for centuries, evolving into the beloved Easter staple we know today.
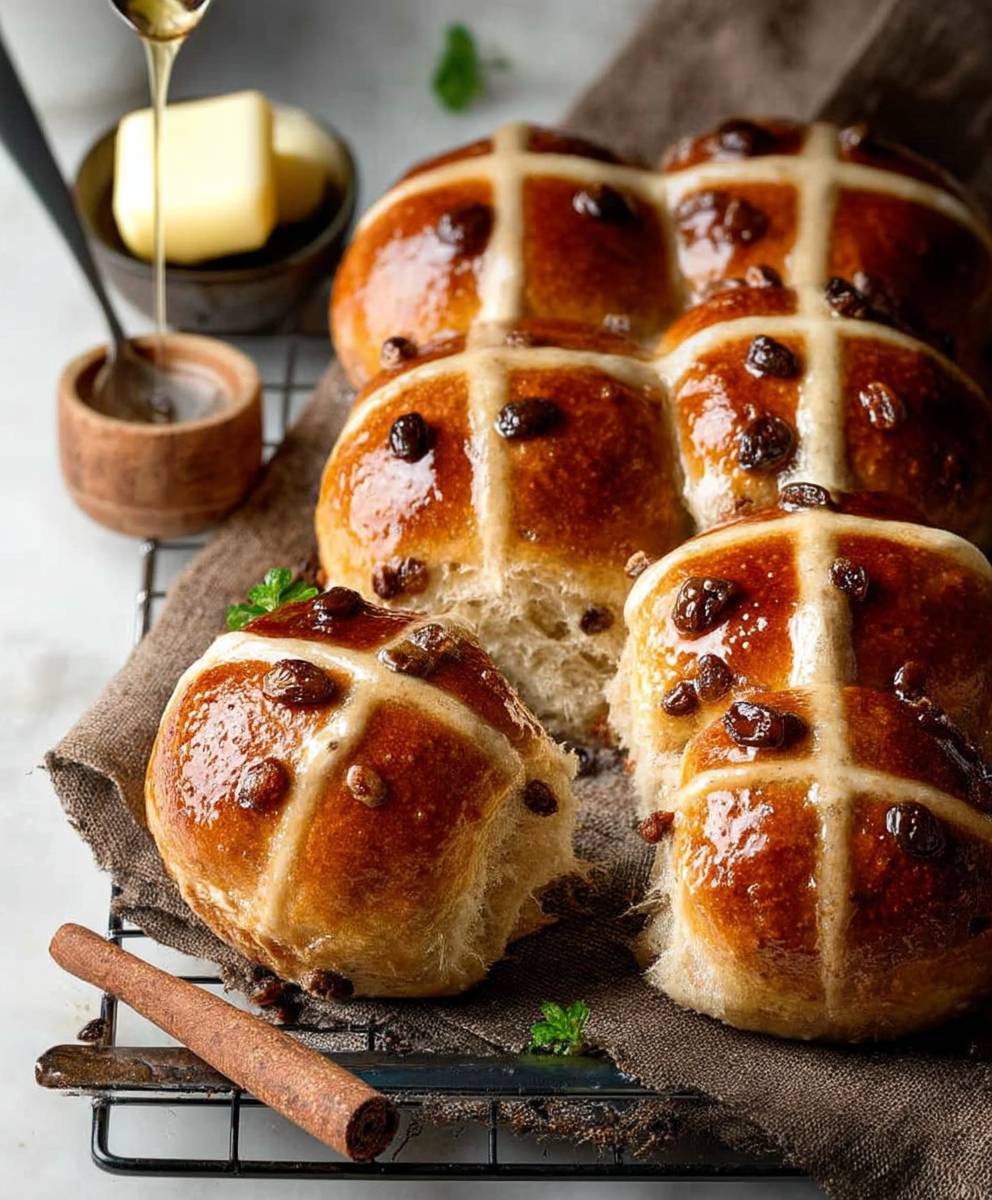
But what makes them so irresistible? It’s the perfect combination of flavors and textures. The slightly sweet, yeasty dough provides a comforting base, while the warm spices add depth and complexity. The dried fruit offers bursts of sweetness and chewiness, and the glaze adds a touch of shine and extra sweetness. Beyond the taste, they’re also incredibly convenient. They’re perfect for a quick breakfast, a satisfying snack, or a delightful addition to any Easter brunch. So, let’s get baking and create some delicious memories with these classic treats!
Ingredients:
- For the Dough:
- 500g strong white bread flour, plus extra for dusting
- 7g sachet of fast-action dried yeast
- 50g caster sugar
- 1 tsp mixed spice
- 1/2 tsp ground cinnamon
- 1/4 tsp ground nutmeg
- 1/2 tsp salt
- 50g unsalted butter, softened
- 300ml lukewarm milk
- 1 large egg, lightly beaten
- 100g mixed dried fruit (raisins, sultanas, currants)
- 50g mixed peel, finely chopped
- For the Crosses:
- 75g plain flour
- 5-7 tbsp water, or enough to make a smooth paste
- For the Glaze:
- 2 tbsp apricot jam
- 1 tbsp water
Making the Dough
- First, let’s get started on the dough. In a large mixing bowl, whisk together the flour, yeast, sugar, mixed spice, cinnamon, nutmeg, and salt. Make sure everything is well combined. This ensures the spices are evenly distributed throughout the dough.
- Now, add the softened butter to the dry ingredients. Use your fingertips to rub the butter into the flour mixture until it resembles breadcrumbs. This step is crucial for creating a tender crumb in your buns. Don’t rush it!
- Next, gradually pour in the lukewarm milk, mixing with a wooden spoon or your hands until a shaggy dough forms. Add the beaten egg and continue to mix until the dough starts to come together.
- Turn the dough out onto a lightly floured surface and knead for 10-12 minutes, or until it becomes smooth and elastic. This is where a stand mixer with a dough hook attachment comes in handy, but kneading by hand is perfectly fine (and a great workout!). The dough should be soft and slightly tacky, but not sticky. If it’s too sticky, add a little more flour, a tablespoon at a time.
- Once the dough is kneaded, place it in a lightly oiled bowl, turning to coat all sides. Cover the bowl with plastic wrap or a damp tea towel and let it rise in a warm place for 1-1.5 hours, or until doubled in size. This first rise is essential for developing the flavor and texture of the buns. I usually put mine in a slightly warm oven (turned off, of course!).
- While the dough is rising, prepare the mixed fruit. If your dried fruit is particularly dry, you can soak it in a little warm water or orange juice for about 30 minutes to plump it up. Drain well before adding it to the dough.
- After the dough has doubled, punch it down gently to release the air. Turn it out onto a lightly floured surface and knead in the mixed dried fruit and mixed peel until evenly distributed. This might take a few minutes, but be patient and make sure the fruit is well incorporated.
Shaping and Proving the Buns
- Divide the dough into 12 equal portions. I find it easiest to weigh the dough and then divide the total weight by 12 to get the weight of each portion. This ensures that all the buns are the same size.
- Shape each portion into a smooth, round bun. To do this, gently stretch the surface of the dough around to the bottom, pinching to seal. Place the buns on a baking sheet lined with parchment paper, leaving some space between them for expansion.
- Cover the buns loosely with plastic wrap or a damp tea towel and let them prove in a warm place for another 45-60 minutes, or until they have almost doubled in size. This second rise is crucial for creating light and fluffy buns.
Making and Applying the Crosses
- While the buns are proving for the second time, prepare the paste for the crosses. In a small bowl, mix the plain flour with water, a tablespoon at a time, until you have a smooth, thick paste. The consistency should be similar to toothpaste. If it’s too thick, add a little more water; if it’s too thin, add a little more flour.
- Transfer the paste to a piping bag fitted with a small round nozzle, or use a zip-top bag and snip off a tiny corner.
- Once the buns have finished proving, pipe crosses onto the top of each bun. Pipe one line horizontally across the buns and then another line vertically, creating a cross on each bun. Try to keep the lines straight and even for a professional look.
Baking the Hot Cross Buns
- Preheat your oven to 200°C (180°C fan/Gas Mark 6).
- Bake the buns for 15-20 minutes, or until they are golden brown on top. Keep a close eye on them, as they can burn easily. If they start to brown too quickly, you can loosely cover them with foil.
- While the buns are baking, prepare the glaze. In a small saucepan, heat the apricot jam and water over low heat, stirring until the jam has melted and the mixture is smooth. You can also do this in the microwave in short bursts, stirring in between.
- Once the buns are out of the oven, brush them immediately with the warm apricot glaze. This will give them a beautiful shine and add a touch of sweetness.
- Let the buns cool slightly on the baking sheet before transferring them to a wire rack to cool completely.
Serving and Storing
- Serve the hot cross buns warm or at room temperature. They are delicious on their own, or you can split them open and spread them with butter.
- Store the buns in an airtight container at room temperature for up to 2 days. They are best eaten fresh, but you can also freeze them for longer storage. To freeze, wrap the buns individually in plastic wrap and then place them in a freezer bag. They can be frozen for up to 3 months. To thaw, simply leave them at room temperature for a few hours.
- To reheat the buns, you can wrap them in foil and warm them in a low oven (around 150°C) for about 10 minutes. You can also microwave them for a few seconds, but be careful not to overcook them, as they can become tough.
Tips for Success
- Use good quality ingredients: The quality of your ingredients will directly impact the flavor and texture of your hot cross buns. Use strong bread flour for a good rise and fresh yeast for optimal leavening.
- Don’t overheat the milk: The milk should be lukewarm, not hot. If it’s too hot, it can kill the yeast.
- Knead the dough well: Kneading develops the gluten in the flour, which gives the buns their structure. Don’t skimp on the kneading time!
- Prove the dough in a warm place: A warm environment helps the yeast to work its magic and allows the dough to rise properly.
- Don’t overbake the buns: Overbaking can result in dry, tough buns. Keep a close eye on them while they’re in the oven and remove them as soon as they are golden brown.
- Get creative with the fillings: While the classic recipe calls for mixed dried fruit and mixed peel, you can experiment with other fillings, such as chocolate chips, cranberries, or chopped nuts.
- Make them ahead of time: You can prepare the dough the day before and let it rise in the refrigerator overnight. This will slow down the fermentation process and develop even more flavor. Just bring the dough back to room temperature before shaping and baking.
Conclusion:
So, there you have it! I truly believe this recipe for Hot Cross Buns is a must-try, especially if you’ve always been a little intimidated by baking with yeast. It’s surprisingly straightforward, and the aroma that fills your kitchen as they bake is simply divine. But beyond the ease of preparation, it’s the taste that will truly win you over. The perfect balance of sweet spice, the soft, pillowy texture, and that signature cross it’s a taste of tradition and comfort all rolled into one delicious bun.
Why is this recipe a must-try? Because it delivers authentic flavor without demanding expert baking skills. It’s a recipe that’s forgiving enough for beginners, yet rewarding enough for seasoned bakers. Plus, homemade Hot Cross Buns are infinitely better than anything you can buy in a store. You control the ingredients, ensuring the freshest, most flavorful result possible. You can also customize the recipe to your liking, which brings me to serving suggestions and variations!
These buns are absolutely perfect served warm with a generous slathering of butter. I also love them toasted the next day with a dollop of jam or marmalade. For a truly decadent treat, try splitting one open and filling it with a scoop of vanilla ice cream. Trust me, you won’t regret it!
But the fun doesn’t stop there! Feel free to experiment with different variations to make this recipe your own. If you’re not a fan of raisins, try substituting them with dried cranberries or chopped apricots. For a richer flavor, add a tablespoon of orange zest to the dough. And if you’re feeling adventurous, you could even try adding a handful of chocolate chips for a chocolatey twist.
Another variation I’ve experimented with is using different types of flour. While all-purpose flour works perfectly well, you could try using bread flour for a slightly chewier texture. Or, for a more rustic flavor, try adding a portion of whole wheat flour. Just be sure to adjust the amount of liquid accordingly, as different flours absorb moisture differently.
The possibilities are endless! Don’t be afraid to get creative and experiment with different flavors and ingredients. The most important thing is to have fun and enjoy the process of baking these delicious buns.
I’m so excited for you to try this recipe and experience the joy of baking your own Hot Cross Buns. I’m confident that you’ll be amazed at how easy and rewarding it is.
So, what are you waiting for? Gather your ingredients, preheat your oven, and get ready to bake! And once you’ve made them, please, please, please share your experience with me! I’d love to hear how they turned out, what variations you tried, and any tips or tricks you discovered along the way. You can leave a comment below, tag me on social media, or even send me an email. I can’t wait to see your creations! Happy baking!
Hot Cross Buns: The Ultimate Guide to Baking and Enjoying This Easter Treat
Perfectly spiced homemade hot cross buns studded with dried fruit, topped with a signature cross and shiny apricot glaze.
Ingredients
- 500g strong white bread flour, plus extra for dusting
- 7g sachet of fast-action dried yeast
- 50g caster sugar
- 1 tsp mixed spice
- 1/2 tsp ground cinnamon
- 1/4 tsp ground nutmeg
- 1/2 tsp salt
- 50g unsalted butter, softened
- 300ml lukewarm milk
- 1 large egg, lightly beaten
- 100g mixed dried fruit (raisins, sultanas, currants)
- 50g mixed peel, finely chopped
- 75g plain flour
- 5-7 tbsp water, or enough to make a smooth paste
- 2 tbsp apricot jam
- 1 tbsp water
Instructions
- Making the Dough: In a large mixing bowl, whisk together the flour, yeast, sugar, mixed spice, cinnamon, nutmeg, and salt.
- Add the softened butter to the dry ingredients. Use your fingertips to rub the butter into the flour mixture until it resembles breadcrumbs.
- Gradually pour in the lukewarm milk, mixing with a wooden spoon or your hands until a shaggy dough forms. Add the beaten egg and continue to mix until the dough starts to come together.
- Turn the dough out onto a lightly floured surface and knead for 10-12 minutes, or until it becomes smooth and elastic.
- Place the dough in a lightly oiled bowl, turning to coat all sides. Cover the bowl with plastic wrap or a damp tea towel and let it rise in a warm place for 1-1.5 hours, or until doubled in size.
- While the dough is rising, prepare the mixed fruit. If your dried fruit is particularly dry, you can soak it in a little warm water or orange juice for about 30 minutes to plump it up. Drain well before adding it to the dough.
- After the dough has doubled, punch it down gently to release the air. Turn it out onto a lightly floured surface and knead in the mixed dried fruit and mixed peel until evenly distributed.
- Shaping and Proving the Buns: Divide the dough into 12 equal portions.
- Shape each portion into a smooth, round bun. Place the buns on a baking sheet lined with parchment paper, leaving some space between them for expansion.
- Cover the buns loosely with plastic wrap or a damp tea towel and let them prove in a warm place for another 45-60 minutes, or until they have almost doubled in size.
- Making and Applying the Crosses: While the buns are proving for the second time, prepare the paste for the crosses. In a small bowl, mix the plain flour with water, a tablespoon at a time, until you have a smooth, thick paste.
- Transfer the paste to a piping bag fitted with a small round nozzle, or use a zip-top bag and snip off a tiny corner.
- Once the buns have finished proving, pipe crosses onto the top of each bun. Pipe one line horizontally across the buns and then another line vertically, creating a cross on each bun.
- Baking the Hot Cross Buns: Preheat your oven to 200°C (180°C fan/Gas Mark 6).
- Bake the buns for 15-20 minutes, or until they are golden brown on top.
- While the buns are baking, prepare the glaze. In a small saucepan, heat the apricot jam and water over low heat, stirring until the jam has melted and the mixture is smooth.
- Once the buns are out of the oven, brush them immediately with the warm apricot glaze.
- Let the buns cool slightly on the baking sheet before transferring them to a wire rack to cool completely.
- Serving and Storing: Serve the hot cross buns warm or at room temperature.
- Store the buns in an airtight container at room temperature for up to 2 days. They are best eaten fresh, but you can also freeze them for longer storage. To freeze, wrap the buns individually in plastic wrap and then place them in a freezer bag. They can be frozen for up to 3 months. To thaw, simply leave them at room temperature for a few hours.
- To reheat the buns, you can wrap them in foil and warm them in a low oven (around 150°C) for about 10 minutes. You can also microwave them for a few seconds, but be careful not to overcook them, as they can become tough.
Notes
- Use good quality ingredients for the best flavor and texture.
- Don’t overheat the milk; it should be lukewarm.
- Knead the dough well to develop gluten.
- Prove the dough in a warm place for proper rising.
- Don’t overbake the buns.
- Get creative with fillings!
- Make the dough ahead of time for enhanced flavor.


Leave a Comment