
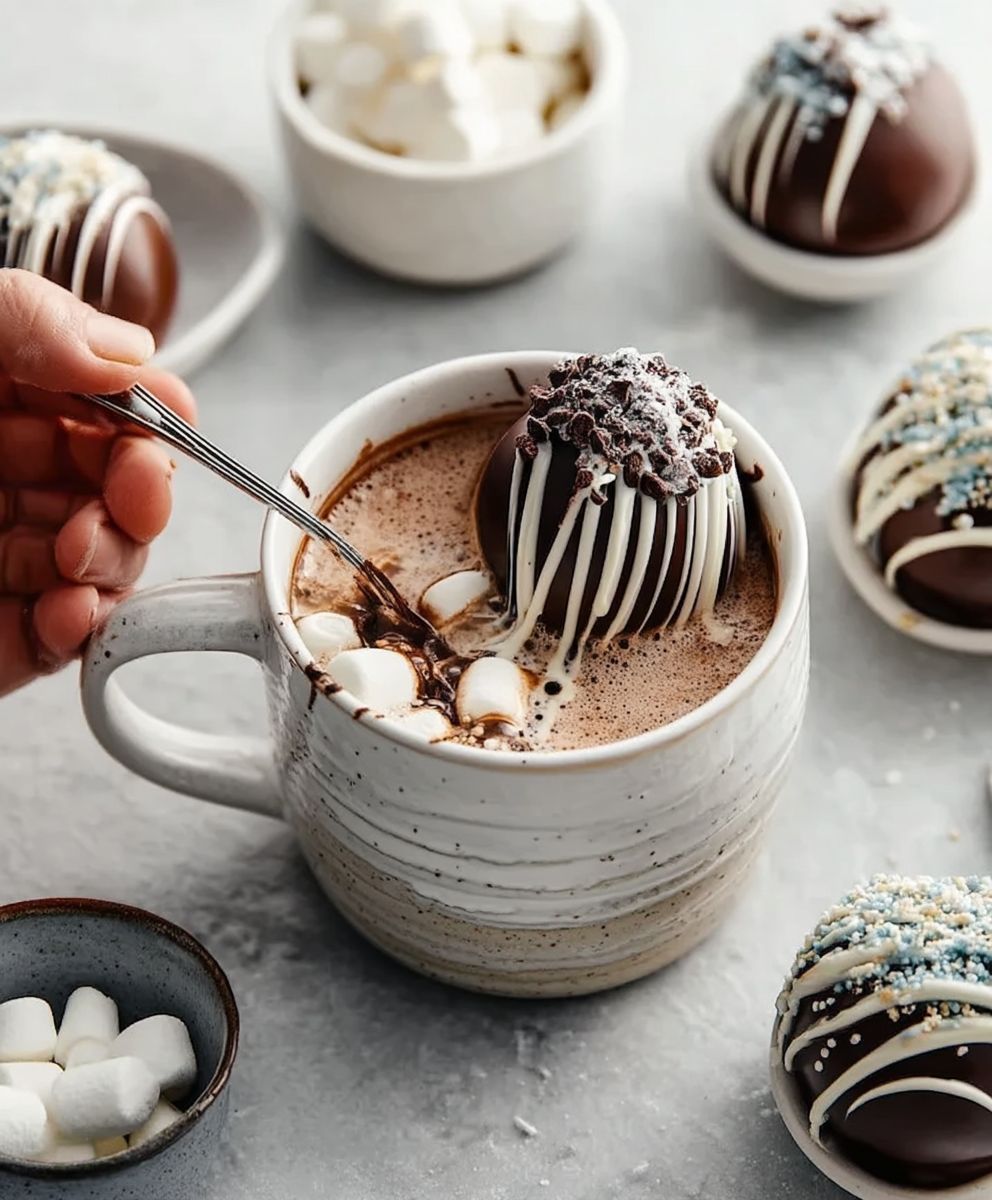
Hot chocolate bombs homemade the mere mention conjures images of cozy nights, crackling fireplaces, and mugs overflowing with decadent, chocolatey goodness. Have you ever witnessed the mesmerizing swirl of cocoa powder and marshmallows erupting from a chocolate sphere as it melts into warm milk? It’s pure magic, and I’m here to tell you that creating this enchanting experience at home is easier than you think!
While the exact origins of hot chocolate bombs are debated, their recent surge in popularity is undeniable. They tap into our collective desire for comfort and a touch of whimsy, transforming a simple beverage into an interactive and delightful treat. Think of them as a modern twist on traditional hot chocolate, adding an element of surprise and customization that appeals to both children and adults alike.
People adore hot chocolate bombs homemade for several reasons. First, they’re incredibly fun to make and even more fun to watch dissolve! The rich, intense chocolate flavor combined with the fluffy sweetness of marshmallows creates a symphony of textures and tastes that’s simply irresistible. Plus, they’re incredibly convenient a pre-portioned dose of happiness ready to be unleashed with just a splash of hot milk. So, ditch the store-bought packets and let’s embark on a delicious adventure to create your own stunning and satisfying hot chocolate bombs!

Ingredients:
- 12 oz high-quality dark chocolate, finely chopped
- 12 oz high-quality milk chocolate, finely chopped
- 1 cup hot chocolate mix (your favorite brand or homemade)
- 1 cup mini marshmallows
- Optional: 1/4 cup sprinkles (for decorating)
- Optional: 1/4 cup crushed peppermint candies (for decorating)
- Optional: Caramel squares, cut into small pieces (for filling)
- Optional: Espresso powder (for adding a mocha flavor)
- Optional: Sea salt flakes (for topping)
Melting the Chocolate:
Okay, let’s get started! The most crucial part of making hot chocolate bombs is melting the chocolate properly. If you don’t temper it, your bombs will be dull and won’t snap nicely. Don’t worry, I’ll walk you through it!
- Prepare your double boiler: Fill a saucepan with about 2 inches of water and bring it to a simmer over medium heat. Make sure the water doesn’t touch the bottom of the heatproof bowl you’ll be using.
- Melt the dark chocolate: Place about two-thirds (8 oz) of the finely chopped dark chocolate in the heatproof bowl and set it over the simmering water. Stir constantly with a rubber spatula until the chocolate is completely melted and smooth. This usually takes about 5-7 minutes.
- Temper the dark chocolate (Seeding Method): Remove the bowl from the heat and add the remaining one-third (4 oz) of the dark chocolate to the melted chocolate. Stir continuously until all the chocolate is melted and the mixture is smooth and glossy. This process is called “seeding” and helps to temper the chocolate, giving it a nice shine and snap. You can check the temperature with a chocolate thermometer; it should be around 88-90°F (31-32°C). If you don’t have a thermometer, just make sure all the chocolate is melted and the mixture is smooth.
- Repeat for milk chocolate: Repeat steps 1-3 with the milk chocolate. Remember to use a clean bowl and spatula to avoid mixing the chocolates. The ideal temperature for tempered milk chocolate is around 86-88°F (30-31°C).
Molding the Chocolate Spheres:
Now that our chocolate is perfectly melted and tempered, it’s time to create the spheres that will hold all the deliciousness!
- Prepare your silicone molds: Make sure your silicone sphere molds are clean and completely dry. This is important for the chocolate to release properly.
- Fill the molds with dark chocolate: Spoon about 1-2 tablespoons of the tempered dark chocolate into each half-sphere mold. Use the back of the spoon or a small spatula to spread the chocolate evenly up the sides of the mold, ensuring that the entire surface is coated. Make sure the chocolate is thick enough to create a sturdy shell.
- Remove excess chocolate: Turn the mold upside down over the bowl of melted chocolate and gently tap it to remove any excess chocolate. This will prevent the shells from being too thick.
- Scrape the edges: Use a clean spatula or knife to scrape away any excess chocolate from the top edges of the molds. This will create a clean edge for when you join the halves together.
- Chill the dark chocolate shells: Place the filled molds in the refrigerator for about 10-15 minutes, or until the chocolate is firm and set.
- Repeat with milk chocolate: Repeat steps 2-5 with the tempered milk chocolate, filling the remaining half-sphere molds.
Releasing the Chocolate Shells:
This part can be a little tricky, but with a gentle touch, you’ll have perfect chocolate shells in no time!
- Gently release the shells: Once the chocolate is firm, carefully remove the molds from the refrigerator. Gently flex the silicone molds to loosen the chocolate shells. You can also try tapping the molds lightly on a hard surface.
- Remove the shells: Carefully peel back the silicone mold to release the chocolate shells. Be gentle to avoid breaking them. If a shell is stuck, you can try placing it back in the refrigerator for a few minutes to firm up further.
- Inspect the shells: Check the shells for any cracks or thin spots. If you find any, you can remelt some chocolate and patch them up.
Filling the Hot Chocolate Bombs:
Now for the fun part filling our chocolate spheres with all the goodies!
- Warm a plate: Gently warm a plate in the microwave for a few seconds. This will help melt the edges of the chocolate shells for sealing. Be careful not to overheat the plate, as it can melt the chocolate too much.
- Fill the dark chocolate shells: Take one of the dark chocolate half-spheres and place it open-side-down on the warm plate for a few seconds to slightly melt the edge. Quickly lift it up and fill it with about 1/2 tablespoon of hot chocolate mix, 1/4 cup of mini marshmallows, and any other desired fillings, such as caramel pieces or espresso powder.
- Seal the dark chocolate bomb: Take another dark chocolate half-sphere and repeat the warming process on the plate. Carefully place it on top of the filled half-sphere, aligning the edges. Gently press the two halves together to seal them. You can use your finger to smooth out the seam.
- Fill and seal the milk chocolate bombs: Repeat steps 2 and 3 with the milk chocolate shells, using the same fillings or creating different flavor combinations.
- Reinforce the seams (optional): If you want to ensure a strong seal, you can melt a small amount of chocolate and use a toothpick or small brush to apply it to the seam of each bomb.
Decorating the Hot Chocolate Bombs:
Let’s add some flair to our creations! This is where you can get creative and personalize your hot chocolate bombs.
- Melt a small amount of chocolate: Melt a small amount of chocolate (either dark or milk) in a small bowl.
- Drizzle with chocolate: Dip a fork or spoon into the melted chocolate and drizzle it over the top of the hot chocolate bombs.
- Add sprinkles: Immediately sprinkle the drizzled chocolate with sprinkles, crushed peppermint candies, or sea salt flakes. The chocolate needs to be wet for the toppings to stick.
- Let the chocolate set: Allow the decorated hot chocolate bombs to sit at room temperature or in the refrigerator for a few minutes until the chocolate is set.
Storing and Serving:
Almost there! Now let’s talk about how to store and enjoy these delightful treats.
- Store properly: Store the hot chocolate bombs in an airtight container at room temperature or in the refrigerator. They will last for about 2-3 weeks.
- Prepare your mug: To use, place a hot chocolate bomb in a mug.
- Pour hot milk: Pour about 8-10 ounces of hot milk (or water, but milk is much richer!) over the bomb.
- Watch the magic happen: Watch as the chocolate melts and the marshmallows pop out!
- Stir and enjoy: Stir well until the hot chocolate mix is completely dissolved. Enjoy your delicious and magical hot chocolate!
Tips and Tricks for Success:
- Use high-quality chocolate: The better the chocolate, the better the flavor of your hot chocolate bombs.
- Temper the chocolate properly: This is crucial for a shiny, snappy shell.
- Work quickly: Tempered chocolate can set quickly, so work efficiently when molding and sealing the shells.
- Don’t overfill the shells: Too much filling can make it difficult to seal the bombs properly.
- Get creative with fillings: Experiment with different flavors and fillings to create unique hot chocolate bomb combinations. Consider adding instant coffee for a mocha flavor, or chopped nuts for added texture.
- Practice makes perfect: Don’t be discouraged if your first few attempts aren’t perfect. With a little practice, you’ll be making beautiful and delicious hot chocolate bombs in no time!
Conclusion:
So there you have it! These hot chocolate bombs homemade are more than just a drink; they’re an experience, a little burst of joy waiting to happen in your favorite mug. I truly believe this recipe is a must-try, and here’s why: it’s incredibly fun to make, surprisingly easy once you get the hang of it, and the payoff is absolutely delicious. Forget those store-bought versions nothing beats the rich, decadent flavor of homemade hot chocolate, especially when it’s delivered in such a delightful and interactive way.
Think about it: the anticipation as you drop the bomb into hot milk, the mesmerizing swirl of melting chocolate, the explosion of marshmallows and cocoa powder it’s pure magic! And the taste? Oh, the taste! It’s a warm, comforting hug in a mug, perfect for chilly evenings, holiday gatherings, or simply treating yourself to something special.
But the best part is the versatility. While the recipe I’ve shared is a fantastic starting point, the possibilities are truly endless. Feel free to experiment with different types of chocolate dark, milk, white, even flavored varieties like peppermint or salted caramel. You can also get creative with the fillings. Instead of just marshmallows, try adding crushed peppermint candies, mini chocolate chips, a sprinkle of cinnamon, or even a shot of espresso powder for a mocha kick. For a truly decadent experience, consider adding a swirl of caramel or a dollop of peanut butter to the inside of the mold before adding the chocolate.
Serving suggestions are just as varied. Of course, the classic way is to simply drop a bomb into a mug of hot milk. But you can also use hot water for a slightly less rich drink. For an extra touch of elegance, top your hot chocolate with whipped cream, chocolate shavings, or a dusting of cocoa powder. And if you’re feeling adventurous, try adding a splash of your favorite liqueur, like Baileys or Kahlua, for an adult-friendly treat. These hot chocolate bombs homemade also make fantastic gifts! Package them in cute little boxes or bags, tie them with a ribbon, and you’ve got a thoughtful and unique present that anyone would love to receive.
I’m so excited for you to try this recipe and create your own magical hot chocolate moments. Don’t be intimidated by the process it’s all about having fun and experimenting. And remember, even if your first few bombs aren’t perfect, they’ll still taste amazing!
I truly encourage you to give these hot chocolate bombs homemade a try. I know you’ll love them as much as I do. And please, don’t be shy! Share your creations with me. I’d love to see your photos, hear about your variations, and learn from your experiences. Tag me on social media using #HomemadeHotChocolateBombs or leave a comment below. I can’t wait to see what you come up with! Happy bomb-making!
Hot Chocolate Bombs Homemade: The Ultimate Guide to Delicious DIY Treats
Chocolate spheres melt in hot milk, releasing marshmallows and cocoa. Customize with fillings and decorations for a magical treat.
Ingredients
- 12 oz high-quality dark chocolate, finely chopped
- 12 oz high-quality milk chocolate, finely chopped
- 1 cup hot chocolate mix (your favorite brand or homemade)
- 1 cup mini marshmallows
- Optional: 1/4 cup sprinkles (for decorating)
- Optional: 1/4 cup crushed peppermint candies (for decorating)
- Optional: Caramel squares, cut into small pieces (for filling)
- Optional: Espresso powder (for adding a mocha flavor)
- Optional: Sea salt flakes (for topping)
Instructions
- Prepare Double Boiler: Fill a saucepan with 2 inches of water and simmer over medium heat. Ensure the water doesn’t touch the bottom of a heatproof bowl.
- Melt Dark Chocolate: Place 8 oz (two-thirds) of chopped dark chocolate in the heatproof bowl over simmering water. Stir constantly until melted and smooth (5-7 minutes).
- Temper Dark Chocolate (Seeding Method): Remove from heat and add the remaining 4 oz (one-third) of dark chocolate. Stir until completely melted, smooth, and glossy. The temperature should be around 88-90°F (31-32°C).
- Repeat for Milk Chocolate: Repeat steps 1-3 with milk chocolate, using a clean bowl and spatula. The ideal temperature is around 86-88°F (30-31°C).
- Prepare Silicone Molds: Ensure silicone sphere molds are clean and dry.
- Fill Molds with Dark Chocolate: Spoon 1-2 tablespoons of tempered dark chocolate into each half-sphere mold. Spread evenly up the sides, ensuring a thick coating.
- Remove Excess Chocolate: Turn the mold upside down over the bowl and gently tap to remove excess.
- Scrape Edges: Use a clean spatula to scrape away excess chocolate from the top edges.
- Chill Dark Chocolate Shells: Refrigerate the filled molds for 10-15 minutes, or until firm.
- Repeat with Milk Chocolate: Repeat steps 6-9 with tempered milk chocolate, filling the remaining half-sphere molds.
- Gently Release Shells: Carefully remove molds from the refrigerator. Flex the silicone molds to loosen the chocolate shells.
- Remove Shells: Carefully peel back the silicone mold to release the chocolate shells.
- Inspect Shells: Check for cracks or thin spots. Remelt chocolate to patch if needed.
- Warm a Plate: Gently warm a plate in the microwave for a few seconds.
- Fill Dark Chocolate Shells: Place one dark chocolate half-sphere open-side-down on the warm plate to slightly melt the edge. Fill with 1/2 tablespoon of hot chocolate mix, 1/4 cup of mini marshmallows, and any other desired fillings.
- Seal Dark Chocolate Bomb: Take another dark chocolate half-sphere and repeat the warming process. Carefully place it on top of the filled half-sphere, aligning the edges. Gently press to seal.
- Fill and Seal Milk Chocolate Bombs: Repeat steps 15 and 16 with the milk chocolate shells.
- Reinforce Seams (Optional): Melt a small amount of chocolate and use a toothpick to apply it to the seam of each bomb.
- Melt a Small Amount of Chocolate: Melt a small amount of chocolate (either dark or milk) in a small bowl.
- Drizzle with Chocolate: Dip a fork or spoon into the melted chocolate and drizzle it over the top of the hot chocolate bombs.
- Add Sprinkles: Immediately sprinkle the drizzled chocolate with sprinkles, crushed peppermint candies, or sea salt flakes.
- Let the Chocolate Set: Allow the decorated hot chocolate bombs to sit at room temperature or in the refrigerator for a few minutes until the chocolate is set.
- Store Properly: Store the hot chocolate bombs in an airtight container at room temperature or in the refrigerator. They will last for about 2-3 weeks.
- Prepare Your Mug: To use, place a hot chocolate bomb in a mug.
- Pour Hot Milk: Pour about 8-10 ounces of hot milk (or water, but milk is much richer!) over the bomb.
- Watch the Magic Happen: Watch as the chocolate melts and the marshmallows pop out!
- Stir and Enjoy: Stir well until the hot chocolate mix is completely dissolved. Enjoy your delicious and magical hot chocolate!
Notes
- Use high-quality chocolate for the best flavor.
- Tempering the chocolate properly is crucial for a shiny, snappy shell.
- Work quickly, as tempered chocolate can set quickly.
- Don’t overfill the shells, as it can make sealing difficult.
- Experiment with different flavors and fillings to create unique combinations.
- Practice makes perfect! Don’t be discouraged if your first attempts aren’t perfect.
Leave a Comment