
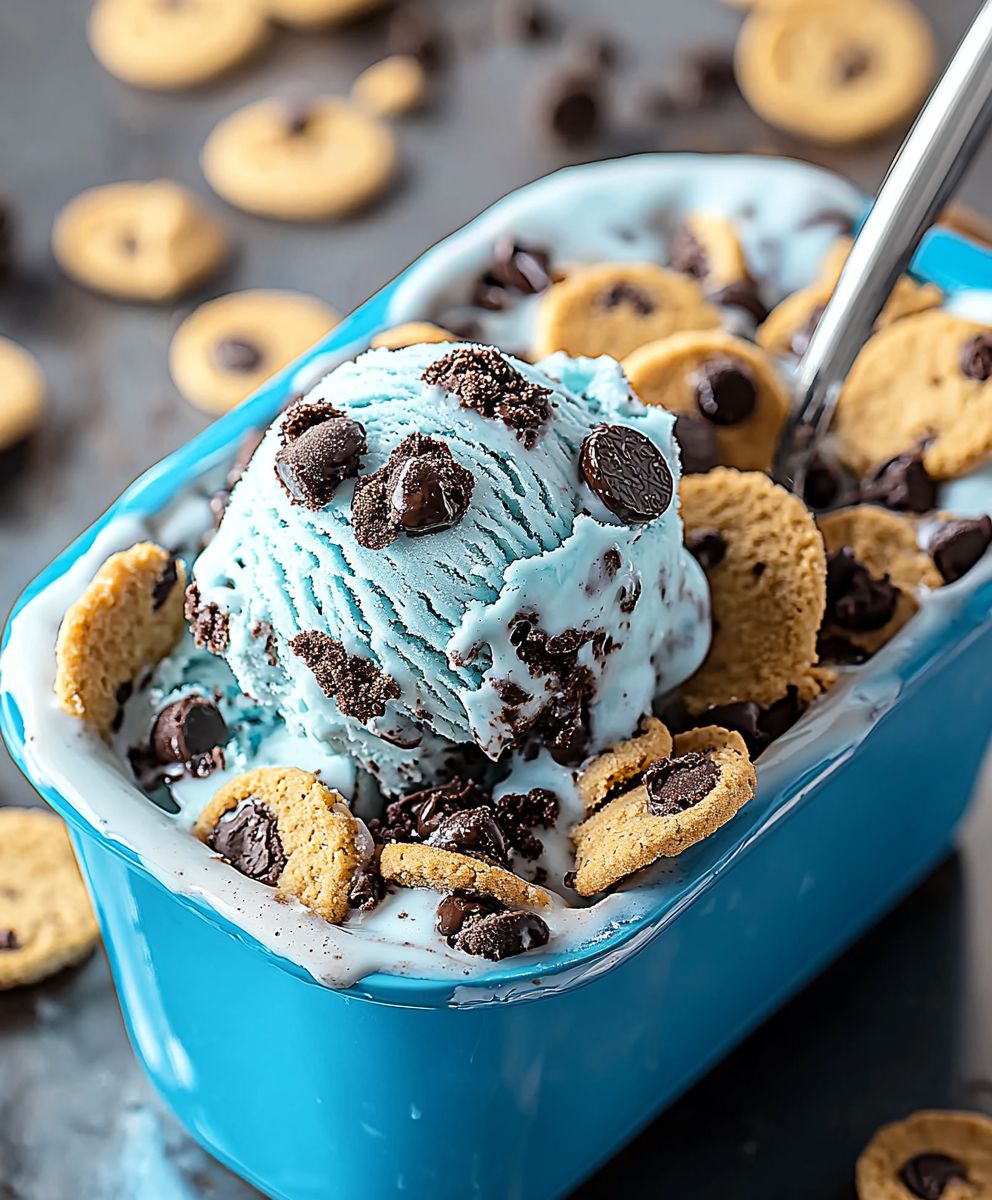
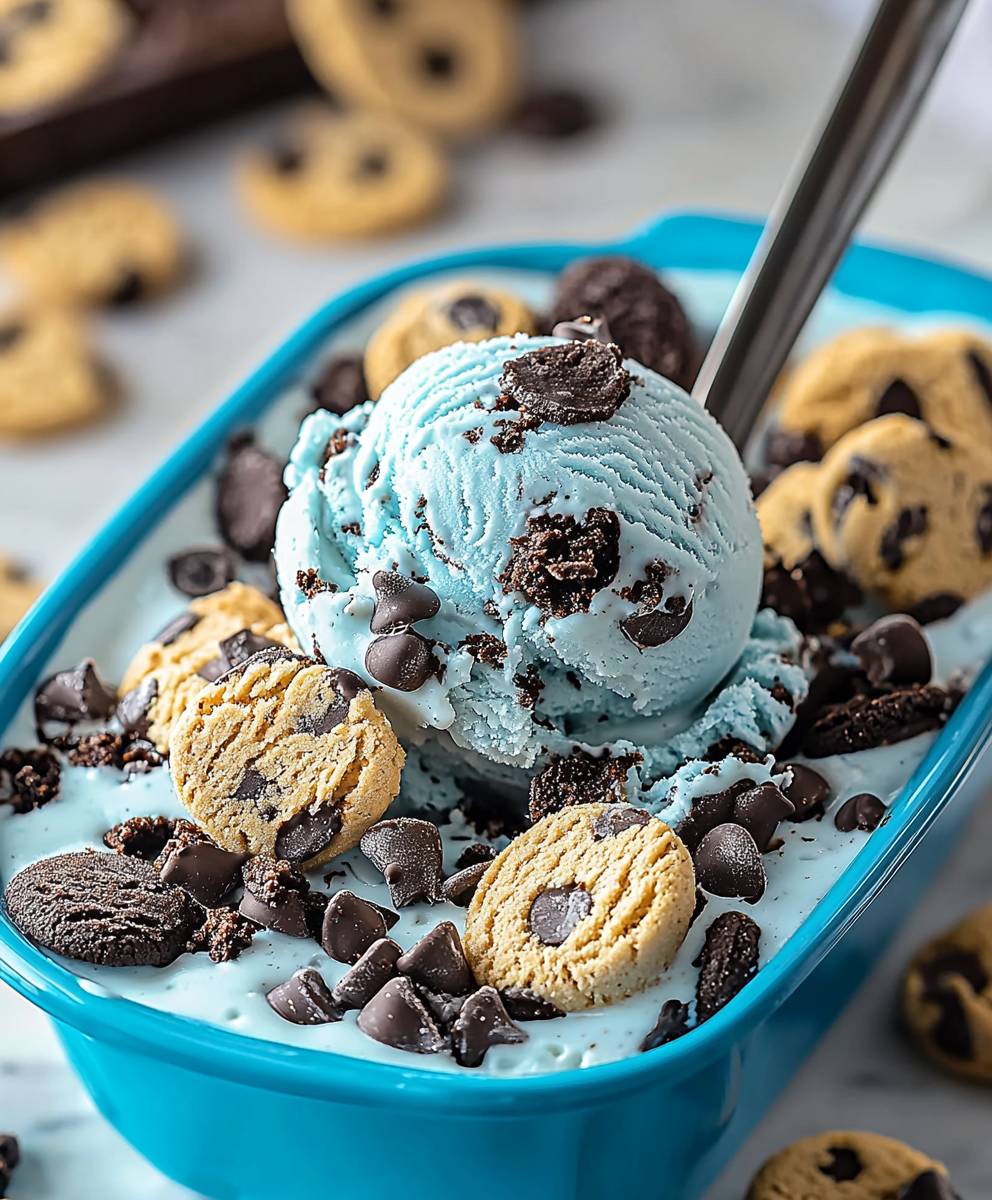
Cookie Monster Ice Cream: just the name alone conjures up images of vibrant blue, chunks of cookies, and pure, unadulterated joy! Forget boring vanilla; we’re diving headfirst into a whimsical world of flavor that will have you channeling your inner child. Have you ever dreamt of a dessert that’s as fun to look at as it is to eat? This is it.
While not steeped in ancient tradition, Cookie Monster Ice Cream holds a special place in modern dessert culture. It’s a playful nod to the beloved Sesame Street character, instantly recognizable and guaranteed to bring a smile to anyone’s face. It’s a celebration of simple pleasures, a reminder that food can be both delicious and delightfully silly.
What makes this ice cream so irresistible? It’s the perfect combination of creamy, sweet ice cream and the satisfying crunch of cookies. The vibrant blue color is undeniably appealing, making it a hit with kids and adults alike. Plus, it’s incredibly easy to customize! You can use your favorite type of cookie chocolate chip, Oreos, even peanut butter cookies to create a truly unique and personalized treat. Get ready to scoop up some happiness with this easy-to-make and utterly delicious dessert!
Ingredients:
- For the Vanilla Ice Cream Base:
- 2 cups heavy cream
- 1 cup whole milk
- ¾ cup granulated sugar
- ? teaspoon salt
- 1 tablespoon pure vanilla extract
- For the Cookie Dough Bites:
- ½ cup (1 stick) unsalted butter, softened
- ½ cup packed light brown sugar
- ¼ cup granulated sugar
- 1 teaspoon pure vanilla extract
- ? teaspoon salt
- 1 ¼ cups all-purpose flour, heat-treated (see instructions below)
- 2 tablespoons milk
- ½ cup mini semi-sweet chocolate chips
- For the Cookie Crumble:
- 1 ½ cups all-purpose flour
- ¾ cup packed light brown sugar
- ½ cup (1 stick) unsalted butter, cold and cubed
- ½ teaspoon baking soda
- ¼ teaspoon salt
- For the Blue Coloring:
- Blue gel food coloring (start with a few drops and add more to achieve desired color)
- Optional Add-ins:
- Mini chocolate sandwich cookies, roughly chopped
- Rainbow sprinkles
Preparing the Cookie Dough Bites:
Okay, let’s get started with the cookie dough bites! These are the heart and soul of our Cookie Monster Ice Cream, and trust me, they’re worth the effort. Remember, we’re making edible cookie dough, so we need to heat-treat the flour to kill any potential bacteria. Don’t skip this step!
- Heat-Treat the Flour: Spread the 1 ¼ cups of all-purpose flour on a baking sheet in a thin, even layer. Bake in a preheated oven at 350°F (175°C) for 5-7 minutes, or until the temperature reaches 165°F (74°C). Let the flour cool completely before using. This is crucial for food safety!
- Cream the Butter and Sugars: In a medium bowl, cream together the softened butter, brown sugar, and granulated sugar until light and fluffy. You can use a stand mixer or a hand mixer for this.
- Add Vanilla and Salt: Beat in the vanilla extract and salt until well combined.
- Incorporate the Flour: Gradually add the heat-treated flour to the wet ingredients, mixing on low speed until just combined. Be careful not to overmix!
- Add Milk: Add the milk, one tablespoon at a time, until the dough comes together. The dough should be thick but pliable.
- Stir in Chocolate Chips: Gently fold in the mini chocolate chips.
- Chill the Dough: Cover the bowl with plastic wrap and refrigerate for at least 30 minutes. This will make the dough easier to handle.
- Form the Bites: Once chilled, roll the dough into small, bite-sized balls (about ½ inch in diameter). Place the cookie dough bites on a parchment-lined baking sheet.
- Freeze the Bites: Freeze the cookie dough bites for at least 1 hour, or until solid. This will prevent them from melting into the ice cream.
Making the Cookie Crumble:
Next up, the cookie crumble! This adds a delightful crunch and texture to our ice cream. It’s super easy to make, so let’s get to it!
- Combine Dry Ingredients: In a medium bowl, whisk together the all-purpose flour, brown sugar, baking soda, and salt.
- Cut in the Butter: Add the cold, cubed butter to the dry ingredients. Use a pastry blender or your fingertips to cut the butter into the flour mixture until it resembles coarse crumbs. The butter should be in small pieces.
- Bake the Crumble: Spread the crumble mixture on a parchment-lined baking sheet. Bake in a preheated oven at 350°F (175°C) for 10-12 minutes, or until golden brown and fragrant.
- Cool Completely: Let the cookie crumble cool completely on the baking sheet. Once cooled, break it up into smaller pieces with your hands.
Preparing the Vanilla Ice Cream Base:
Now, let’s create the creamy vanilla ice cream base that will bring everything together. This is a simple custard-based ice cream, and it’s absolutely delicious!
- Combine Ingredients: In a medium saucepan, combine the heavy cream, whole milk, granulated sugar, and salt.
- Heat and Dissolve: Heat the mixture over medium heat, stirring constantly, until the sugar is completely dissolved and the mixture is steaming but not boiling.
- Remove from Heat: Remove the saucepan from the heat and stir in the vanilla extract.
- Cool the Mixture: Pour the mixture into a bowl and let it cool to room temperature. This will take about 30-45 minutes.
- Chill Thoroughly: Cover the bowl with plastic wrap and refrigerate for at least 4 hours, or preferably overnight. This is essential for a smooth and creamy ice cream.
Churning and Assembling the Ice Cream:
Alright, the moment we’ve been waiting for! It’s time to churn the ice cream and assemble our Cookie Monster masterpiece. Get ready for some serious deliciousness!
- Churn the Ice Cream: Pour the chilled ice cream base into your ice cream maker and churn according to the manufacturer’s instructions. This usually takes about 20-25 minutes, or until the ice cream reaches a soft-serve consistency.
- Add Blue Coloring: While the ice cream is churning, gradually add the blue gel food coloring, a few drops at a time, until you achieve your desired shade of Cookie Monster blue. Be careful not to add too much at once, as it can affect the texture of the ice cream.
- Layer in the Goodies: Once the ice cream is churned, transfer about one-third of it to a freezer-safe container. Sprinkle half of the frozen cookie dough bites and half of the cookie crumble over the ice cream. If you’re using mini chocolate sandwich cookies and sprinkles, add some of those too!
- Repeat Layers: Add another third of the ice cream, followed by the remaining cookie dough bites, cookie crumble, and any other add-ins.
- Top with Remaining Ice Cream: Top with the remaining ice cream.
- Freeze to Harden: Gently press down on the top of the ice cream to compact it. Cover the container with a lid or plastic wrap and freeze for at least 2-3 hours, or until the ice cream is firm.
Serving and Enjoying:
Finally, the best part! Scoop out a generous portion of your homemade Cookie Monster Ice Cream and enjoy! This ice cream is best served slightly softened, so let it sit at room temperature for a few minutes before scooping. You can garnish with extra sprinkles or a mini chocolate sandwich cookie for an extra touch of fun. Enjoy!
Conclusion:
So there you have it! My take on Cookie Monster Ice Cream, a recipe that’s guaranteed to bring a smile to your face and a delightful sugar rush to your taste buds. I truly believe this is a must-try recipe for anyone who loves ice cream, cookies, or just a bit of whimsical fun in their dessert. It’s not just about the vibrant blue color (though that’s definitely a showstopper!), it’s about the perfect balance of creamy, sweet ice cream and the satisfying crunch of those beloved chocolate chip cookies. Why is it a must-try? Because it’s incredibly easy to make, even if you’re not a seasoned ice cream maker. The no-churn method means you don’t need any fancy equipment just a few simple ingredients and a little bit of patience while it freezes. Plus, it’s completely customizable! You can adjust the amount of cookies to your liking, add different types of cookies (Oreo chunks, anyone?), or even swirl in some fudge sauce for an extra layer of decadence. But the real reason this recipe is a winner is the sheer joy it brings. It’s nostalgic, playful, and undeniably delicious. It’s the kind of ice cream that makes you feel like a kid again, no matter your age. Now, let’s talk serving suggestions. Of course, you can always enjoy a scoop (or two!) straight from the container. But if you want to get a little fancy, try serving it in a waffle cone, topped with whipped cream and extra cookie crumbles. For a truly indulgent treat, make an ice cream sandwich using homemade chocolate chip cookies. Or, blend it into a milkshake for a super-charged cookie monster experience. Here are a few variations to get your creative juices flowing: * Double Chocolate Chunk: Use double chocolate chip cookies and add some dark chocolate shavings to the ice cream base. * Peanut Butter Cookie Swirl: Swirl in some peanut butter before freezing for a salty-sweet combination. * Mint Chocolate Chip Monster: Add a few drops of peppermint extract and some mini chocolate chips for a refreshing twist. * Birthday Cake Cookie Monster: Use birthday cake flavored cookies and add sprinkles to the ice cream. The possibilities are endless! Don’t be afraid to experiment and create your own unique version of this delightful treat. I’m so excited for you to try this recipe! I poured my heart into perfecting it, and I truly believe you’ll love it as much as I do. It’s the perfect dessert for a hot summer day, a fun birthday party, or just a cozy night in. So, go ahead, grab your ingredients, and get ready to make some magic in the kitchen. And most importantly, don’t forget to share your creations with me! I’d love to see your photos and hear about your experiences. Tag me on social media using #CookieMonsterIceCream or leave a comment below. I can’t wait to see what you come up with! Happy ice cream making! I hope you enjoy this Cookie Monster Ice Cream as much as I do! Print
Cookie Monster Ice Cream: A Deliciously Fun Treat!
- Total Time: 300 minutes
- Yield: 6–8 servings 1x
Description
Creamy vanilla ice cream swirled with blue food coloring, loaded with chunks of edible cookie dough bites and crunchy cookie crumble. A fun and delicious treat!
Ingredients
- 2 cups heavy cream
- 1 cup whole milk
- ¾ cup granulated sugar
- ? teaspoon salt
- 1 tablespoon pure vanilla extract
- ½ cup (1 stick) unsalted butter, softened
- ½ cup packed light brown sugar
- ¼ cup granulated sugar
- 1 teaspoon pure vanilla extract
- ? teaspoon salt
- 1 ¼ cups all-purpose flour, heat-treated
- 2 tablespoons milk
- ½ cup mini semi-sweet chocolate chips
- 1 ½ cups all-purpose flour
- ¾ cup packed light brown sugar
- ½ cup (1 stick) unsalted butter, cold and cubed
- ½ teaspoon baking soda
- ¼ teaspoon salt
- Blue gel food coloring
- Mini chocolate sandwich cookies, roughly chopped
- Rainbow sprinkles
Instructions
- Heat-Treat the Flour: Spread the flour on a baking sheet in a thin layer. Bake at 350°F (175°C) for 5-7 minutes, or until it reaches 165°F (74°C). Cool completely.
- Cream Butter and Sugars: Cream together butter, brown sugar, and granulated sugar until light and fluffy.
- Add Vanilla and Salt: Beat in vanilla extract and salt.
- Incorporate Flour: Gradually add heat-treated flour, mixing on low speed until just combined.
- Add Milk: Add milk, one tablespoon at a time, until the dough comes together.
- Stir in Chocolate Chips: Gently fold in mini chocolate chips.
- Chill the Dough: Refrigerate for at least 30 minutes.
- Form the Bites: Roll into small, bite-sized balls.
- Freeze the Bites: Freeze for at least 1 hour, or until solid.
- Combine Dry Ingredients: Whisk together flour, brown sugar, baking soda, and salt.
- Cut in Butter: Cut in cold, cubed butter until the mixture resembles coarse crumbs.
- Bake the Crumble: Spread on a baking sheet. Bake at 350°F (175°C) for 10-12 minutes, or until golden brown.
- Cool Completely: Let cool completely, then break into smaller pieces.
- Combine Ingredients: Combine heavy cream, whole milk, granulated sugar, and salt in a saucepan.
- Heat and Dissolve: Heat over medium heat, stirring constantly, until sugar is dissolved and the mixture is steaming (not boiling).
- Remove from Heat: Remove from heat and stir in vanilla extract.
- Cool the Mixture: Let cool to room temperature.
- Chill Thoroughly: Refrigerate for at least 4 hours, or preferably overnight.
- Churn the Ice Cream: Pour chilled ice cream base into your ice cream maker and churn according to the manufacturer’s instructions.
- Add Blue Coloring: Gradually add blue gel food coloring until desired shade is achieved.
- Layer in Goodies: Transfer ? of the ice cream to a freezer-safe container. Sprinkle with half of the cookie dough bites, cookie crumble, and optional add-ins.
- Repeat Layers: Add another ? of the ice cream, followed by remaining cookie dough bites, cookie crumble, and add-ins.
- Top with Remaining Ice Cream: Top with the remaining ice cream.
- Freeze to Harden: Freeze for at least 2-3 hours, or until firm.
Notes
- Heat-treating the flour for the cookie dough bites is crucial for food safety.
- Chilling the ice cream base thoroughly is essential for a smooth and creamy texture.
- Add the blue food coloring gradually to achieve the desired color without affecting the ice cream’s texture.
- Freeze the cookie dough bites before adding them to the ice cream to prevent them from melting.
- Let the ice cream soften slightly at room temperature before scooping for the best texture.
- Prep Time: 45 minutes
- Cook Time: 30 minutes


Leave a Comment