
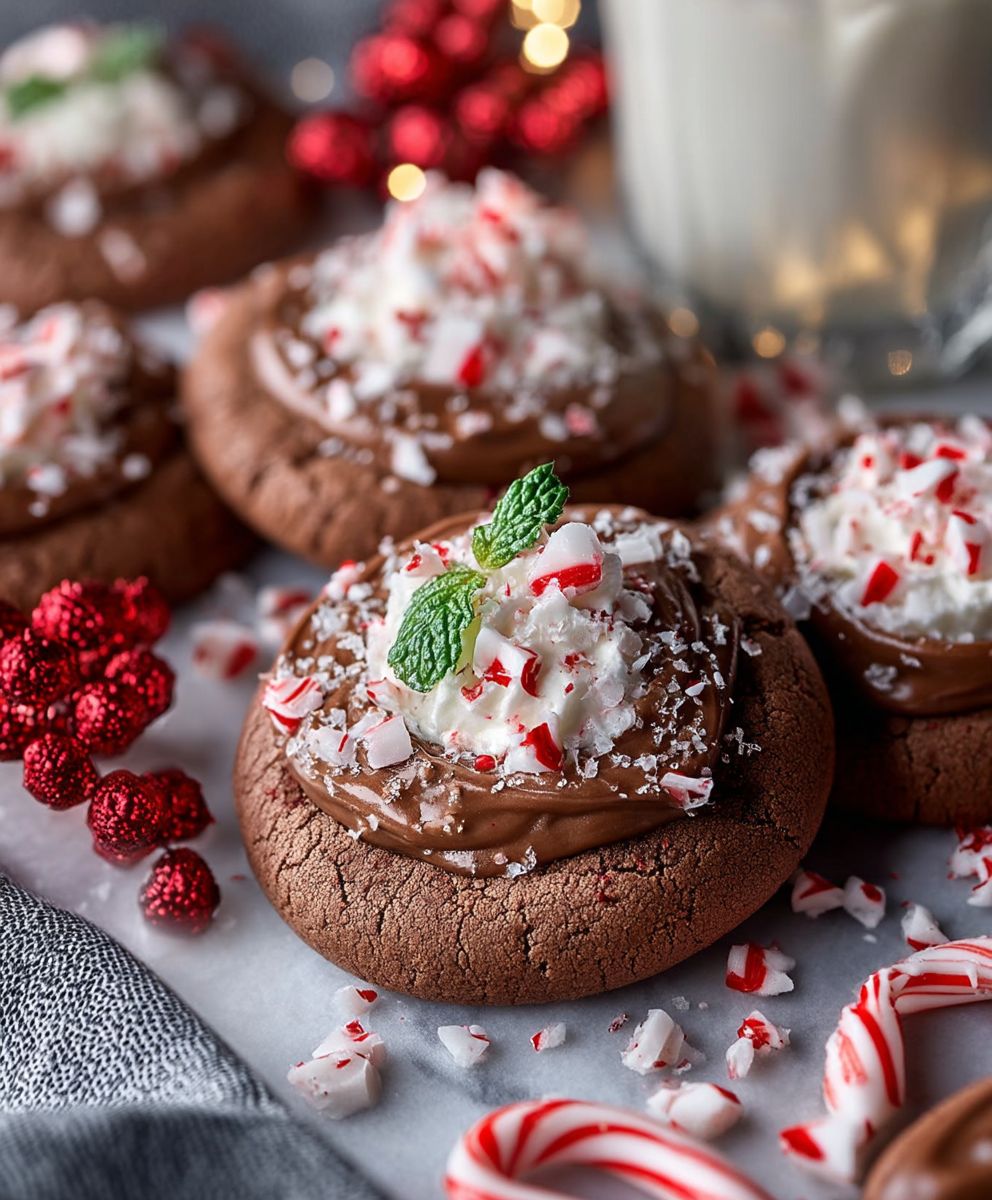
Chocolate Peppermint Cookies: the very words conjure up images of cozy fireplaces, twinkling lights, and the joyous spirit of the holiday season! But what if I told you that these delightful treats are more than just a festive indulgence? They’re a delicious collision of rich, dark chocolate and the invigorating coolness of peppermint, a flavor combination that has captivated taste buds for generations.
The marriage of chocolate and mint has a surprisingly long history, with roots tracing back to Victorian England, where chocolate mint creams were a popular confection. This classic pairing evolved over time, finding its way into cookies, candies, and even beverages. Today, Chocolate Peppermint Cookies stand as a testament to the enduring appeal of this harmonious blend.
What makes these cookies so irresistible? It’s the perfect balance of textures the soft, chewy interior contrasted with the slightly crisp edges. The intense chocolate flavor is beautifully complemented by the refreshing peppermint, creating a symphony of sensations that dance on your palate. Plus, they are incredibly easy to make, making them the perfect treat to bake with family and friends during the holidays. So, grab your apron, preheat your oven, and let’s embark on a culinary adventure to create the most delectable Chocolate Peppermint Cookies you’ve ever tasted!

Ingredients:
- 1 cup (2 sticks) unsalted butter, softened
- 1 ½ cups granulated sugar
- ½ cup packed light brown sugar
- 2 large eggs
- 1 teaspoon vanilla extract
- ½ teaspoon peppermint extract
- 2 ¾ cups all-purpose flour
- ¾ cup unsweetened cocoa powder
- 1 teaspoon baking soda
- ½ teaspoon salt
- 1 cup semi-sweet chocolate chips
- ½ cup crushed peppermint candies (like candy canes)
Preparing the Dough:
- Cream the Butter and Sugars: In a large bowl, or the bowl of your stand mixer, cream together the softened butter, granulated sugar, and light brown sugar until light and fluffy. This usually takes about 3-5 minutes. Make sure to scrape down the sides of the bowl occasionally to ensure everything is evenly mixed. You don’t want any lumps of butter hiding at the bottom!
- Incorporate the Wet Ingredients: Beat in the eggs one at a time, mixing well after each addition. Then, stir in the vanilla extract and peppermint extract. The peppermint extract is potent, so start with ½ teaspoon and add a little more if you want a stronger peppermint flavor. Be careful not to overdo it, though, or it can taste medicinal.
- Combine the Dry Ingredients: In a separate medium bowl, whisk together the all-purpose flour, cocoa powder, baking soda, and salt. Whisking ensures that the baking soda and salt are evenly distributed throughout the flour mixture, which is crucial for proper leavening and flavor.
- Gradually Add Dry Ingredients to Wet Ingredients: Gradually add the dry ingredients to the wet ingredients, mixing on low speed until just combined. Be careful not to overmix the dough, as this can result in tough cookies. Overmixing develops the gluten in the flour, which can make the cookies chewy instead of soft.
- Fold in Chocolate Chips and Peppermint Candies: Gently fold in the semi-sweet chocolate chips and crushed peppermint candies. Make sure they are evenly distributed throughout the dough. I like to use a rubber spatula for this step to avoid overmixing.
- Chill the Dough: Cover the bowl with plastic wrap and chill the dough in the refrigerator for at least 1 hour, or preferably 2-3 hours. Chilling the dough allows the gluten to relax, which results in softer cookies. It also prevents the cookies from spreading too much during baking. You can even chill the dough overnight for even better results.
Baking the Cookies:
- Preheat the Oven: Preheat your oven to 350°F (175°C). Line baking sheets with parchment paper or silicone baking mats. Parchment paper prevents the cookies from sticking to the baking sheet and makes cleanup a breeze. Silicone baking mats provide even heat distribution, which helps the cookies bake evenly.
- Scoop the Dough: Use a cookie scoop or spoon to drop rounded tablespoons of dough onto the prepared baking sheets, leaving about 2 inches between each cookie. This allows the cookies to spread without running into each other.
- Bake the Cookies: Bake for 9-11 minutes, or until the edges are set and the centers are still slightly soft. The cookies will continue to bake on the baking sheet after you remove them from the oven, so it’s important not to overbake them.
- Cool the Cookies: Let the cookies cool on the baking sheets for a few minutes before transferring them to a wire rack to cool completely. This allows the cookies to firm up slightly, which makes them easier to handle.
Optional: Peppermint Glaze
While the cookies are delicious on their own, a simple peppermint glaze adds an extra touch of festive flavor and visual appeal.
Ingredients for Peppermint Glaze:
- 1 cup powdered sugar
- 2-3 tablespoons milk
- ¼ teaspoon peppermint extract
- Optional: a few drops of red food coloring
Instructions for Peppermint Glaze:
- Combine Ingredients: In a small bowl, whisk together the powdered sugar, milk, and peppermint extract until smooth. Add milk gradually until you reach your desired consistency. If you want a thicker glaze, use less milk. If you want a thinner glaze, use more milk.
- Add Food Coloring (Optional): If you want to add a touch of color, add a few drops of red food coloring and stir until evenly combined.
- Glaze the Cookies: Once the cookies are completely cool, drizzle the glaze over the tops of the cookies. You can use a spoon or a fork to drizzle the glaze.
- Add Sprinkles (Optional): If desired, sprinkle the glazed cookies with additional crushed peppermint candies or other festive sprinkles before the glaze sets.
- Let Glaze Set: Allow the glaze to set completely before serving or storing the cookies. This usually takes about 30 minutes.
Tips for Perfect Chocolate Peppermint Cookies:
- Use Room Temperature Butter: Softened butter is crucial for creaming properly with the sugars. If the butter is too cold, it won’t cream properly, and if it’s too melted, the cookies will spread too much.
- Don’t Overmix the Dough: Overmixing develops the gluten in the flour, which can result in tough cookies. Mix the dough until just combined.
- Chill the Dough: Chilling the dough is essential for preventing the cookies from spreading too much during baking and for developing the flavor.
- Use Parchment Paper or Silicone Baking Mats: Parchment paper and silicone baking mats prevent the cookies from sticking to the baking sheet and make cleanup a breeze.
- Don’t Overbake the Cookies: The cookies will continue to bake on the baking sheet after you remove them from the oven, so it’s important not to overbake them.
- Store the Cookies Properly: Store the cookies in an airtight container at room temperature for up to 3 days.
- For a richer chocolate flavor: Use dark cocoa powder instead of regular unsweetened cocoa powder.
- Add a pinch of espresso powder: A small amount of espresso powder enhances the chocolate flavor. Add about ¼ teaspoon to the dry ingredients.
- Vary the chocolate chips: Use a combination of semi-sweet, milk chocolate, and dark chocolate chips for a more complex flavor.
- Make them gluten-free: Substitute the all-purpose flour with a gluten-free all-purpose flour blend. Be sure to choose a blend that contains xanthan gum for best results.
- Freeze the dough: Cookie dough can be frozen for up to 2 months. Scoop the dough into balls, place them on a baking sheet, and freeze until solid. Then, transfer the frozen dough balls to a freezer bag. When ready to bake, bake from frozen, adding a few extra minutes to the baking time.
- Adjust peppermint extract to taste: Peppermint extract can be quite strong, so adjust the amount to your preference. Start with a smaller amount and add more if needed.
- Use high-quality chocolate: The quality of the chocolate chips will affect the overall flavor of the cookies. Use high-quality chocolate chips for the best results.
Enjoy your delicious Chocolate Peppermint Cookies!
Conclusion:
And there you have it! These Chocolate Peppermint Cookies are more than just a holiday treat; they’re a symphony of rich chocolate and refreshing peppermint that will tantalize your taste buds and leave you craving more. I truly believe this recipe is a must-try for anyone who loves a good cookie, especially during the festive season. The combination of the deep, dark chocolate with the bright, invigorating peppermint is simply irresistible.
But why is this recipe so special? It’s the perfect balance of flavors, the delightful chewy texture, and the ease of preparation. You don’t need to be a master baker to create these little masterpieces. The recipe is straightforward, uses readily available ingredients, and yields consistently delicious results. Plus, the aroma that fills your kitchen while they’re baking is pure holiday magic!
Beyond the sheer deliciousness, these cookies are incredibly versatile. Serve them warm with a scoop of vanilla ice cream for an extra indulgent dessert. Crumble them over a chocolate milkshake for a pepperminty twist. Or, package them up in festive tins and give them as homemade gifts to friends and family. They’re guaranteed to be a hit!
Looking for variations? You could try using different types of chocolate, such as milk chocolate or white chocolate, for a sweeter flavor profile. Add a sprinkle of sea salt on top before baking to enhance the chocolate’s richness. For a vegan version, simply substitute the butter with a vegan butter alternative and use a plant-based milk. The possibilities are endless!
Another fun variation is to dip the cooled cookies in melted white chocolate and then sprinkle them with crushed peppermint candies. This adds an extra layer of sweetness and a beautiful festive touch. You could also add a few drops of peppermint extract to the cookie dough for an even more intense peppermint flavor. Just be careful not to add too much, as it can be overpowering.
I’ve poured my heart into perfecting this recipe, and I’m confident that you’ll love it as much as I do. The secret ingredient? A generous dose of holiday cheer! But seriously, the key is to use high-quality ingredients and to follow the instructions carefully. Don’t be afraid to experiment and adjust the recipe to your own preferences. Baking is all about having fun and creating something delicious that you can share with others.
So, what are you waiting for? Preheat your oven, gather your ingredients, and get ready to bake a batch of these incredible Chocolate Peppermint Cookies. I promise you won’t regret it!
I’m so excited for you to try this recipe and experience the joy of baking these delightful cookies. Once you’ve made them, I would absolutely love to hear about your experience! Share your photos, your tips, and your variations in the comments below. Let’s create a community of cookie lovers and spread the holiday cheer, one delicious bite at a time. Happy baking!
Chocolate Peppermint Cookies: The Ultimate Holiday Recipe
Decadent chocolate cookies with peppermint flavor, chocolate chips, and crushed peppermint candies. Perfect for the holidays!
Ingredients
- 1 cup (2 sticks) unsalted butter, softened
- 1 ½ cups granulated sugar
- ½ cup packed light brown sugar
- 2 large eggs
- 1 teaspoon vanilla extract
- ½ teaspoon peppermint extract (adjust to taste)
- 2 ¾ cups all-purpose flour
- ¾ cup unsweetened cocoa powder
- 1 teaspoon baking soda
- ½ teaspoon salt
- 1 cup semi-sweet chocolate chips
- ½ cup crushed peppermint candies (like candy canes)
Instructions
- Cream the Butter and Sugars: In a large bowl, or the bowl of your stand mixer, cream together the softened butter, granulated sugar, and light brown sugar until light and fluffy (3-5 minutes). Scrape down the sides of the bowl occasionally.
- Incorporate the Wet Ingredients: Beat in the eggs one at a time, mixing well after each addition. Then, stir in the vanilla extract and peppermint extract.
- Combine the Dry Ingredients: In a separate medium bowl, whisk together the all-purpose flour, cocoa powder, baking soda, and salt.
- Gradually Add Dry Ingredients to Wet Ingredients: Gradually add the dry ingredients to the wet ingredients, mixing on low speed until just combined. Be careful not to overmix.
- Fold in Chocolate Chips and Peppermint Candies: Gently fold in the semi-sweet chocolate chips and crushed peppermint candies until evenly distributed.
- Chill the Dough: Cover the bowl with plastic wrap and chill the dough in the refrigerator for at least 1 hour, or preferably 2-3 hours (or overnight).
- Preheat the Oven: Preheat your oven to 350°F (175°C). Line baking sheets with parchment paper or silicone baking mats.
- Scoop the Dough: Use a cookie scoop or spoon to drop rounded tablespoons of dough onto the prepared baking sheets, leaving about 2 inches between each cookie.
- Bake the Cookies: Bake for 9-11 minutes, or until the edges are set and the centers are still slightly soft.
- Cool the Cookies: Let the cookies cool on the baking sheets for a few minutes before transferring them to a wire rack to cool completely.
- Combine Ingredients: In a small bowl, whisk together the powdered sugar, milk, and peppermint extract until smooth. Add milk gradually until you reach your desired consistency.
- Add Food Coloring (Optional): If you want to add a touch of color, add a few drops of red food coloring and stir until evenly combined.
- Glaze the Cookies: Once the cookies are completely cool, drizzle the glaze over the tops of the cookies.
- Add Sprinkles (Optional): If desired, sprinkle the glazed cookies with additional crushed peppermint candies or other festive sprinkles before the glaze sets.
- Let Glaze Set: Allow the glaze to set completely before serving or storing the cookies. This usually takes about 30 minutes.
Notes
- Use room temperature butter for best results.
- Don’t overmix the dough.
- Chilling the dough is essential.
- Don’t overbake the cookies.
- Store the cookies in an airtight container at room temperature for up to 3 days.
- For a richer chocolate flavor, use dark cocoa powder.
- Add a pinch of espresso powder (¼ teaspoon) to enhance the chocolate flavor.
- Vary the chocolate chips for a more complex flavor.
- Make them gluten-free by substituting with a gluten-free all-purpose flour blend (containing xanthan gum).
- Freeze the dough for up to 2 months.
- Adjust peppermint extract to taste.
- Use high-quality chocolate chips for the best results.


Leave a Comment