
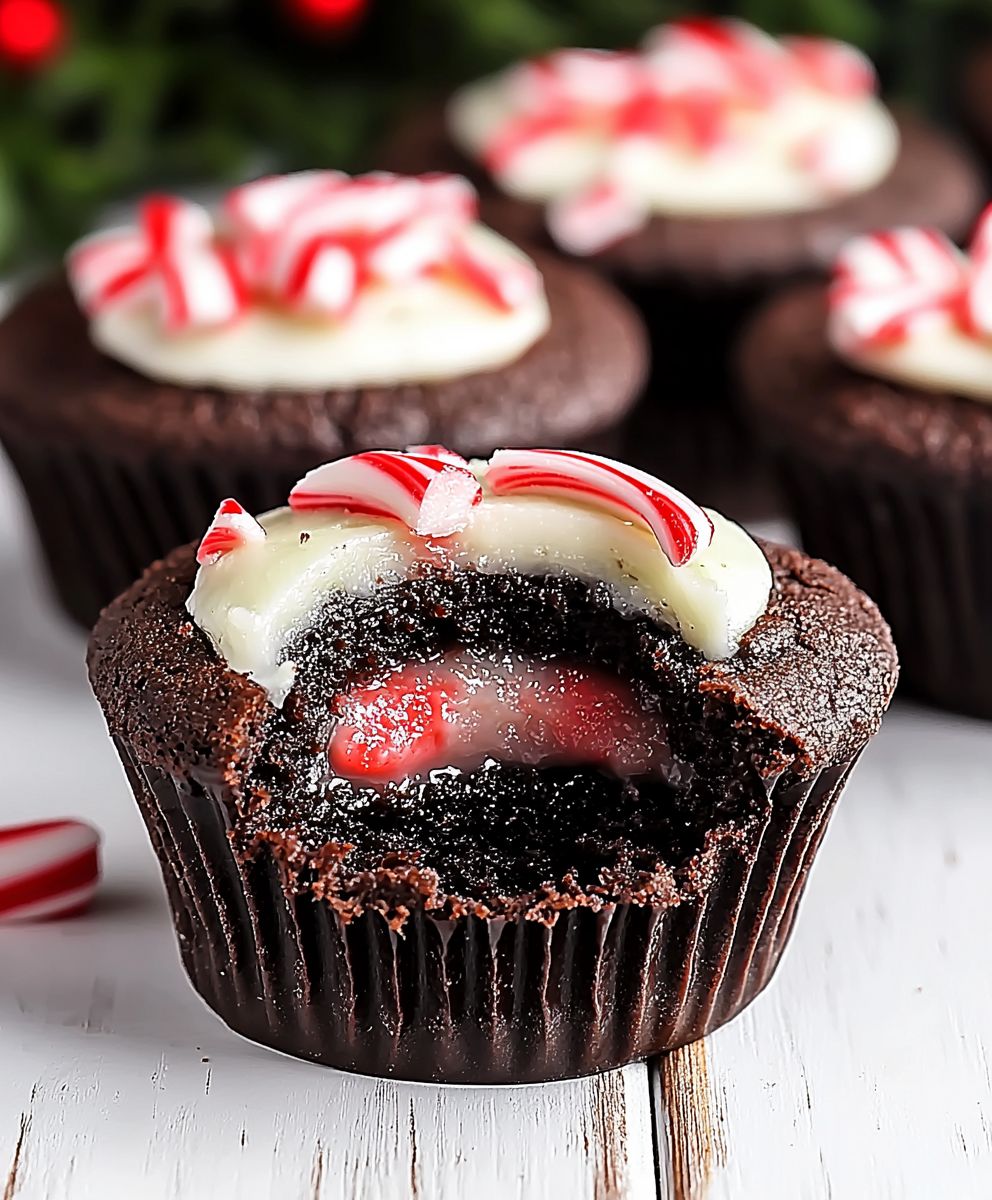
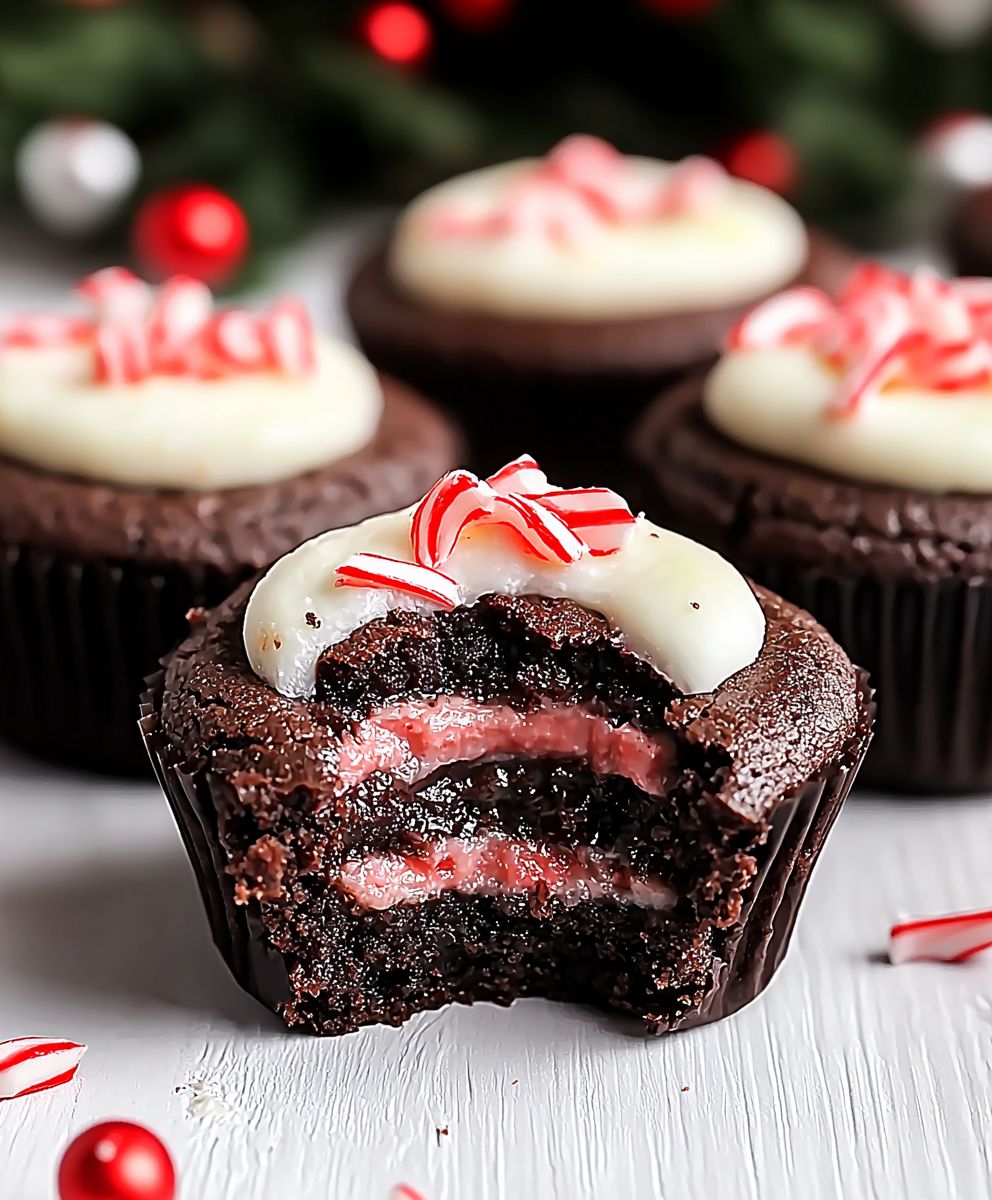
Chocolate Peppermint Cookie Cups: Prepare to be utterly captivated by these miniature marvels! Imagine the rich, decadent allure of dark chocolate melding seamlessly with the cool, invigorating zest of peppermint. These aren’t just cookies; they’re tiny vessels of holiday cheer, perfect for gifting, sharing, or simply indulging in a moment of pure bliss.
The combination of chocolate and peppermint has a long and storied history, particularly around the festive season. Peppermint, with its refreshing and slightly medicinal qualities, has been used for centuries, while chocolate, originating in ancient Mesoamerica, gained widespread popularity in Europe and eventually became a global sensation. The pairing of these two distinct flavors is a relatively modern invention, but it has quickly become a beloved tradition, evoking feelings of warmth, comfort, and celebration.
What makes these Chocolate Peppermint Cookie Cups so irresistible? It’s the delightful contrast of textures the crisp, slightly chewy cookie base giving way to a smooth, melt-in-your-mouth chocolate filling, punctuated by the refreshing crunch of peppermint candies. They are incredibly easy to make, requiring minimal ingredients and baking time, making them ideal for busy holiday schedules. Plus, their adorable size makes them perfect for portion control (if you can resist eating more than one!). Whether you’re a seasoned baker or a novice in the kitchen, these cookie cups are guaranteed to impress.
Ingredients:
- For the Chocolate Cookie Cups:
- 1 cup (2 sticks) unsalted butter, softened
- 1 cup granulated sugar
- 1 cup packed light brown sugar
- 2 large eggs
- 1 teaspoon vanilla extract
- 2 cups all-purpose flour
- ¾ cup unsweetened cocoa powder
- 1 teaspoon baking soda
- ½ teaspoon salt
- For the Peppermint Filling:
- 8 ounces cream cheese, softened
- ½ cup (1 stick) unsalted butter, softened
- 3 cups powdered sugar
- ½ teaspoon peppermint extract
- 2 tablespoons milk
- Pinch of salt
- For the Garnish:
- Crushed peppermint candies (about ½ cup)
- Chocolate shavings (optional)
Preparing the Chocolate Cookie Cups:
- Cream the Butter and Sugars: In a large bowl, cream together the softened butter, granulated sugar, and brown sugar until light and fluffy. I like to use an electric mixer for this, but you can definitely do it by hand if you’re feeling ambitious! Make sure to scrape down the sides of the bowl occasionally to ensure everything is evenly mixed.
- Add Eggs and Vanilla: Beat in the eggs one at a time, then stir in the vanilla extract. The mixture should be smooth and well combined.
- Combine Dry Ingredients: In a separate medium bowl, whisk together the flour, cocoa powder, baking soda, and salt. This ensures that the baking soda and salt are evenly distributed throughout the flour mixture.
- Gradually Add Dry Ingredients to Wet Ingredients: Gradually add the dry ingredients to the wet ingredients, mixing on low speed until just combined. Be careful not to overmix, as this can result in tough cookies. Overmixing develops the gluten in the flour, which we want to avoid for tender cookie cups.
- Chill the Dough (Important!): Wrap the dough in plastic wrap and chill in the refrigerator for at least 30 minutes. This step is crucial because it allows the gluten to relax and prevents the cookies from spreading too much in the oven. Chilling also makes the dough easier to handle. You can chill it for longer, even overnight, if you need to.
- Preheat Oven and Prepare Muffin Tin: Preheat your oven to 350°F (175°C). Grease a 24-cup mini muffin tin. Alternatively, you can use paper liners, but I find that greasing the tin works best for these cookie cups.
- Shape the Cookie Cups: Roll the chilled dough into 1-inch balls. Place each ball into a cup of the prepared mini muffin tin.
- Bake the Cookie Cups: Bake for 10-12 minutes, or until the edges are set and the centers are slightly soft. Keep a close eye on them, as baking times can vary depending on your oven.
- Create the Cup Shape: Immediately after removing the cookie cups from the oven, use the back of a small spoon or a tart tamper to gently press down the center of each cookie, creating a well for the filling. Be careful not to press too hard and crack the cookies. This step needs to be done while the cookies are still warm and pliable.
- Cool Completely: Let the cookie cups cool completely in the muffin tin before removing them. This will prevent them from breaking. Once cooled, gently remove them from the tin.
Preparing the Peppermint Filling:
- Cream the Cream Cheese and Butter: In a large bowl, cream together the softened cream cheese and butter until smooth and fluffy. Again, an electric mixer is your best friend here. Make sure there are no lumps of cream cheese or butter remaining.
- Gradually Add Powdered Sugar: Gradually add the powdered sugar, one cup at a time, mixing on low speed until combined. Be careful not to add too much powdered sugar at once, as it can create a cloud of dust.
- Add Peppermint Extract and Milk: Stir in the peppermint extract and milk. Add the milk gradually until you reach your desired consistency. You want the filling to be thick enough to hold its shape but still creamy and spreadable.
- Add a Pinch of Salt: Add a pinch of salt to balance the sweetness.
- Mix Until Smooth: Beat the filling until smooth and creamy.
Assembling the Chocolate Peppermint Cookie Cups:
- Fill the Cookie Cups: Spoon or pipe the peppermint filling into the cooled chocolate cookie cups. I like to use a piping bag with a star tip for a pretty presentation, but a spoon works just as well.
- Garnish: Sprinkle the crushed peppermint candies over the filling. You can also add chocolate shavings for an extra touch of chocolatey goodness.
- Chill (Optional): For best results, chill the filled cookie cups in the refrigerator for at least 30 minutes before serving. This will allow the filling to firm up and the flavors to meld together.
- Serve and Enjoy!: Serve the Chocolate Peppermint Cookie Cups and enjoy! These are perfect for holiday parties, cookie exchanges, or just a festive treat.
Tips and Variations:
- Make Ahead: You can make the cookie cups and the filling ahead of time and store them separately. Assemble them just before serving.
- Peppermint Extract: Be careful not to add too much peppermint extract, as it can be overpowering. Start with ½ teaspoon and add more to taste.
- Chocolate Chips: Add ½ cup of chocolate chips to the cookie dough for extra chocolate flavor.
- Different Candies: Use different types of crushed candies for the garnish, such as Andes mints or chocolate-covered pretzels.
- Vegan Option: Substitute the butter with vegan butter, the eggs with flax eggs (1 tablespoon flaxseed meal mixed with 3 tablespoons water per egg), and the cream cheese with vegan cream cheese.
- Gluten-Free Option: Use a gluten-free all-purpose flour blend in place of the regular flour.
- Storage: Store the cookie cups in an airtight container in the refrigerator for up to 3 days.
Troubleshooting:
- Cookies Spreading Too Much: If your cookies are spreading too much in the oven, make sure you chilled the dough for long enough. You can also add a tablespoon or two of flour to the dough.
- Cookies Too Dry: If your cookies are too dry, try adding a tablespoon of milk to the dough.
- Filling Too Runny: If your filling is too runny, add more powdered sugar, one tablespoon at a time, until it reaches the desired consistency.
- Filling Too Thick: If your filling is too thick, add a teaspoon of milk at a time until it reaches the desired consistency.
Enjoy Baking!
I hope you enjoy making these Chocolate Peppermint Cookie Cups as much as I do! They’re a festive and delicious treat that’s sure to be a hit with everyone. Happy baking!
Conclusion:
And there you have it! These Chocolate Peppermint Cookie Cups are more than just a dessert; they’re a festive explosion of flavor and texture that’s guaranteed to become a holiday favorite. I truly believe this recipe is a must-try for anyone who loves the classic combination of chocolate and peppermint, and especially for those looking for a fun and impressive treat to share.
Why is it a must-try? Well, beyond the incredible taste, these cookie cups are surprisingly easy to make. The recipe is straightforward, and the results are absolutely stunning. Imagine the look on your friends’ and family’s faces when you present them with these beautiful, bite-sized delights! They’re perfect for holiday parties, cookie exchanges, or simply enjoying with a cup of hot cocoa on a cold winter evening. Plus, the individual portions make them incredibly convenient and easy to serve. No messy slicing or crumbling cookies just grab and go!
But the best part? The versatility! While I’ve presented the classic Chocolate Peppermint Cookie Cups, the possibilities are endless. Feel free to experiment with different types of chocolate. Dark chocolate will give you a richer, more intense flavor, while milk chocolate will create a sweeter, more kid-friendly treat. You could even try using white chocolate for a completely different twist!
And don’t stop there! Consider adding other mix-ins to the cookie dough. Chopped walnuts or pecans would add a delightful crunch, while a sprinkle of sea salt on top would enhance the sweetness and create a more sophisticated flavor profile. For a truly decadent experience, try drizzling the finished cookie cups with melted white chocolate or a homemade peppermint glaze.
Serving suggestions? These cookie cups are fantastic on their own, but they also pair beautifully with other desserts. Serve them alongside a scoop of vanilla ice cream for a truly indulgent treat, or arrange them on a platter with other holiday cookies and candies for a festive dessert spread. They also make a wonderful addition to a gift basket or care package. Imagine the joy of receiving a batch of these homemade goodies!
For a fun variation, consider using different types of peppermint candies. Crushed candy canes are a classic choice, but you could also use peppermint swirls or even peppermint bark. Just be sure to chop the candies into small pieces so they distribute evenly throughout the cookie cups. Another fun idea is to add a layer of peppermint buttercream frosting on top of the baked cookie cups before adding the crushed peppermint. This will add an extra layer of sweetness and peppermint flavor.
I’m so excited for you to try this recipe! I know you’ll love the combination of rich chocolate and refreshing peppermint. It’s a truly irresistible treat that’s perfect for the holiday season.
So, what are you waiting for? Gather your ingredients, preheat your oven, and get ready to bake up a batch of these amazing Chocolate Peppermint Cookie Cups. I promise you won’t be disappointed.
And most importantly, I want to hear about your experience! Did you try any variations? Did you make them for a special occasion? Share your photos and stories in the comments below. I can’t wait to see what you create! Happy baking!
Chocolate Peppermint Cookie Cups: A Festive Holiday Treat
Festive chocolate cookie cups with creamy peppermint filling and crushed peppermint topping. Perfect for holiday parties!
Ingredients
- 1 cup (2 sticks) unsalted butter, softened
- 1 cup granulated sugar
- 1 cup packed light brown sugar
- 2 large eggs
- 1 teaspoon vanilla extract
- 2 cups all-purpose flour
- ¾ cup unsweetened cocoa powder
- 1 teaspoon baking soda
- ½ teaspoon salt
- 8 ounces cream cheese, softened
- ½ cup (1 stick) unsalted butter, softened
- 3 cups powdered sugar
- ½ teaspoon peppermint extract
- 2 tablespoons milk
- Pinch of salt
- Crushed peppermint candies (about ½ cup)
- Chocolate shavings (optional)
Instructions
- Cream the Butter and Sugars: In a large bowl, cream together the softened butter, granulated sugar, and brown sugar until light and fluffy. Use an electric mixer or mix by hand. Scrape down the sides of the bowl occasionally.
- Add Eggs and Vanilla: Beat in the eggs one at a time, then stir in the vanilla extract until smooth and well combined.
- Combine Dry Ingredients: In a separate medium bowl, whisk together the flour, cocoa powder, baking soda, and salt.
- Gradually Add Dry Ingredients to Wet Ingredients: Gradually add the dry ingredients to the wet ingredients, mixing on low speed until just combined. Be careful not to overmix.
- Chill the Dough: Wrap the dough in plastic wrap and chill in the refrigerator for at least 30 minutes (or longer, even overnight).
- Preheat Oven and Prepare Muffin Tin: Preheat your oven to 350°F (175°C). Grease a 24-cup mini muffin tin.
- Shape the Cookie Cups: Roll the chilled dough into 1-inch balls. Place each ball into a cup of the prepared mini muffin tin.
- Bake the Cookie Cups: Bake for 10-12 minutes, or until the edges are set and the centers are slightly soft.
- Create the Cup Shape: Immediately after removing the cookie cups from the oven, use the back of a small spoon or a tart tamper to gently press down the center of each cookie, creating a well for the filling.
- Cool Completely: Let the cookie cups cool completely in the muffin tin before removing them. Once cooled, gently remove them from the tin.
- Cream the Cream Cheese and Butter: In a large bowl, cream together the softened cream cheese and butter until smooth and fluffy.
- Gradually Add Powdered Sugar: Gradually add the powdered sugar, one cup at a time, mixing on low speed until combined.
- Add Peppermint Extract and Milk: Stir in the peppermint extract and milk. Add the milk gradually until you reach your desired consistency.
- Add a Pinch of Salt: Add a pinch of salt to balance the sweetness.
- Mix Until Smooth: Beat the filling until smooth and creamy.
- Fill the Cookie Cups: Spoon or pipe the peppermint filling into the cooled chocolate cookie cups.
- Garnish: Sprinkle the crushed peppermint candies over the filling. Add chocolate shavings if desired.
- Chill (Optional): For best results, chill the filled cookie cups in the refrigerator for at least 30 minutes before serving.
- Serve and Enjoy!
Notes
- Make Ahead: You can make the cookie cups and the filling ahead of time and store them separately. Assemble them just before serving.
- Peppermint Extract: Be careful not to add too much peppermint extract, as it can be overpowering. Start with ½ teaspoon and add more to taste.
- Chocolate Chips: Add ½ cup of chocolate chips to the cookie dough for extra chocolate flavor.
- Different Candies: Use different types of crushed candies for the garnish, such as Andes mints or chocolate-covered pretzels.
- Vegan Option: Substitute the butter with vegan butter, the eggs with flax eggs (1 tablespoon flaxseed meal mixed with 3 tablespoons water per egg), and the cream cheese with vegan cream cheese.
- Gluten-Free Option: Use a gluten-free all-purpose flour blend in place of the regular flour.
- Storage: Store the cookie cups in an airtight container in the refrigerator for up to 3 days.
- Cookies Spreading Too Much: If your cookies are spreading too much in the oven, make sure you chilled the dough for long enough. You can also add a tablespoon or two of flour to the dough.
- Cookies Too Dry: If your cookies are too dry, try adding a tablespoon of milk to the dough.
- Filling Too Runny: If your filling is too runny, add more powdered sugar, one tablespoon at a time, until it reaches the desired consistency.
- Filling Too Thick: If your filling is too thick, add a teaspoon of milk at a time until it reaches the desired consistency.

Leave a Comment